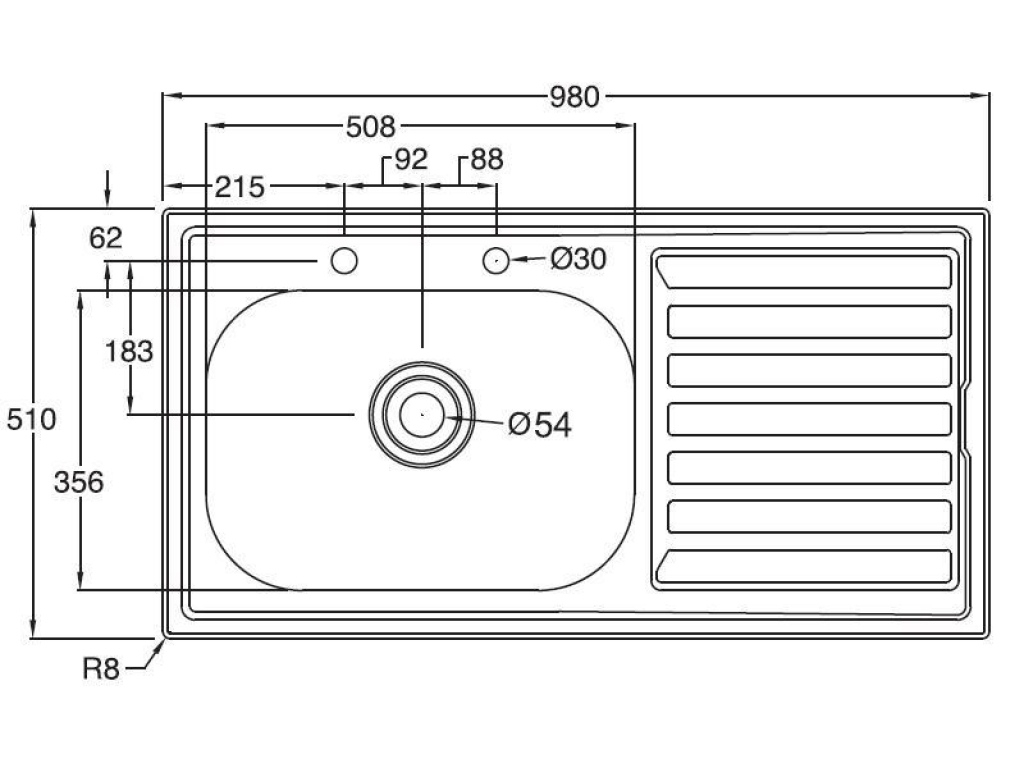
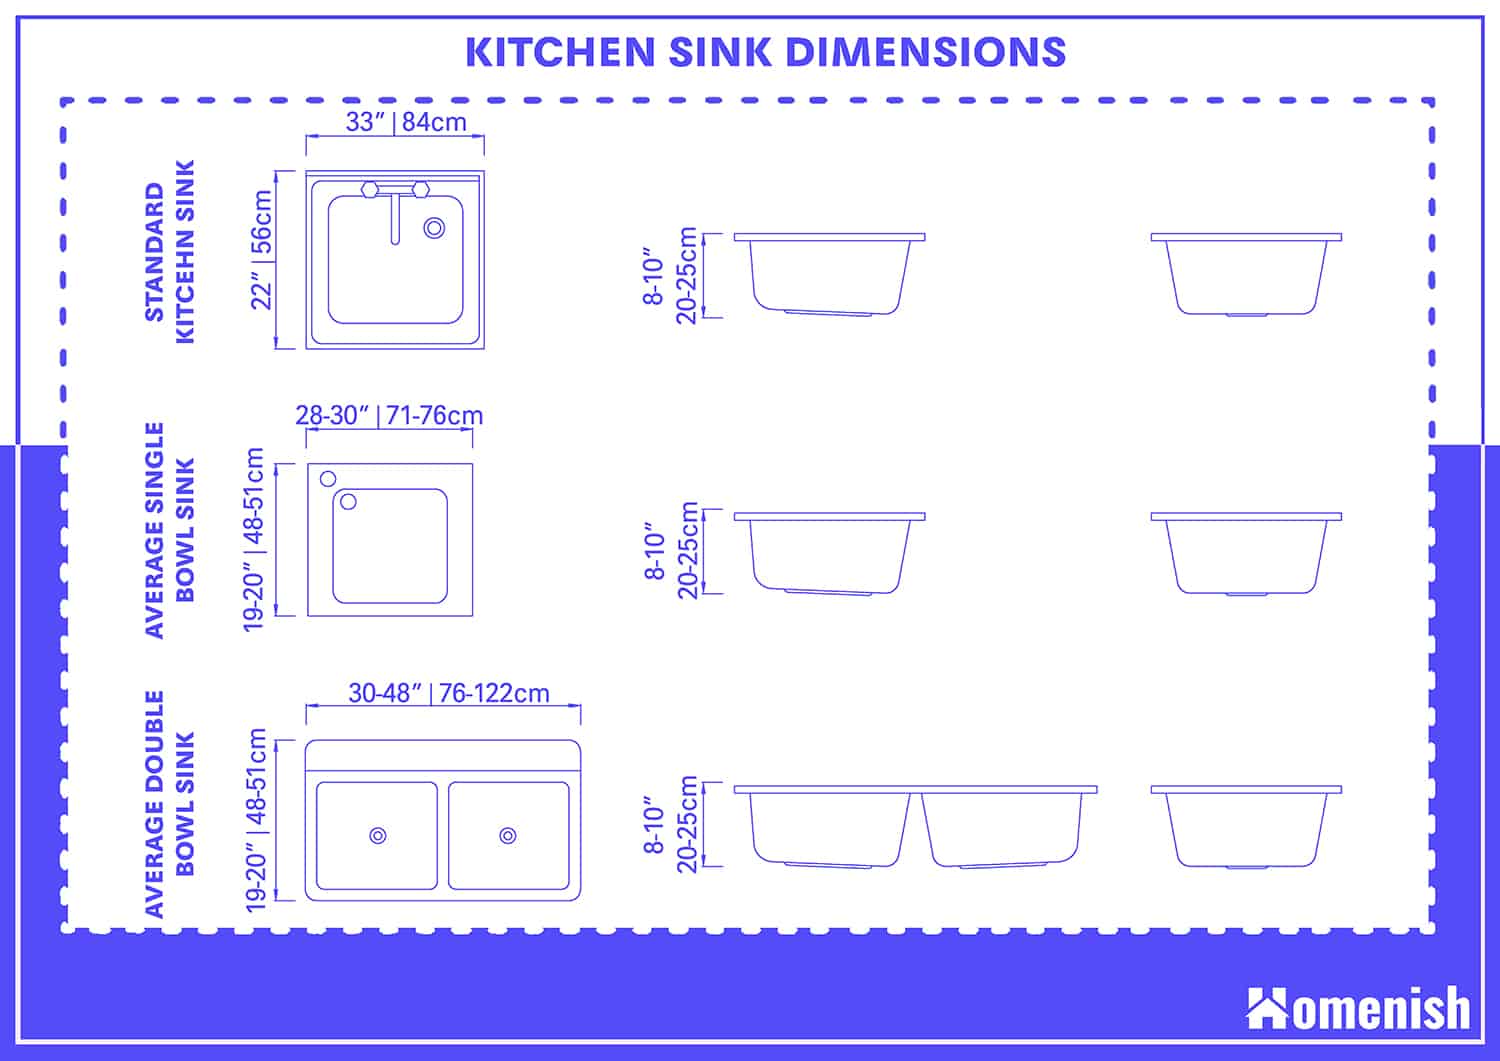
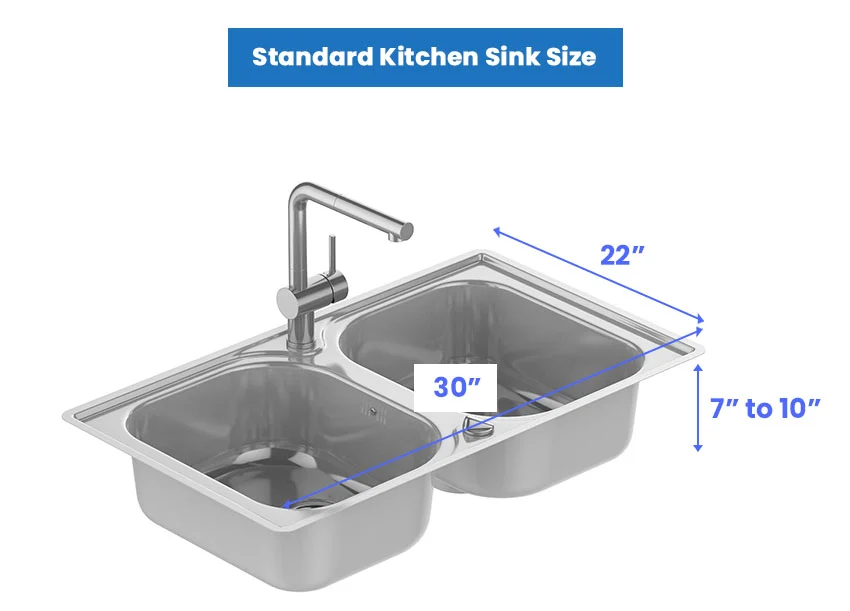
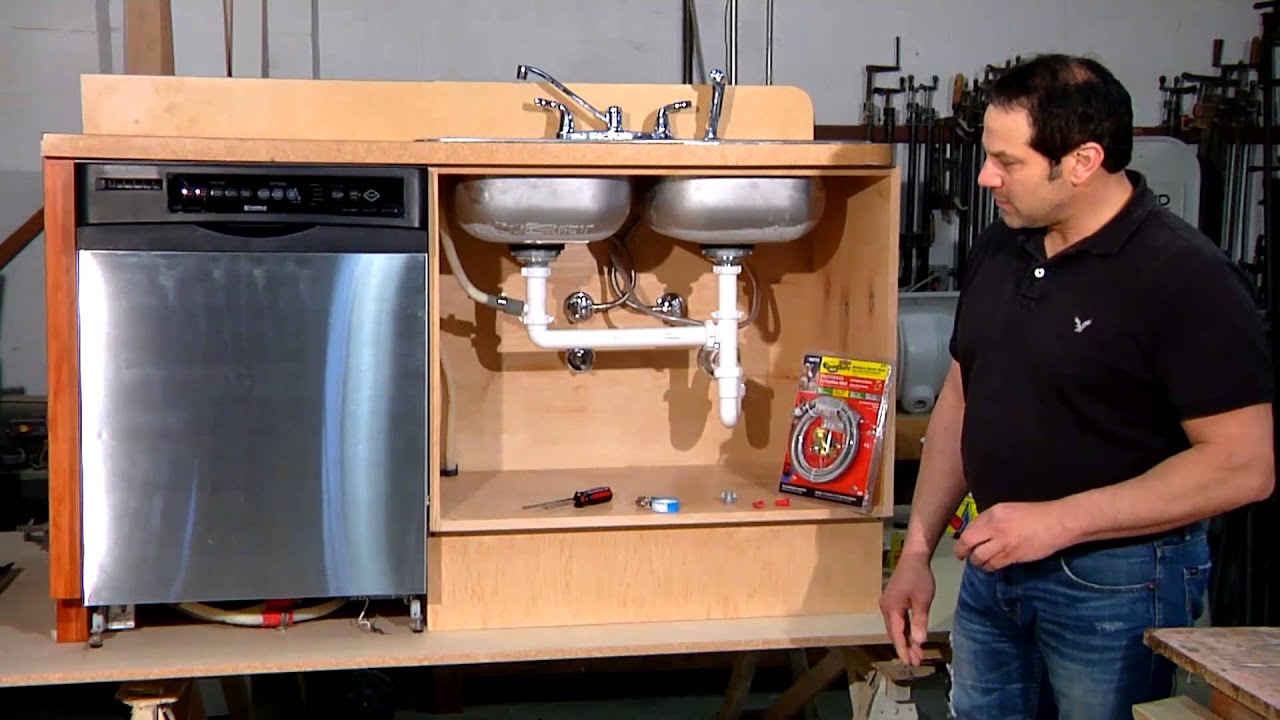
If you're in the process of remodeling your kitchen or building a new home, it's important to understand the standard rough-in dimensions for your kitchen sink. This will ensure that your sink fits properly and that all the necessary plumbing and electrical connections are in the right place. Here are the typical rough-in dimensions for a kitchen sink with a dishwasher. For a single-bowl kitchen sink, the standard rough-in dimensions are 22 inches long by 24 inches wide. For a double-bowl sink, the dimensions are typically 33 inches long by 22 inches wide. However, these dimensions may vary depending on the size and style of the sink you choose. When it comes to the height, the standard rough-in dimensions for a kitchen sink are 36 inches. This allows for comfortable use and easy access to the sink for washing dishes and other tasks. If you're planning on installing a garbage disposal, you'll also need to consider the rough-in dimensions for that as well. The standard dimensions for a garbage disposal are 12 inches wide by 6 inches deep. Make sure to leave enough room in your cabinet for the disposal to fit comfortably.Standard Kitchen Sink Rough-In Dimensions


Standard Kitchen Sink Rough-In Dimensions


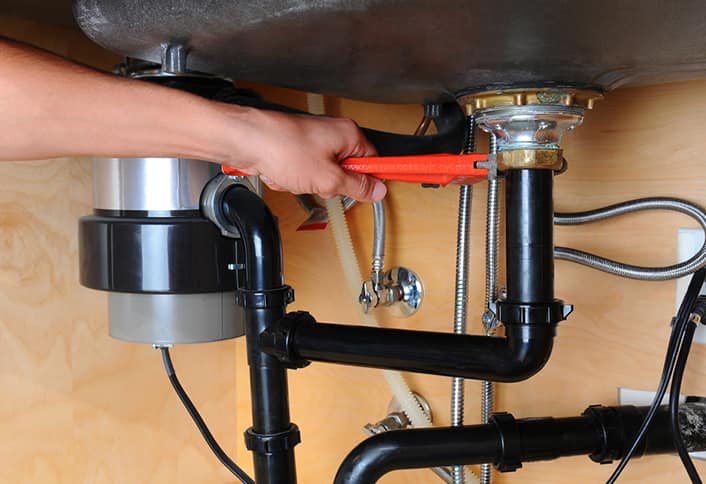
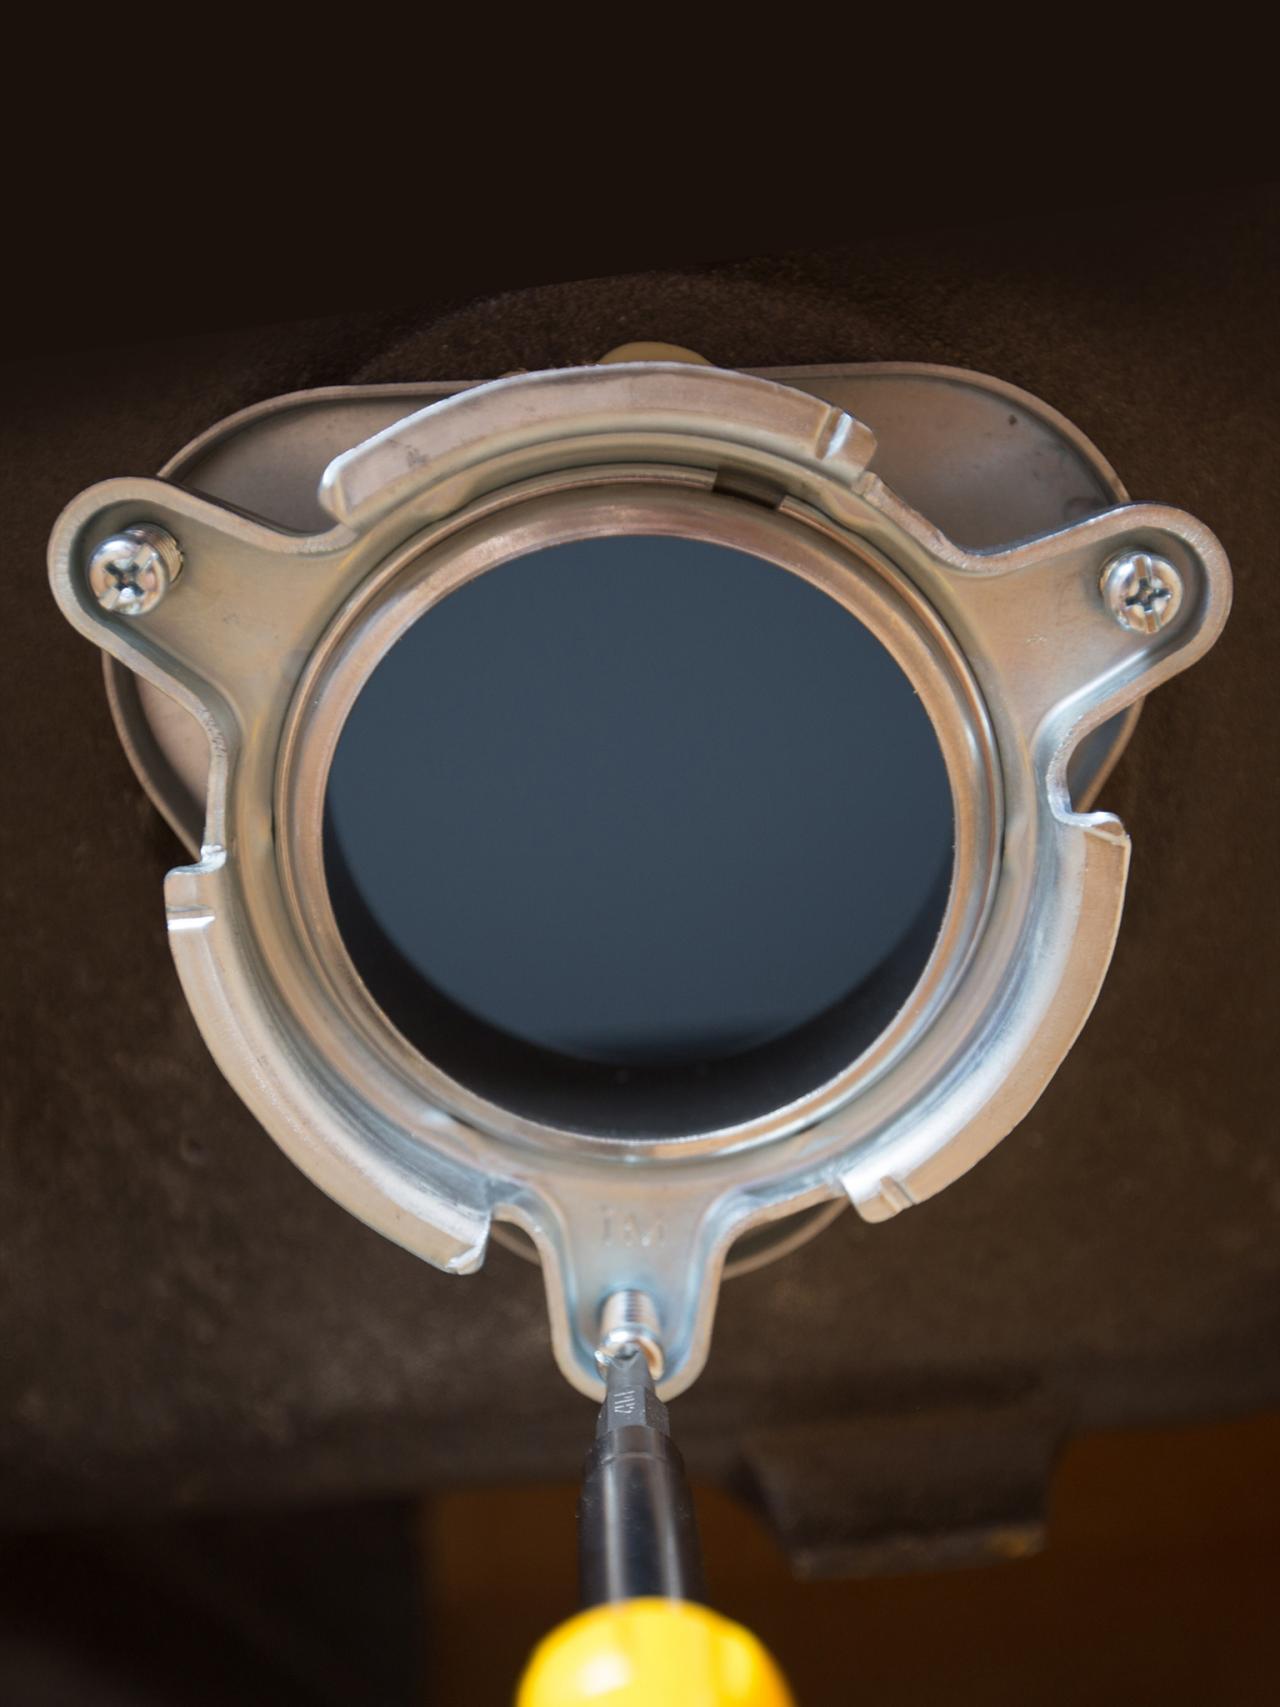
Before you can install your kitchen sink, you'll need to install the drain. Here's a step-by-step guide on how to do it: Step 1: Start by installing the drain tailpiece into the sink bottom. Make sure to use plumber's putty around the opening to create a watertight seal. Step 2: Attach the drain basket to the tailpiece by screwing it on. Use a wrench to tighten the connection. Step 3: Apply a thin layer of plumber's putty around the underside of the drain flange. Then, insert the flange into the drain opening and press down firmly to create a seal. Step 4: Underneath the sink, attach the rubber gasket and mounting bracket to the drain flange. Then, tighten the mounting screws to secure the drain in place. Step 5: Connect the drain pipe to the drain outlet on the bottom of the sink. Use a wrench to tighten the connection. Your kitchen sink drain is now installed and ready for use.How to Install a Kitchen Sink Drain


How to Install a Kitchen Sink Drain

/how-to-install-a-sink-drain-2718789-hero-b5b99f72b5a24bb2ae8364e60539cece.jpg)


:max_bytes(150000):strip_icc()/how-to-install-a-sink-drain-2718789-hero-24e898006ed94c9593a2a268b57989a3.jpg)


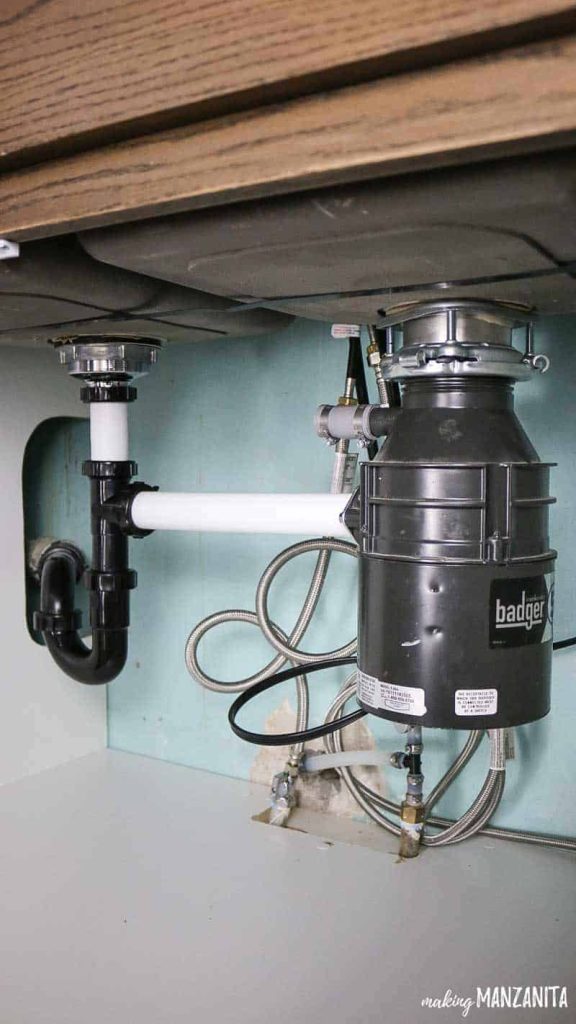
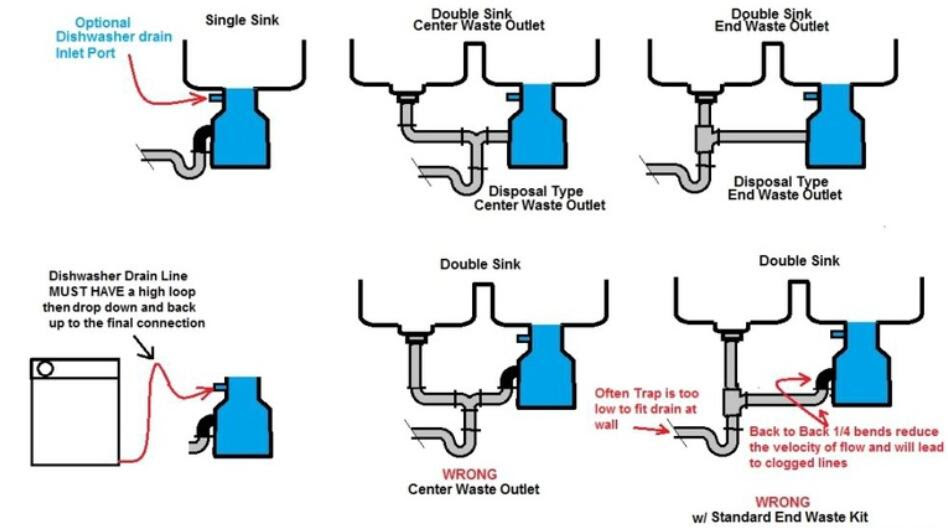
If you're planning on installing a dishwasher in your kitchen, here's how to do it: Step 1: Start by shutting off the water supply to the kitchen. Then, disconnect the water supply line from the sink and remove the drain pipe from the sink. Step 2: Next, remove the cabinet or panel underneath the sink to make room for the dishwasher. Step 3: Install the drain hose from the dishwasher to the garbage disposal or drain pipe. Use hose clamps to secure the connection. Step 4: Connect the water supply line to the dishwasher. Make sure to turn the water supply back on before testing for leaks. Step 5: Finally, slide the dishwasher into place and secure it to the cabinet with screws. Then, plug it in and test for proper functioning. With these steps, you'll have a fully functioning dishwasher in your kitchen in no time.How to Install a Dishwasher


How to Install a Dishwasher


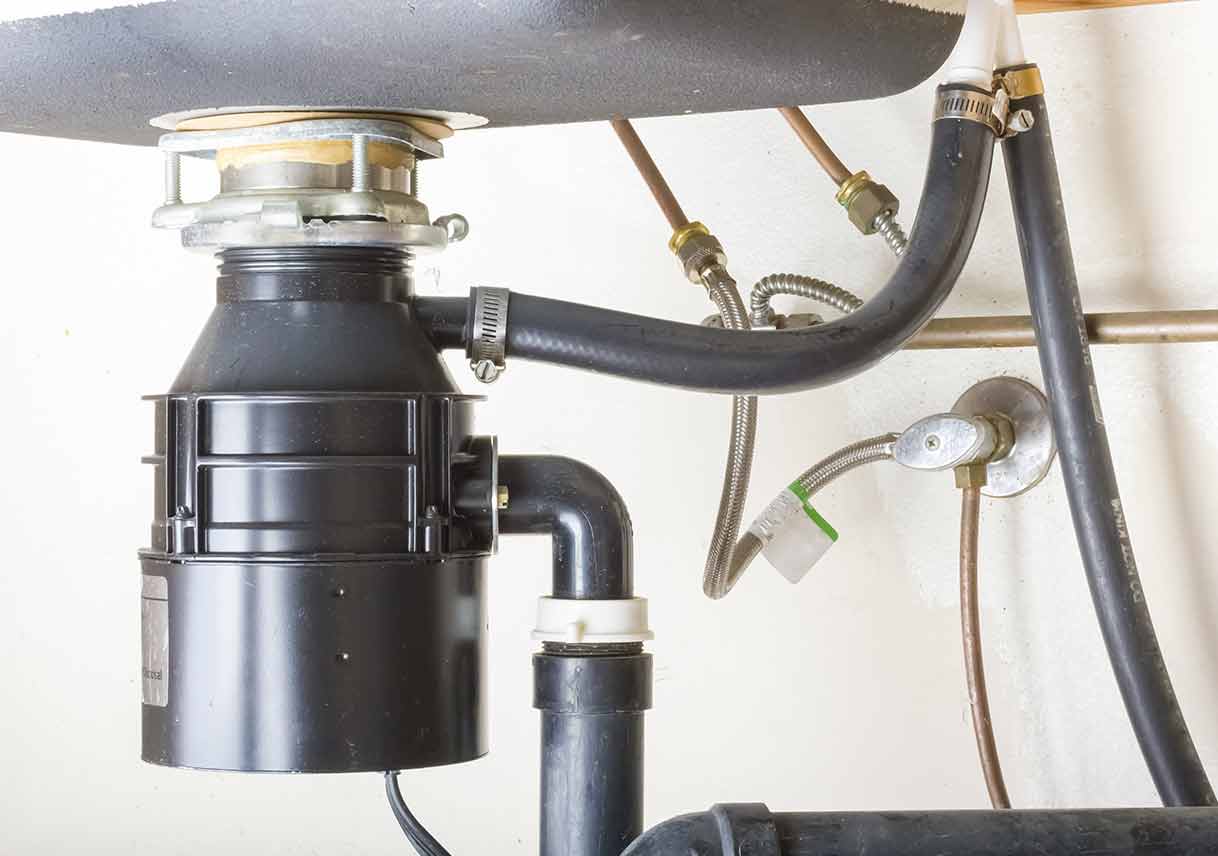
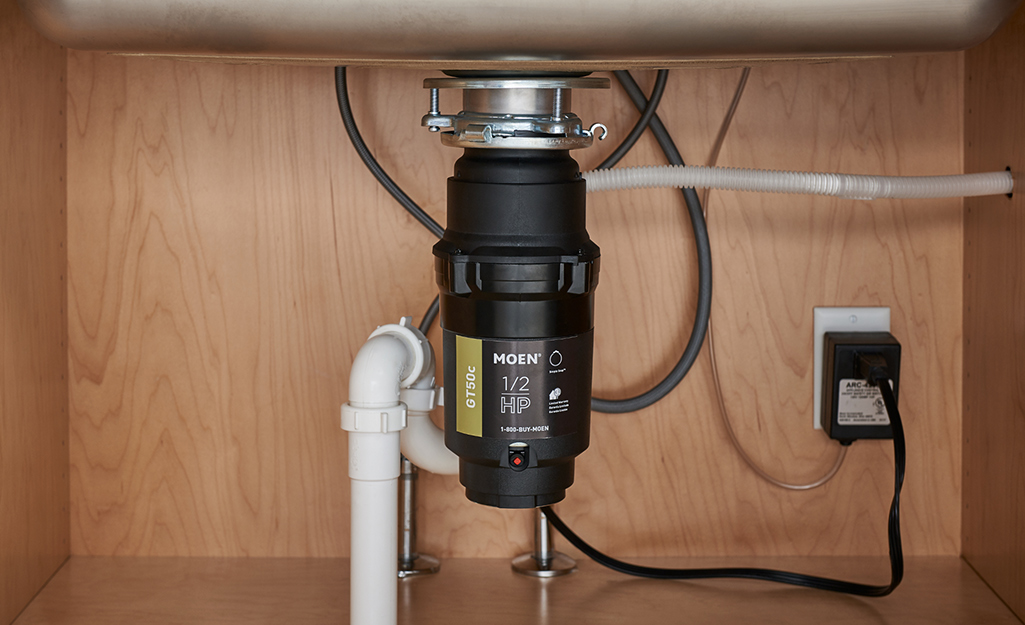
If you've purchased a garbage disposal for your kitchen sink, here's how to install it: Step 1: Start by turning off the power to your kitchen at the circuit breaker. Then, disconnect the drain pipe from the sink and remove the old drain flange. Step 2: Install the new drain flange by applying plumber's putty around the underside and pressing it into the drain opening. Step 3: Underneath the sink, attach the mounting bracket and rubber gasket to the drain flange. Then, tighten the screws to secure it in place. Step 4: Connect the power supply to the garbage disposal and attach the disposal to the mounting bracket. Use a wrench to tighten the connection. Step 5: Finally, connect the drain pipe to the disposal and turn the power back on. Test the disposal for proper functioning. With these steps, you'll have a new garbage disposal installed and ready to use in your kitchen.How to Install a Garbage Disposal
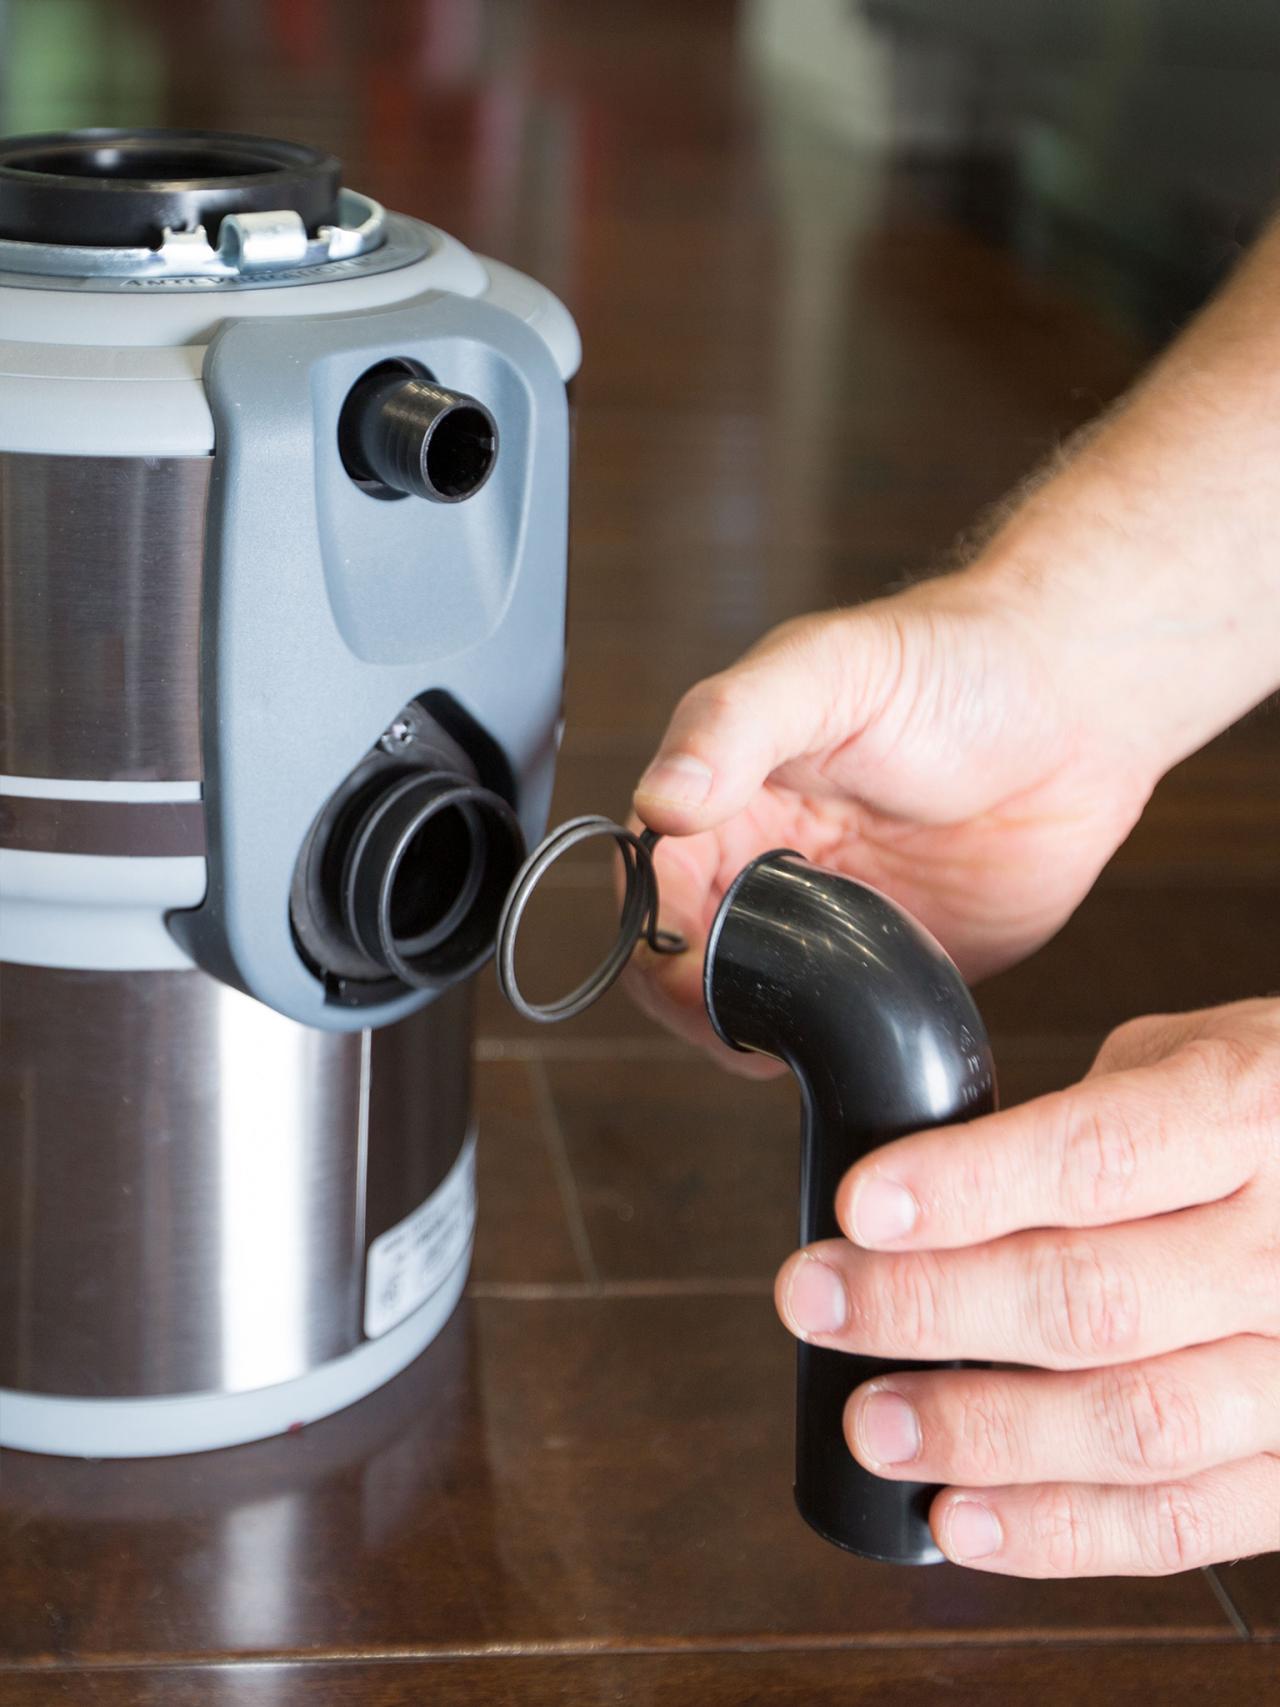
How to Install a Garbage Disposal


:max_bytes(150000):strip_icc()/garbage-disposal-installation-1824830-hero-1dcd7b5b05d44a2cb367e31692500c8c.jpg)
If you're installing a new kitchen sink, here's how to do it: Step 1: Start by removing the old sink and disconnecting any plumbing and electrical connections. Step 2: Measure and mark the location of the sink on the countertop. Then, use a jigsaw to cut out the opening. Step 3: Apply a thin layer of silicone caulk around the edge of the sink opening. Then, carefully lower the sink into place and press down firmly to create a seal. Step 4: Underneath the sink, attach the mounting clips to the sink using a screwdriver. Then, tighten the clips to secure the sink to the countertop. Step 5: Connect the plumbing and electrical connections to the sink. Then, turn on the water supply and test for leaks. Your new kitchen sink is now installed and ready to use.How to Install a Kitchen Sink


How to Install a Kitchen Sink


:no_upscale()/cdn.vox-cdn.com/uploads/chorus_asset/file/19495086/drain_0.jpg)


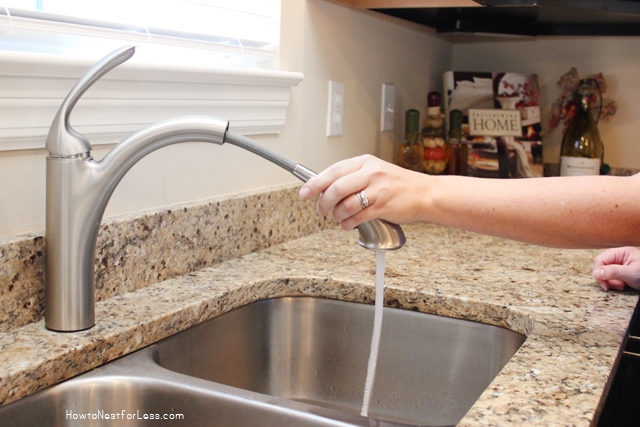
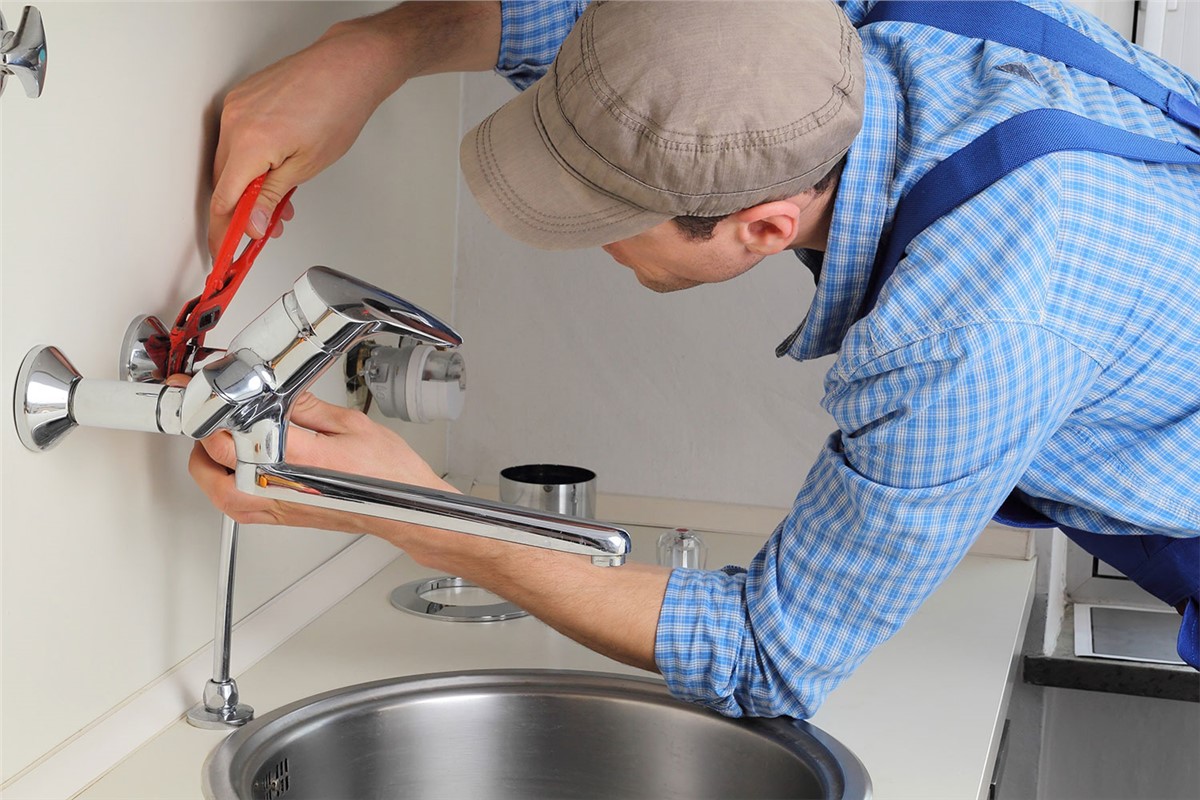
To install a new kitchen faucet, follow these steps: Step 1: Start by removing the old faucet and disconnecting any plumbing connections. Step 2: Place the new faucet into the sink and attach the mounting nuts from underneath. Use a wrench to tighten the connection. Step 3: Connect the hot and cold water supply lines to the faucet. Use a wrench to tighten the connections. Step 4: Turn on the water supply and test the faucet for proper functioning. Your new kitchen faucet is now installed and ready to use.How to Install a Kitchen Faucet

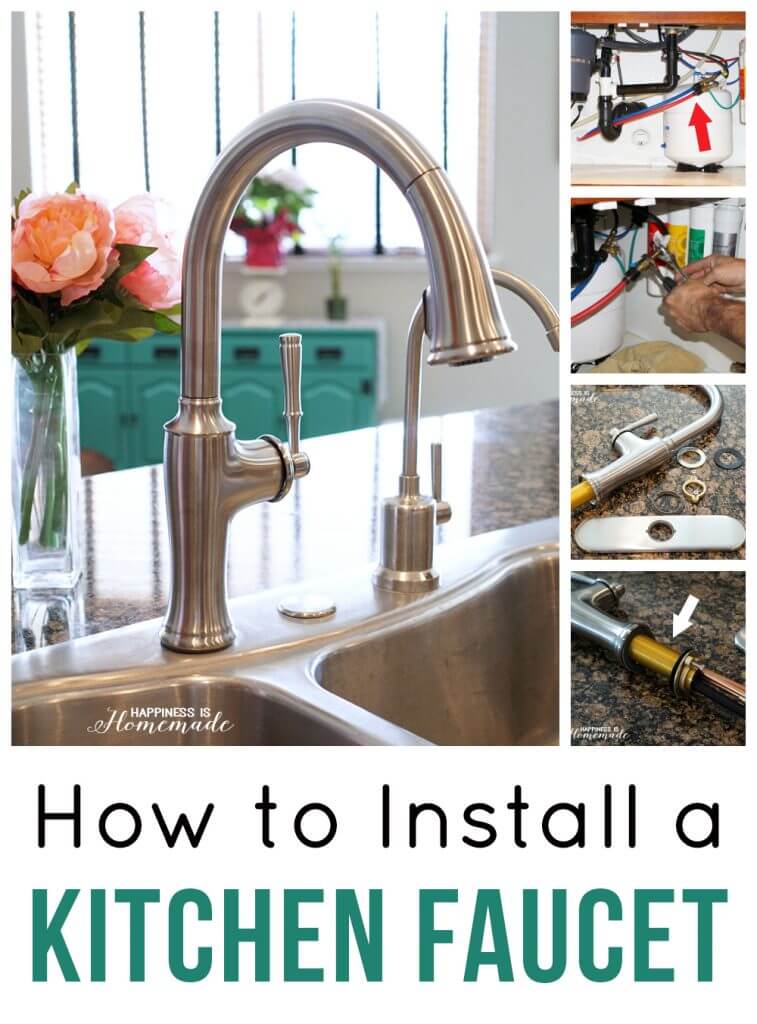
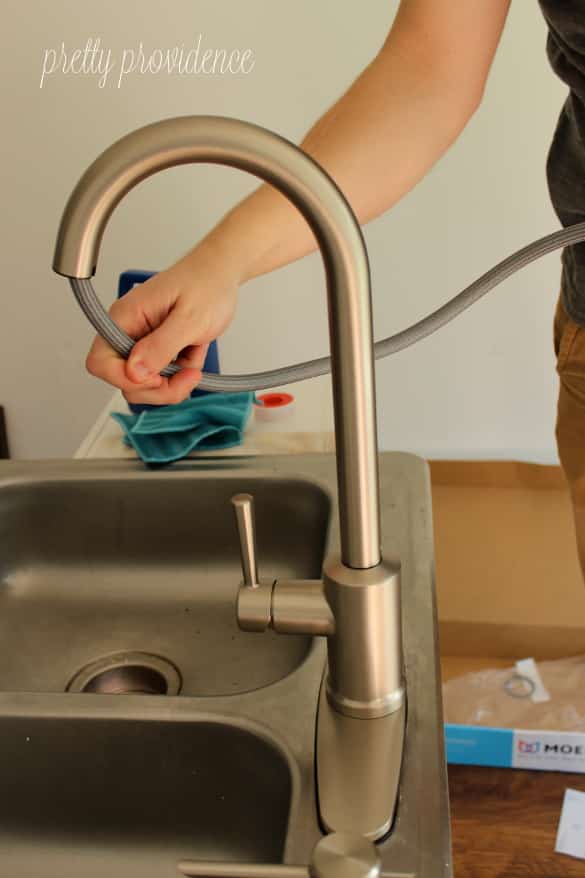
How to Install a Kitchen Faucet


To install a kitchen sink strainer, follow these steps: Step 1: Start by removing the old strainer and cleaning the sink surface around the drain opening. Step 2: Apply plumber's putty around the underside of the strainer and insert it into the drain opening. Step 3: Underneath the sink, attach the rubber gasket and mounting nut to the strainer. Then, tighten the nut to secure the strainer in place. Step 4: Wipe away any excess putty from around the strainer. Your new kitchen sink strainer is now installed and ready to use.How to Install a Kitchen Sink Strainer


How to Install a Kitchen Sink Strainer


If you need to replace the drain pipe for your kitchen sink, here's how to do it: Step 1: Start by removing the old drain pipe and cleaning the area around the drain opening. Step 2: Measure and cut the new drain pipe to fit between the sink and the wall drain. Make sure to leave enough room for the pipe to fit comfortably. Step 3: Attach the new drain pipe to the sink drain and the wall drain. Use slip nuts and washers to create a secure connection. Step 4: Turn on the water supply and test for leaks. Your new kitchen sink drain pipe is now installed and ready to use.How to Install a Kitchen Sink Drain Pipe


How to Install a Kitchen Sink Drain Pipe

If you need to replace the drain basket for your kitchen sink, here's how to do it: Step 1: Start by removing the old drain basket and cleaning the sink surface around the drain opening. Step 2: Apply plumber's putty around the underside of the new drain basket and insert it into the drain opening. Step 3: Underneath the sink, attach the rubber gasket and mounting nut to the drain basket. Then, tighten the nut to secure the basket in place. Step 4: Wipe away any excess putty from around the drain basket. Your new kitchen sink drain basket is now installed and ready to use.How to Install a Kitchen Sink Drain Basket


How to Install a Kitchen Sink Drain Basket

If you need to replace the entire drain assembly for your kitchen sink, here's how to do it: Step 1: Start by removing the old drain assembly, including the drain basket, drain pipe, and strainer. Step 2: Clean the sink surface and the surrounding area of any debris or residue. Step 3: Follow the individual steps for installing a new drain basket, drain pipe, and strainer as outlined above. Step 4: Turn on the water supply and test for leaks. Your new kitchen sink drain assembly is now installed and ready to use.How to Install a Kitchen Sink Drain Assembly


How to Install a Kitchen Sink Drain Assembly


The Importance of Proper Rough-In for Kitchen Sink with Dishwashers

Understanding the Basics of Rough-In for Kitchen Sinks and Dishwashers
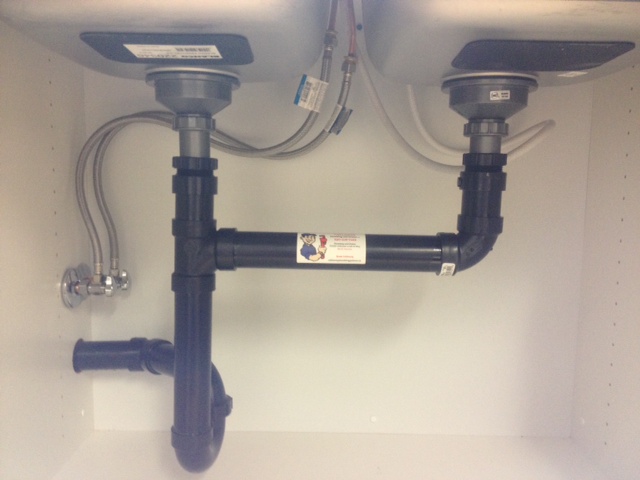
 The rough-in stage is an essential part of any kitchen renovation or construction process. It involves the installation of all necessary plumbing and electrical systems before the finishing touches are added. When it comes to a kitchen sink with a dishwasher, the rough-in process requires careful planning and execution to ensure both appliances function properly. In this article, we will discuss the typical rough-in for a kitchen sink with dishwashers and why it is crucial to get it right.
Proper Placement of Pipes
 One of the key elements of a rough-in for a kitchen sink with a dishwasher is the proper placement of pipes. The location of the sink and dishwasher will determine where the water supply and drain pipes need to be installed. It is essential to ensure that the pipes are placed at the correct height and angle to prevent any future leaks or drainage issues.
Proper placement of pipes
also allows for easy access in case of any repairs or maintenance.
One of the key elements of a rough-in for a kitchen sink with a dishwasher is the proper placement of pipes. The location of the sink and dishwasher will determine where the water supply and drain pipes need to be installed. It is essential to ensure that the pipes are placed at the correct height and angle to prevent any future leaks or drainage issues.
Proper placement of pipes
also allows for easy access in case of any repairs or maintenance.
Ensuring Adequate Space
 Another crucial aspect of a rough-in for a kitchen sink with a dishwasher is ensuring there is enough space for both appliances to function efficiently. The sink and dishwasher need to be placed in a way that allows for easy movement and access.
Adequate space
also ensures that the dishwasher door can be opened and closed without any obstructions. It is essential to consider the size of the appliances and any additional features such as a garbage disposal when planning for the rough-in.
Another crucial aspect of a rough-in for a kitchen sink with a dishwasher is ensuring there is enough space for both appliances to function efficiently. The sink and dishwasher need to be placed in a way that allows for easy movement and access.
Adequate space
also ensures that the dishwasher door can be opened and closed without any obstructions. It is essential to consider the size of the appliances and any additional features such as a garbage disposal when planning for the rough-in.
Electrical and Water Connections
 In addition to plumbing, the rough-in process also involves the installation of electrical and water connections for the dishwasher. These connections need to be carefully planned and installed to avoid any potential hazards or malfunctions.
Electrical and water connections
should be placed in a way that allows for easy access and maintenance.
In addition to plumbing, the rough-in process also involves the installation of electrical and water connections for the dishwasher. These connections need to be carefully planned and installed to avoid any potential hazards or malfunctions.
Electrical and water connections
should be placed in a way that allows for easy access and maintenance.
The Benefits of a Well-Executed Rough-In
 A well-executed rough-in for a kitchen sink with a dishwasher can save you time, money, and headaches in the long run. It ensures that all plumbing and electrical systems are in place and functioning correctly before the finishing touches are added. A
proper rough-in
also allows for a smoother installation process and minimizes the risk of any future issues or repairs.
A well-executed rough-in for a kitchen sink with a dishwasher can save you time, money, and headaches in the long run. It ensures that all plumbing and electrical systems are in place and functioning correctly before the finishing touches are added. A
proper rough-in
also allows for a smoother installation process and minimizes the risk of any future issues or repairs.