How to Remove a Kitchen Sink Drain
Removing a kitchen sink drain may seem like a daunting task, but with the right tools and techniques, it can be a simple DIY project. Whether you're replacing an old drain or fixing a clogged one, knowing how to remove a kitchen sink drain is an essential skill for any homeowner. Follow this step-by-step guide to learn how to remove a kitchen sink drain in no time.


How to Remove a Kitchen Sink Drain


Removing a Kitchen Sink Drain: Step-by-Step Guide
The first step in removing a kitchen sink drain is to gather all the necessary tools. You will need a pair of pliers, a pipe wrench, a bucket, and a screwdriver. Once you have all your tools ready, follow these steps:
Step 1: Turn off the water supply. Before you start working on the drain, make sure to turn off the water supply to your sink. This will prevent any water from spilling out while you're removing the drain.
Step 2: Remove the sink stopper. If your sink has a stopper, unscrew it using a pair of pliers or a screwdriver. This will expose the drain and allow you to access it.
Step 3: Loosen the drain basket. Using a pipe wrench, loosen the drain basket by turning it counterclockwise. If the basket is stuck, you can use a hammer to gently tap it loose.
Step 4: Remove the drain basket. Once the drain basket is loosened, you can pull it out of the sink. Be careful not to damage the sink or any surrounding pipes.
Step 5: Clean the area. With the drain basket removed, you can now clean the area around the drain. Use a plumber's snake or a wire hanger to remove any debris or clogs from the pipes.
Step 6: Remove the drain flange. The drain flange is the piece that connects the drain to the sink. Use a wrench to loosen the bolts and remove the flange.
Step 7: Clean the drain pipe. With the flange removed, you can now clean the drain pipe thoroughly. Use a brush or a rag to remove any buildup or debris.
Step 8: Replace the drain pipe. If you're replacing an old drain, now is the time to install a new one. Follow the manufacturer's instructions to install the new drain properly.
Step 9: Reattach the flange. Once the new drain is installed, reattach the drain flange using a wrench and bolts.
Step 10: Test the drain. Before you reattach the sink stopper, turn the water supply back on and test the drain. Make sure there are no leaks and that the water is draining properly.


Removing a Kitchen Sink Drain: Step-by-Step Guide


:no_upscale()/cdn.vox-cdn.com/uploads/chorus_asset/file/19495086/drain_0.jpg)

DIY: How to Remove a Kitchen Sink Drain
Removing a kitchen sink drain is a task that can easily be done by any DIY enthusiast. With the right tools and a bit of know-how, you can save yourself the cost of hiring a professional plumber. Follow the steps outlined in this guide, and you'll have your kitchen sink drain removed in no time.


DIY: How to Remove a Kitchen Sink Drain


Removing a Kitchen Sink Drain: Tips and Tricks
When removing a kitchen sink drain, there are a few tips and tricks that can make the process easier and more efficient. Here are some helpful tips to keep in mind:
Tip #1: Use the right tools. Make sure you have all the necessary tools before starting the project. This will save you time and frustration in the long run.
Tip #2: Be gentle. When removing the drain basket or flange, be gentle to avoid damaging the sink or surrounding pipes.
Tip #3: Wear protective gear. When working with pipes and drains, it's always a good idea to wear protective gear, such as gloves and safety goggles.
Tip #4: Know when to call a professional. If you encounter any issues or difficulties while removing the drain, don't hesitate to call a professional plumber for assistance.


Removing a Kitchen Sink Drain: Tips and Tricks


Step-by-Step Guide for Removing a Kitchen Sink Drain
For a more detailed guide on how to remove a kitchen sink drain, follow these step-by-step instructions:
Step 1: Gather your tools. As mentioned earlier, you will need a pair of pliers, a pipe wrench, a bucket, and a screwdriver to remove a kitchen sink drain.
Step 2: Turn off the water supply. This is an essential step to avoid any water from spilling out while you're working on the drain.
Step 3: Remove the sink stopper. Unscrew the sink stopper using a pair of pliers or a screwdriver.
Step 4: Loosen the drain basket. Using a pipe wrench, loosen the drain basket by turning it counterclockwise.
Step 5: Remove the drain basket. Pull the drain basket out of the sink.
Step 6: Clean the area. Use a plumber's snake or a wire hanger to remove any debris or clogs from the pipes.
Step 7: Remove the drain flange. Use a wrench to loosen the bolts and remove the flange.
Step 8: Clean the drain pipe. Use a brush or a rag to remove any buildup or debris from the drain pipe.
Step 9: Replace the drain pipe. If you're replacing an old drain, install a new one following the manufacturer's instructions.
Step 10: Reattach the flange. Use a wrench and bolts to reattach the flange to the drain pipe.
Step 11: Test the drain. Turn the water supply back on and test the drain to make sure it's working correctly.


Step-by-Step Guide for Removing a Kitchen Sink Drain


Removing a Kitchen Sink Drain: Common Mistakes to Avoid
When removing a kitchen sink drain, there are a few common mistakes that you should avoid:
Mistake #1: Using the wrong tools. Using the wrong tools can not only make the process more difficult but also cause damage to your sink or pipes.
Mistake #2: Being too forceful. Being too forceful when removing the drain basket or flange can result in damage to your sink or pipes.
Mistake #3: Not turning off the water supply. Forgetting to turn off the water supply can lead to a messy situation when removing the drain.
Mistake #4: Not cleaning the area properly. Failing to clean the area around the drain can result in a clog or other issues down the line.


Removing a Kitchen Sink Drain: Common Mistakes to Avoid


Quick and Easy Way to Remove a Kitchen Sink Drain
If you're looking for a quick and easy way to remove a kitchen sink drain, follow these simplified steps:
Step 1: Gather your tools. You will need a pair of pliers, a pipe wrench, and a bucket.
Step 2: Turn off the water supply. Make sure to turn off the water supply to your sink before starting.
Step 3: Remove the sink stopper. Unscrew the sink stopper using a pair of pliers.
Step 4: Loosen the drain basket. Using a pipe wrench, loosen the drain basket and pull it out of the sink.
Step 5: Clean the area. Use a plumber's snake to remove any debris or clogs from the pipes.
Step 6: Remove the drain flange. Use a wrench to loosen the bolts and remove the flange.
Step 7: Clean the drain pipe. Use a brush or a rag to remove any buildup or debris from the drain pipe.
Step 8: Test the drain. Turn the water supply back on and test the drain to make sure it's working correctly.


Quick and Easy Way to Remove a Kitchen Sink Drain


Removing a Kitchen Sink Drain: Tools You'll Need
To successfully remove a kitchen sink drain, you will need the following tools:
- Pliers to unscrew the sink stopper and loosen the drain basket.
- A pipe wrench to loosen the drain basket and remove the drain flange.
- A bucket to catch any water that may spill out while removing the drain.
- A screwdriver to remove the sink stopper (if necessary).


Removing a Kitchen Sink Drain: Tools You'll Need


How to Remove a Kitchen Sink Drain without Damaging Your Sink
Removing a kitchen sink drain can be a delicate process, and it's essential to avoid damaging your sink. Here are some tips to help you remove the drain without causing any damage:
- Use the right tools: Using the correct tools will help you remove the drain without putting too much pressure on your sink.
- Be gentle: When removing the drain basket or flange, be gentle and avoid using excessive force.
- Wear protective gear: Wearing gloves and safety goggles will protect your hands and eyes while working with pipes and drains.
- Know when to call a professional: If you encounter any difficulties or are unsure about the process, it's best to call a professional plumber for assistance.


How to Remove a Kitchen Sink Drain without Damaging Your Sink

Removing a Kitchen Sink Drain: Troubleshooting Common Issues
Even with the right tools and techniques, you may encounter some issues when removing a kitchen sink drain. Here are some common problems and how to troubleshoot them:
Issue #1: The drain is stuck. If the drain is stuck, use a hammer to gently tap it loose.
Issue #2: The drain is clogged. Use a plumber's snake or a wire hanger to remove any debris or clogs from the pipes.
Issue #3: The drain flange is corroded. A corroded drain flange can be challenging to remove. Try using some penetrating oil to loosen the bolts.
Issue #4: The new drain won't fit. If the new drain doesn't fit, you may need to adjust the height of the drain pipe or purchase a different size drain.
In conclusion, removing a kitchen sink drain may seem like a daunting task, but with the right tools and techniques, it can be a simple DIY project. Remember to turn off the water supply, use the right tools, and be gentle when removing the drain to avoid any damage to your sink. If you encounter any difficulties, don't hesitate to call a professional plumber for assistance. Now that you know how to remove a kitchen sink drain, you can tackle this project with confidence and keep your sink running smoothly.


Removing a Kitchen Sink Drain: Troubleshooting Common Issues


Why Removing Your Kitchen Sink Drain Can Improve the Design of Your House

What Is a Kitchen Sink Drain?
 A kitchen sink drain is a vital component of any kitchen, allowing water and food particles to flow out of your sink and into your plumbing system. Over time, these drains can become clogged with grease, food debris, and other substances, causing water to drain slowly or not at all. This can be frustrating and unsanitary, making it important to regularly clean and maintain your kitchen sink drain.
Why You Should Consider Removing Your Kitchen Sink Drain
 While cleaning your kitchen sink drain can help improve its functionality, sometimes the best solution is to completely remove it. This may seem counterintuitive, but it can actually have several benefits for your house design.
Improved Aesthetics:
Old, rusty, or stained kitchen sink drains can be an eyesore in an otherwise beautiful kitchen. By removing it, you can instantly improve the overall look of your kitchen, creating a more modern and clean aesthetic.
More Space:
In smaller kitchens, every inch of counter space is valuable. By removing your kitchen sink drain, you can free up some much-needed space, allowing for more room to prep and cook meals.
Customization:
Removing your kitchen sink drain also gives you the opportunity to customize your sink area. You can choose to install a new, more stylish drain or even opt for a unique and decorative sink without a visible drain.
While cleaning your kitchen sink drain can help improve its functionality, sometimes the best solution is to completely remove it. This may seem counterintuitive, but it can actually have several benefits for your house design.
Improved Aesthetics:
Old, rusty, or stained kitchen sink drains can be an eyesore in an otherwise beautiful kitchen. By removing it, you can instantly improve the overall look of your kitchen, creating a more modern and clean aesthetic.
More Space:
In smaller kitchens, every inch of counter space is valuable. By removing your kitchen sink drain, you can free up some much-needed space, allowing for more room to prep and cook meals.
Customization:
Removing your kitchen sink drain also gives you the opportunity to customize your sink area. You can choose to install a new, more stylish drain or even opt for a unique and decorative sink without a visible drain.
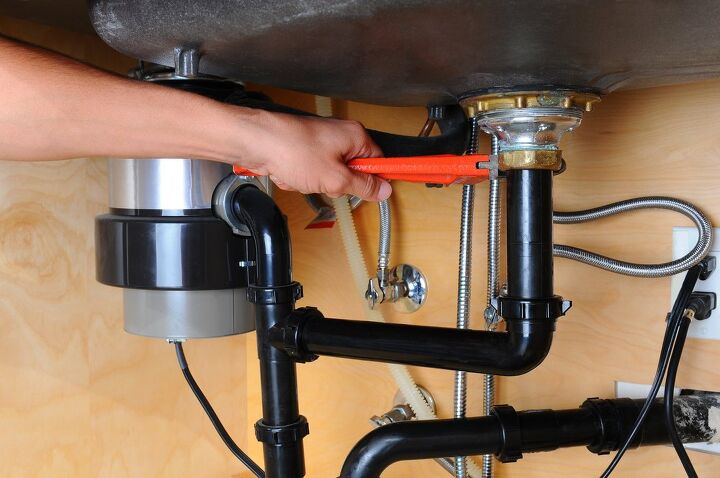
How to Remove Your Kitchen Sink Drain
 Before attempting to remove your kitchen sink drain, it is important to turn off the water supply and disconnect the plumbing. You will then need to use a wrench or pliers to unscrew the drain from the sink. Once removed, you can clean and inspect the drain for any damage or clogs. If needed, you can replace the drain with a new one or leave it off completely for a more open sink area.
In Conclusion
 Removing your kitchen sink drain may not be a common solution, but it can have a big impact on the design and functionality of your kitchen. By following the proper steps and considering the benefits, you can easily improve the aesthetics and functionality of your kitchen sink area. Don't be afraid to get creative and try something new – it may just surprise you how much a simple change can improve your house design.