Staining and Finishing Butcherblock for Bathroom Sink
Butcherblock countertops are a popular and stylish choice for bathroom sinks. They add a warm and natural element to the space, making it feel cozy and inviting. Butcherblock is also a durable material that can withstand the daily wear and tear of a busy bathroom. However, in order to keep your butcherblock looking its best, it is important to properly stain and finish it. Here are the top 10 tips for staining and finishing butcherblock for your bathroom sink.


Staining and Finishing Butcherblock for Bathroom Sink


1. Choose the Right Stain
When it comes to staining butcherblock, there are many options to choose from. You can go for a classic wood stain that will enhance the natural beauty of the wood, or you can opt for a more bold color to make a statement. It is important to choose a stain that is specifically designed for wood, as this will ensure a long-lasting finish.


Butcherblock Staining and Finishing for Bathroom Sink


2. Prep the Butcherblock
Before staining, it is important to properly prep the butcherblock surface. This includes sanding any rough spots or imperfections and making sure the surface is clean and free of any debris. This will ensure that the stain adheres evenly and creates a smooth finish.

Finishing and Staining Butcherblock for Bathroom Sink
3. Test the Stain
Before applying the stain to the entire surface, it is always a good idea to do a test spot in an inconspicuous area. This will allow you to see how the stain will look on your specific butcherblock and make any necessary adjustments before committing to the whole surface.


Staining Butcherblock for Bathroom Sink


4. Apply the Stain Evenly
When applying the stain, it is important to do so evenly. This will prevent any streaking or blotchiness in the final finish. Use a clean cloth or brush to apply the stain in the direction of the wood grain, and make sure to cover the entire surface.


Finishing Butcherblock for Bathroom Sink

5. Let it Dry
After applying the stain, it is important to let it dry completely before moving on to the next step. This can take anywhere from 6-24 hours, depending on the type of stain you choose. Be patient and resist the urge to touch or handle the surface until it is fully dry.
Butcherblock Staining for Bathroom Sink
6. Sand Between Coats
If you are looking for a deeper color or more even finish, you may choose to apply multiple coats of stain. In between coats, it is important to lightly sand the surface with a fine-grit sandpaper. This will help the next coat of stain adhere better and create a smoother finish.

Butcherblock Finishing for Bathroom Sink
7. Choose the Right Finish
After staining, it is important to choose the right finish for your butcherblock. Polyurethane is a popular choice for bathroom sinks as it is water-resistant and durable. However, you can also opt for a more natural finish such as beeswax or mineral oil. Just make sure to choose a finish that is safe for use in a bathroom.

Bathroom Sink Butcherblock Staining and Finishing


8. Apply the Finish
When applying the finish, make sure to follow the manufacturer's instructions carefully. Use a clean cloth or brush and apply in thin, even coats. It may take multiple coats to achieve the desired level of protection and shine.
Bathroom Sink Staining and Finishing Butcherblock

9. Let it Cure
After applying the finish, it is important to let it cure for the recommended amount of time. This can vary depending on the type of finish you choose, so be sure to read the instructions carefully. Curing allows the finish to fully harden and provide maximum protection for your butcherblock.
Bathroom Sink Finishing and Staining Butcherblock

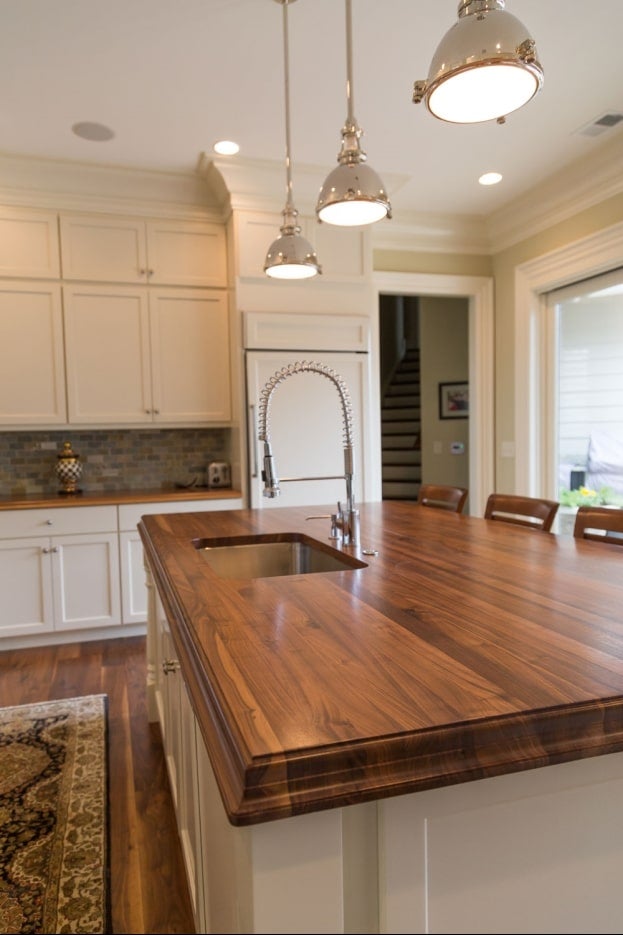
Why Staining and Finishing Butcherblock is Essential for Your Bathroom Sink

Creating a Timeless Look
 When it comes to designing your bathroom, every detail matters. From the fixtures to the flooring, each element contributes to the overall aesthetic of the space. One key design element that often gets overlooked is the bathroom sink. While it may seem like a small feature, the sink can make a big impact on the style of your bathroom. That's why choosing a
butcherblock sink
and properly
staining and finishing
it is essential for creating a timeless and elegant bathroom.
When it comes to designing your bathroom, every detail matters. From the fixtures to the flooring, each element contributes to the overall aesthetic of the space. One key design element that often gets overlooked is the bathroom sink. While it may seem like a small feature, the sink can make a big impact on the style of your bathroom. That's why choosing a
butcherblock sink
and properly
staining and finishing
it is essential for creating a timeless and elegant bathroom.
Unmatched Durability
 Butcherblock sinks are known for their durability and strength, making them a popular choice for bathrooms. They are made from strips of wood that are glued together, creating a solid and sturdy surface. However, in order to maintain their durability and prolong their lifespan,
staining and finishing
is crucial. This process not only enhances the natural beauty of the wood, but it also provides a protective layer that helps to prevent water damage and scratches.
Butcherblock sinks are known for their durability and strength, making them a popular choice for bathrooms. They are made from strips of wood that are glued together, creating a solid and sturdy surface. However, in order to maintain their durability and prolong their lifespan,
staining and finishing
is crucial. This process not only enhances the natural beauty of the wood, but it also provides a protective layer that helps to prevent water damage and scratches.
Customization Options
 Another benefit of
staining and finishing
your butcherblock sink is the wide range of customization options available. With different stain colors and finishes, you can choose the perfect look to complement your bathroom design. Whether you want a rich and dark tone or a light and airy feel, the staining and finishing process allows you to achieve your desired look. It also helps to bring out the unique grain patterns and characteristics of the wood, adding a touch of natural beauty to your bathroom.
Another benefit of
staining and finishing
your butcherblock sink is the wide range of customization options available. With different stain colors and finishes, you can choose the perfect look to complement your bathroom design. Whether you want a rich and dark tone or a light and airy feel, the staining and finishing process allows you to achieve your desired look. It also helps to bring out the unique grain patterns and characteristics of the wood, adding a touch of natural beauty to your bathroom.
Easy Maintenance
 In addition to its durability,
staining and finishing
your butcherblock sink also makes it easier to maintain. The protective layer created by the finishing process makes the sink more resistant to water and stains, making it easier to clean. This is especially beneficial for bathrooms, where water and spills are common. With regular cleaning and proper maintenance, your stained and finished butcherblock sink can last for many years to come.
In addition to its durability,
staining and finishing
your butcherblock sink also makes it easier to maintain. The protective layer created by the finishing process makes the sink more resistant to water and stains, making it easier to clean. This is especially beneficial for bathrooms, where water and spills are common. With regular cleaning and proper maintenance, your stained and finished butcherblock sink can last for many years to come.
Conclusion
 In conclusion, choosing a butcherblock sink for your bathroom and properly
staining and finishing
it is essential for creating a beautiful, durable, and low-maintenance space. Not only does it add a touch of elegance and customization to your design, but it also helps to protect and prolong the lifespan of your sink. So don't overlook the importance of
staining and finishing
when it comes to your bathroom sink – it can make all the difference in creating a stunning and functional space.
In conclusion, choosing a butcherblock sink for your bathroom and properly
staining and finishing
it is essential for creating a beautiful, durable, and low-maintenance space. Not only does it add a touch of elegance and customization to your design, but it also helps to protect and prolong the lifespan of your sink. So don't overlook the importance of
staining and finishing
when it comes to your bathroom sink – it can make all the difference in creating a stunning and functional space.