How to Replace a Kitchen Sink Waste
Replacing a kitchen sink waste may seem like a daunting task, but with the right tools and knowledge, it can be a simple and straightforward DIY project. In this guide, we will walk you through the steps of replacing a kitchen sink waste and provide you with tips and tricks to make the process easier.


How to Replace a Kitchen Sink Waste


Replacing Kitchen Sink Waste: A Step-by-Step Guide
The first step in replacing a kitchen sink waste is to gather all the necessary tools and materials. You will need a new sink waste kit, a wrench, plumber's putty, and a bucket to catch any water that may spill. Once you have everything you need, follow these steps:
Step 1: Turn off the water supply to your sink. This can usually be done by turning off the shut-off valves under the sink.
Step 2: Place the bucket under the sink to catch any water that may spill out.
Step 3: Loosen the slip nuts connecting the sink waste to the drain pipe using a wrench. Once they are loose, you can remove the waste from the sink.
Step 4: Clean the area around the drain opening and remove any old plumber's putty.
Step 5: Take your new sink waste kit and apply a thin layer of plumber's putty around the flange. This will create a watertight seal when the waste is installed.
Step 6: Place the flange over the drain opening and press down firmly to ensure it is sealed with the plumber's putty.
Step 7: From under the sink, place the rubber gasket and cardboard washer over the flange and secure them with the metal nut provided in the sink waste kit.
Step 8: Reconnect the waste to the drain pipe by tightening the slip nuts with a wrench.
Step 9: Turn the water supply back on and check for any leaks. If there are leaks, tighten the slip nuts until the leak stops.
Step 10: Once everything is secure and there are no leaks, clean up any excess plumber's putty and test your new sink waste by running water down the drain.


Replacing Kitchen Sink Waste: A Step-by-Step Guide


:no_upscale()/cdn.vox-cdn.com/uploads/chorus_asset/file/19495086/drain_0.jpg)


DIY: Replacing a Kitchen Sink Waste
Replacing a kitchen sink waste can save you time and money compared to hiring a professional plumber. With the right tools and knowledge, this DIY project can be completed in just a few hours. However, it is important to know your limits and when it may be better to call in a professional. If you encounter any difficulties or are unsure about any steps, it is always better to seek professional help.


DIY: Replacing a Kitchen Sink Waste


Replacing a Kitchen Sink Waste: What You Need to Know
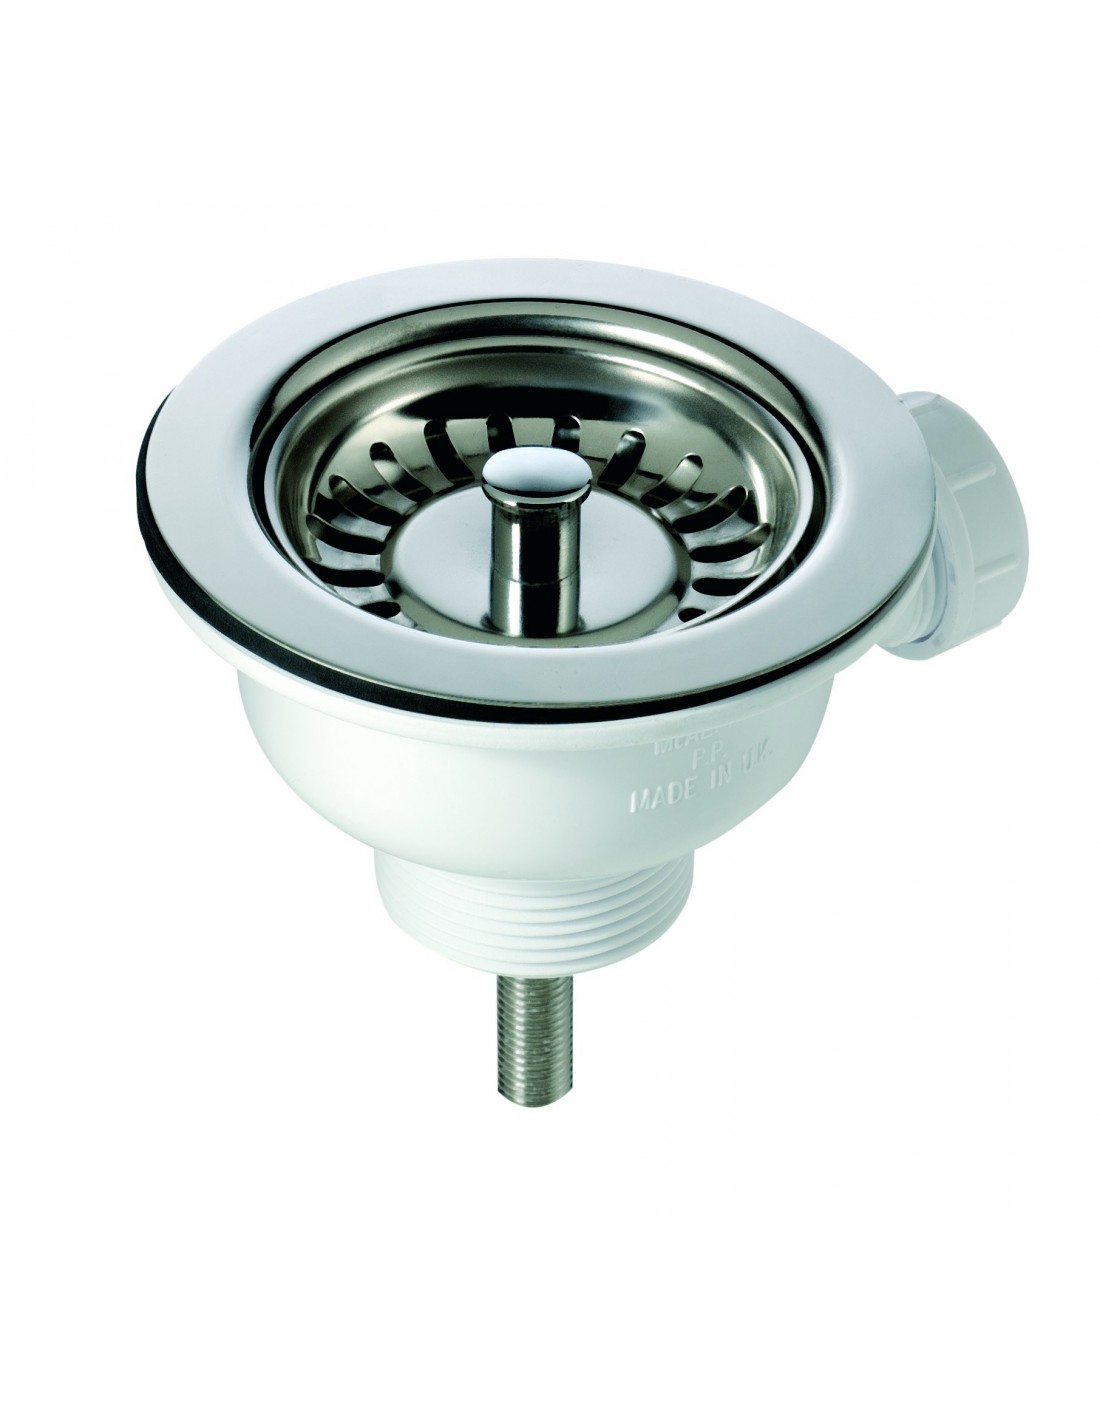
Before attempting to replace a kitchen sink waste, it is important to understand the different types of wastes and how they function. There are two main types of sink wastes: the basket strainer waste and the pop-up waste. The basket strainer waste is the most common type and is found in most kitchen sinks. The pop-up waste is found in sinks with a separate hot and cold faucet and a central lever to open and close the drain.
It is also important to note the size of your sink waste. Make sure to measure the diameter of your drain opening to ensure you purchase the correct size waste kit.


Replacing a Kitchen Sink Waste: What You Need to Know


Replacing a Kitchen Sink Waste: Tips and Tricks
Here are a few tips and tricks to make the process of replacing a kitchen sink waste easier:
Tip 1: Before starting, make sure to turn off the water supply to your sink and have a bucket ready to catch any water that may spill out.
Tip 2: Use plumber's putty to create a watertight seal between the flange and the sink. This will prevent any leaks from occurring.
Tip 3: If you encounter any difficulties, such as rusted or stuck slip nuts, use a penetrating oil to loosen them before attempting to remove them with a wrench.
Tip 4: If you are unsure about any steps, refer to the manufacturer's instructions or seek professional help.


Replacing a Kitchen Sink Waste: Tips and Tricks


Replacing a Kitchen Sink Waste: Common Mistakes to Avoid
When replacing a kitchen sink waste, there are a few common mistakes that can be easily avoided:
Mistake 1: Not turning off the water supply before starting the replacement process. This can result in a messy and potentially damaging water spill.
Mistake 2: Forgetting to place a bucket under the sink to catch any water that may spill out. This can result in a messy cleanup and potential damage to your flooring.
Mistake 3: Using too much plumber's putty, which can lead to it oozing out and creating a messy appearance.
Mistake 4: Not properly tightening the slip nuts, resulting in leaks. Make sure to tighten them enough to create a secure seal, but not too much to avoid damaging the sink or waste kit.


Replacing a Kitchen Sink Waste: Common Mistakes to Avoid

Replacing a Kitchen Sink Waste: Tools and Materials You'll Need
Here is a list of the tools and materials you will need to replace a kitchen sink waste:
Tools: Wrench, bucket, and screwdriver.
Materials: New sink waste kit, plumber's putty, and a penetrating oil (if needed).

Replacing a Kitchen Sink Waste: Tools and Materials You'll Need


How to Replace a Kitchen Sink Waste in 5 Easy Steps
If you are short on time or just want a quick overview of the replacement process, here are the 5 easy steps to replace a kitchen sink waste:
Step 1: Turn off the water supply and place a bucket under the sink.
Step 2: Remove the old waste and clean the area around the drain opening.
Step 3: Apply plumber's putty to the flange and place it over the drain opening.
Step 4: Secure the waste with the rubber gasket and metal nut provided in the waste kit.
Step 5: Turn the water supply back on and check for any leaks.
How to Replace a Kitchen Sink Waste in 5 Easy Steps


Replacing a Kitchen Sink Waste: Troubleshooting Common Issues
If you encounter any issues while replacing a kitchen sink waste, here are a few troubleshooting tips:
Issue 1: The waste is leaking.
Solution: Make sure the slip nuts are securely tightened and there is no excess plumber's putty that could be causing a leak.
Issue 2: The waste is not draining properly.
Solution: Check for any blockages in the drain pipe and make sure the waste is properly connected to the drain.
Issue 3: The waste is difficult to remove.
Solution: Use a penetrating oil to loosen any stuck or rusted slip nuts before attempting to remove them with a wrench.

Replacing a Kitchen Sink Waste: Troubleshooting Common Issues


Replacing a Kitchen Sink Waste: Professional vs. DIY
Replacing a kitchen sink waste can be done as a DIY project, but it is important to know your limits and when it may be better to call in a professional. If you encounter any difficulties or are unsure about any steps, it is always better to seek professional help to avoid causing further damage.
In conclusion, replacing a kitchen sink waste may seem like a daunting task, but with the right tools and knowledge, it can be a simple and straightforward DIY project. Make sure to follow the steps outlined in this guide and avoid common mistakes to successfully replace your kitchen sink waste in no time.

Replacing a Kitchen Sink Waste: Professional vs. DIY

Why You Should Consider Replacing Your Kitchen Sink Waste

The Importance of a Functional Kitchen Sink
 A kitchen sink is an essential part of any household. It is where we wash our dishes, rinse our produce, and even fill up our pots and pans with water. Therefore, it is crucial to have a functional and efficient kitchen sink. However, over time, the waste of your kitchen sink can wear out and affect the overall functionality of the sink. This is why it is necessary to consider replacing your kitchen sink waste.
The Signs Your Kitchen Sink Waste Needs Replacing
 One of the main reasons to replace your kitchen sink waste is due to wear and tear. Over time, the materials of your sink waste, such as the pipes and seals, can deteriorate and cause leaks or clogs. This can lead to water damage and mold growth, which can be hazardous to your health. Additionally, if you notice foul odors coming from your sink or slow drainage, it may be a sign that your sink waste needs to be replaced.
The Benefits of Replacing Your Kitchen Sink Waste
 Replacing your kitchen sink waste not only ensures the functionality of your sink but also comes with various benefits. For starters, a new sink waste will prevent leaks and clogs, saving you from costly repairs in the future. It will also improve the overall hygiene of your kitchen, as a faulty sink waste can harbor bacteria and germs. Furthermore, a new sink waste can also enhance the aesthetic of your kitchen, as you can choose from a variety of modern and stylish designs.
SEO Keywords: kitchen sink waste, replacing, functional, efficient, wear and tear, pipes, seals, leaks, clogs, water damage, mold growth, hazardous, foul odors, drainage, benefits, prevent, hygiene, bacteria, germs, aesthetic, modern, stylish designs.
Replacing your kitchen sink waste not only ensures the functionality of your sink but also comes with various benefits. For starters, a new sink waste will prevent leaks and clogs, saving you from costly repairs in the future. It will also improve the overall hygiene of your kitchen, as a faulty sink waste can harbor bacteria and germs. Furthermore, a new sink waste can also enhance the aesthetic of your kitchen, as you can choose from a variety of modern and stylish designs.
SEO Keywords: kitchen sink waste, replacing, functional, efficient, wear and tear, pipes, seals, leaks, clogs, water damage, mold growth, hazardous, foul odors, drainage, benefits, prevent, hygiene, bacteria, germs, aesthetic, modern, stylish designs.
In Conclusion
 In conclusion, replacing your kitchen sink waste is a necessary task for any homeowner. Not only does it ensure the functionality and hygiene of your kitchen sink, but it also comes with various benefits. If you notice any signs of wear and tear or have been experiencing issues with your sink waste, it is time to consider replacing it. Don't wait for costly repairs or potential health hazards, make the change and enjoy a functional and stylish kitchen sink.