Removing Old Bathroom Sink Drain and P Trap
The bathroom sink is one of the most frequently used fixtures in any home. Over time, the drain and p trap can become clogged with hair, soap residue, and other debris, causing slow drainage or even complete blockage. In order to keep your sink functioning properly, it is important to know how to remove the old drain and p trap and replace it with a new one. In this article, we will provide a step-by-step guide on how to remove the old bathroom sink drain and p trap.


Removing Old Bathroom Sink Drain and P Trap


/sink-drain-trap-185105402-5797c5f13df78ceb869154b5.jpg)
How to Remove a Bathroom Sink Drain
Before beginning the process of removing the old bathroom sink drain, it is important to gather all the necessary tools and materials. You will need an adjustable wrench, a pair of pliers, a bucket, a sponge, and a new drain assembly. Once you have everything you need, follow these steps to remove the old bathroom sink drain:
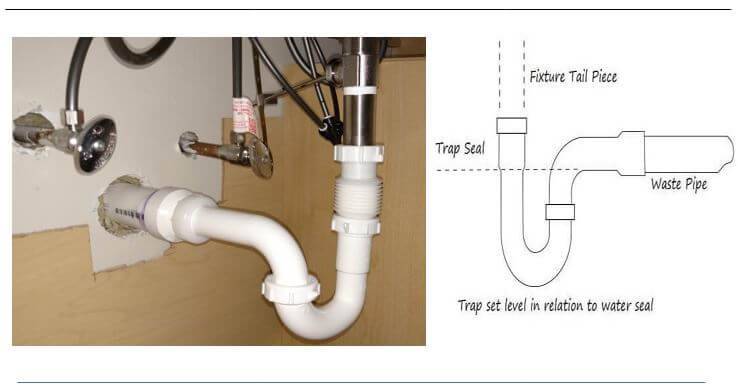
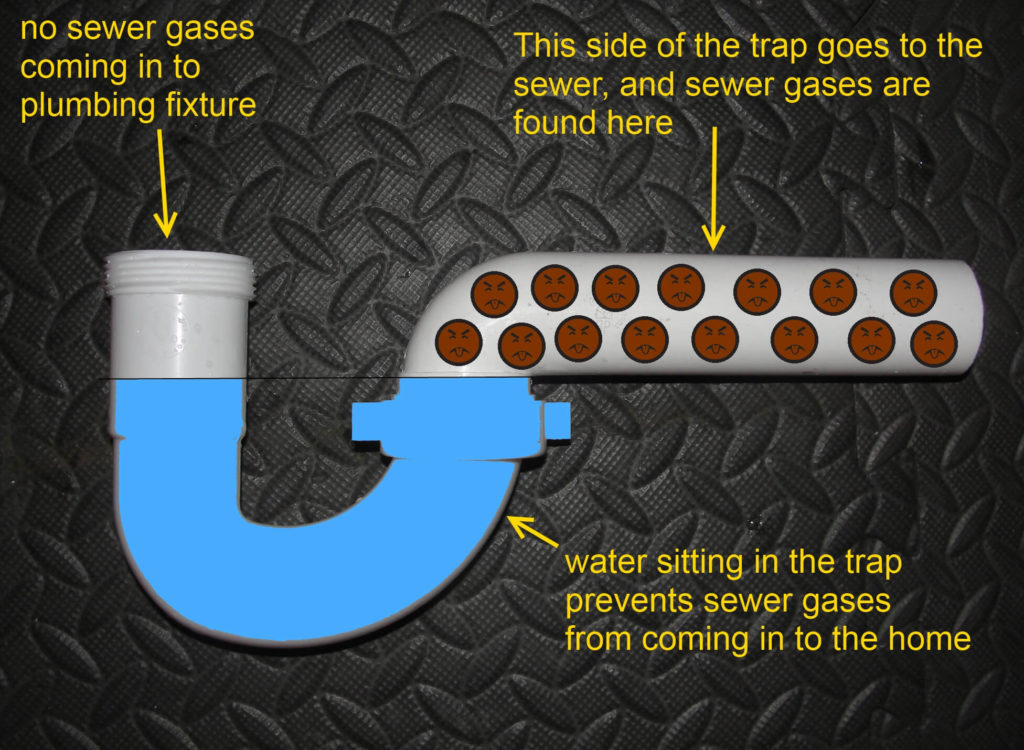
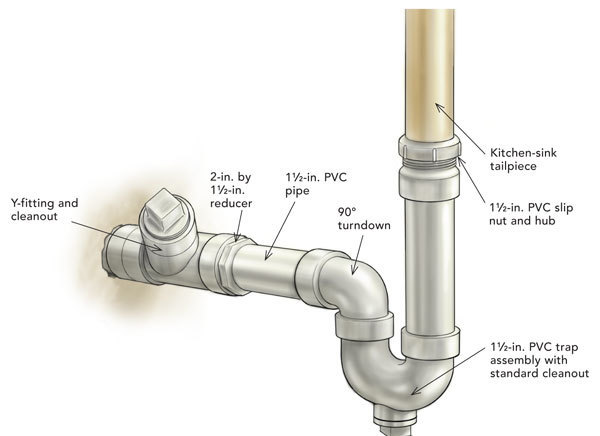
Step 1: Start by locating the p trap, which is the curved section of pipe underneath the sink. Place the bucket under the p trap to catch any excess water that may spill out.
Step 2: Using the adjustable wrench, loosen the slip nuts on both ends of the p trap and remove it from the drain pipe and the sink tailpiece.
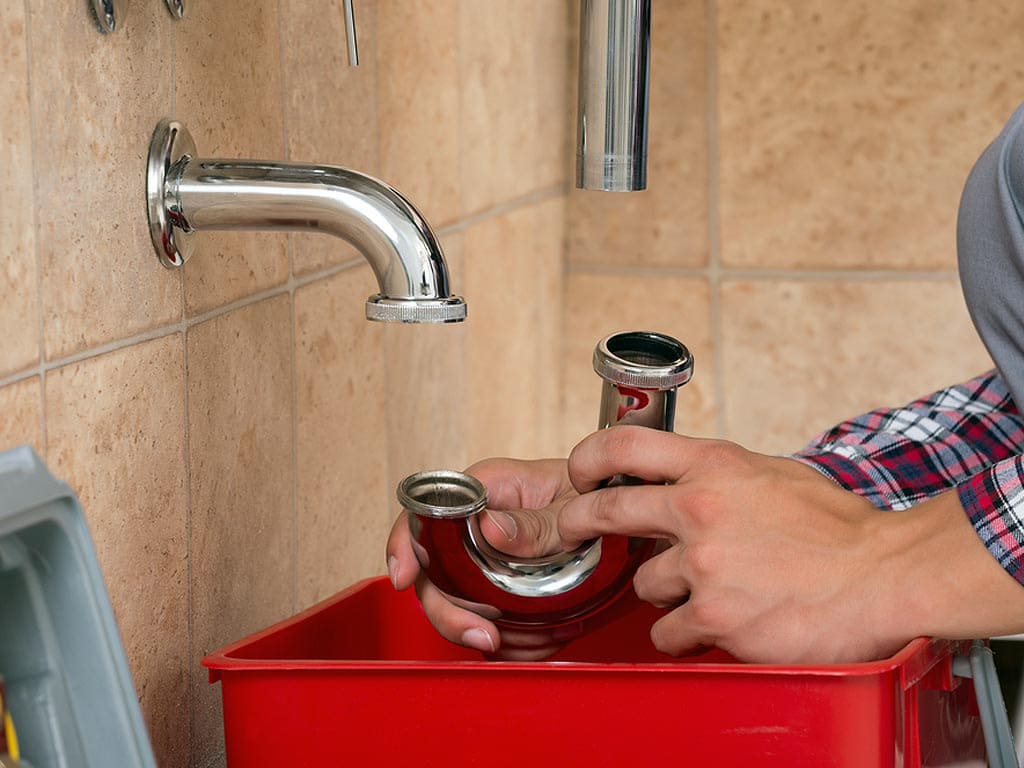
Step 3: Next, use the pliers to loosen the nut on the bottom of the sink drain. This nut connects the drain to the sink and can be difficult to remove, so you may need to use some force.
Step 4: Once the nut is loosened, you should be able to pull the drain out from the sink. If it is stuck, you can use the pliers to gently wiggle it back and forth until it comes loose.
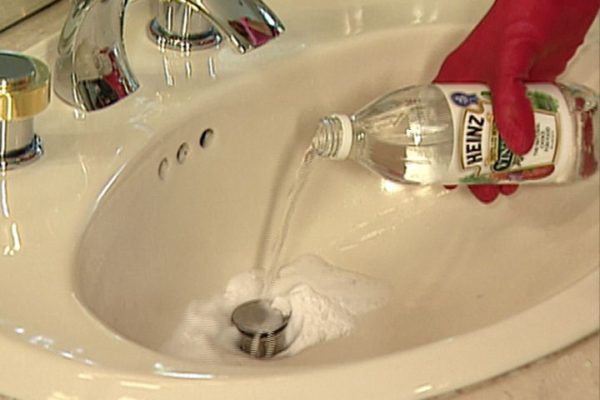
Step 5: Clean the sink and drain opening with a sponge to remove any residue or debris from the old drain. This will help ensure a proper fit for the new drain assembly.
Step 6: Finally, install the new drain assembly by following the manufacturer's instructions. This typically involves applying plumber's putty around the bottom of the drain and then tightening the nut underneath the sink to secure it in place.


How to Remove a Bathroom Sink Drain


DIY: Removing a Bathroom Sink Drain
If you are a handy homeowner, you may be tempted to tackle the task of removing the old bathroom sink drain yourself. While it is certainly possible to do so, it is important to consider your level of experience and the complexity of the job. Here are some tips and tricks for successfully completing this DIY project:
Bold: Be sure to turn off the water supply before beginning the removal process. This will prevent any water from spilling out and causing a mess.
Bold: Have a bucket and sponge on hand to catch any excess water or debris that may come out during the removal process. This will make the cleanup much easier.
Bold: If the drain assembly is difficult to remove, you can try using a lubricant, such as WD-40, to loosen it. Just be sure to wipe off any excess lubricant before installing the new drain.
Bold: Always follow the manufacturer's instructions when installing the new drain assembly. This will ensure a proper fit and prevent any potential issues in the future.


DIY: Removing a Bathroom Sink Drain

Step-by-Step Guide to Removing a Bathroom Sink Drain
Removing a bathroom sink drain may seem like a daunting task, but by following these step-by-step instructions, you can easily complete the job in no time:
Step 1: Gather all the necessary tools and materials, including an adjustable wrench, pliers, bucket, sponge, and a new drain assembly.
Step 2: Locate the p trap and place a bucket underneath to catch any water that may spill out.
Step 3: Loosen the slip nuts on both ends of the p trap and remove it from the drain pipe and sink tailpiece.
Step 4: Use pliers to loosen the nut on the bottom of the sink drain and remove the drain from the sink.
Step 5: Clean the sink and drain opening with a sponge to remove any debris or residue from the old drain.
Step 6: Follow the manufacturer's instructions to install the new drain assembly. This typically involves applying plumber's putty and tightening the nut underneath the sink.


Step-by-Step Guide to Removing a Bathroom Sink Drain


/bathroom-sink-drain-installation-2718843-01-4955fe1f576b447a91abe51c126d220b.jpg)
Removing a Bathroom Sink Drain and P Trap: A Beginner's Guide
For those who have never attempted to remove a bathroom sink drain before, it can seem like a daunting task. However, with the right tools and a little bit of knowledge, even a beginner can successfully complete this project. Here are some important tips to keep in mind:
Italic: Always turn off the water supply before beginning the removal process.
Italic: Be patient and take your time. Rushing through the process can lead to mistakes and potential issues in the future.
Italic: If you encounter any difficulties during the removal process, don't hesitate to call a professional plumber for assistance.


Removing a Bathroom Sink Drain and P Trap: A Beginner's Guide
:max_bytes(150000):strip_icc()/bathroom-sink-drain-installation-2718843-02-61e5ecbee1e949be8d8f45ac4f5a6797.jpg)

Removing a Bathroom Sink Drain and P Trap: Tips and Tricks
When it comes to removing a bathroom sink drain and p trap, there are some tips and tricks that can make the task easier and more efficient. Here are a few to keep in mind:
Underline: Use a pipe wrench instead of pliers for more leverage when loosening stubborn nuts.
Underline: Apply a small amount of plumber's putty around the bottom of the sink drain for a better seal.
Underline: Consider using a drain snake to clear any clogs or debris from the drain before installing the new assembly.


Removing a Bathroom Sink Drain and P Trap: Tips and Tricks


Removing a Bathroom Sink Drain and P Trap: Common Mistakes to Avoid
While removing a bathroom sink drain and p trap may seem like a simple task, there are some common mistakes that can lead to bigger problems. Here are a few to avoid:
Bold: Not turning off the water supply before beginning the removal process.
Bold: Not properly cleaning the sink and drain opening before installing the new drain assembly.
Bold: Not following the manufacturer's instructions when installing the new drain.


Removing a Bathroom Sink Drain and P Trap: Common Mistakes to Avoid

Removing a Bathroom Sink Drain and P Trap: Tools You'll Need
In order to successfully remove a bathroom sink drain and p trap, you will need a few basic tools and materials. Here is a list of what you will need:
Italic: Adjustable wrench
Italic: Pliers
Italic: Bucket
Italic: Sponge
Italic: New drain assembly

Removing a Bathroom Sink Drain and P Trap: Tools You'll Need


Removing a Bathroom Sink Drain and P Trap: Safety Precautions
While removing a bathroom sink drain and p trap is a relatively simple task, it is important to take some safety precautions to avoid any accidents or injuries. Here are a few important safety tips:
Underline: Always turn off the water supply before beginning the removal process.
Underline: Wear protective gloves when handling any tools or materials.
Underline: Use caution when using pliers or a pipe wrench to avoid injury.

Removing a Bathroom Sink Drain and P Trap: Safety Precautions

Removing a Bathroom Sink Drain and P Trap: Professional vs. DIY
Deciding whether to hire a professional plumber or attempt to remove the bathroom sink drain and p trap yourself can be a difficult decision. Here are some factors to consider:
Italic: Your level of experience and knowledge when it comes to plumbing projects.
Italic: The complexity of the job and potential for complications.
Italic: The cost of hiring a professional vs. purchasing the necessary tools and materials for a DIY project.
Now that you have a better understanding of how to remove an old bathroom sink drain and p trap, you can confidently tackle this task yourself or make an informed decision about hiring a professional. With the right tools and a little bit of patience, you can have your bathroom sink functioning like new in no time.


Removing a Bathroom Sink Drain and P Trap: Professional vs. DIY


Why You Should Consider Removing Your Old Bathroom Sink Drain and P Trap

When it comes to house design, the bathroom is often overlooked as a space for creativity and functionality. However, the bathroom is a crucial part of any home and can greatly affect the overall aesthetics and functionality of your space. One often overlooked aspect of the bathroom is the sink drain and p trap. While these may seem like insignificant components, they play a crucial role in keeping your bathroom functioning properly. In this article, we will discuss why you should consider removing your old bathroom sink drain and p trap and the benefits it can bring to your bathroom design.
The Importance of Proper Drainage

The main function of a sink drain and p trap is to remove wastewater from your sink and prevent foul odors from entering your bathroom. Over time, these components can become clogged with hair, soap scum, and other debris, leading to slow drainage and unpleasant smells. This can be not only inconvenient but also unsanitary for your bathroom. Removing your old bathroom sink drain and p trap can improve water flow and eliminate any unpleasant odors, making your bathroom a more enjoyable space.
Enhancing Your Bathroom Aesthetics

Aside from functionality, the appearance of your bathroom is just as important. An old, rusted, or outdated sink drain and p trap can be an eyesore and detract from the overall design of your bathroom. By replacing your old bathroom sink drain and p trap , you can give your bathroom a fresh and updated look. There are a variety of stylish and modern options available that can add a touch of elegance to your bathroom design.
Preventing Costly Repairs

While it may seem like a small issue, neglecting to remove your old bathroom sink drain and p trap can lead to more significant problems down the line. A clogged drain or malfunctioning p trap can cause water damage to your bathroom, leading to costly repairs. By regularly replacing these components, you can prevent any potential issues and save yourself the hassle and expense of major repairs.
In conclusion, removing your old bathroom sink drain and p trap can have numerous benefits for your bathroom design. By improving functionality, enhancing aesthetics, and preventing costly repairs, it is a simple and effective way to upgrade your bathroom. So don't neglect this important component of your bathroom, and consider giving it a much-needed update. Your bathroom and your wallet will thank you.