How to Refinish a Porcelain Kitchen Sink Before and After
Are you tired of looking at your old, stained porcelain kitchen sink? Are you considering replacing it with a new one? Before you spend a fortune on a brand new sink, why not try refinishing your current one? Refinishing a porcelain kitchen sink is a cost-effective way to give it a new lease on life. In this guide, we will walk you through the steps of refinishing your porcelain kitchen sink and show you the dramatic before and after results.


How to Refinish a Porcelain Kitchen Sink Before and After


How to Refinish a Porcelain Kitchen Sink Before and After: 10 Steps
Refinishing a porcelain kitchen sink may seem like a daunting task, but with the right tools and instructions, it can be done easily and efficiently. Follow these 10 steps to achieve a beautifully refinished porcelain kitchen sink.
Step 1: Gather Your Supplies
Before you begin, make sure you have all the necessary supplies. You will need a porcelain sink refinishing kit, a sponge, an old toothbrush, a putty knife, sandpaper, and a mask and gloves for protection.
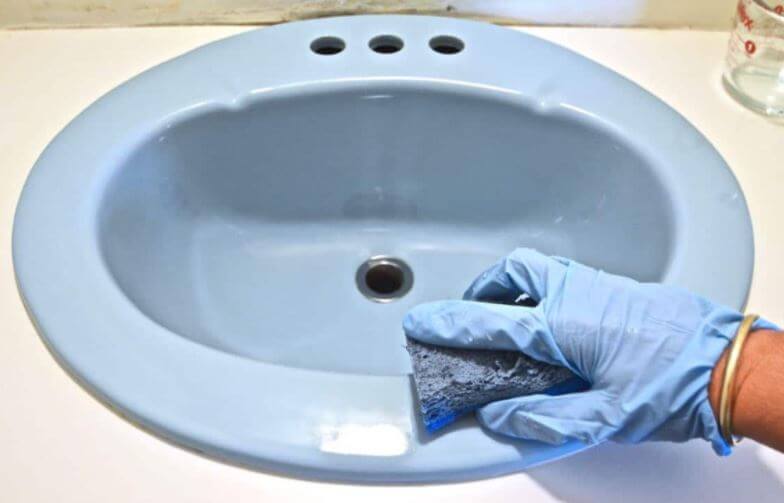
Step 2: Clean the Sink
Using a mild detergent and warm water, thoroughly clean the sink and remove any dirt, grime, or soap scum. Rinse the sink well and dry it with a clean cloth.
Step 3: Sand the Sink
Using a fine-grit sandpaper, gently sand the entire surface of the sink. This will help the new finish adhere better and create a smooth surface for the new coating to be applied.
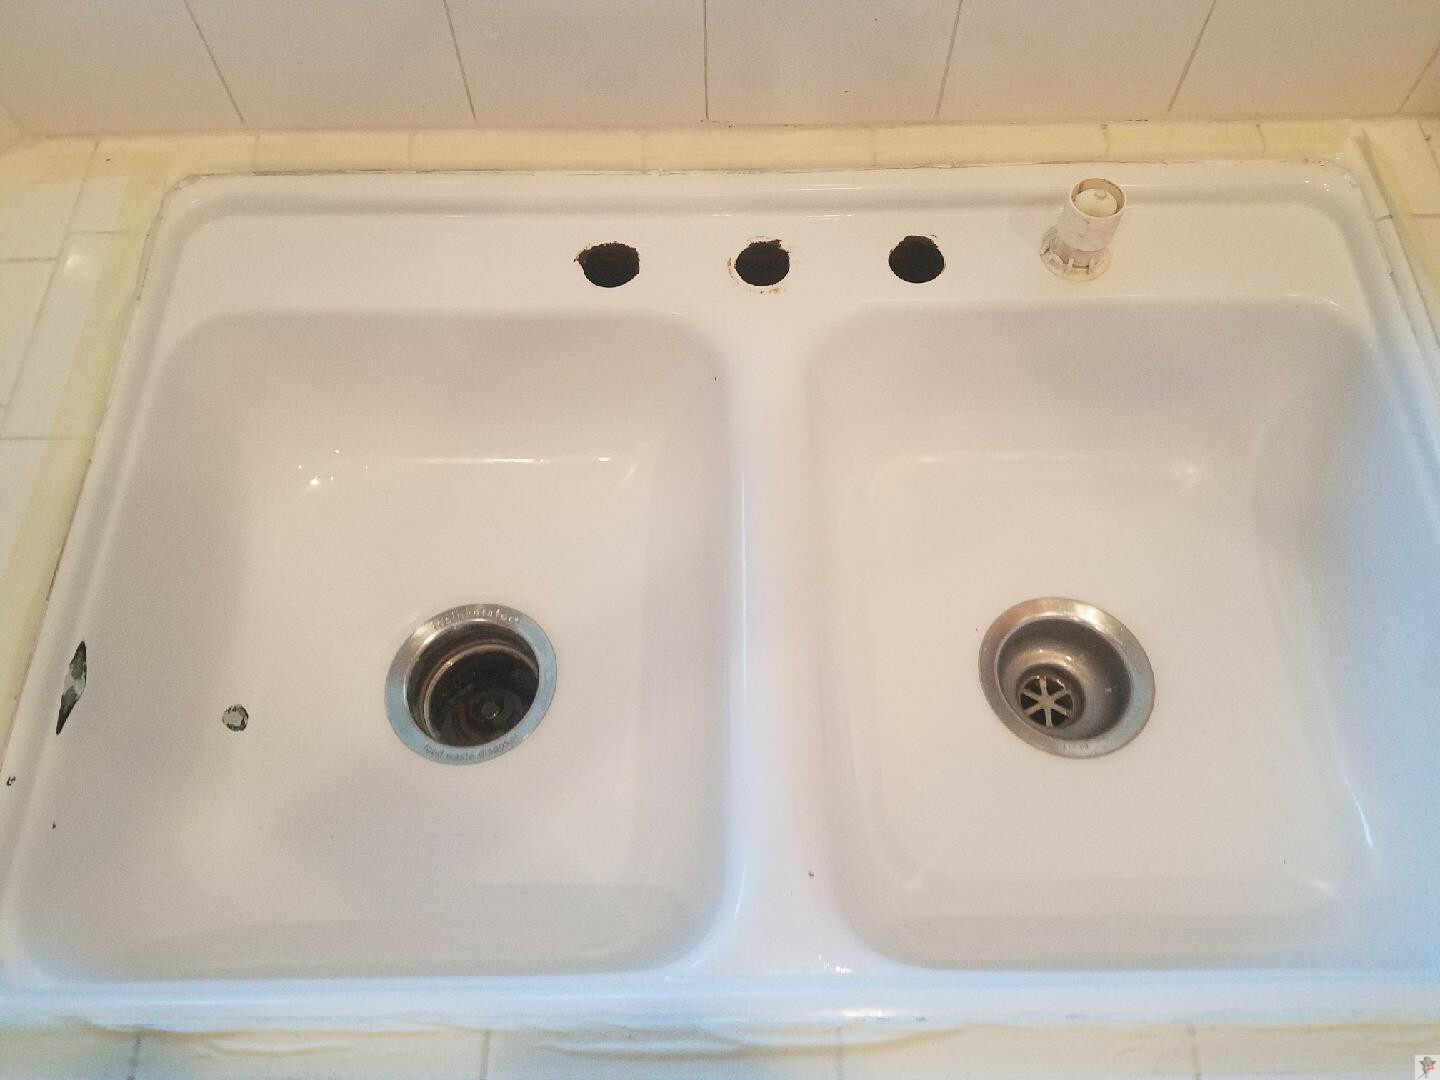
Step 4: Fill in Chips and Scratches
If your sink has any chips or scratches, use the porcelain repair compound from your refinishing kit to fill them in. Follow the instructions on the kit for the best results.
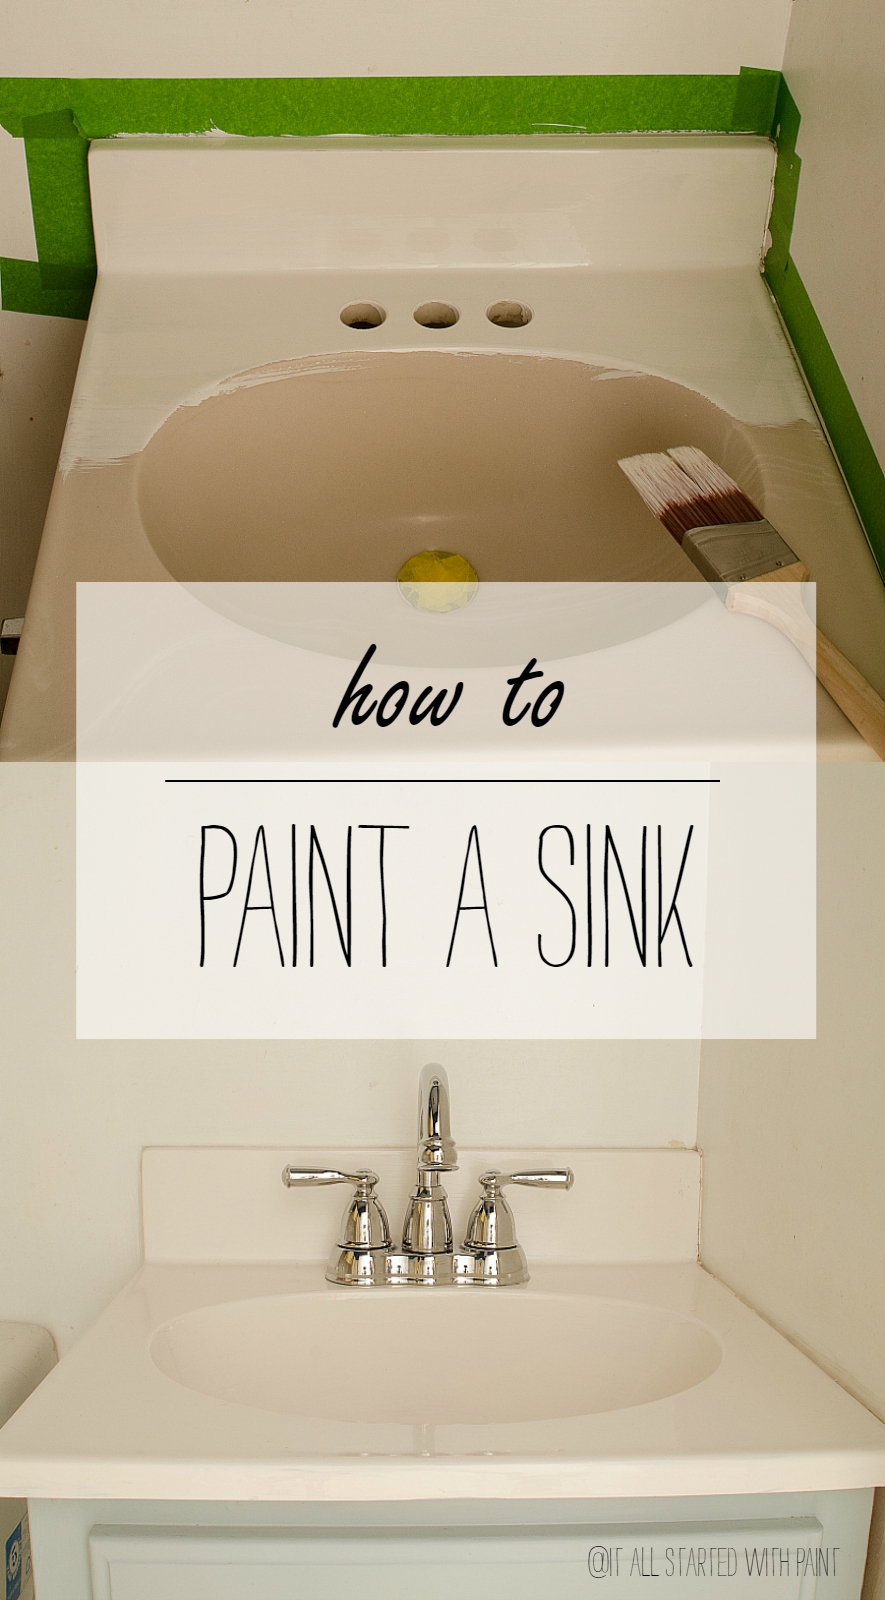
Step 5: Apply the Primer
Using a brush or roller, apply the primer from your refinishing kit to the entire sink. This will help the new coating adhere better and ensure a long-lasting finish.
Step 6: Apply the Topcoat
Once the primer has dried, apply the topcoat from your refinishing kit. Use the brush or roller in even strokes to ensure a smooth and consistent finish. You may need to apply multiple coats for a flawless finish.
Step 7: Let it Dry
Allow the topcoat to dry completely before using your sink. This can take anywhere from 24 to 48 hours, so make sure you have access to another sink during this time.
Step 8: Sand and Buff
Once the topcoat is completely dry, use a fine-grit sandpaper to lightly sand the surface of the sink. This will remove any imperfections and create a smooth finish. Then, use a buffing compound and a clean cloth to buff the sink to a shiny finish.
Step 9: Reinstall Fixtures
If you removed any fixtures from your sink, such as faucets or drains, now is the time to reinstall them. Follow the manufacturer's instructions for proper installation.
Step 10: Enjoy Your Like-New Sink
Once all the coatings have dried and the fixtures are reinstalled, your sink is ready to use! Enjoy your beautifully refinished porcelain kitchen sink.


How to Refinish a Porcelain Kitchen Sink Before and After: 10 Steps

How to Refinish a Porcelain Kitchen Sink Before and After: 13 Steps
If you want to take your refinishing game to the next level, follow these additional steps for an even more professional-looking before and after result.
Step 11: Remove the Sink
If possible, remove the sink from the countertop to make the refinishing process easier. This will also allow you to get a better finish on the edges and hard-to-reach areas.
Step 12: Mask Off the Area
Use painter's tape and plastic sheeting to mask off the surrounding area and protect it from any overspray or drips.
Step 13: Use a Sprayer
For a more professional finish, consider using a paint sprayer instead of a brush or roller. This will give you a smoother and more even coat of primer and topcoat.

How to Refinish a Porcelain Kitchen Sink Before and After: 13 Steps


How to Refinish a Porcelain Kitchen Sink Before and After: 15 Steps
For the ultimate before and after transformation, follow these additional steps for a complete refinish of your porcelain kitchen sink.
Step 14: Replace Caulk and Grout
If your sink has caulk or grout around the edges, remove and replace it with fresh caulk or grout to give your sink a clean and polished look.
Step 15: Add a New Drain Strainer
If your sink's drain strainer is old and worn, consider replacing it with a new one for a fresh and updated look.

How to Refinish a Porcelain Kitchen Sink Before and After: 15 Steps
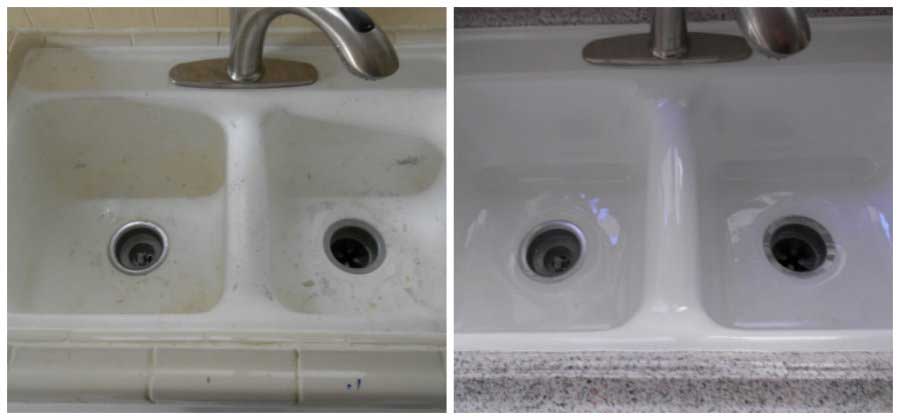
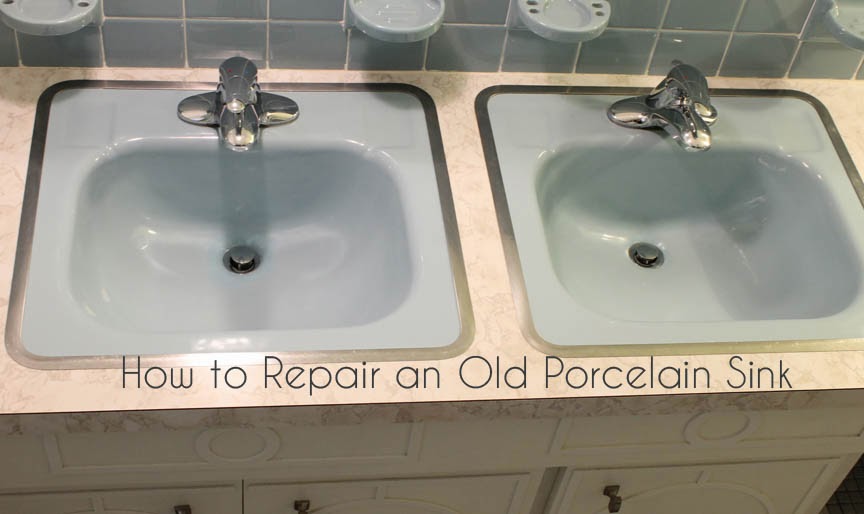
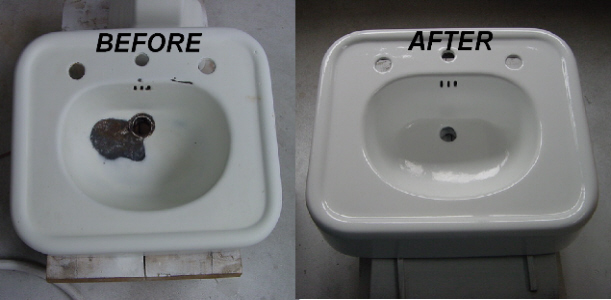
How to Refinish a Porcelain Kitchen Sink: Before and After Comparison
Now that you've completed the refinishing process, take a step back and compare the before and after results. You'll be amazed at the difference a little bit of elbow grease and some refinishing products can make.


How to Refinish a Porcelain Kitchen Sink Before and After: A Step-by-Step Guide

Refinishing a Porcelain Kitchen Sink: Before and After Photos
To really appreciate the transformation, take some before and after photos of your porcelain kitchen sink. You'll be able to see the dramatic difference side by side.


Refinishing a Porcelain Kitchen Sink: Before and After Photos


Before and After: Refinishing a Porcelain Kitchen Sink
Not only will you see a physical difference in your sink, but you'll also notice a difference in the overall look and feel of your kitchen. Refinishing your porcelain sink can give your kitchen a fresh and updated look without the hassle and expense of a complete renovation.


Before and After: Refinishing a Porcelain Kitchen Sink


Refinishing a Porcelain Kitchen Sink: Before and After Results
The results of refinishing your porcelain kitchen sink speak for themselves. You'll have a like-new sink that will last for years to come, and you'll have saved yourself a significant amount of money in the process.


Refinishing a Porcelain Kitchen Sink: Before and After Results


Refinishing a Porcelain Kitchen Sink: Before and After Video Tutorial
To see the refinishing process in action, check out online tutorials for a step-by-step video guide. You'll be able to follow along and get a visual idea of what to expect during the process.
In conclusion, refinishing a porcelain kitchen sink before and after can make a huge difference in the overall look and feel of your kitchen. With the right supplies and instructions, you can easily achieve a beautiful and long-lasting finish that will leave your sink looking like new. So before you consider replacing your sink, give refinishing a try and see the amazing before and after results for yourself.

How to Refinish a Porcelain Kitchen Sink: Before and After Comparison
Why Refinishing Your Porcelain Kitchen Sink is a Must for Your Home Design

The Importance of a Kitchen Sink in Your Home Design
 A kitchen sink is an essential element in any home design. It serves as a functional space for washing dishes, preparing food, and cleaning hands. But it also plays a significant role in the overall aesthetic of your kitchen. A worn-out or outdated sink can bring down the entire look of your kitchen, no matter how well-designed it is. That's why it's crucial to pay attention to your kitchen sink and give it the care it deserves.
The Benefits of Refinishing Your Porcelain Kitchen Sink
 Refinishing your porcelain kitchen sink
can completely transform the look of your kitchen. It involves a process of repairing and resurfacing the sink's surface, giving it a brand new look. This method of
restoring
your sink is much more cost-effective than replacing it entirely. Plus, it can save you the hassle of dealing with a construction project in your kitchen.
Furthermore, refinishing your porcelain kitchen sink can also improve its functionality. Over time, sinks can develop cracks, scratches, and stains, making them more challenging to clean and maintain. The refinishing process can fix these issues, creating a smooth and easy-to-clean surface. It can also add a protective layer to your sink, making it more durable and resistant to future damage.
Refinishing your porcelain kitchen sink
can completely transform the look of your kitchen. It involves a process of repairing and resurfacing the sink's surface, giving it a brand new look. This method of
restoring
your sink is much more cost-effective than replacing it entirely. Plus, it can save you the hassle of dealing with a construction project in your kitchen.
Furthermore, refinishing your porcelain kitchen sink can also improve its functionality. Over time, sinks can develop cracks, scratches, and stains, making them more challenging to clean and maintain. The refinishing process can fix these issues, creating a smooth and easy-to-clean surface. It can also add a protective layer to your sink, making it more durable and resistant to future damage.
The Process of Refinishing Your Porcelain Kitchen Sink
 Refinishing your porcelain kitchen sink
is a straightforward process that can be completed in just a few hours. First, the sink is thoroughly cleaned and prepped to ensure the refinishing material adheres correctly. Then, a specialized coating is applied to the sink's surface, giving it a smooth and glossy finish. The color can also be customized to match your kitchen's design, making it a versatile option for any home.
Refinishing your porcelain kitchen sink
is a straightforward process that can be completed in just a few hours. First, the sink is thoroughly cleaned and prepped to ensure the refinishing material adheres correctly. Then, a specialized coating is applied to the sink's surface, giving it a smooth and glossy finish. The color can also be customized to match your kitchen's design, making it a versatile option for any home.
Final Thoughts
 In conclusion,
refinishing your porcelain kitchen sink
is a simple yet highly effective way to upgrade your home design. It can save you time, money, and headaches, while also elevating the look and functionality of your kitchen. So if you want to give your kitchen a fresh and modern look, consider refinishing your porcelain kitchen sink. Trust us; you won't regret it.
In conclusion,
refinishing your porcelain kitchen sink
is a simple yet highly effective way to upgrade your home design. It can save you time, money, and headaches, while also elevating the look and functionality of your kitchen. So if you want to give your kitchen a fresh and modern look, consider refinishing your porcelain kitchen sink. Trust us; you won't regret it.