Installing or replacing a bathroom sink can be a simple and satisfying DIY project, but attaching a drain may seem like a daunting task. However, with the right tools and knowledge, it can be easily done in just a few steps. In this article, we will guide you on how to properly attach a drain to your bathroom sink, ensuring a smooth and functional plumbing system.How to Attach a Drain to a Bathroom Sink


How to Attach a Drain to a Bathroom Sink


Before starting, make sure you have all the necessary tools and materials. You will need a drain assembly kit, pliers, a pipe wrench, plumber's putty, and Teflon tape. Once you have everything ready, follow these steps: Step 1: Remove the old drain assembly. If you are replacing an old sink, you will need to remove the old drain assembly by unscrewing the locknut and the drain flange from the sink. Use pliers or a pipe wrench if necessary. Step 2: Clean the sink and drain opening. Remove any old putty or debris from the sink and drain opening. This will ensure a smooth and tight fit for the new drain assembly. Step 3: Apply plumber's putty. Roll a small amount of plumber's putty into a thin rope and wrap it around the underside of the drain flange. This will create a watertight seal between the sink and the drain assembly. Step 4: Insert the drain flange. Place the drain flange into the opening on the sink, making sure it sits evenly and securely. If necessary, use a wrench to tighten the locknut from underneath the sink. Step 5: Install the drain body. Apply Teflon tape to the threads of the drain body and screw it into the drain flange. Use a pipe wrench to tighten it, but be careful not to over-tighten as it may cause damage to the sink or the drain assembly. Step 6: Connect the P-trap. The P-trap is a curved pipe that connects the drain body to the main plumbing line. Make sure the P-trap is properly aligned and secured with the drain body and the main plumbing line using the appropriate fittings. Step 7: Check for leaks. Once everything is connected, turn on the water and check for any leaks. If you notice any leakage, tighten the fittings or add more Teflon tape as needed.Attaching a Drain to a Bathroom Sink: Step-by-Step Guide

Attaching a Drain to a Bathroom Sink: Step-by-Step Guide


Installing a bathroom sink drain may seem like a job best left to the professionals, but with the right tools and proper instructions, you can do it yourself. Not only will it save you money, but it can also give you a sense of accomplishment. Follow these easy steps to install a bathroom sink drain on your own: Step 1: Gather your tools and materials. You will need a drain assembly kit, pliers, a pipe wrench, plumber's putty, Teflon tape, and a screwdriver. Step 2: Remove the old drain assembly. If you are replacing an old sink, you will need to remove the old drain assembly by unscrewing the locknut and the drain flange from the sink. Use pliers or a pipe wrench if necessary. Step 3: Clean the sink and drain opening. Make sure the sink and drain opening are free from any old putty or debris for a smooth fit for the new drain assembly. Step 4: Apply plumber's putty. Roll a small amount of plumber's putty into a thin rope and wrap it around the underside of the drain flange. This will ensure a watertight seal between the sink and the drain assembly. Step 5: Install the drain flange. Place the drain flange into the opening on the sink, making sure it sits evenly and securely. If necessary, use a wrench to tighten the locknut from underneath the sink. Step 6: Connect the drain body. Apply Teflon tape to the threads of the drain body and screw it into the drain flange. Use a pipe wrench to tighten it, but be careful not to over-tighten. Step 7: Connect the P-trap. The P-trap is a curved pipe that connects the drain body to the main plumbing line. Make sure the P-trap is properly aligned and secured with the drain body and the main plumbing line using the appropriate fittings. Step 8: Test for leaks. Turn on the water and check for any leaks. If there are any, tighten the fittings or add more Teflon tape as needed.DIY: How to Install a Bathroom Sink Drain


DIY: How to Install a Bathroom Sink Drain


Attaching a drain to a bathroom sink may seem like a complicated task, but it can be easily done with these simple steps: Step 1: Prepare your tools and materials. You will need a drain assembly kit, pliers, a pipe wrench, plumber's putty, Teflon tape, and a screwdriver. Step 2: Remove the old drain assembly. If you are replacing an old sink, you will need to remove the old drain assembly by unscrewing the locknut and the drain flange from the sink. Use pliers or a pipe wrench if necessary. Step 3: Clean the sink and drain opening. Remove any old putty or debris from the sink and drain opening for a tight fit for the new drain assembly. Step 4: Apply plumber's putty. Roll a small amount of plumber's putty into a thin rope and wrap it around the underside of the drain flange. Step 5: Install the drain flange. Place the drain flange into the opening on the sink, making sure it sits evenly and securely. Use a wrench to tighten the locknut if necessary. Step 6: Connect the drain body. Apply Teflon tape to the threads of the drain body and screw it into the drain flange. Use a pipe wrench to tighten it, but be careful not to over-tighten. Step 7: Connect the P-trap. Make sure the P-trap is properly aligned and secured with the drain body and the main plumbing line using the appropriate fittings. Step 8: Check for leaks. Turn on the water and check for any leaks. If there are any, tighten the fittings or add more Teflon tape as needed.Easy Steps for Attaching a Drain to Your Bathroom Sink


Easy Steps for Attaching a Drain to Your Bathroom Sink


Attaching a bathroom sink drain can be a tricky task, but here are some tips and tricks to make the process easier and more efficient: Tip 1: Make sure to turn off the water supply before starting the installation to avoid any accidents or water damage. Tip 2: Use a hairdryer to soften old putty and make it easier to remove from the sink and drain opening. Tip 3: Apply a thin layer of plumber's putty to prevent any excess from oozing out and creating a messy installation. Tip 4: Use your fingers to create a smooth and even layer of putty around the drain flange for a better seal. Tip 5: Use Teflon tape on the threads of the drain body for a secure and leak-proof connection. Tip 6: Don't over-tighten the fittings to avoid damaging the sink or the drain assembly.Attaching a Bathroom Sink Drain: Tips and Tricks


Attaching a Bathroom Sink Drain: Tips and Tricks


Properly attaching a drain to your bathroom sink is crucial for the functionality and longevity of your plumbing system. A poorly attached drain can result in leaks, clogs, and other plumbing issues that can be costly to fix. By following the correct steps and using the right tools and materials, you can ensure a secure and efficient drain attachment.The Importance of Properly Attaching a Drain to Your Bathroom Sink


The Importance of Properly Attaching a Drain to Your Bathroom Sink


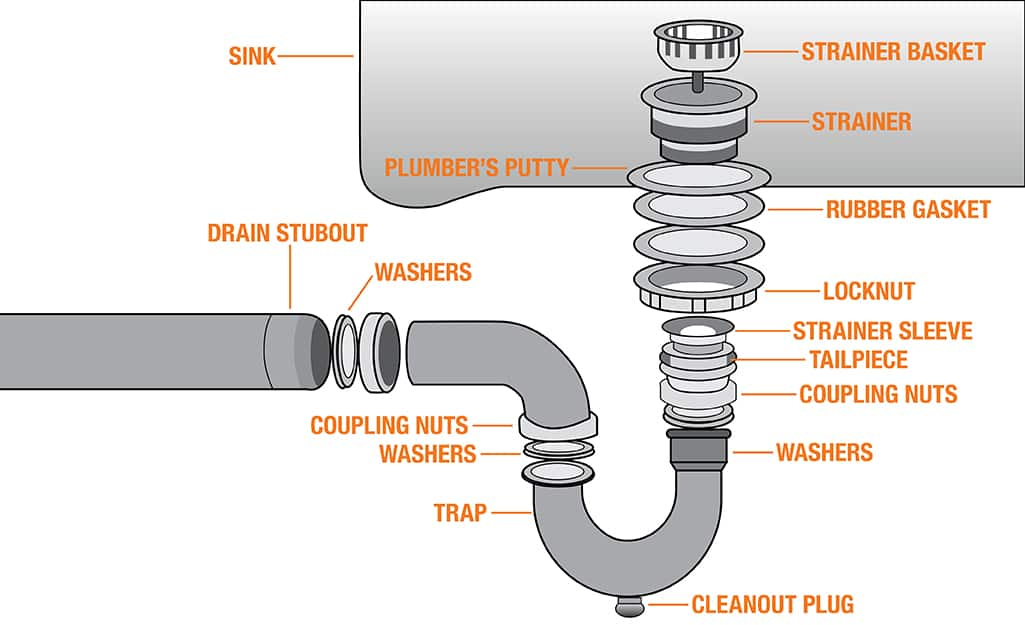
To properly attach a drain to a bathroom sink, you will need the following tools and materials: Tools: Pliers, pipe wrench, screwdriver. Materials: Drain assembly kit, plumber's putty, Teflon tape.Tools and Materials Needed for Attaching a Drain to a Bathroom Sink


Tools and Materials Needed for Attaching a Drain to a Bathroom Sink
:no_upscale()/cdn.vox-cdn.com/uploads/chorus_asset/file/19495086/drain_0.jpg)


When attaching a drain to a bathroom sink, it is important to avoid these common mistakes: Mistake 1: Not turning off the water supply before starting the installation. Mistake 2: Failing to clean the sink and drain opening, resulting in a poor seal. Mistake 3: Using too much plumber's putty, which can cause a messy installation and potential leaks. Mistake 4: Over-tightening the fittings, which can damage the sink or the drain assembly. Mistake 5: Not testing for leaks after installation, which can lead to future plumbing issues.Common Mistakes to Avoid When Attaching a Drain to a Bathroom Sink


Common Mistakes to Avoid When Attaching a Drain to a Bathroom Sink


If you are new to DIY projects, attaching a drain to a bathroom sink may seem like a daunting task. However, with the right instructions and tools, it can be easily done. Remember to take your time, follow the steps carefully, and don't hesitate to ask for help if needed.Attaching a Drain to a Bathroom Sink: A Beginner's Guide

Attaching a Drain to a Bathroom Sink: A Beginner's Guide


For a professional and efficient drain attachment, follow these tips from the experts: Tip 1: Use high-quality tools and materials for a more secure and long-lasting installation. Tip 2: Read the instructions carefully before starting the installation. Tip 3: Take your time and don't rush the process to avoid making mistakes. Tip 4: Double-check all fittings and connections before turning on the water. Tip 5: If you encounter any issues, don't hesitate to call a professional plumber for assistance.Expert Tips for Attaching a Drain to a Bathroom Sink
Expert Tips for Attaching a Drain to a Bathroom Sink


Why Properly Attaching the Drain to Your Bathroom Sink is Essential for House Design
Maintaining a Functional and Aesthetically Pleasing Bathroom Sink
 When designing a house, every detail matters and the bathroom is no exception. The sink is one of the most frequently used fixtures in the bathroom, making it a crucial element in both functionality and design. One of the key components of a sink is the drain, which is responsible for carrying away any used water and preventing clogs. However, many homeowners underestimate the importance of properly attaching the drain to their bathroom sink. In this article, we will discuss the reasons why properly attaching the drain is essential for both the functionality and aesthetics of your bathroom sink.
Preventing Costly Repairs and Maintenance
 One of the main reasons why attaching the drain to your bathroom sink is important is to prevent costly repairs and maintenance in the future. A poorly attached drain can easily become loose or disconnected, causing water to leak and potentially damaging your sink and surrounding areas. This not only leads to expensive repairs, but it also creates an inconvenience for you and your family. By ensuring that the drain is properly attached, you can avoid these issues and save yourself time and money in the long run.
Ensuring Proper Drainage and Preventing Clogs
 A properly attached drain also plays a crucial role in the functionality of your bathroom sink. It ensures that the water flows smoothly down the drain and prevents clogs from occurring. A clogged drain can be a major inconvenience and can disrupt your daily routine. It can also lead to unpleasant odors and the need for costly plumbing services. By attaching the drain properly, you can avoid these issues and maintain a functional bathroom sink.
Enhancing the Aesthetics of Your Bathroom
 In addition to functionality, properly attaching the drain to your bathroom sink can also enhance the overall aesthetics of your bathroom. A loose or disconnected drain can be an eyesore and take away from the overall design of your bathroom. By making sure the drain is securely attached, you can ensure a clean and seamless look for your sink, adding to the overall appeal of your bathroom.
In Conclusion
 In conclusion, properly attaching the drain to your bathroom sink is essential for both the functionality and design of your bathroom. It prevents costly repairs, ensures proper drainage, and enhances the aesthetics of your sink. As you design your house, do not overlook this crucial detail and be sure to hire a professional plumber to properly install and attach the drain to your bathroom sink.


:max_bytes(150000):strip_icc()/Contemporary-living-room-with-fireplace-58e1205c5f9b58ef7e040d61.png)
