If you're in the process of installing a new kitchen sink, one important component to consider is a Studor Vent. This small, but essential, device helps to regulate air pressure and prevent sewer gas from entering your home. While traditional venting methods involve running a pipe through the roof, a Studor Vent eliminates the need for this by using a one-way valve to allow air to flow out of the plumbing system. In this article, we'll walk you through the steps of installing a Studor Vent for your kitchen sink and explain why it's a popular choice among homeowners.1. Studor Vent Installation for Kitchen Sink


1. Studor Vent Installation for Kitchen Sink


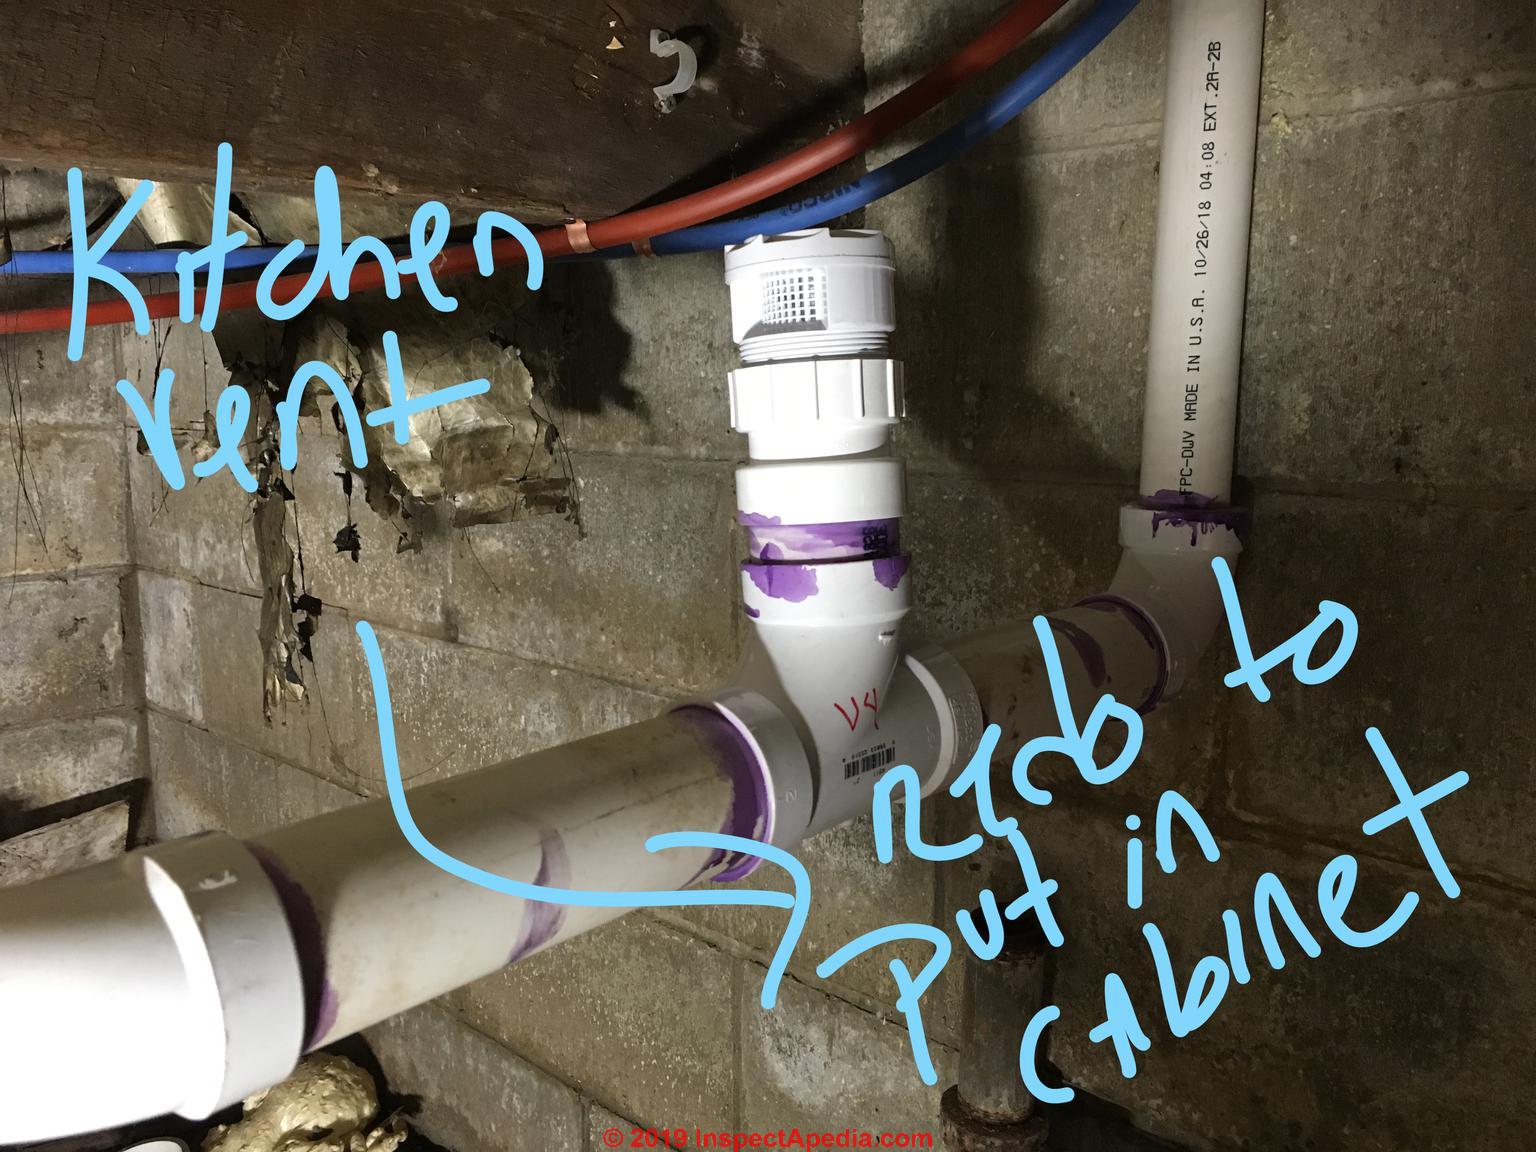
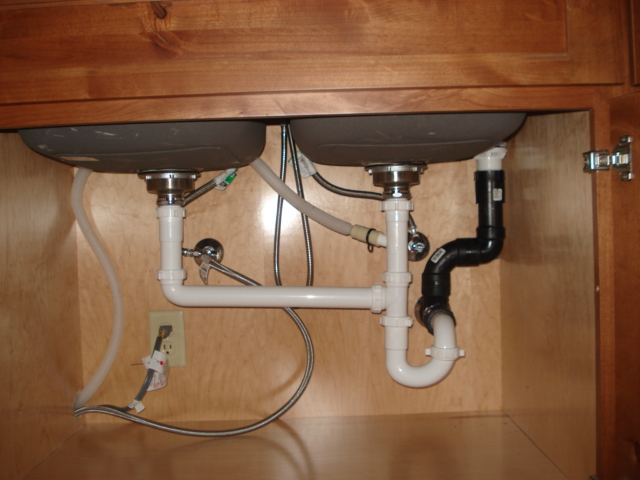
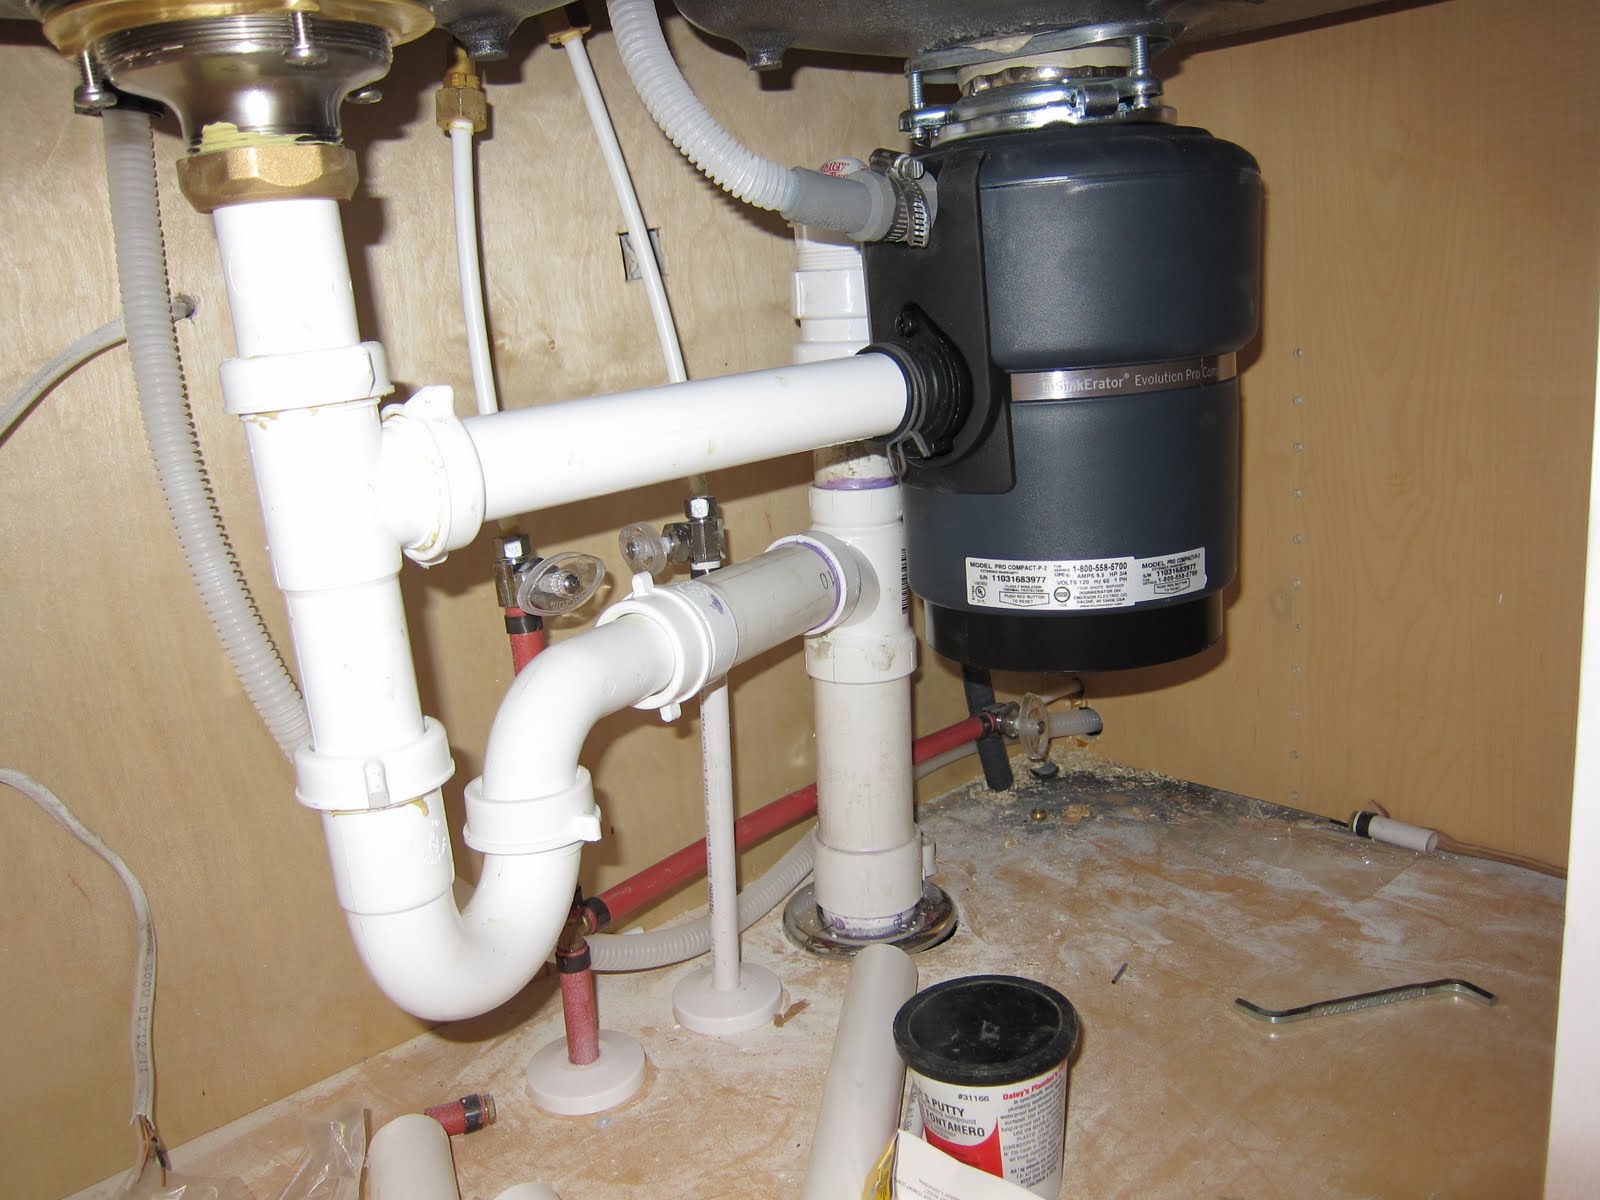
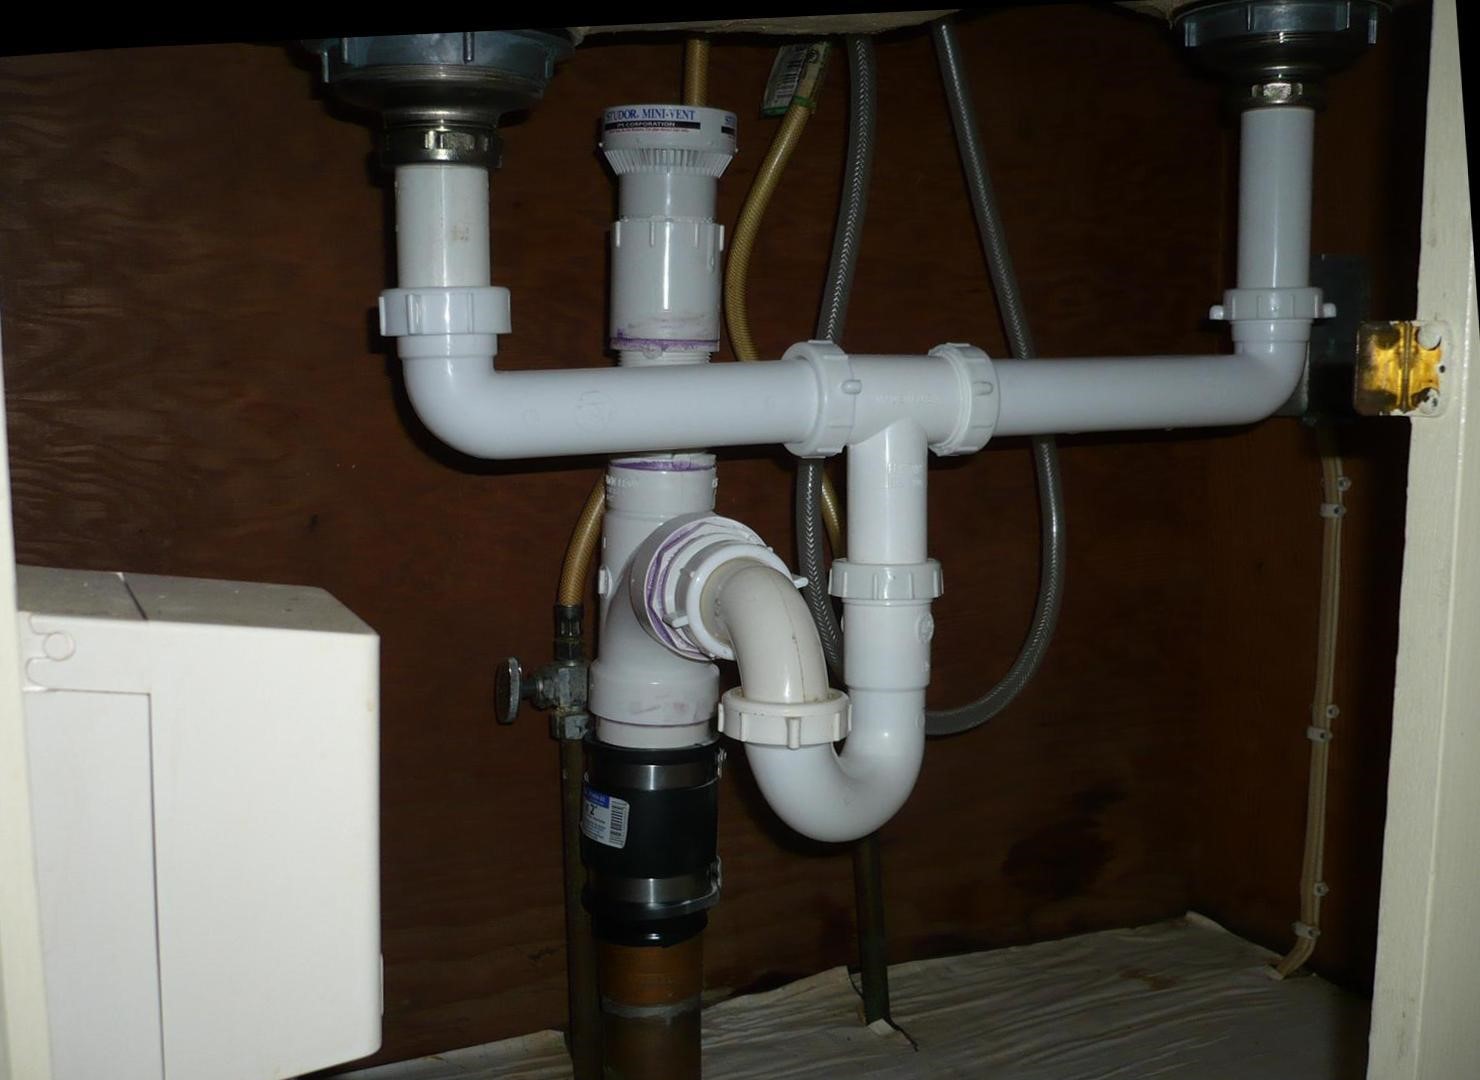
The first step in installing a Studor Vent is to determine the location of your kitchen sink's drain pipe. This is usually located under the sink and will be connected to the main sewer line. Once you've located the drain pipe, measure the distance between it and the underside of your sink. This will help you determine the length of the Studor Vent you'll need. Keep in mind that Studor Vents come in different sizes, so be sure to choose the right one for your specific setup.2. How to Install a Studor Vent for a Kitchen Sink

2. How to Install a Studor Vent for a Kitchen Sink


Once you have your Studor Vent, it's time to install it. Follow these steps for a successful installation: Step 1: Turn off the water supply to your kitchen sink and remove any items stored under the sink to give yourself ample working space. Step 2: Unscrew the trap from the drain pipe and remove it. This will give you access to the drain pipe and allow you to install the Studor Vent. Step 3: Measure the distance between the drain pipe and the underside of your sink to determine the length of the Studor Vent you'll need. Step 4: Cut the Studor Vent to the appropriate length, leaving enough space for it to fit comfortably between the drain pipe and the underside of the sink. Step 5: Connect one end of the Studor Vent to the drain pipe and the other end to the underside of the sink. Use a clamp to secure it in place. Step 6: Reattach the trap to the drain pipe and turn the water supply back on.3. Step-by-Step Guide for Installing a Studor Vent in a Kitchen Sink


3. Step-by-Step Guide for Installing a Studor Vent in a Kitchen Sink


Now that you know how to install a Studor Vent, let's take a look at why it's a popular choice among homeowners: 1. Cost-effective: Installing a Studor Vent is much more affordable than traditional venting methods, as it eliminates the need for running a pipe through the roof. 2. Easy to install: As we've outlined in this article, installing a Studor Vent is a simple process that can be done by most homeowners. 3. Saves space: With traditional venting methods, you need to allocate space for a pipe to be run through the roof. A Studor Vent eliminates this need, freeing up valuable space in your kitchen. 4. Prevents sewer gas from entering your home: The one-way valve in a Studor Vent allows air to flow out of the plumbing system, but prevents sewer gas from entering your home. This is a crucial safety measure for you and your family.4. Benefits of Using a Studor Vent for Kitchen Sink Installation

4. Benefits of Using a Studor Vent for Kitchen Sink Installation

While installing a Studor Vent is a straightforward process, there are a few common mistakes to avoid to ensure a successful installation: 1. Choosing the wrong size: As mentioned earlier, Studor Vents come in different sizes. Be sure to measure carefully and choose the right size for your setup. 2. Not securing the vent properly: It's essential to use clamps to secure the Studor Vent in place to prevent any leaks. 3. Over-tightening the clamp: While it's important to secure the vent, be careful not to over-tighten the clamp, as this can cause damage to the vent and lead to leaks.5. Common Mistakes to Avoid When Installing a Studor Vent for a Kitchen Sink

5. Common Mistakes to Avoid When Installing a Studor Vent for a Kitchen Sink

To install a Studor Vent for your kitchen sink, you'll need the following tools and materials: 1. Studor Vent: Make sure to choose the right size for your setup. 2. A saw: To cut the Studor Vent to the appropriate length. 3. A clamp: To secure the vent in place. 4. Screwdriver: To remove and reattach the trap on the drain pipe. 5. Measuring tape: To ensure the Studor Vent is the correct length.6. Tools and Materials Needed for Installing a Studor Vent in a Kitchen Sink

6. Tools and Materials Needed for Installing a Studor Vent in a Kitchen Sink

To ensure a successful installation, here are a few tips to keep in mind: 1. Measure carefully: As we've mentioned, it's crucial to measure the distance between the drain pipe and the underside of your sink accurately to determine the length of the Studor Vent you'll need. 2. Use a level: It's essential to ensure that the Studor Vent is installed in a level position to prevent any leaks. 3. Follow the manufacturer's instructions: Be sure to read the instructions provided by the manufacturer carefully to ensure you're installing the Studor Vent correctly.7. Tips for Properly Installing a Studor Vent for a Kitchen Sink
7. Tips for Properly Installing a Studor Vent for a Kitchen Sink

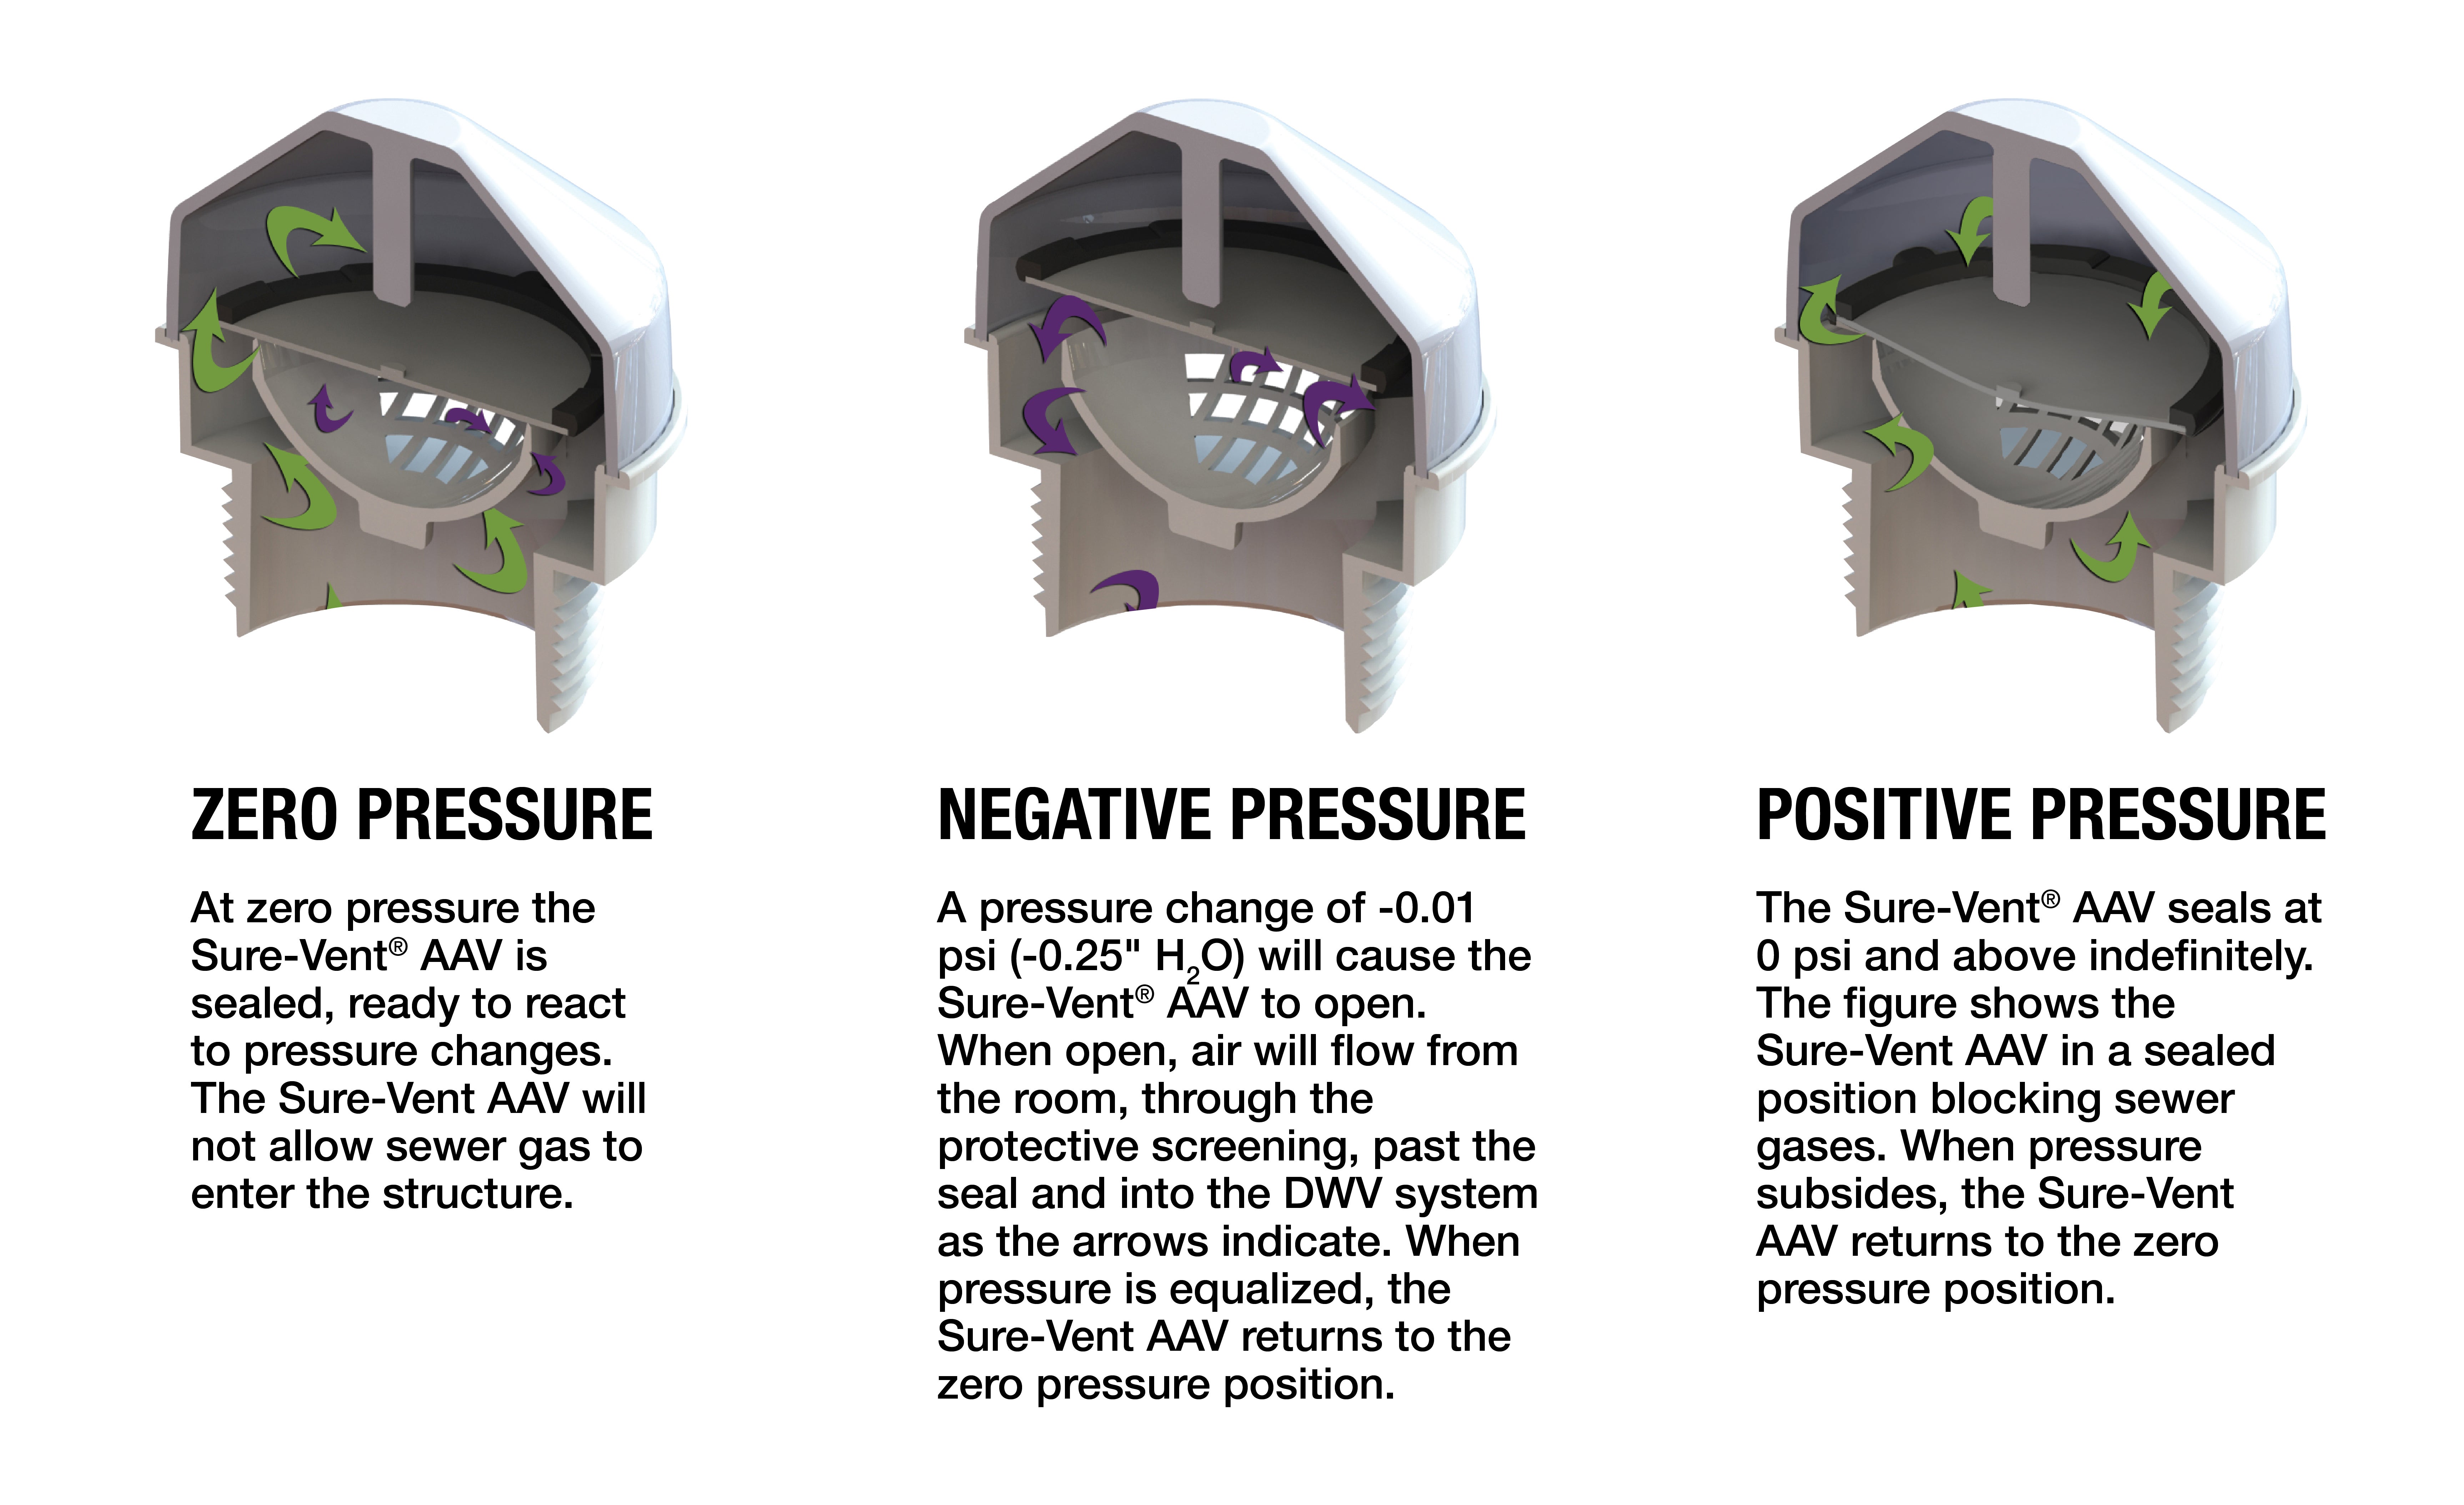
If you experience any issues with your Studor Vent after installation, here are a few troubleshooting tips: 1. Check for blockages: If you notice a decrease in water flow or gurgling sounds, there may be a blockage in the vent. Use a plumber's snake to remove any debris or buildup. 2. Check the vent's positioning: If you notice a leak or sewer gas odor, check to make sure the vent is installed in a level position and is securely clamped in place.8. How to Troubleshoot Issues with a Studor Vent in a Kitchen Sink


8. How to Troubleshoot Issues with a Studor Vent in a Kitchen Sink
/sink-vent-installing-an-auto-vent-2718828-hero-c276117e78dc4a5988e55f07b7c6e129.jpg)
:max_bytes(150000):strip_icc()/sink-vent-installing-an-auto-vent-2718828-01-1894a3f9c97c4c22949448eac8b5c64b.jpg)


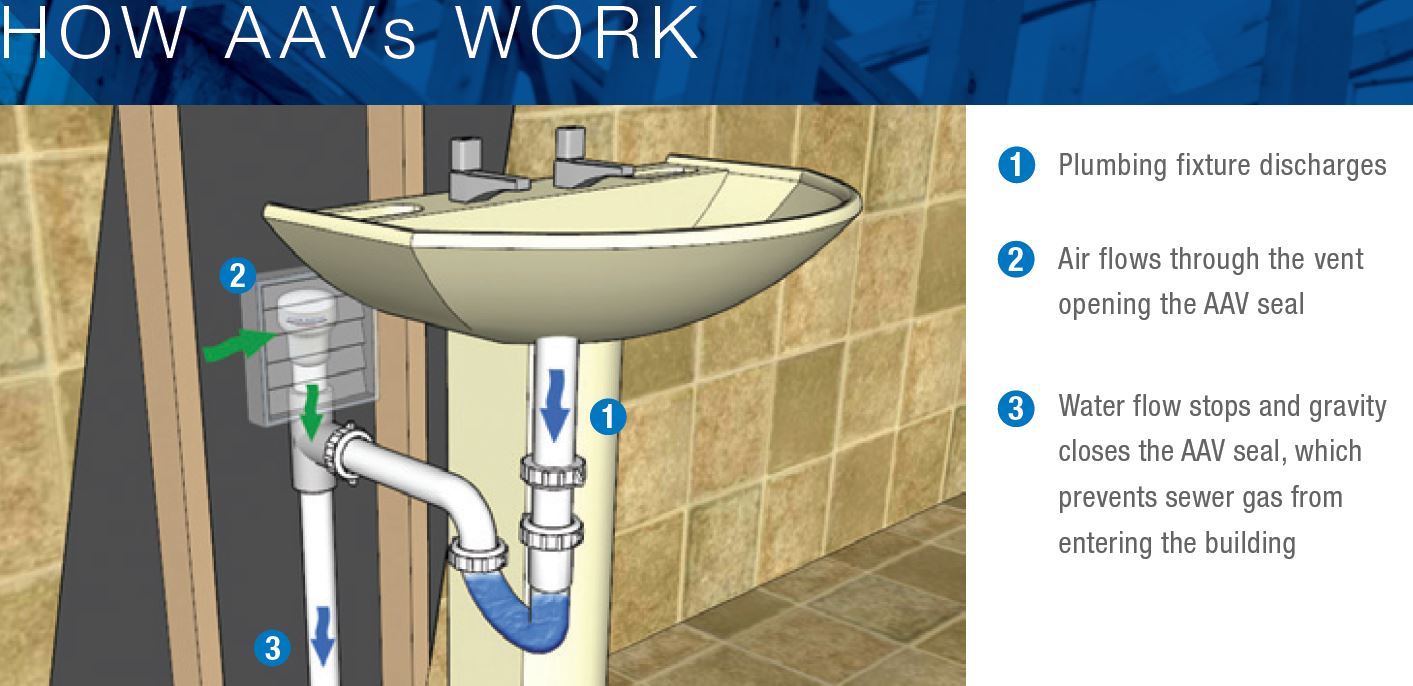
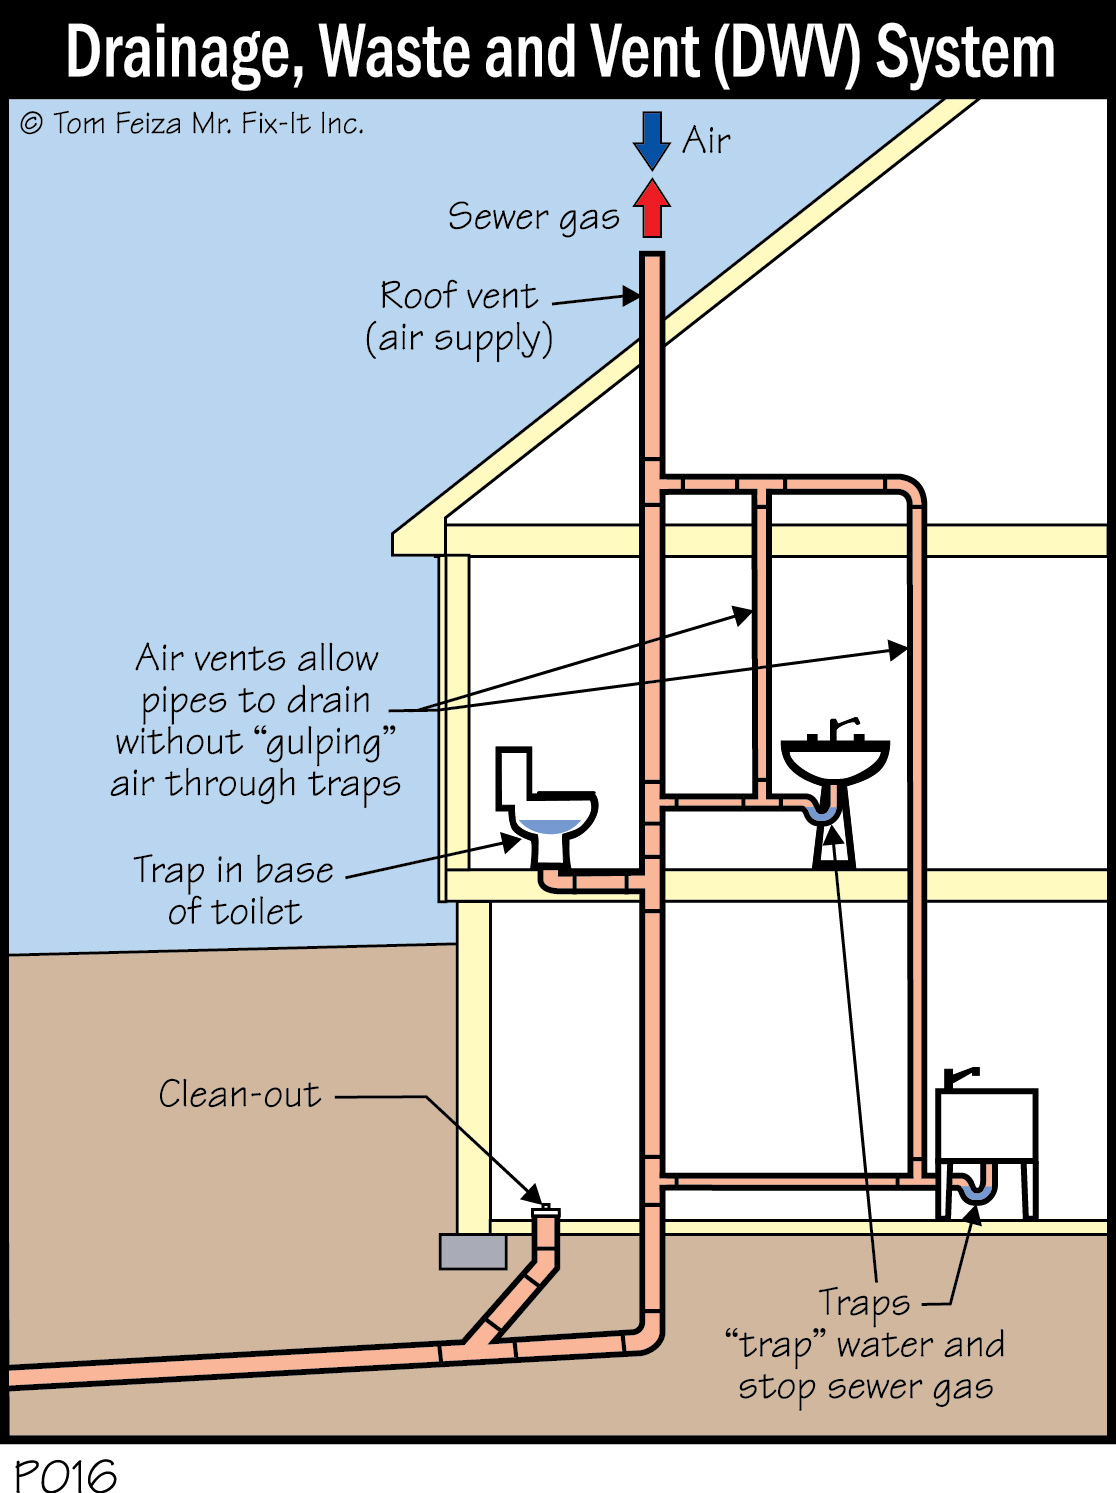
Now that you know how to install and troubleshoot a Studor Vent, you may be wondering why it's necessary. As mentioned earlier, a Studor Vent helps to regulate air pressure and prevent sewer gas from entering your home. Without it, you may experience slow drainage, gurgling sounds, and unpleasant odors.9. Understanding the Purpose of a Studor Vent in a Kitchen Sink Installation

9. Understanding the Purpose of a Studor Vent in a Kitchen Sink Installation

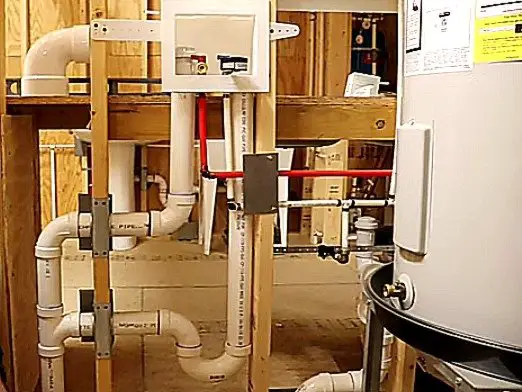
Finally, let's take a look at how Studor Vent installation compares to traditional venting methods: 1. Cost: As we mentioned earlier, installing a Studor Vent is more cost-effective than traditional venting methods, as it eliminates the need for running a pipe through the roof. 2. Ease of installation: While traditional venting methods can be complicated and require professional assistance, a Studor Vent can be installed by most homeowners with basic DIY skills. 3. Space-saving: With traditional venting methods, you need to allocate space for a pipe to be run through the roof. A Studor Vent eliminates this need and frees up space in your kitchen.10. Comparing Studor Vent Installation to Traditional Venting Methods for Kitchen Sinks

10. Comparing Studor Vent Installation to Traditional Venting Methods for Kitchen Sinks


How a Studor Vent Can Improve Your Kitchen Sink Installation

The Importance of Proper Ventilation in House Design
 When it comes to designing a functional and efficient kitchen, proper ventilation is often overlooked. However, it is a crucial aspect that can greatly impact the overall functionality and comfort of your kitchen. Without adequate ventilation, unpleasant odors, excess moisture, and even harmful pollutants can become trapped in your home. This can not only lead to discomfort but also pose health risks for you and your family. This is where a
studor vent
comes in.
When it comes to designing a functional and efficient kitchen, proper ventilation is often overlooked. However, it is a crucial aspect that can greatly impact the overall functionality and comfort of your kitchen. Without adequate ventilation, unpleasant odors, excess moisture, and even harmful pollutants can become trapped in your home. This can not only lead to discomfort but also pose health risks for you and your family. This is where a
studor vent
comes in.
What is a Studor Vent?
 A
studor vent
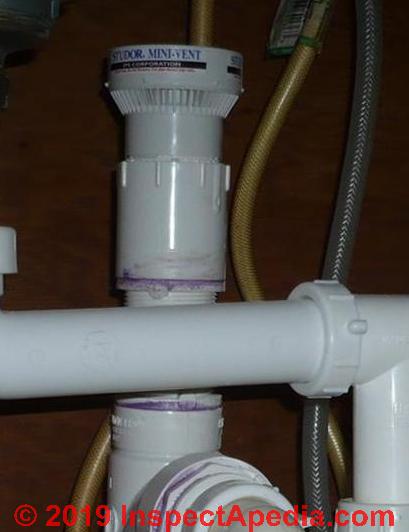
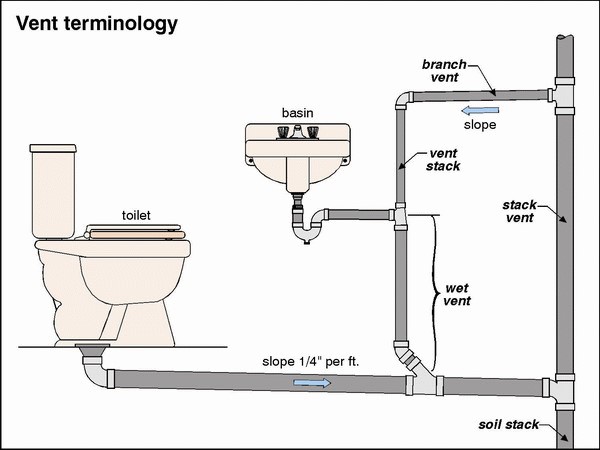
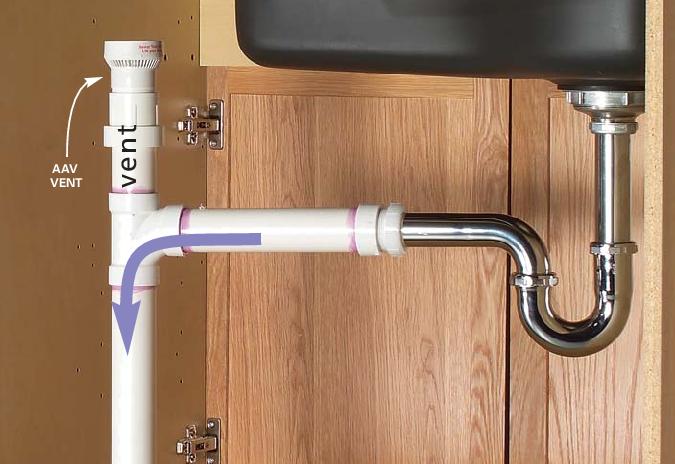
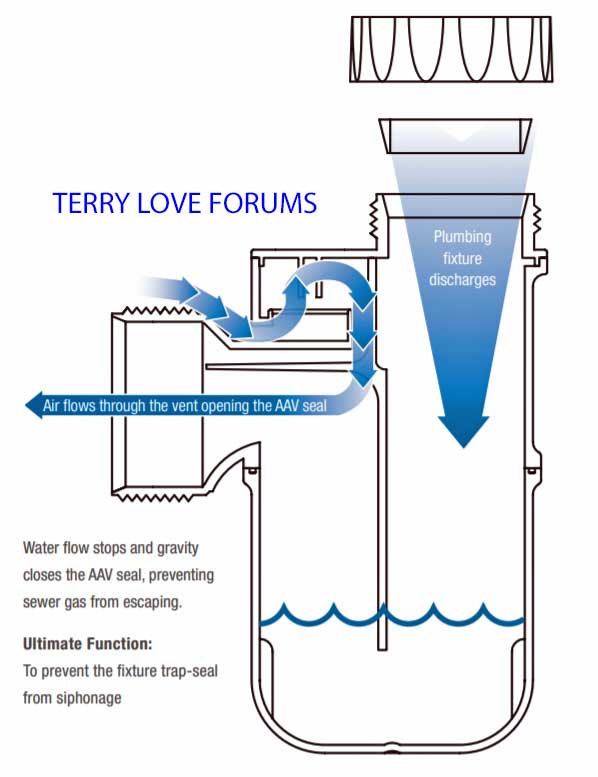
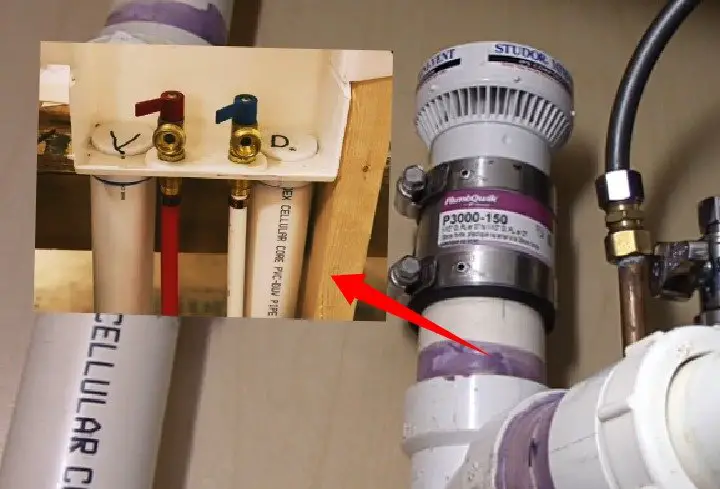
, also known as an air admittance valve, is a small mechanical device that is installed in plumbing systems to allow air to enter and exit the drainage system. Its main purpose is to prevent the buildup of negative pressure in the pipes, which can cause slow draining, gurgling noises, and even sewer gas to escape into your home. It is typically used in homes where traditional venting methods, such as a vent stack, are not possible or practical.
A
studor vent
, also known as an air admittance valve, is a small mechanical device that is installed in plumbing systems to allow air to enter and exit the drainage system. Its main purpose is to prevent the buildup of negative pressure in the pipes, which can cause slow draining, gurgling noises, and even sewer gas to escape into your home. It is typically used in homes where traditional venting methods, such as a vent stack, are not possible or practical.
The Benefits of Installing a Studor Vent for Your Kitchen Sink
 When it comes to kitchen sink installations, a
studor vent
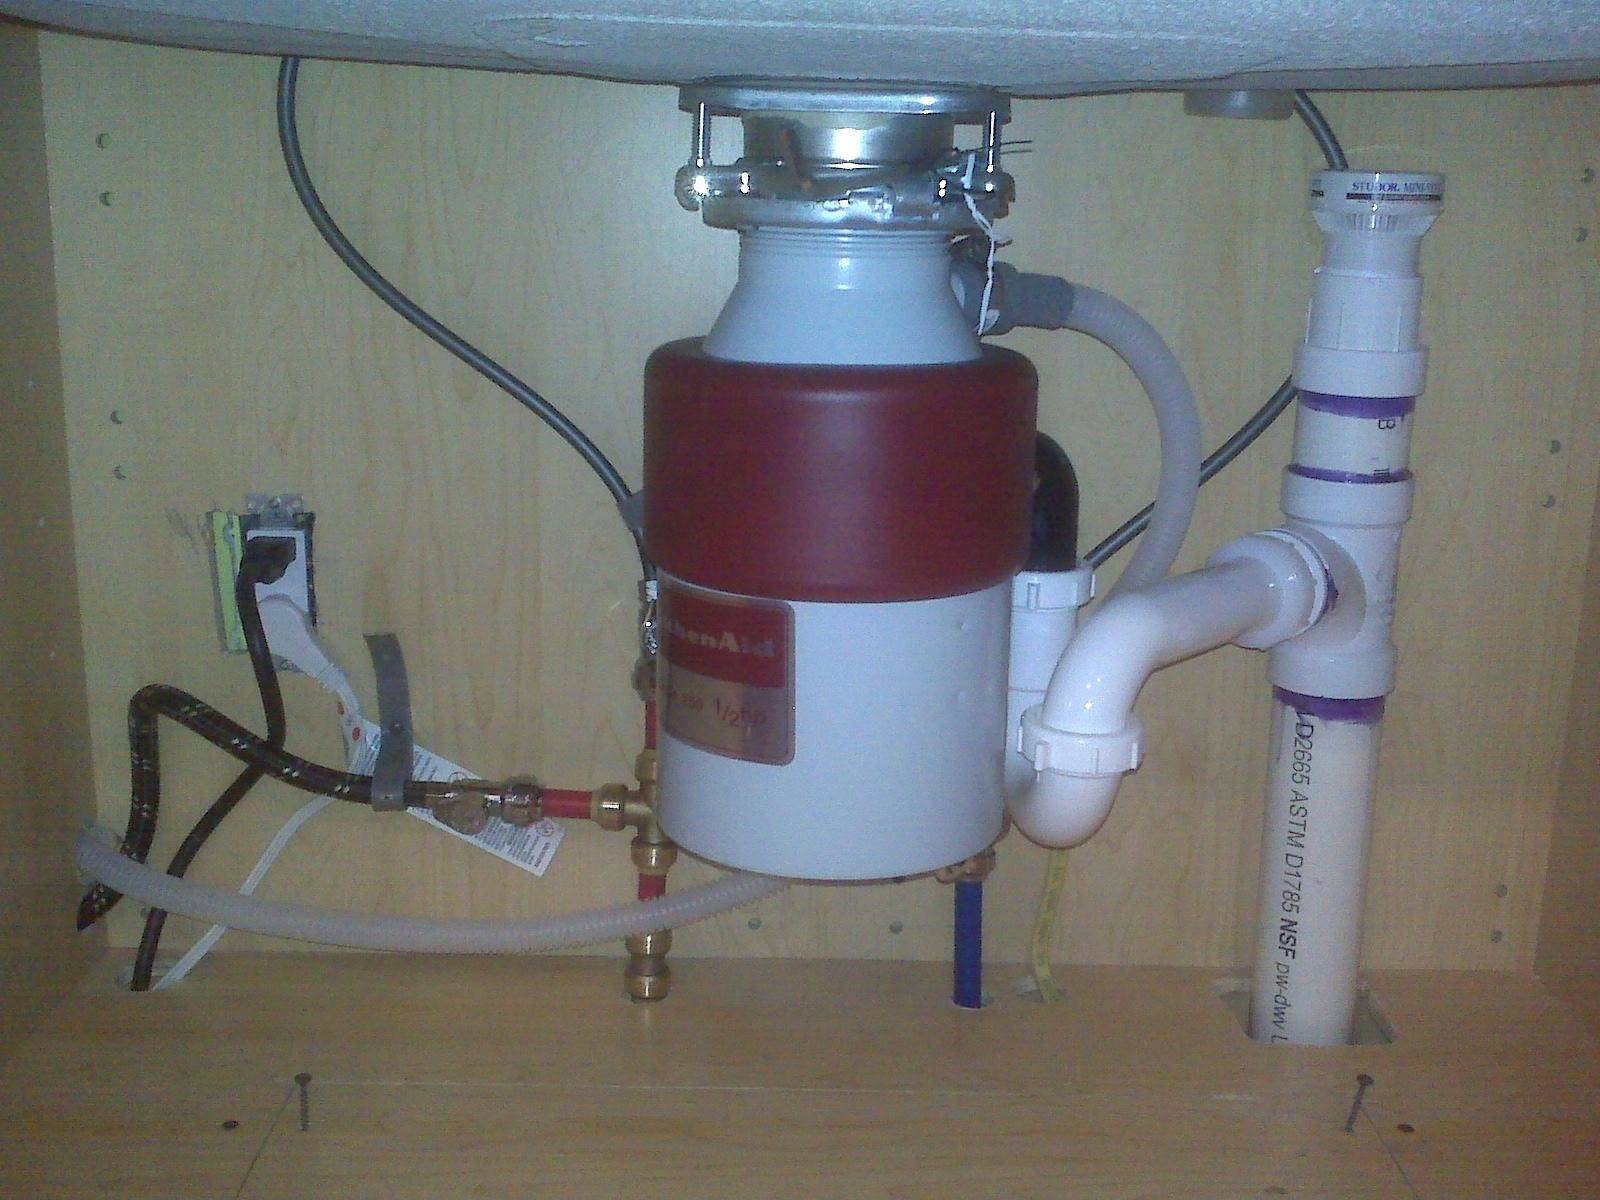
can provide several benefits. Firstly, it is a cost-effective solution that eliminates the need for expensive and complicated venting systems. This makes it a popular choice for homeowners who are looking to renovate their kitchens on a budget. Additionally, a studor vent can save space as it can be installed in tight spaces, unlike traditional vent stacks that require ample room for installation.
Moreover, a studor vent can also improve the aesthetic appeal of your kitchen. As it is typically installed under the sink, it eliminates the need for unsightly pipes and vents protruding from the roof. This can give your kitchen a cleaner and more streamlined look. Furthermore, a studor vent can improve the overall air quality in your home by preventing odors and pollutants from escaping into your living space.
When it comes to kitchen sink installations, a
studor vent
can provide several benefits. Firstly, it is a cost-effective solution that eliminates the need for expensive and complicated venting systems. This makes it a popular choice for homeowners who are looking to renovate their kitchens on a budget. Additionally, a studor vent can save space as it can be installed in tight spaces, unlike traditional vent stacks that require ample room for installation.
Moreover, a studor vent can also improve the aesthetic appeal of your kitchen. As it is typically installed under the sink, it eliminates the need for unsightly pipes and vents protruding from the roof. This can give your kitchen a cleaner and more streamlined look. Furthermore, a studor vent can improve the overall air quality in your home by preventing odors and pollutants from escaping into your living space.