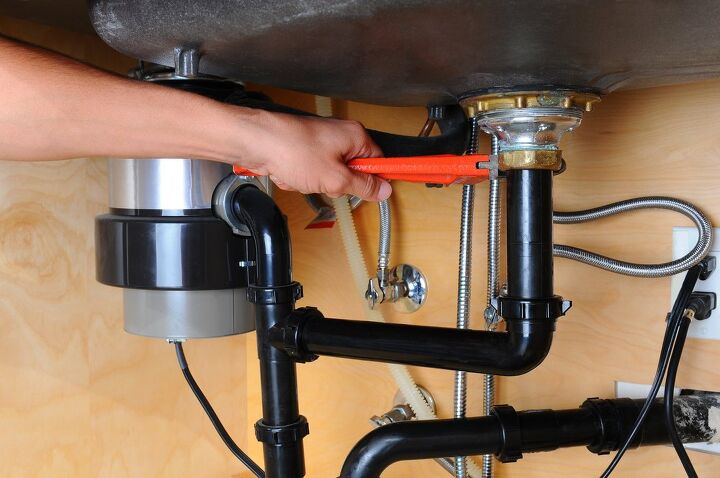
Replacing a kitchen sink drain may seem like a daunting task, but with the right tools and knowledge, it can be a simple and straightforward process. Whether you are looking to update the look of your kitchen or your current sink drain is damaged, follow these steps to successfully replace it.How to Replace a Kitchen Sink Drain


How to Replace a Kitchen Sink Drain
/how-to-install-a-sink-drain-2718789-hero-b5b99f72b5a24bb2ae8364e60539cece.jpg)


Step 1: Turn off the water supply Before starting any plumbing work, it is important to turn off the water supply to your sink. This can usually be done by turning the shut-off valves located under the sink clockwise. If you do not have shut-off valves, you will need to turn off the main water supply to your home. Step 2: Remove the old drain Using a wrench, loosen and remove the nuts and washers that connect the drain to the sink and the P-trap. Once they are removed, you can pull out the old drain and set it aside. Step 3: Clean the sink and drain area Take the time to thoroughly clean the sink and the area around the drain opening. This will ensure a smooth installation of the new drain and prevent any leaks in the future. Step 4: Install the new drain Apply plumber's putty around the underside of the flange of the new drain. Place the drain into the opening and press down firmly. From underneath the sink, place the gasket and washer onto the drain and tighten the nut to secure it in place. Step 5: Install the P-trap Using the same method as the drain, attach the P-trap to the bottom of the sink and the drain. Make sure all connections are tight to prevent any leaks. Step 6: Turn the water supply back on Once the new drain is installed, turn the water supply back on and check for any leaks. If there are no leaks, you have successfully replaced your kitchen sink drain!Replacing a Kitchen Sink Drain: 6 Steps


Replacing a Kitchen Sink Drain: 6 Steps

:max_bytes(150000):strip_icc()/how-to-install-a-sink-drain-2718789-hero-24e898006ed94c9593a2a268b57989a3.jpg)
Replacing a kitchen sink drain is a DIY project that can save you time and money. By following the steps outlined above, you can easily replace your old drain and give your kitchen a fresh new look without the help of a professional plumber.DIY Kitchen Sink Drain Replacement


DIY Kitchen Sink Drain Replacement


Here are some helpful tips and tricks to keep in mind when replacing a kitchen sink drain: Use the right tools: Make sure you have the proper tools on hand, including a wrench, plumber's putty, and a bucket to catch any excess water. Measure twice, cut once: Before purchasing a new drain, make sure you measure the diameter of your current drain to ensure the new one will fit properly. Check for leaks: After installing the new drain, run water through the sink and check for any leaks. If you notice any, tighten the connections or use plumber's tape to seal them. Be patient: Replacing a kitchen sink drain may take some time, especially if you are a beginner. Take your time and make sure each step is done correctly to prevent any issues in the future.Replacing a Kitchen Sink Drain: Tips and Tricks


Replacing a Kitchen Sink Drain: Tips and Tricks


If you are a visual learner, here is a step-by-step guide to help you replace your kitchen sink drain: Step 1: Turn off the water supply. Step 2: Remove the old drain. Step 3: Clean the sink and drain area. Step 4: Apply plumber's putty to the new drain and install it. Step 5: Attach the P-trap to the drain. Step 6: Turn the water supply back on and check for leaks.Step-by-Step Guide to Replacing a Kitchen Sink Drain

Step-by-Step Guide to Replacing a Kitchen Sink Drain


While replacing a kitchen sink drain may seem like a simple task, there are some common mistakes that can lead to issues down the road. Here are some mistakes to avoid: Not turning off the water supply: This can lead to a flooded kitchen and potentially cause damage to your home. Not cleaning the area: Neglecting to clean the sink and drain area can result in a poor seal and cause leaks. Not using plumber's putty: Plumber's putty helps create a tight seal between the drain and the sink, preventing leaks. Not tightening connections: Make sure all connections are tight to prevent any leaks.Replacing a Kitchen Sink Drain: Common Mistakes to Avoid

Replacing a Kitchen Sink Drain: Common Mistakes to Avoid

To successfully replace a kitchen sink drain, you will need the following tools and materials: Tools: Wrench, bucket, plumber's putty, pliers, and a screwdriver. Materials: New drain, gasket, washer, and P-trap.Tools and Materials Needed for Replacing a Kitchen Sink Drain


Tools and Materials Needed for Replacing a Kitchen Sink Drain


If you are not comfortable with plumbing work or encounter any issues during the replacement process, it is best to call a professional plumber. They have the experience and knowledge to handle any problems that may arise and ensure the job is done correctly.Replacing a Kitchen Sink Drain: When to Call a Professional


Replacing a Kitchen Sink Drain: When to Call a Professional

When choosing a replacement kitchen sink drain, it is important to consider the following factors: Size: Make sure to measure the diameter of your current drain to ensure the replacement will fit properly. Material: Choose a durable material such as stainless steel or brass to ensure longevity. Style: Consider the style of your kitchen and choose a drain that complements it.How to Choose the Right Replacement Kitchen Sink Drain


How to Choose the Right Replacement Kitchen Sink Drain


If you encounter any issues during the replacement process, here are some common problems and how to troubleshoot them: Leaks: Check all connections and tighten as needed. If the leak persists, use plumber's tape to seal the connections. Difficulties removing the old drain: Apply some WD-40 or a similar lubricant to loosen the connections. Incorrect measurements: If the new drain does not fit, you may need to purchase a different size or call a professional for assistance. Replacing a kitchen sink drain may seem overwhelming, but with the right tools and knowledge, it can be a simple and cost-effective project. By following these steps and tips, you can successfully replace your kitchen sink drain and give your kitchen a fresh new look.Replacing a Kitchen Sink Drain: Troubleshooting Common Issues
Replacing a Kitchen Sink Drain: Troubleshooting Common Issues
Why Replacing the Kitchen Sink Drain is Essential for a Functional and Stylish Kitchen

The kitchen sink is an essential component of any kitchen, used for everything from washing dishes to preparing food. However, the sink drain is often overlooked and neglected, causing problems such as clogging and leaks. In order to maintain a functional and stylish kitchen, it is important to pay attention to the sink drain and replace it when necessary. In this article, we will discuss the importance of replacing the kitchen sink drain and provide a step-by-step guide on how to do it yourself.
The Role of the Kitchen Sink Drain

The kitchen sink drain plays a crucial role in keeping your kitchen clean and hygienic. It is responsible for draining the dirty water from dishes and preventing it from accumulating in the sink. Without a properly functioning drain, your kitchen will become a breeding ground for bacteria and bad odors. Additionally, a clogged drain can cause water to back up and overflow, resulting in a messy and potentially damaging situation.
When to Replace the Kitchen Sink Drain

Like any other plumbing fixture, the kitchen sink drain is subject to wear and tear over time. Constant use of the sink can cause the drain to become clogged with debris and hair, making it less effective in draining water. Additionally, exposure to harsh chemicals and hot water can cause the drain to corrode and develop leaks. It is important to regularly check and replace the sink drain if necessary to avoid these issues.
Replacing the Kitchen Sink Drain

Replacing the kitchen sink drain may seem like a daunting task, but it can be done easily with the right tools and knowledge. Firstly, turn off the water supply to the sink and place a bucket under the drain to catch any excess water. Next, unscrew the nuts and bolts that hold the drain in place and remove the old drain. Make sure to clean any debris or residue from the sink before installing the new drain. Finally, secure the new drain in place and turn the water supply back on to test for any leaks.
By replacing the kitchen sink drain, not only will you ensure a functional and hygienic kitchen, but you can also upgrade the style and design of your sink. There are various types of drains available in the market, from traditional chrome finishes to more modern and sleek options. Choose a drain that complements your kitchen's overall design and adds a touch of personality to the space.
In conclusion, replacing the kitchen sink drain is an essential step in maintaining a functional and stylish kitchen. Regularly checking and replacing the drain will prevent clogs, leaks, and potential damage to your kitchen. With the right tools and knowledge, this task can be easily done yourself, saving you time and money in the long run.