If you're tired of dealing with a leaky or clogged kitchen sink drain, it may be time to replace it. While this may seem like a daunting task, it can actually be a fairly simple DIY project. In this guide, we'll walk you through the steps of replacing a kitchen sink drain, so you can have a functional and leak-free sink in no time.How to Replace a Kitchen Sink Drain


How to Replace a Kitchen Sink Drain


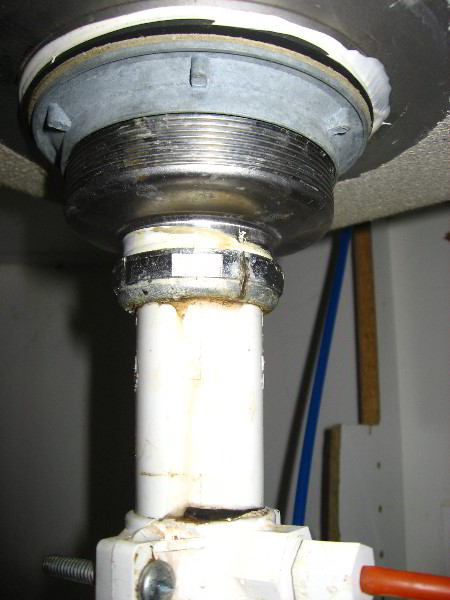
The first step in replacing a kitchen sink drain is to gather all the necessary tools and materials. This includes a new sink drain, plumber's putty, a pipe wrench, pliers, and a screwdriver. Once you have everything you need, follow these steps: Step 1: Begin by turning off the water supply to your sink. This can typically be done by turning off the shut-off valves under the sink or shutting off the main water supply to your home. Step 2: Next, place a bucket under the sink to catch any water or debris that may come out when you remove the old drain. Step 3: Use a pipe wrench or pliers to loosen the slip nuts that connect the drain to the sink and the trap. Once they are loose, you should be able to remove the old drain and trap. Step 4: Clean the area around the sink where the old drain was located. Use a putty knife to remove any old plumber's putty or debris. Step 5: Roll a small amount of plumber's putty into a thin rope and place it around the flange of the new sink drain. Step 6: Insert the new drain into the sink and press down firmly to create a tight seal with the putty. Step 7: Under the sink, place the rubber gasket and paper washer over the threaded part of the new drain. Then, screw on the slip nut and tighten with pliers. Step 8: Connect the drain to the sink by tightening the slip nut with pliers. Step 9: Reattach the trap to the new drain and tighten the slip nuts with pliers. Step 10: Turn the water supply back on and test the new drain for any leaks. If everything looks good, you're done!Replacing a Kitchen Sink Drain: Step-by-Step Guide


Replacing a Kitchen Sink Drain: Step-by-Step Guide


Replacing a kitchen sink drain can be a DIY project, but it's important to know your limitations. If you have any doubts or concerns, it's best to hire a professional plumber. However, if you're confident in your abilities, follow the steps outlined in this guide and you should have a new drain installed in no time.DIY Kitchen Sink Drain Replacement


DIY Kitchen Sink Drain Replacement


:max_bytes(150000):strip_icc()/how-to-install-a-sink-drain-2718789-hero-24e898006ed94c9593a2a268b57989a3.jpg)

Here are a few tips and tricks to keep in mind when replacing a kitchen sink drain: Tip 1: Before installing the new drain, apply a small amount of plumber's grease to the threads of the slip nuts. This will make it easier to tighten and loosen them in the future. Tip 2: Use a towel or rag to wipe away any excess putty that may have squeezed out from under the flange of the new drain. Tip 3: If you encounter any tough or stubborn slip nuts, use a pair of pliers or a pipe wrench to loosen them.Replacing a Kitchen Sink Drain: Tips and Tricks


Replacing a Kitchen Sink Drain: Tips and Tricks

Follow these steps for a quick and easy kitchen sink drain replacement: Step 1: Turn off the water supply. Step 2: Remove the old drain and trap. Step 3: Clean the area and apply plumber's putty. Step 4: Install the new drain. Step 5: Reattach the trap. Step 6: Turn the water supply back on and test for leaks.Step-by-Step Guide for Replacing a Kitchen Sink Drain


Step-by-Step Guide for Replacing a Kitchen Sink Drain


When replacing a kitchen sink drain, there are a few common mistakes you'll want to avoid: Mistake 1: Not turning off the water supply. This can lead to a big mess and potential damage to your plumbing. Mistake 2: Forgetting to clean the area before installing the new drain. This can prevent a tight seal and cause leaks. Mistake 3: Not using enough plumber's putty. This can also result in leaks.Replacing a Kitchen Sink Drain: Common Mistakes to Avoid


Replacing a Kitchen Sink Drain: Common Mistakes to Avoid

Here are the tools and materials you'll need to replace a kitchen sink drain: Tools: Pipe wrench, pliers, screwdriver, putty knife Materials: New sink drain, plumber's putty, bucketTools and Materials Needed for Replacing a Kitchen Sink Drain

Tools and Materials Needed for Replacing a Kitchen Sink Drain


If you encounter any issues while replacing your kitchen sink drain, here are a few troubleshooting tips: Issue 1: Leaks from the new drain. Make sure you have a tight seal between the drain and the sink, and that all slip nuts are tightened properly. Issue 2: Difficulty removing the old drain. Use a lubricant such as WD-40 to loosen tough slip nuts. Issue 3: The new drain doesn't fit. Check the size of your old drain and make sure you have a compatible replacement.Replacing a Kitchen Sink Drain: Troubleshooting Common Issues

Replacing a Kitchen Sink Drain: Troubleshooting Common Issues

When choosing a replacement kitchen sink drain, consider the style and size of your sink, as well as the material and finish of the drain. It's also important to make sure the drain is compatible with your plumbing system.How to Choose the Right Replacement Kitchen Sink Drain


How to Choose the Right Replacement Kitchen Sink Drain

If you're not confident in your plumbing skills or if you encounter any unexpected issues, it's best to hire a professional plumber to replace your kitchen sink drain. However, if you're comfortable with DIY projects and follow the steps outlined in this guide, you can save yourself some money and successfully replace your kitchen sink drain on your own.Replacing a Kitchen Sink Drain: Professional vs. DIY


Replacing a Kitchen Sink Drain: Professional vs. DIY

Replacing a Kitchen Sink Drain: A Simple Guide for an Essential Kitchen Update

Why Replace a Kitchen Sink Drain?
 The kitchen sink is one of the most utilized fixtures in any home, and its drain is responsible for disposing of food scraps, debris, and dirty water. Over time, kitchen sink drains can become clogged, leaky, or even rusted, making it necessary to replace them. Replacing a kitchen sink drain is a relatively easy and inexpensive way to update the look and functionality of your kitchen.
Step 1: Gather the Necessary Tools and Materials
/how-to-install-a-sink-drain-2718789-hero-b5b99f72b5a24bb2ae8364e60539cece.jpg) Before starting the replacement process, make sure you have all the tools and materials you will need. This includes a new
kitchen sink drain
, plumbers putty, slip-joint pliers, a screwdriver, and a bucket to catch any water that may leak during the process.
Before starting the replacement process, make sure you have all the tools and materials you will need. This includes a new
kitchen sink drain
, plumbers putty, slip-joint pliers, a screwdriver, and a bucket to catch any water that may leak during the process.
Step 2: Remove the Old Drain
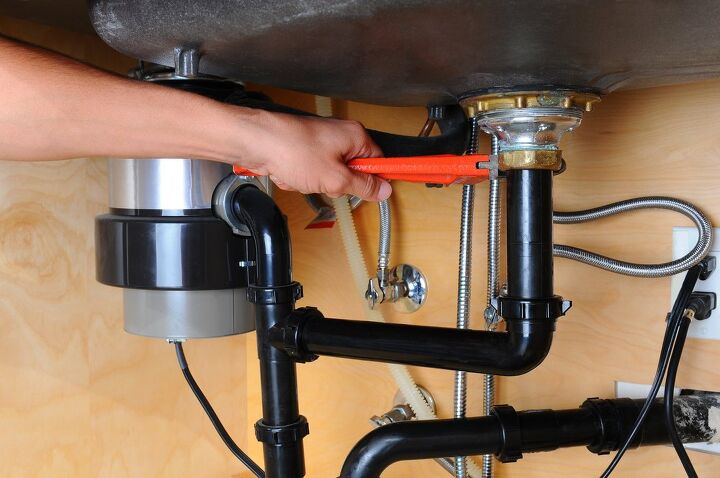
 Start by removing the old drain from your sink. Use the screwdriver to loosen the screws on the drain basket, and then use the slip-joint pliers to unscrew the locknut underneath the sink. Once the locknut is removed, you can easily pull out the old drain and clean the area around it.
Step 3: Install the New Drain
 Apply a thin layer of
plumbers putty
around the edge of the new drain basket, and then insert it into the sink's drain hole. Underneath the sink, place the gasket and locknut onto the drain basket and tighten it with the slip-joint pliers.
Apply a thin layer of
plumbers putty
around the edge of the new drain basket, and then insert it into the sink's drain hole. Underneath the sink, place the gasket and locknut onto the drain basket and tighten it with the slip-joint pliers.
Step 4: Connect the Drain Pipe
 Underneath the sink, connect the drain pipe to the new drain basket. Use the slip-joint pliers to tighten any connections, and make sure there are no leaks.
Step 5: Test and Adjust
 Once the new drain is installed, run water through the sink to test for any leaks. If there are no leaks, you can adjust the drain's position if necessary to ensure proper drainage.
Step 6: Clean Up and Enjoy Your Updated Kitchen Sink
 Clean up any excess putty or debris from the installation process, and then enjoy your newly replaced kitchen sink drain. Not only will it improve the functionality of your sink, but it will also give your kitchen a refreshed look.
Replacing a kitchen sink drain may seem like a daunting task, but with the right tools and materials, it can be a simple and effective way to update your kitchen. Remember to take your time and carefully follow each step, and you'll have a new and improved kitchen sink drain in no time.
Clean up any excess putty or debris from the installation process, and then enjoy your newly replaced kitchen sink drain. Not only will it improve the functionality of your sink, but it will also give your kitchen a refreshed look.
Replacing a kitchen sink drain may seem like a daunting task, but with the right tools and materials, it can be a simple and effective way to update your kitchen. Remember to take your time and carefully follow each step, and you'll have a new and improved kitchen sink drain in no time.