How to Remove a Kitchen Sink: 14 Steps (with Pictures) - wikiHow
If you're looking to update your kitchen, one of the first things you may want to replace is your old, stained, or broken kitchen sink. Removing a kitchen sink may seem like a daunting task, but with the right tools and a little know-how, it can be done quickly and efficiently. Whether you're replacing your sink with a new one or just need to remove it temporarily for a renovation, this guide will walk you through the steps of removing a stainless kitchen sink in an old house.


How to Remove a Kitchen Sink: 14 Steps (with Pictures) - wikiHow


Step 1: Gather Your Tools and Materials
Before you begin removing your kitchen sink, it's important to have all the necessary tools and materials on hand. This will save you time and frustration during the process. Here's a list of what you'll need:


How to Remove a Kitchen Sink: 14 Steps (with Pictures) - wikiHow
Step 2: Turn Off the Water Supply
The first step in removing any kitchen sink is to turn off the water supply. This will prevent any leaks or flooding while you work. Look for the shut-off valves under the sink and turn them clockwise to shut off the water.
How to Remove a Kitchen Sink: 14 Steps (with Pictures) - wikiHow
Step 3: Disconnect the Water Supply Lines
Using your adjustable wrench, loosen the nuts that connect the water supply lines to the faucet. Once they are loose, remove the lines and set them aside. Make sure to have a bucket or container handy to catch any water that may come out.


How to Remove a Kitchen Sink: 14 Steps (with Pictures) - wikiHow


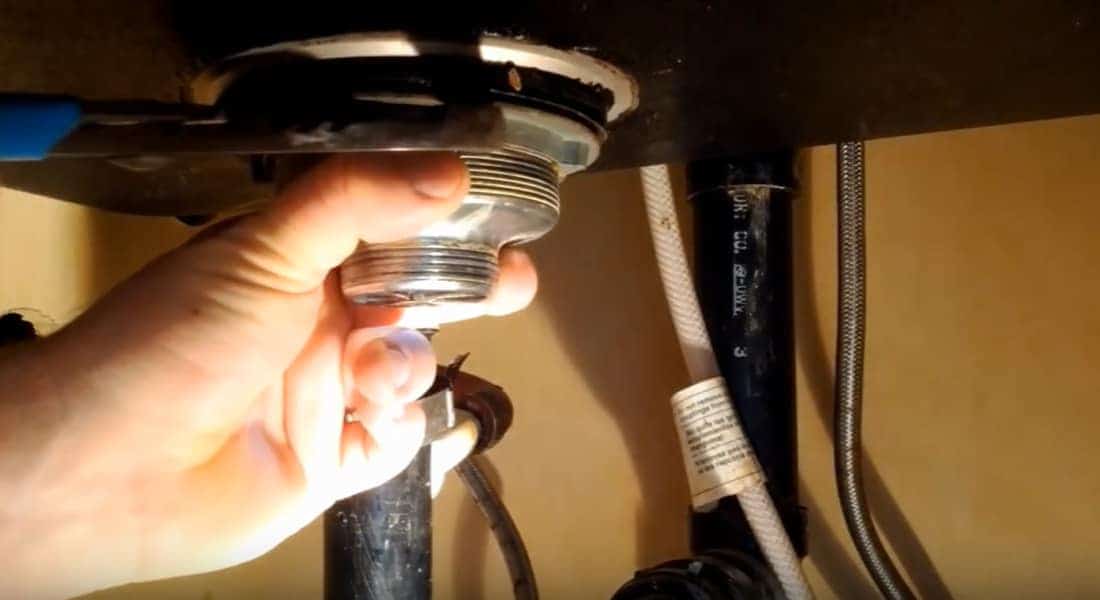
Step 4: Remove the Drain Pipes
Next, you'll need to remove the drain pipes from the sink. These are usually held in place by a nut or clamp and can be loosened with your adjustable wrench. Once the pipes are disconnected, you can remove them and set them aside.
How to Remove a Kitchen Sink: 14 Steps (with Pictures) - wikiHow
Step 5: Disconnect the Garbage Disposal, if applicable
If your kitchen sink has a garbage disposal, you'll need to disconnect it before removing the sink. First, turn off the power to the disposal at the circuit breaker. Then, use a screwdriver to loosen the clamp that connects the disposal to the drain pipe. Once the clamp is loose, you can remove the disposal and set it aside.
How to Remove a Kitchen Sink: 14 Steps (with Pictures) - wikiHow
Step 6: Loosen the Sink Clips or Screws
Most kitchen sinks are held in place by clips or screws underneath the countertop. Use your screwdriver to loosen these clips or screws and set them aside. Some sinks may also be caulked to the countertop, so you may need to use a putty knife to break the seal.
How to Remove a Kitchen Sink: 14 Steps (with Pictures) - wikiHow
Step 7: Remove the Sink from the Countertop
With all the attachments loosened, you can now lift the sink out of the countertop. It's a good idea to have someone help you with this step, as sinks can be heavy and difficult to maneuver on your own.

How to Remove a Kitchen Sink: 14 Steps (with Pictures) - wikiHow
Step 8: Clean Up the Area
Once the sink is removed, you may notice some leftover caulk or debris on the countertop. Use a rag or towel to clean up any mess and prepare the area for the new sink.
How to Remove a Kitchen Sink: 14 Steps (with Pictures) - wikiHow
Step 9: Install the New Sink, if applicable
If you're replacing your old sink with a new one, now is the time to install it. Follow the manufacturer's instructions for proper installation and make sure to seal the sink with plumber's putty to prevent leaks.

How to Remove a Kitchen Sink: 14 Steps (with Pictures) - wikiHow
Why Replace Your Old Stainless Kitchen Sink?

The Importance of Upgrading Your Kitchen Sink
 When it comes to kitchen design, the sink is often overlooked but plays a vital role in the overall functionality and aesthetic of the space. A stainless steel kitchen sink may have been the go-to choice for homes in the past, but as technology and design have evolved, it may be time to consider upgrading to a newer, more modern sink. Not only can replacing your old stainless sink improve the look of your kitchen, but it can also provide practical benefits that will make your daily tasks easier and more enjoyable.
One of the main reasons to upgrade to a new kitchen sink is for improved durability and functionality.
While stainless steel is known for its strength and durability, over time, it can become scratched, dented, and stained, making it difficult to clean and maintain. This can not only be frustrating but also unhygienic, as bacteria can hide in these imperfections. A new sink with advanced materials and features can provide a smoother and more durable surface, making it easier to keep clean and reducing the risk of bacteria buildup.
Another important factor to consider when replacing a stainless kitchen sink is the design and style of your kitchen.
With advancements in technology, kitchen sinks now come in a variety of shapes, sizes, and finishes, allowing you to choose one that complements your overall kitchen design. Whether you prefer a modern and sleek look or a more traditional farmhouse style, there is a sink to fit your taste and enhance the overall look of your kitchen.
When it comes to kitchen design, the sink is often overlooked but plays a vital role in the overall functionality and aesthetic of the space. A stainless steel kitchen sink may have been the go-to choice for homes in the past, but as technology and design have evolved, it may be time to consider upgrading to a newer, more modern sink. Not only can replacing your old stainless sink improve the look of your kitchen, but it can also provide practical benefits that will make your daily tasks easier and more enjoyable.
One of the main reasons to upgrade to a new kitchen sink is for improved durability and functionality.
While stainless steel is known for its strength and durability, over time, it can become scratched, dented, and stained, making it difficult to clean and maintain. This can not only be frustrating but also unhygienic, as bacteria can hide in these imperfections. A new sink with advanced materials and features can provide a smoother and more durable surface, making it easier to keep clean and reducing the risk of bacteria buildup.
Another important factor to consider when replacing a stainless kitchen sink is the design and style of your kitchen.
With advancements in technology, kitchen sinks now come in a variety of shapes, sizes, and finishes, allowing you to choose one that complements your overall kitchen design. Whether you prefer a modern and sleek look or a more traditional farmhouse style, there is a sink to fit your taste and enhance the overall look of your kitchen.
The Benefits of Upgrading Your Sink
 Upgrading to a new kitchen sink can also improve the functionality of your space.
With features such as a deeper basin, integrated cutting boards, and built-in drainboards, newer sinks are designed to make your daily tasks more efficient and convenient. You can also opt for additional accessories such as colanders and dish racks that fit perfectly within the sink, freeing up counter space and making meal prep and clean up a breeze.
Replacing your old stainless kitchen sink can also increase the value of your home.
A dated and worn sink can bring down the overall value and appeal of your kitchen, which is often considered the heart of the home. By investing in a new sink, you are not only improving the functionality and aesthetics of your kitchen, but also adding value to your home for potential future buyers.
In conclusion, while a stainless steel kitchen sink may have been the standard in the past, it may be time to consider upgrading to a newer, more modern sink. With improved durability, functionality, and design, a new sink can not only enhance the look of your kitchen but also make your daily tasks more efficient and enjoyable. So why wait? Upgrade your old stainless kitchen sink today and experience the many benefits it has to offer.
Upgrading to a new kitchen sink can also improve the functionality of your space.
With features such as a deeper basin, integrated cutting boards, and built-in drainboards, newer sinks are designed to make your daily tasks more efficient and convenient. You can also opt for additional accessories such as colanders and dish racks that fit perfectly within the sink, freeing up counter space and making meal prep and clean up a breeze.
Replacing your old stainless kitchen sink can also increase the value of your home.
A dated and worn sink can bring down the overall value and appeal of your kitchen, which is often considered the heart of the home. By investing in a new sink, you are not only improving the functionality and aesthetics of your kitchen, but also adding value to your home for potential future buyers.
In conclusion, while a stainless steel kitchen sink may have been the standard in the past, it may be time to consider upgrading to a newer, more modern sink. With improved durability, functionality, and design, a new sink can not only enhance the look of your kitchen but also make your daily tasks more efficient and enjoyable. So why wait? Upgrade your old stainless kitchen sink today and experience the many benefits it has to offer.


