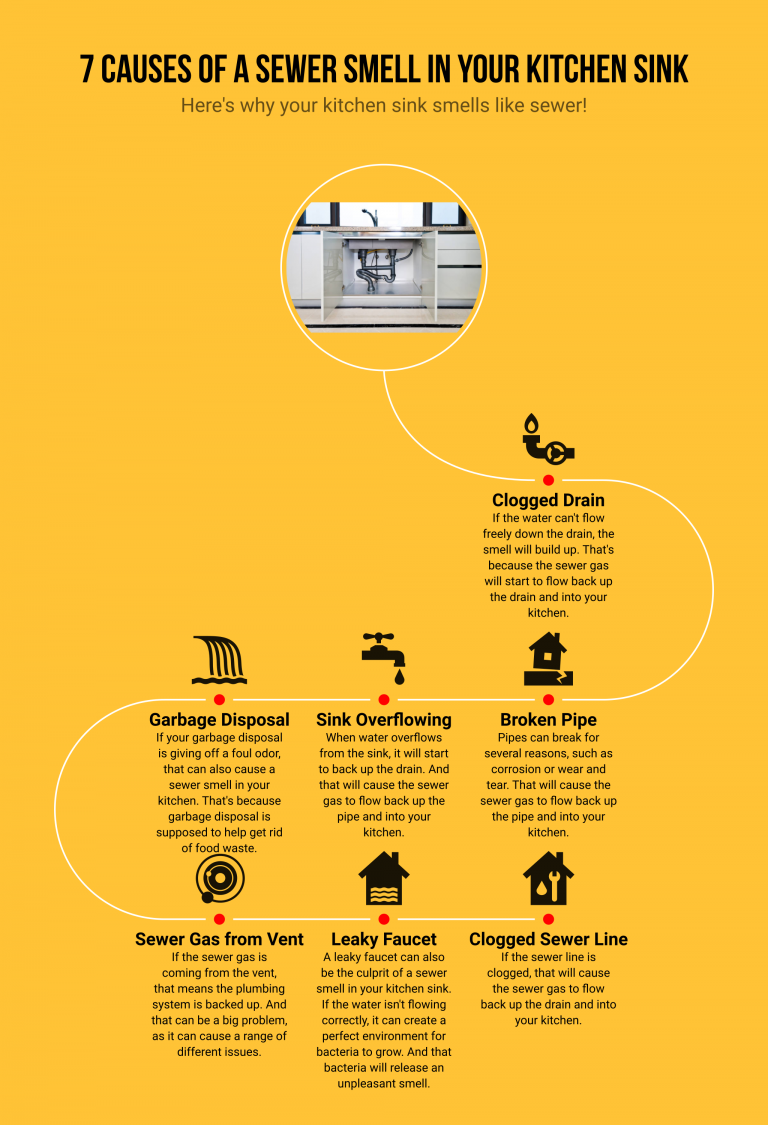
If you’re looking to add a T valve to your kitchen sink water line, you’re in luck! This simple and affordable DIY project can make a big difference in your daily life. Whether you want to connect a water filter or install a new appliance, a T valve is a convenient addition that allows you to control the flow of water to your sink. In this guide, we’ll walk you through the steps of installing a T valve in your kitchen sink water line.1. How to Install a T Valve in a Kitchen Sink Water Line


1. How to Install a T Valve in a Kitchen Sink Water Line


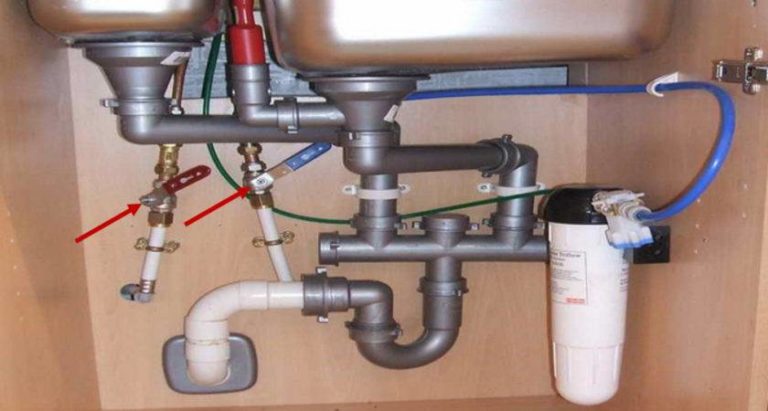
Before you begin, make sure you have all the necessary tools and materials. You’ll need a T valve, a wrench, plumber’s tape, and a bucket or towel to catch any water that may come out during installation. Start by turning off the water supply to your kitchen sink. This can usually be done by turning a valve under the sink or shutting off the main water supply to your home. Next, disconnect the water line from the shutoff valve. This is the valve that connects your sink to the main water supply. Use a wrench to loosen the nut and pull the water line away from the valve. Apply plumber’s tape to the threads of the T valve to ensure a tight seal. Then, attach the T valve to the shutoff valve by screwing it onto the threads. Once the T valve is securely attached, connect the water line to the other end of the T valve. Make sure to tighten the nut with a wrench to prevent any leaks. Turn the water supply back on and check for any leaks. If you notice any, tighten the connections with a wrench until they are secure. Lastly, turn the handle on the T valve to the “on” position and test the flow of water to your sink. If everything is working properly, congratulations – you’ve successfully installed a T valve in your kitchen sink water line!2. Step-by-Step Guide for Adding a T Valve to Your Kitchen Sink Water Line


2. Step-by-Step Guide for Adding a T Valve to Your Kitchen Sink Water Line

Installing a T valve in your kitchen sink water line is a relatively easy DIY project that can save you time and money. By following our step-by-step guide, you can complete this project in no time and enjoy the convenience of controlling the water flow to your sink.3. DIY: Installing a T Valve in Your Kitchen Sink Water Line

3. DIY: Installing a T Valve in Your Kitchen Sink Water Line


There are several benefits to adding a T valve to your kitchen sink water line. Firstly, it allows you to control the flow of water to your sink, making it easier to fill up pots and other containers. Additionally, a T valve allows you to connect additional appliances or filters, giving you more options for your kitchen sink.4. The Benefits of Adding a T Valve to Your Kitchen Sink Water Line


4. The Benefits of Adding a T Valve to Your Kitchen Sink Water Line
:max_bytes(150000):strip_icc()/Basic-kitchen-sink-types-1821207_color_rev-0b539306b9ef4236a136624ad2a89a4c.jpg)


Before you install a T valve in your kitchen sink water line, there are a few things you should know. Firstly, make sure to turn off the water supply before beginning the installation. It’s also important to use plumber’s tape on the threads to prevent leaks. Lastly, make sure to choose the right size and type of T valve for your specific water line.5. What You Need to Know Before Installing a T Valve in Your Kitchen Sink Water Line


5. What You Need to Know Before Installing a T Valve in Your Kitchen Sink Water Line


When it comes to choosing a T valve for your kitchen sink water line, there are a few things to keep in mind. Consider the size and type of your water line to ensure you choose a compatible T valve. You may also want to consider the material of the T valve – brass and stainless steel are durable options that resist corrosion.6. Tips for Choosing the Right T Valve for Your Kitchen Sink Water Line


6. Tips for Choosing the Right T Valve for Your Kitchen Sink Water Line


While installing a T valve in your kitchen sink water line is a simple task, there are a few common mistakes to avoid. These include not using enough plumber’s tape, over-tightening connections, and choosing the wrong size or type of T valve. By following our guide and being careful during installation, you can avoid these mistakes and ensure a successful project.7. Common Mistakes to Avoid When Installing a T Valve in Your Kitchen Sink Water Line


7. Common Mistakes to Avoid When Installing a T Valve in Your Kitchen Sink Water Line


If you notice any leaks after installing a T valve in your kitchen sink water line, don’t panic. Most leaks can be easily fixed by tightening connections with a wrench. If the leak persists, make sure you used enough plumber’s tape and that the T valve is compatible with your water line. If you’re still having trouble, consult a professional plumber for assistance.8. Troubleshooting: How to Fix Leaks in Your Kitchen Sink Water Line with a T Valve


8. Troubleshooting: How to Fix Leaks in Your Kitchen Sink Water Line with a T Valve

Properly installing a T valve in your kitchen sink water line is crucial for the functionality and longevity of your water line. By following our guide and using the right materials, you can ensure a secure and leak-free installation. This will save you time and money in the long run and prevent any potential damage to your kitchen sink.9. The Importance of Properly Installing a T Valve in Your Kitchen Sink Water Line


9. The Importance of Properly Installing a T Valve in Your Kitchen Sink Water Line

To keep your T valve in good working condition, it’s important to perform regular maintenance and care. This includes checking for leaks, cleaning the valve periodically, and replacing any worn-out parts. With proper maintenance, your T valve can last for many years and continue to provide convenience to your kitchen sink.10. How to Maintain and Care for Your T Valve in Your Kitchen Sink Water Line


10. How to Maintain and Care for Your T Valve in Your Kitchen Sink Water Line
How to Install a T Valve in Your Kitchen Sink Water Line

Why You Should Consider Installing a T Valve
 The kitchen sink is a vital part of any home, used for washing dishes, preparing food, and even filling up water bottles. However, with regular use, the water line connected to your kitchen sink can become clogged or damaged, causing low water pressure or leaks. This can be a major inconvenience and can also lead to costly repairs. That's where a T valve comes in. By installing a T valve in your kitchen sink water line, you can easily control the water flow, prevent clogs, and make any necessary repairs without disrupting the water supply to your entire home.
Step-by-Step Guide to Installing a T Valve
 Before starting the installation process, make sure you have all the necessary tools and materials, including a T valve, wrench, plumber's tape, and a bucket. Follow these steps to install a T valve in your kitchen sink water line:
- Turn off the main water supply to your home and drain any remaining water from the kitchen faucet.
- Locate the water line under your kitchen sink and use a wrench to loosen the nut connecting it to the faucet.
- Wrap plumber's tape around the threads of the T valve to create a tight seal.
- Attach the T valve to the water line, making sure it is securely in place.
- Attach the other end of the T valve to the faucet, using plumber's tape to create a seal.
- Turn the main water supply back on and test the T valve by turning it to different positions and checking the water flow.
Maintaining Your T Valve
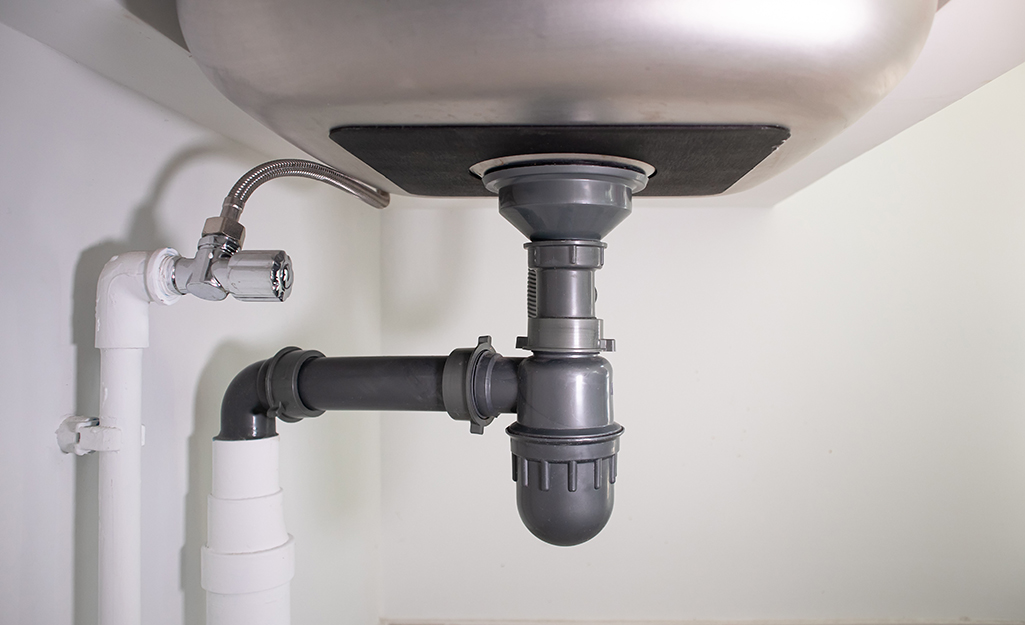
:max_bytes(150000):strip_icc()/sink-pipe-under-wash-basin-119001607-6f28aec4c66944efb7a9a38cb622ab8b.jpg) To ensure your T valve continues to function properly, it is important to perform regular maintenance. This includes checking for any leaks, cleaning out any debris, and replacing the T valve if it becomes damaged. It is also recommended to turn off the main water supply and drain the faucet before making any repairs or replacements.
By installing a T valve in your kitchen sink water line, you can have more control over your water flow and avoid any potential clogs or leaks. Follow these simple steps to install a T valve and enjoy a hassle-free kitchen sink for years to come.
To ensure your T valve continues to function properly, it is important to perform regular maintenance. This includes checking for any leaks, cleaning out any debris, and replacing the T valve if it becomes damaged. It is also recommended to turn off the main water supply and drain the faucet before making any repairs or replacements.
By installing a T valve in your kitchen sink water line, you can have more control over your water flow and avoid any potential clogs or leaks. Follow these simple steps to install a T valve and enjoy a hassle-free kitchen sink for years to come.