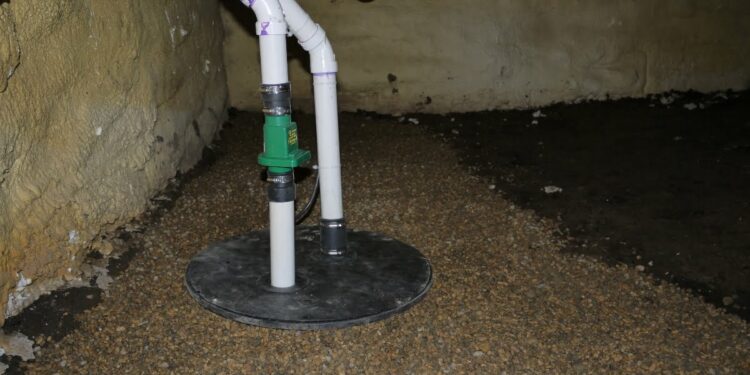
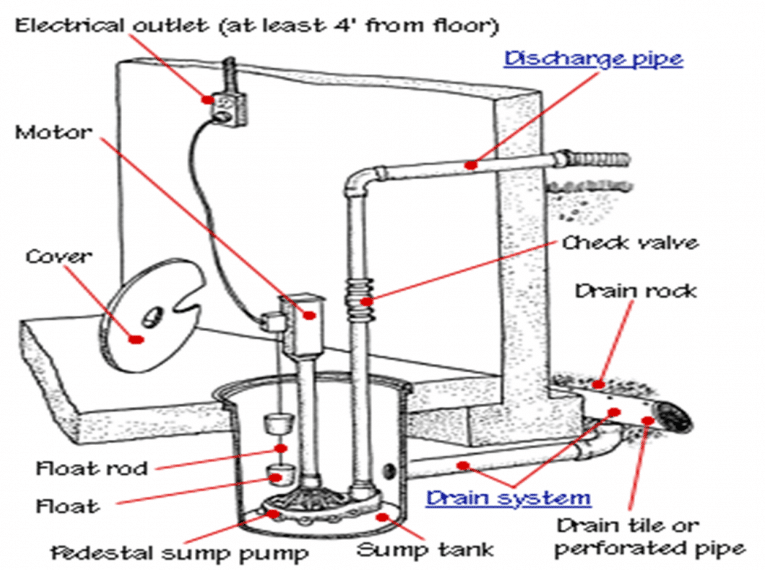
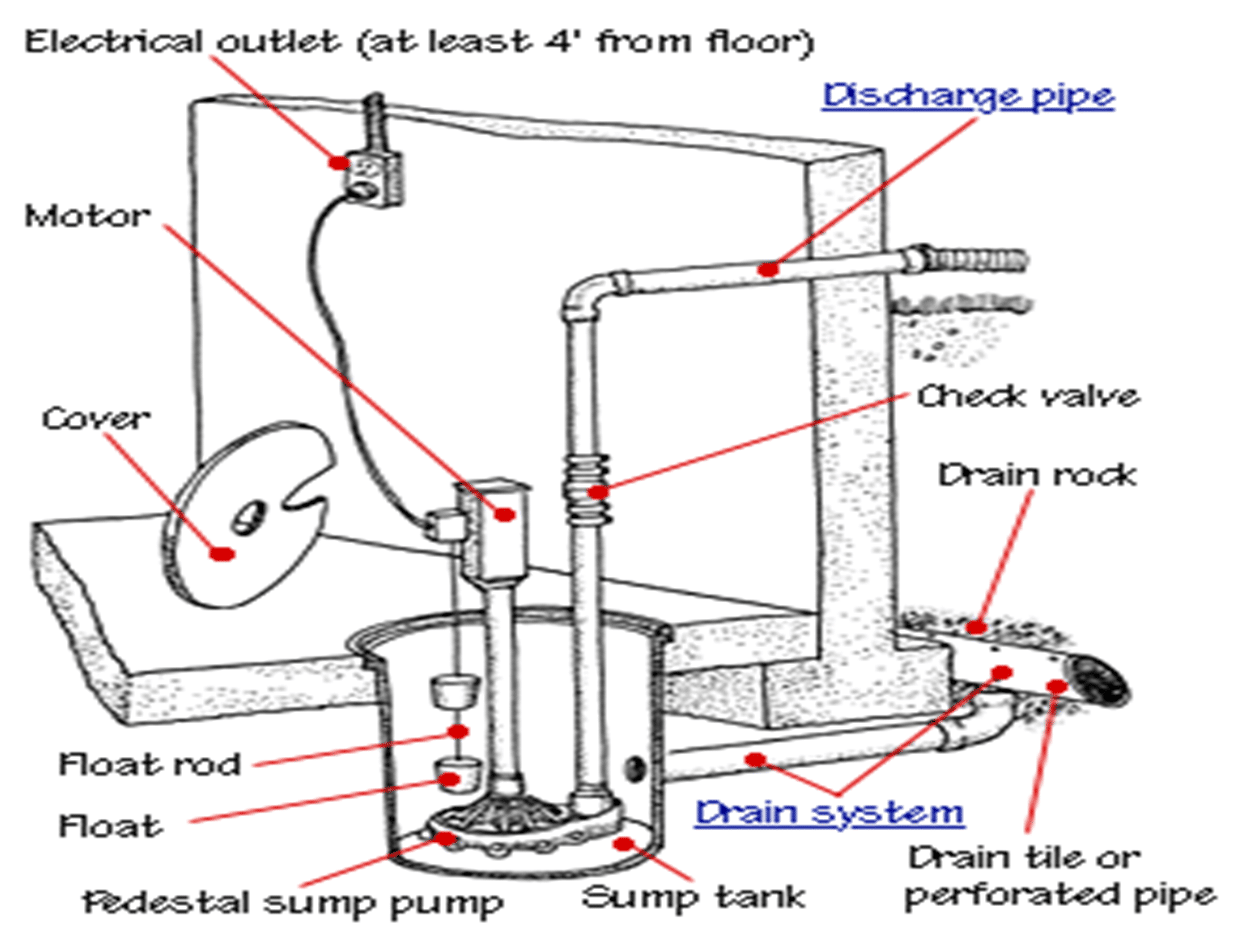
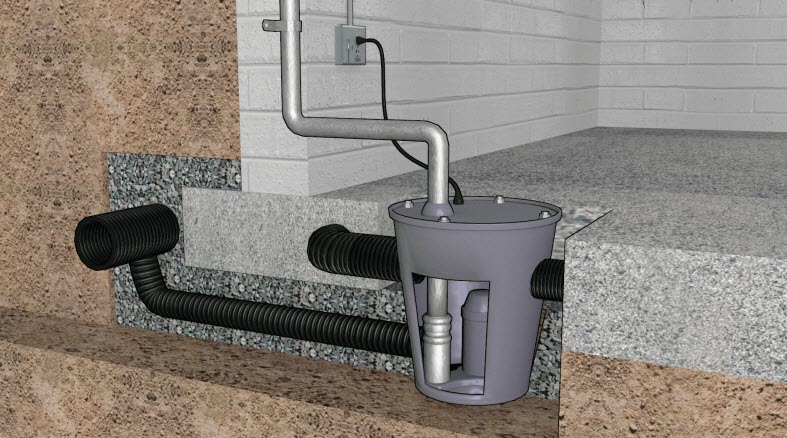
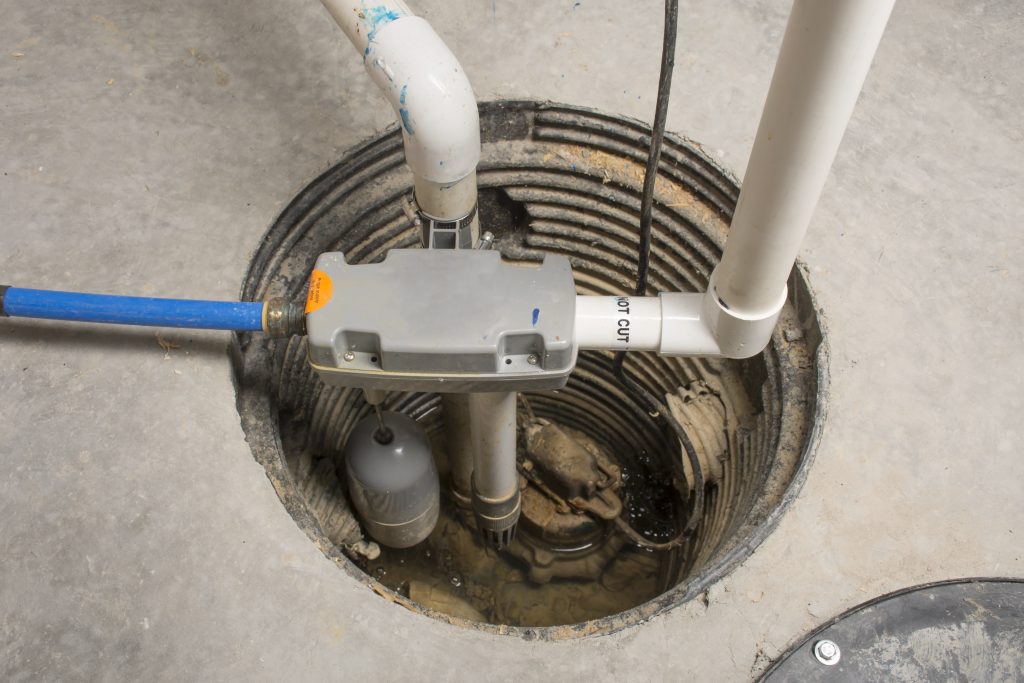
A sump pump drainage system is an essential part of any home with a sump pit. It helps to prevent flooding and water damage by removing excess water from the pit and directing it away from your home's foundation. Here's a step-by-step guide on how to install a sump pump drainage system. First, you'll need to gather all the necessary tools and materials. This includes a sump pump, PVC pipes, couplings, elbows, check valve, and a sump pit liner. You may also need a shovel, a level, and a PVC cutter. Next, locate the sump pit in your basement or crawlspace. It's usually a large, plastic or concrete basin located in the lowest part of your home. Make sure the pit is clean and free of debris. Then, dig a trench from the sump pit to the outside of your home. This is where the drainage pipes will be installed. The trench should slope away from your home's foundation to ensure proper water flow. Using the PVC cutter, cut a piece of PVC pipe that will fit into the sump pump outlet. This will be the discharge pipe that will carry the water out of the pit. Attach the PVC pipe to the sump pump outlet using a coupling. Then, connect the check valve to the other end of the pipe. The check valve will prevent water from flowing back into the pit. Place the sump pump inside the pit, making sure it is level. Then, secure the discharge pipe to the wall of the pit using a pipe clamp. This will prevent the pipe from moving around when the pump is running. Next, install the pit liner. This is a plastic or concrete lining that will help to keep the pit clean and prevent debris from entering the sump pump. Make sure the liner is securely in place. Now, connect the other end of the check valve to the drainage pipe in the trench. Use elbows and couplings to make turns and connect the pipes as needed. The drainage pipe should slope away from your home's foundation. Finally, cover the trench with soil and make sure it is compacted. You can also add a layer of gravel for better drainage. Then, test your sump pump by pouring water into the pit. The pump should turn on and the water should be pumped out through the drainage pipe.How to Install a Sump Pump Drainage System


How to Install a Sump Pump Drainage System
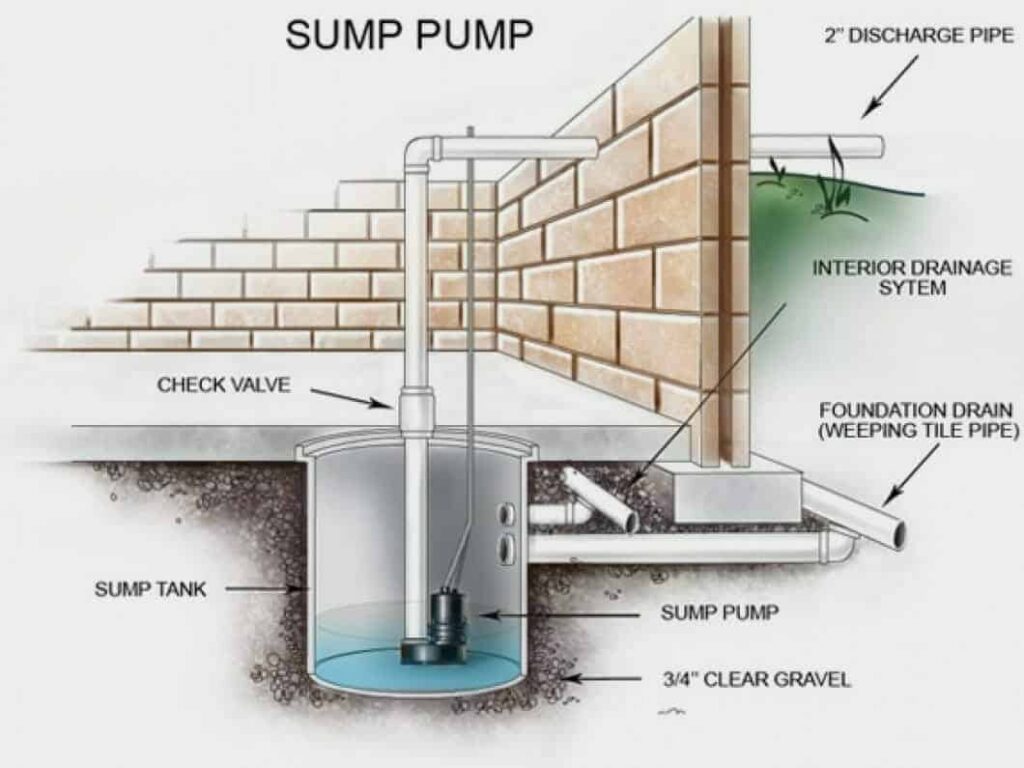


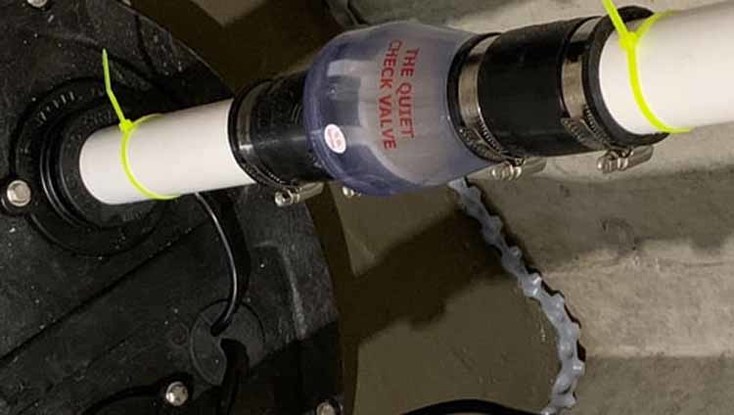
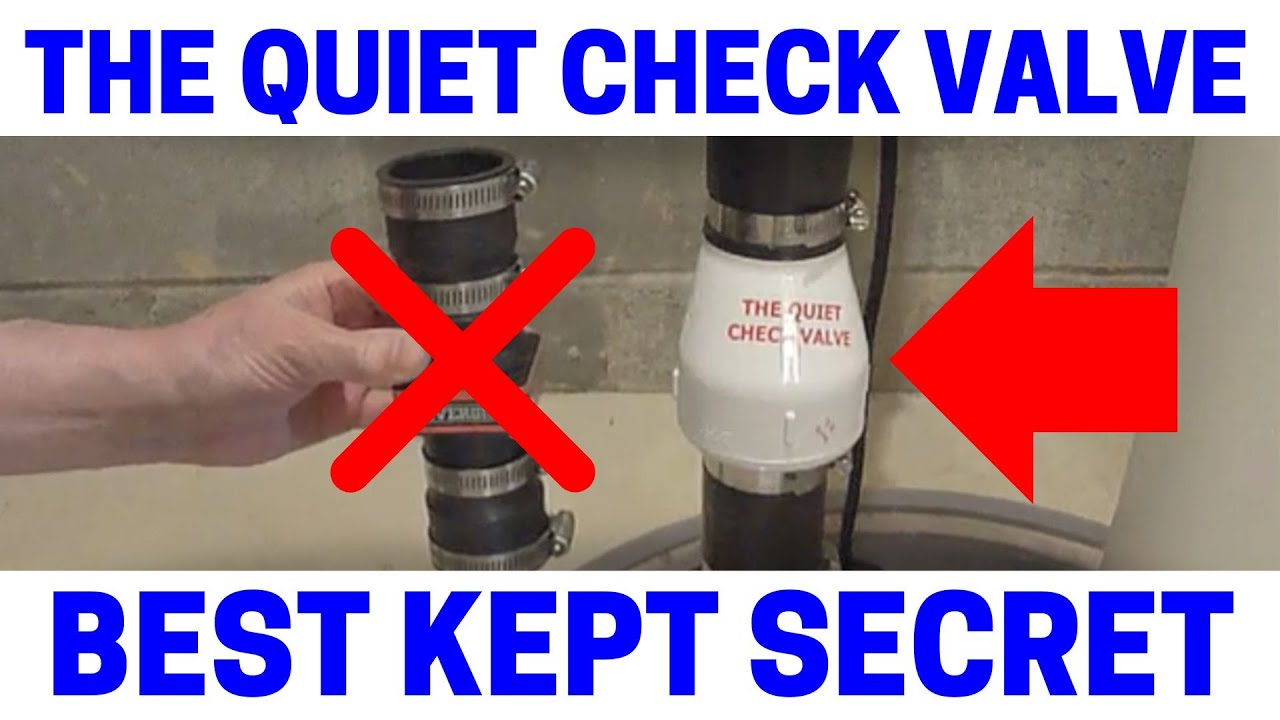
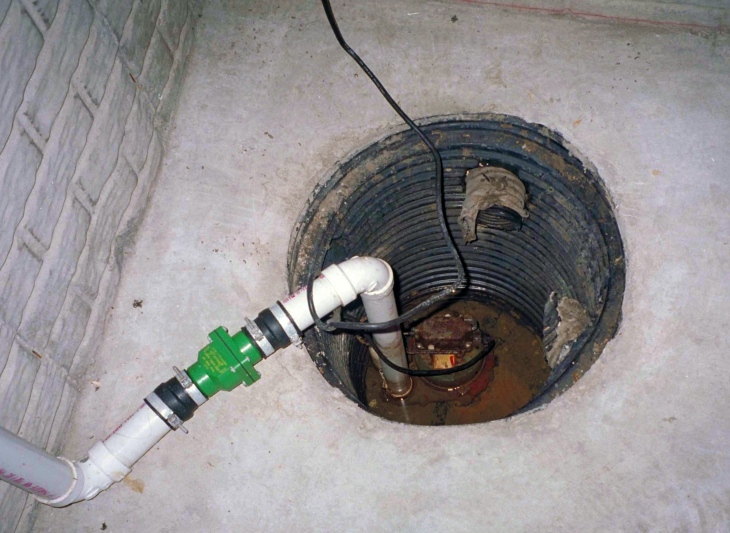
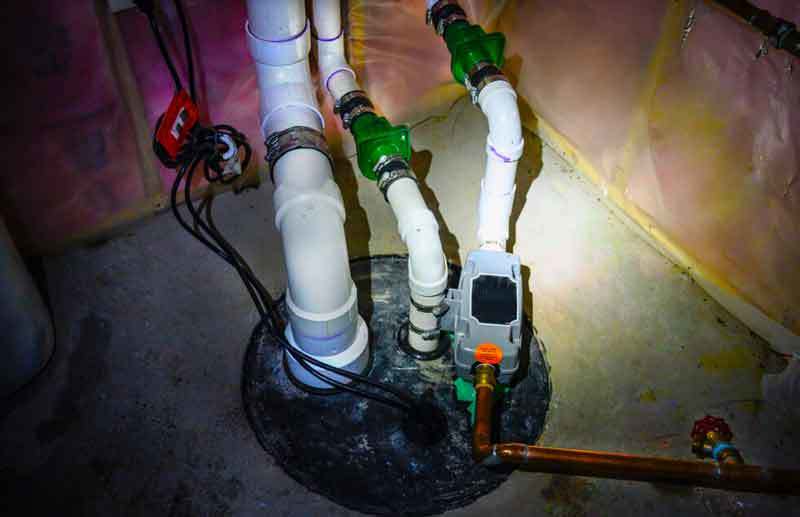
The sump pump check valve is an important component of your sump pump system. It prevents water from flowing back into the pit, which can cause the pump to run continuously and burn out. Here's how to install a sump pump check valve. First, gather all the necessary tools and materials. You will need a check valve, PVC primer and cement, a PVC cutter, and couplings. Next, locate the sump pump discharge pipe. This is the pipe that carries the water out of the pit. Cut a section of the pipe using the PVC cutter. Using the PVC primer, clean the ends of the pipe and the inside of the check valve. Then, apply PVC cement to both surfaces and attach the check valve to the pipe. Make sure the arrow on the check valve is pointing away from the pit. Next, measure the distance between the check valve and the sump pump outlet. Cut a piece of PVC pipe to this length using the PVC cutter. Attach this piece of pipe to the other end of the check valve using a coupling. Finally, attach the sump pump outlet to the other end of the pipe using another coupling. Make sure all connections are secure and the pipe is straight. Test the check valve by pouring water into the pit. The water should flow out of the discharge pipe, but not back into the pit.How to Install a Sump Pump Check Valve
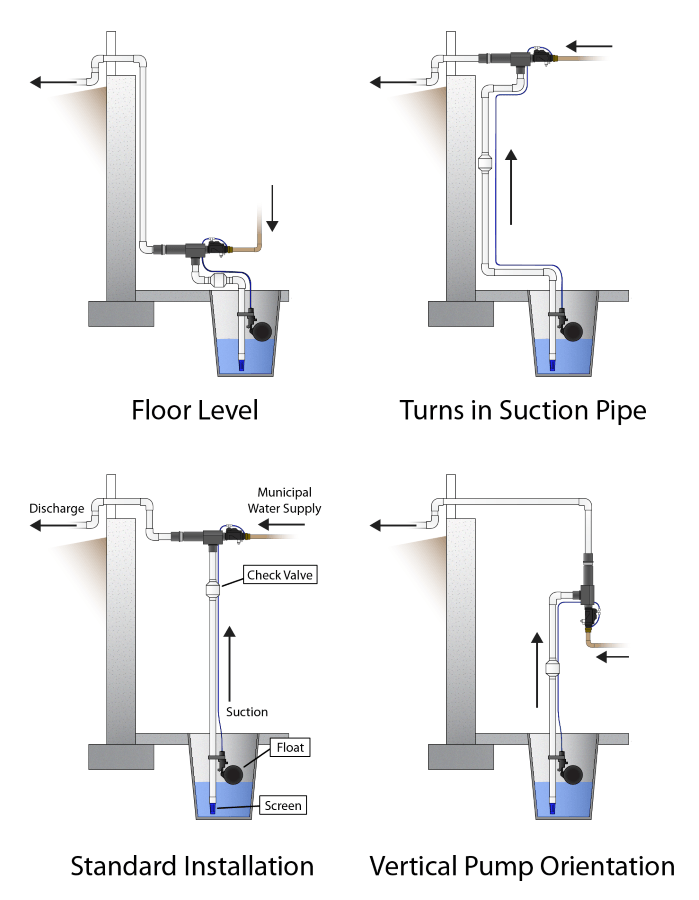


How to Install a Sump Pump Check Valve


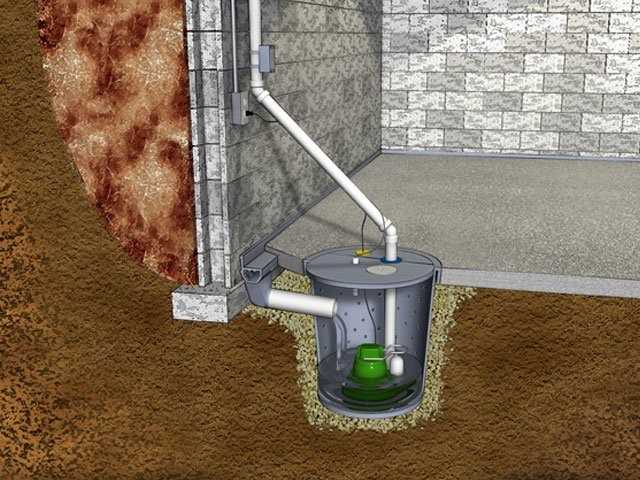
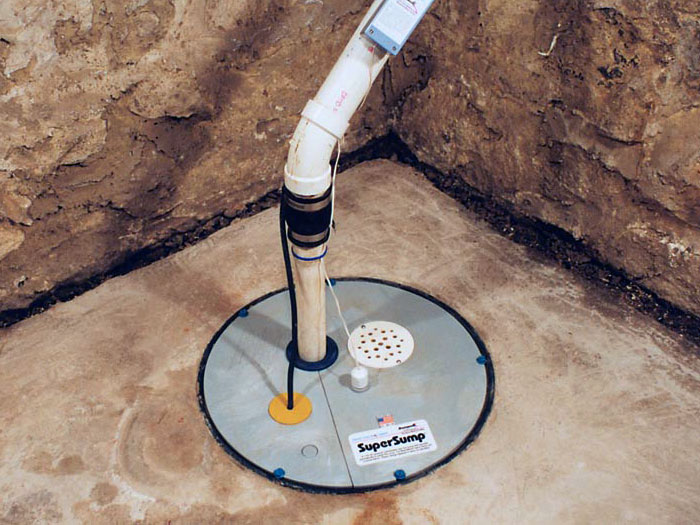
A sump pump basin, also known as a sump pit, is a crucial part of a sump pump system. It collects excess water from the foundation of your home and directs it to the sump pump for removal. Here's how to install a sump pump basin. First, gather all the necessary tools and materials. This includes a sump pump basin, a shovel, a level, and gravel. You may also need a sump pump liner if your basin is not made of a durable material like concrete. Next, locate the lowest point in your basement or crawlspace. This is where the sump pump basin should be installed. Make sure the area is clear of any debris. Dig a hole in the ground that is slightly larger than the sump pump basin. The hole should be deep enough so that the top of the basin is level with the surrounding floor. Place the sump pump basin in the hole and use a level to make sure it is even. If the basin is not level, adjust the soil or add gravel to the bottom of the hole to make it level. If you are using a sump pump liner, place it inside the basin. This will provide an extra layer of protection for your pump and help to keep the pit clean. Finally, fill the gap between the basin and the hole with gravel. This will help to support the basin and provide better drainage. Test the basin by pouring water into it. The water should flow into the pit and be pumped out by the sump pump.How to Install a Sump Pump Basin


How to Install a Sump Pump Basin
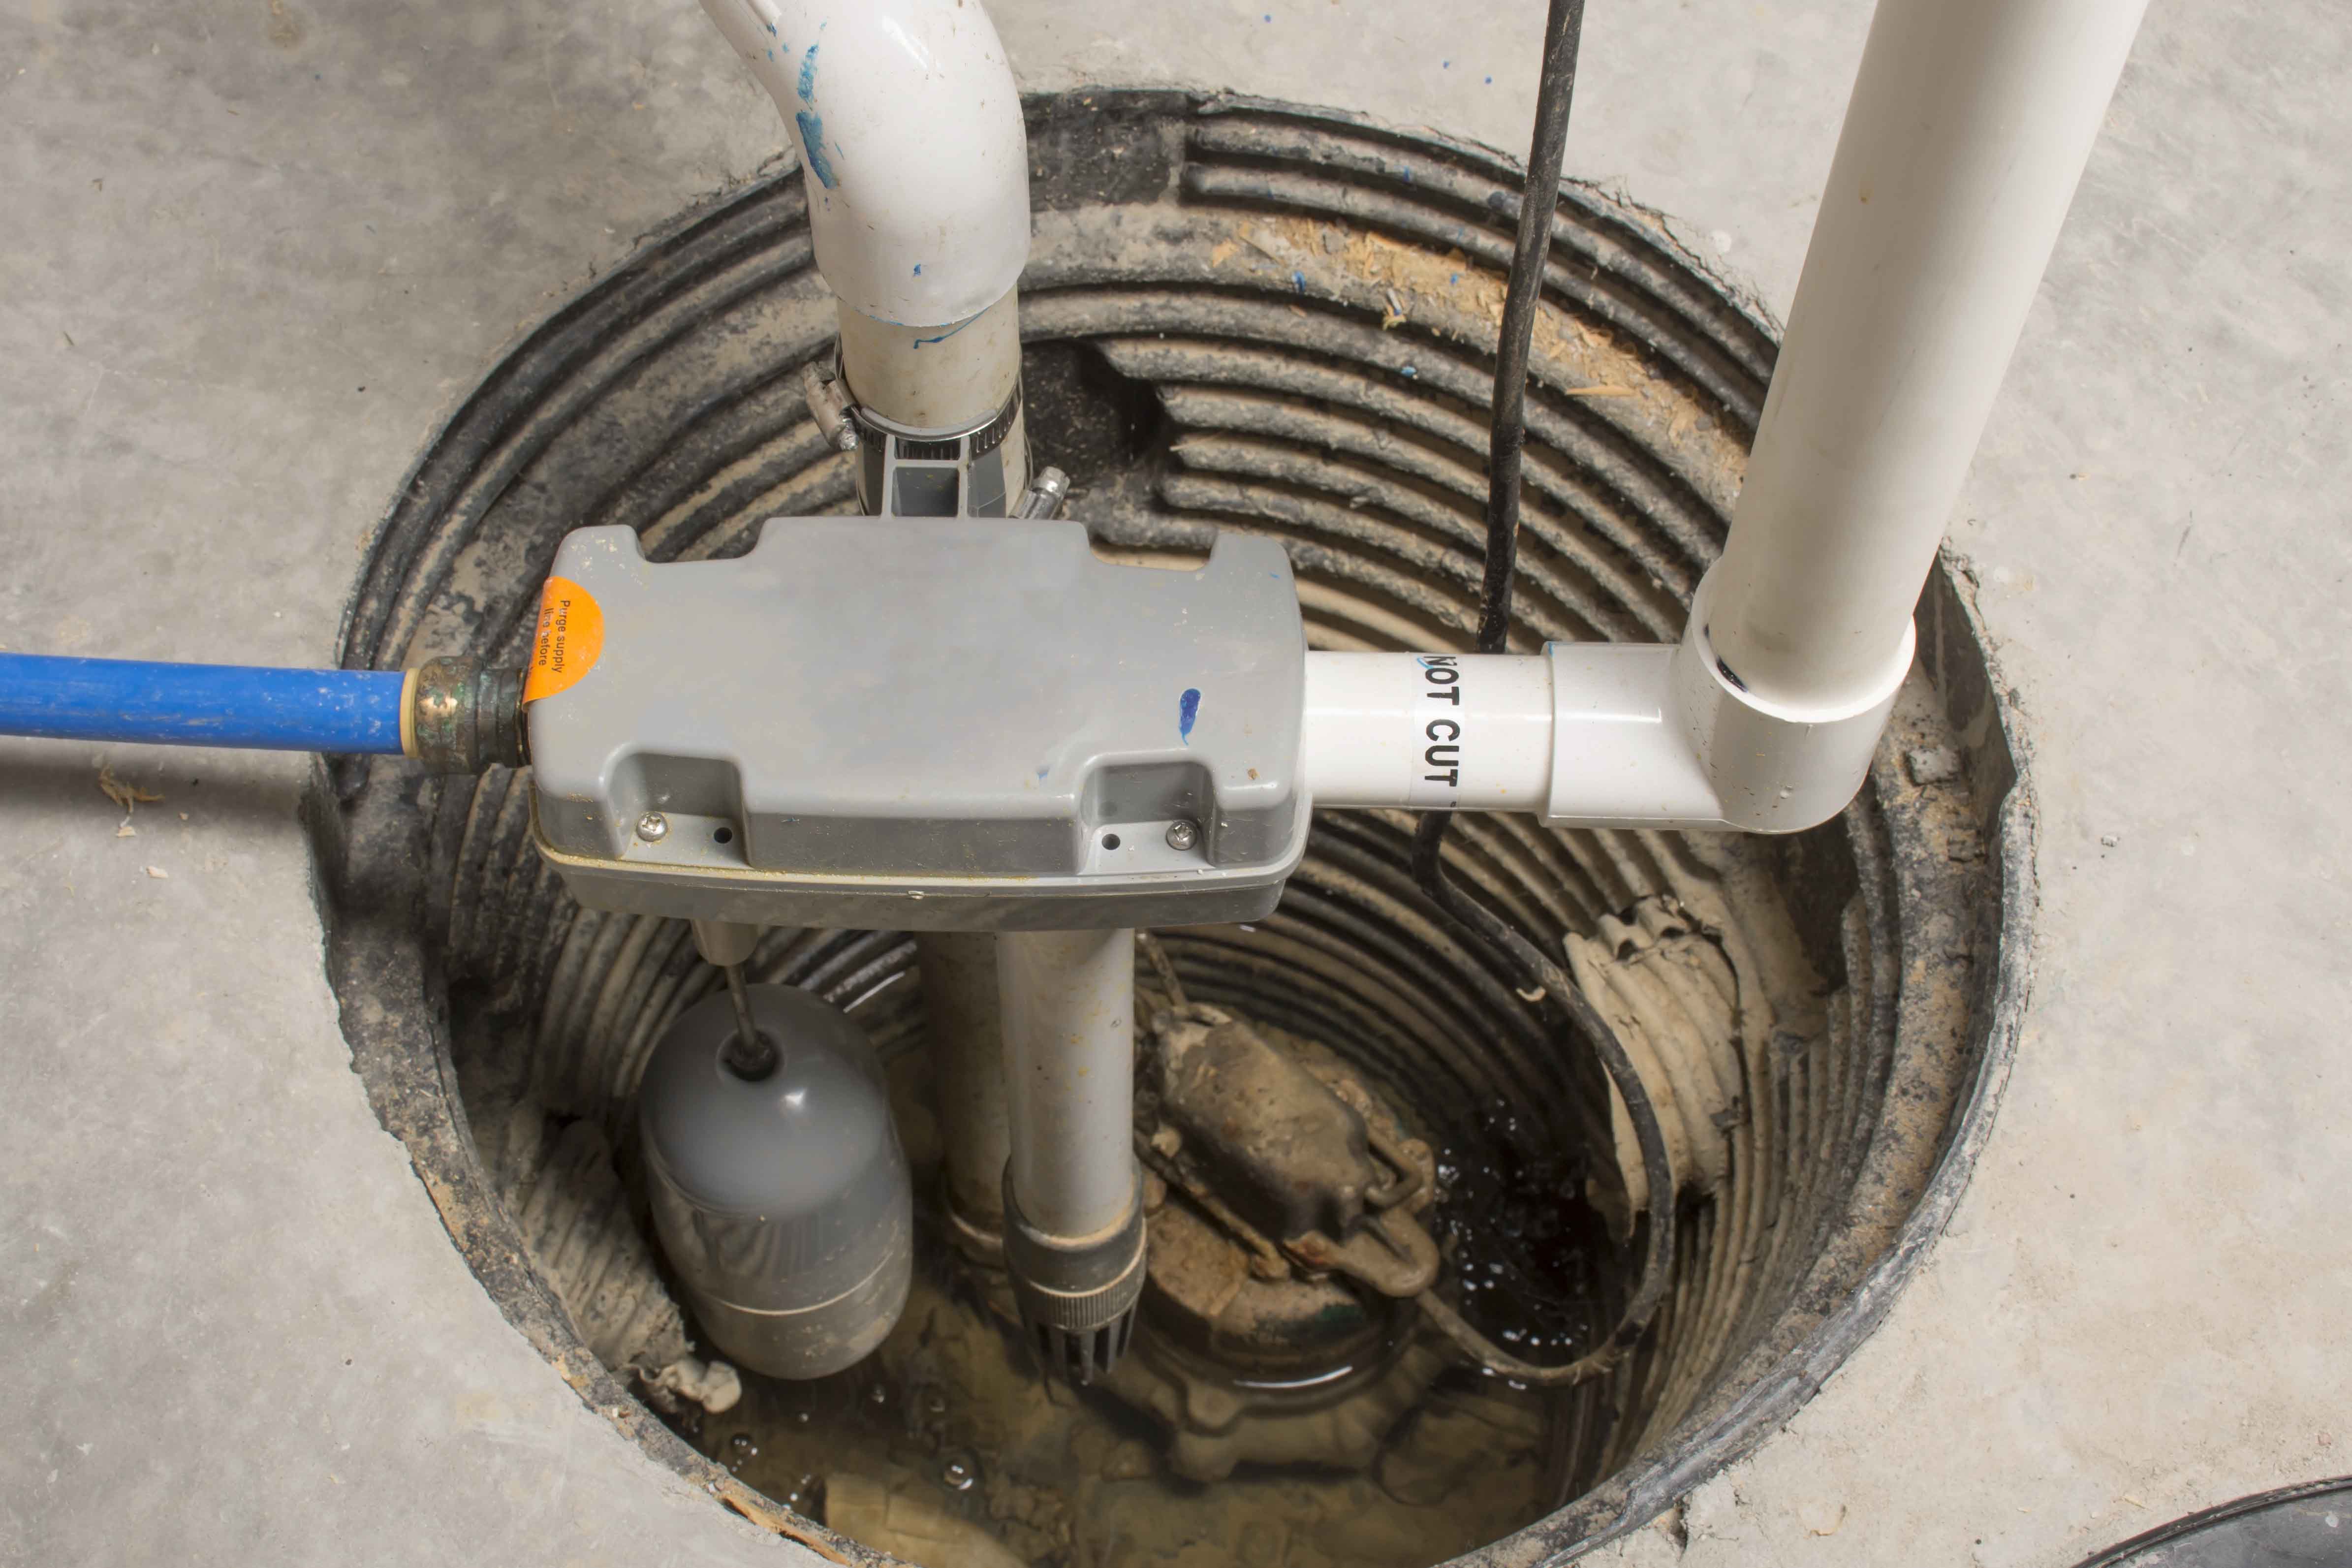


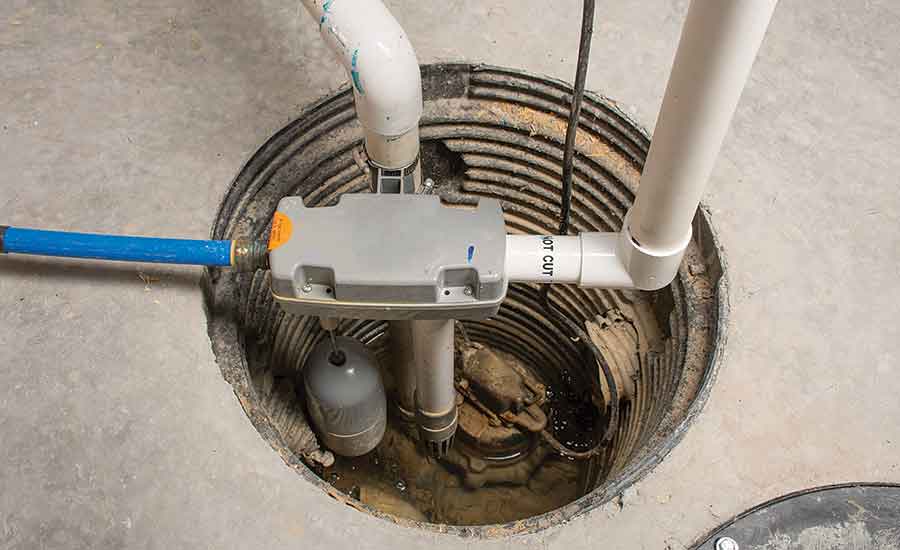
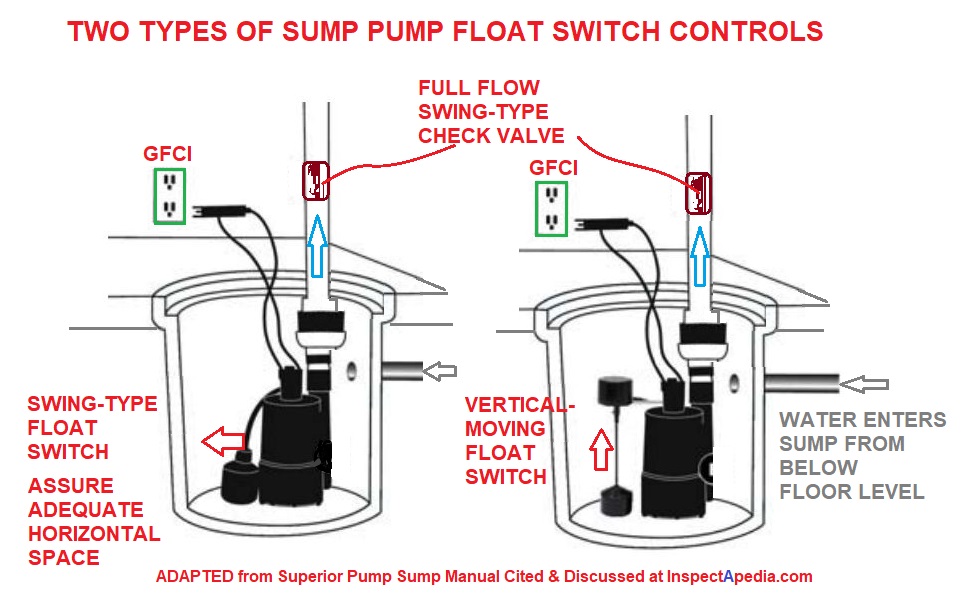
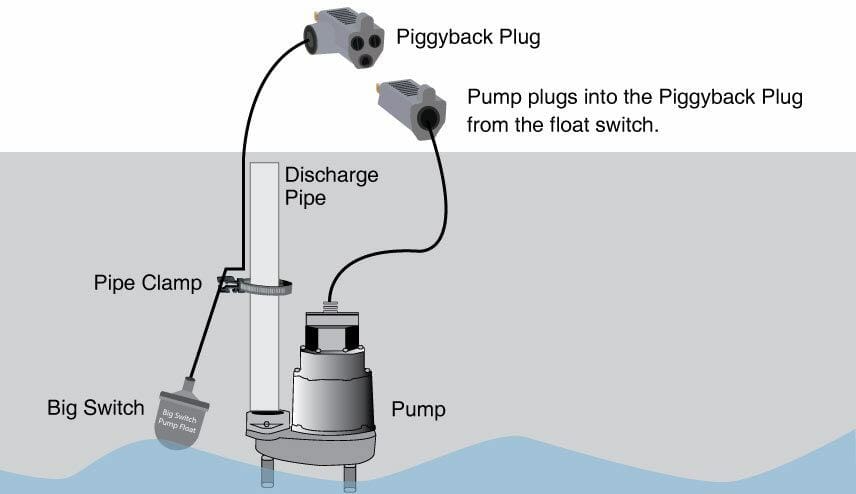
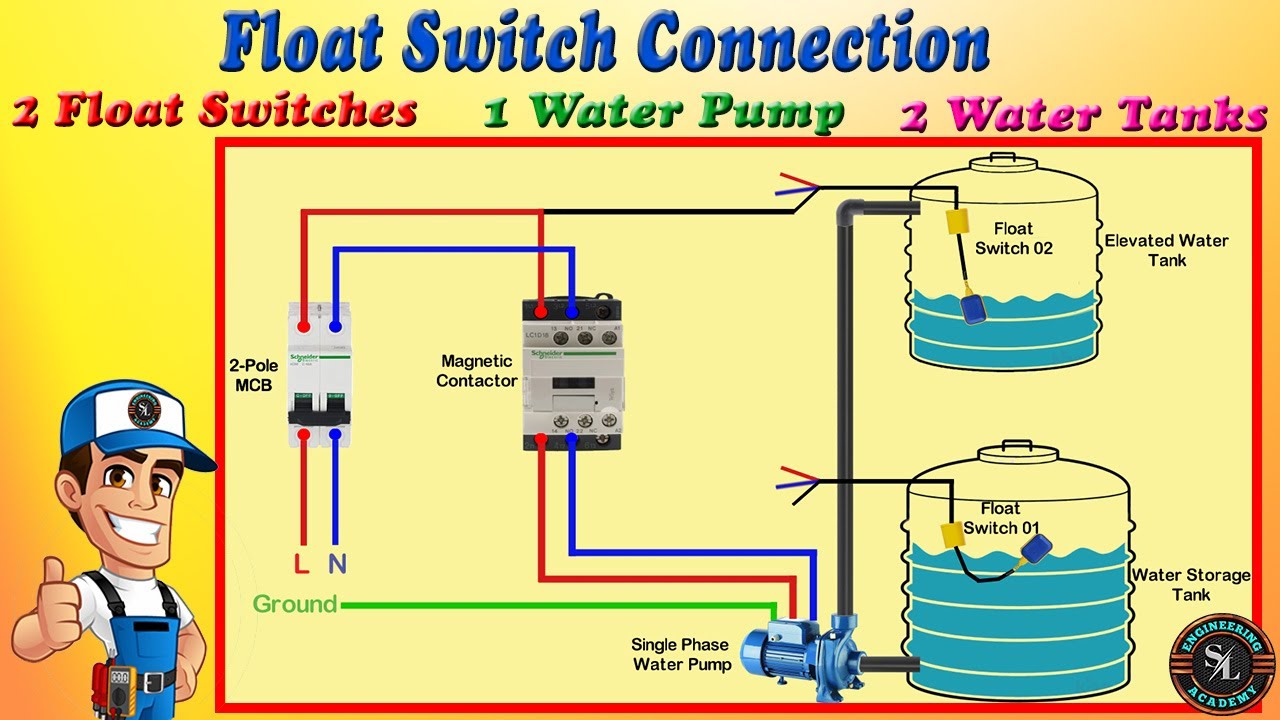
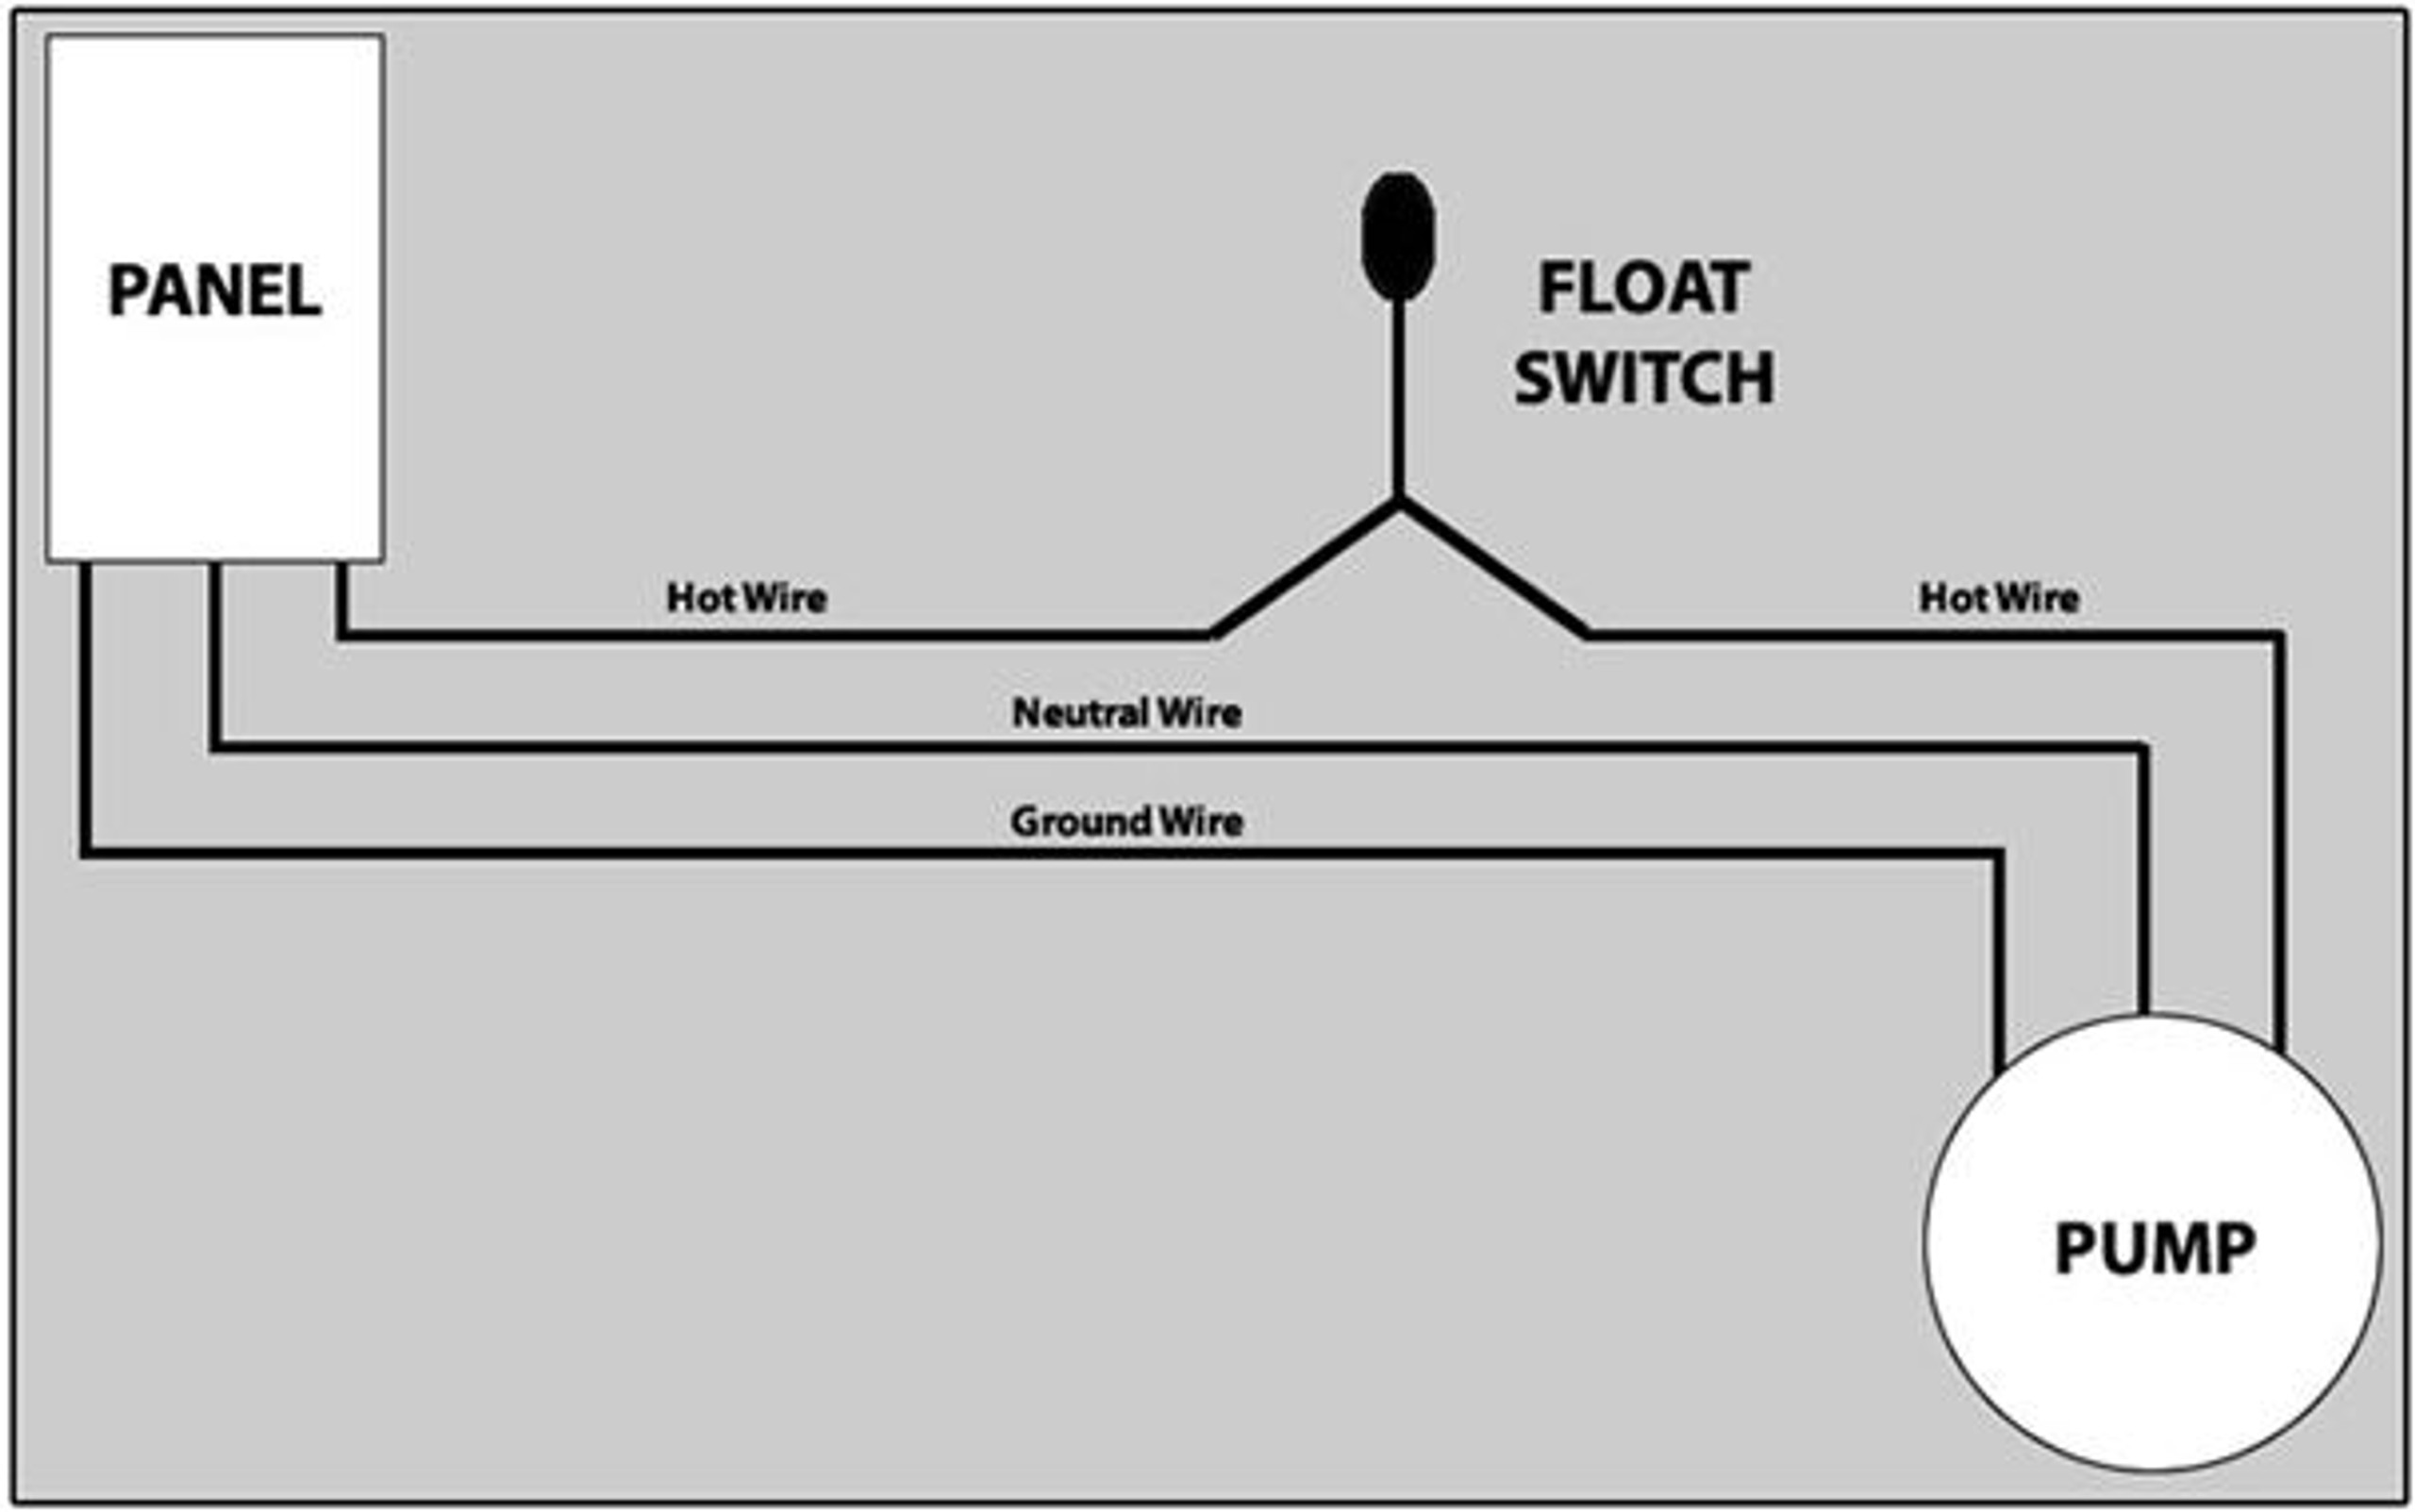
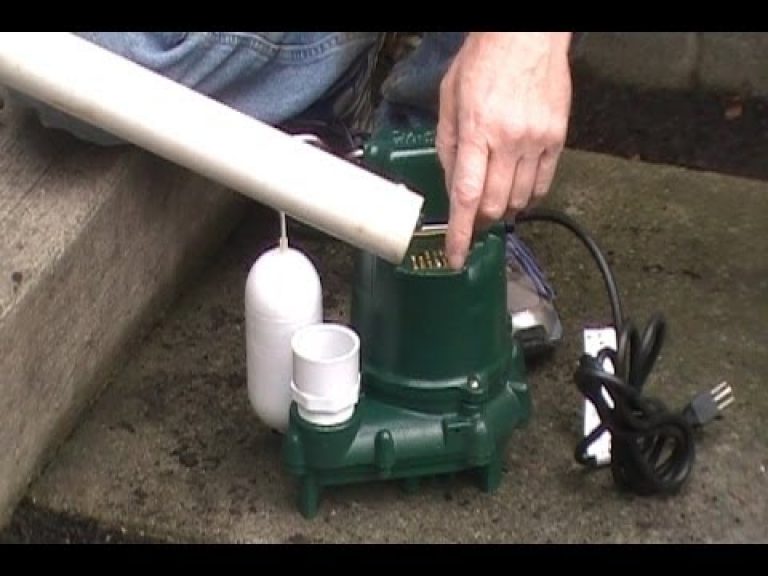
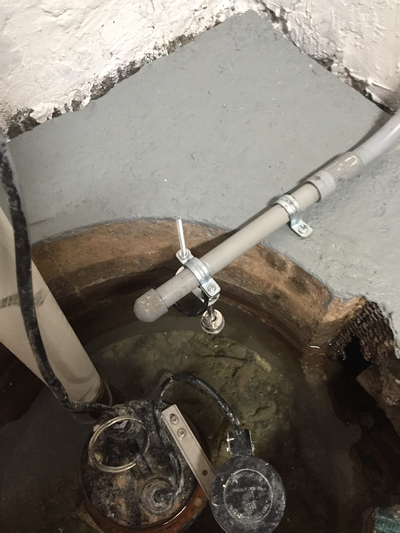
The sump pump float switch is a small device that controls when the sump pump turns on and off. It is essential for preventing flooding and water damage in your home. Here's how to install a sump pump float switch. First, gather all the necessary tools and materials. This includes a float switch, PVC pipes, couplings, and a sump pump. You may also need a PVC cutter, primer, and cement. Next, locate the sump pump discharge pipe. Cut a section of the pipe using the PVC cutter. Using the PVC primer, clean the ends of the pipe and the inside of the float switch. Then, apply PVC cement to both surfaces and attach the float switch to the pipe. Make sure the float switch is positioned so that it can move freely up and down. Next, measure the distance between the float switch and the sump pump outlet. Cut a piece of PVC pipe to this length using the PVC cutter. Attach this piece of pipe to the other end of the float switch using a coupling. Finally, attach the sump pump outlet to the other end of the pipe using another coupling. Make sure all connections are secure and the pipe is straight. Test the float switch by pouring water into the pit. The sump pump should turn on when the float switch rises, and turn off when it falls.How to Install a Sump Pump Float Switch

How to Install a Sump Pump Float Switch


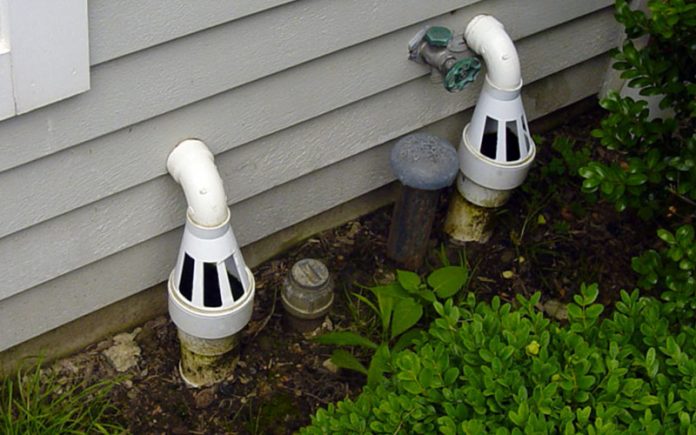
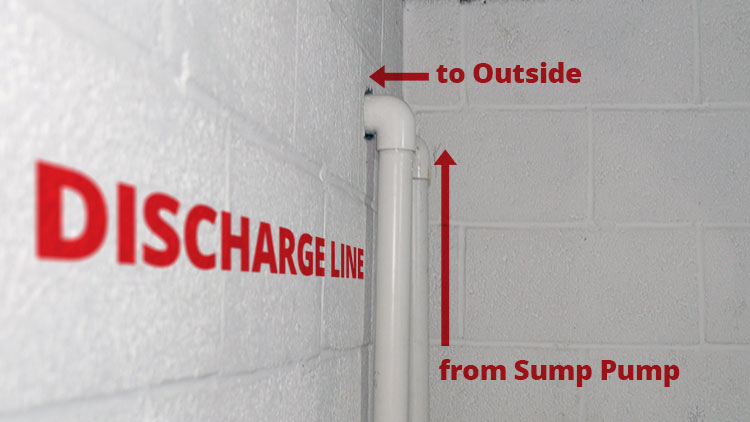
The sump pump discharge line is the pipe that carries water out of the sump pit and away from your home's foundation. It is crucial for keeping your basement or crawlspace dry and free of water damage. Here's how to install a sump pump discharge line. First, gather all the necessary tools and materials. This includes PVC pipes, couplings, elbows, and a sump pump. You may also need a PVC cutter, primer, and cement. Next, locate the sump pump discharge pipe. Cut a section of the pipe using the PVC cutter. Using the PVC primer, clean the ends of the pipe and the inside of the elbow. Then, apply PVC cement to both surfaces and attach the elbow to the pipe. The elbow should be pointing away from your home's foundation. Next, measure the distance between the elbow and the outside of your home. Cut a piece of PVC pipe to this length using the PVC cutter. Attach this piece of pipe to the other end of the elbow using a coupling. Finally, attach the other end of the pipe to the drainage system or a designated area away from your home. Make sure all connections are secure and the pipe is sloping away from your home's foundation. Test the discharge line by pouring water into the pit. The water should flow out of the pit and away from your home.How to Install a Sump Pump Discharge Line

How to Install a Sump Pump Discharge Line


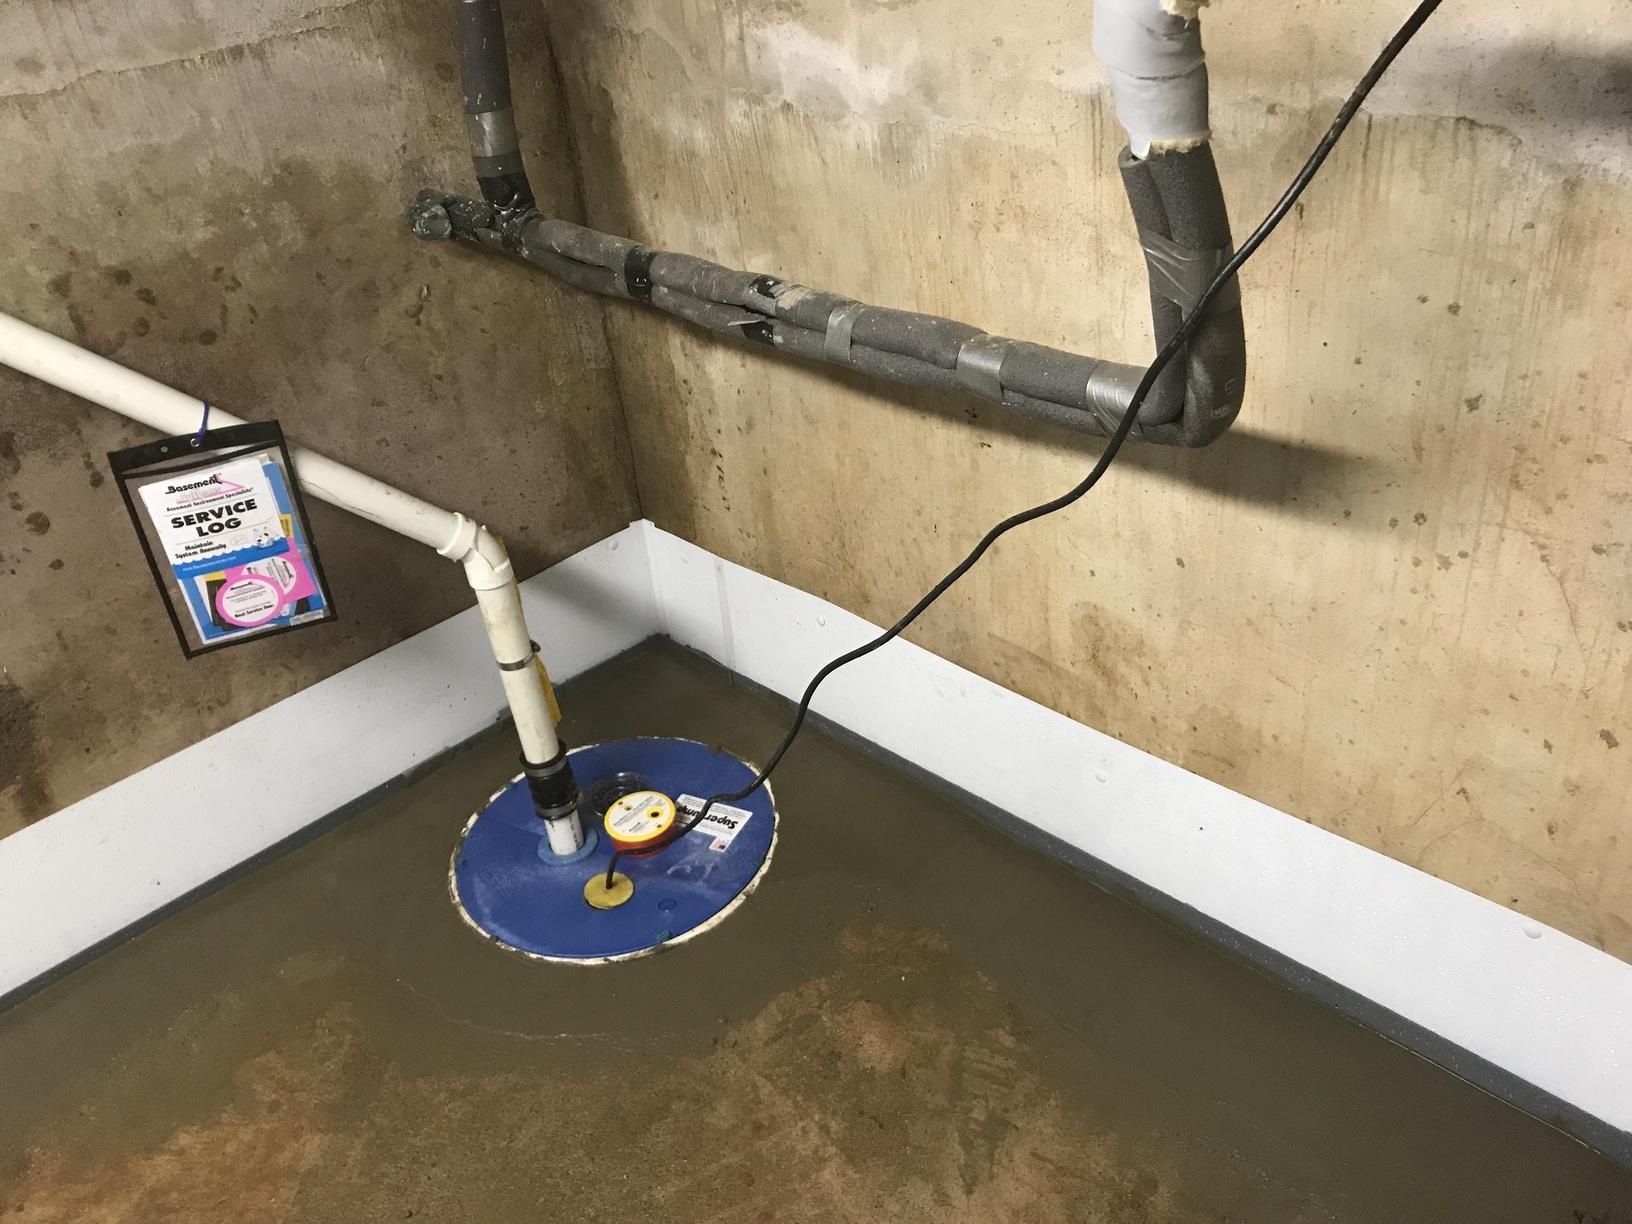
The sump pump pit cover is a necessary component of a sump pump system. It helps to keep debris out of the pit and prevent odors from escaping. Here's how to install a sump pump pit cover. First, gather all the necessary tools and materials. This includes a sump pump pit cover, screws, and a screwdriver. Next, measure the diameter of your sump pit. The cover should be slightly larger than the pit to ensure a snug fit. Place the cover on top of the pit and make sure it fits properly. If it's too big, you can trim it down to size using a saw. Once the cover fits snugly on top of the pit, use screws to secure it in place. Make sure the screws are evenly spaced around the cover. Test the cover by pouring water into the pit. The cover should keep the water from splashing out of the pit. It should also prevent odors from escaping.How to Install a Sump Pump Pit Cover


How to Install a Sump Pump Pit Cover
:max_bytes(150000):strip_icc()/how-to-install-sump-pumps-1398056-hero-abd3b18a98ce46559bed3cd99054963f.jpg)
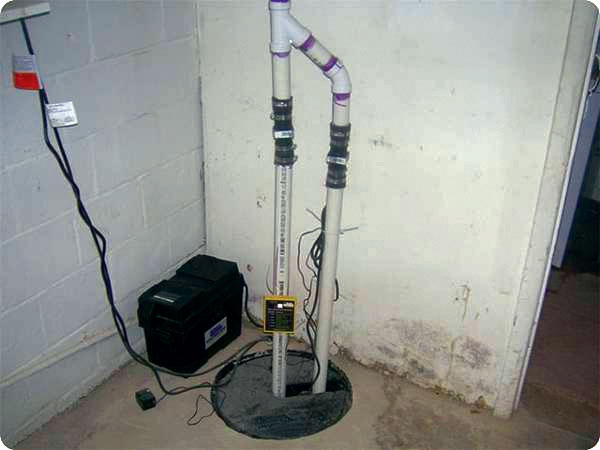
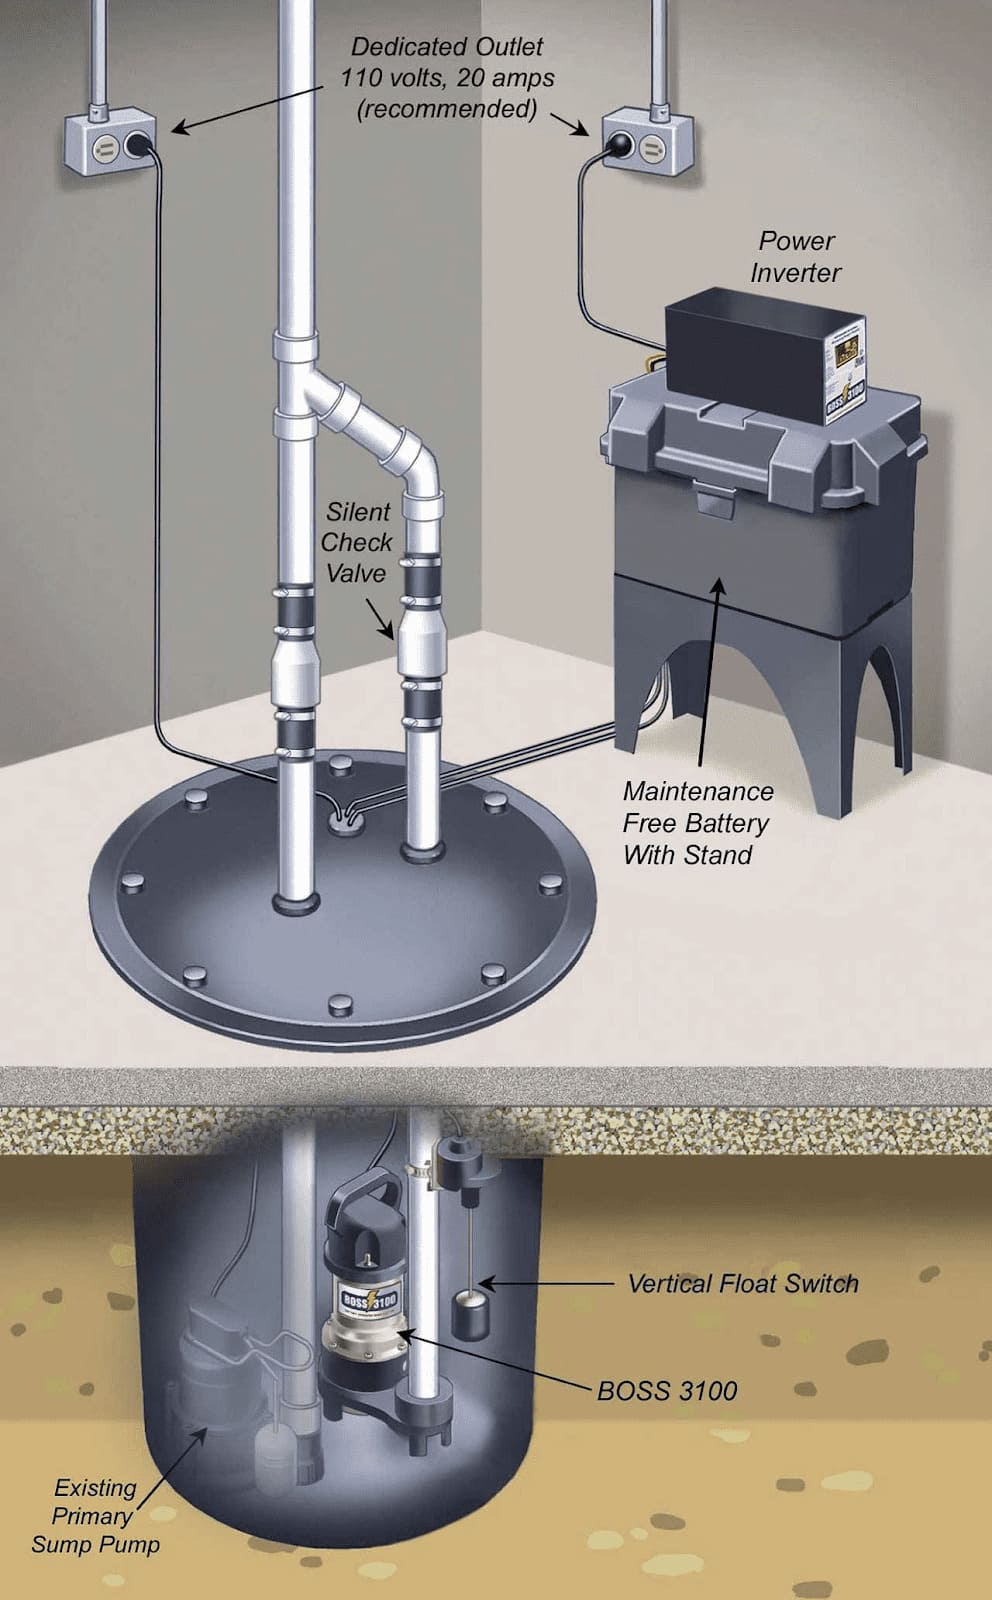
A sump pump backup system is a secondary pump that kicks in when the primary pump fails or cannot keep up with the water flow. It's essential for preventing flooding and water damage in your home. Here's how to install a sump pump backup system. First, gather all the necessary tools and materials. This includes a backup sump pump, a battery, and a battery case. Next, locate the primary sump pump. Install the backup pump next to it, making sure it doesn't interfere with the primary pump's operation. Connect the backup pump to the discharge pipe using couplings and elbows if needed. Make sure the backup pump is positioned correctly and securely in place. Install the battery in the battery case and connect it to the backup pump. Some backup systems may also include a charger that keeps the battery charged and ready for use. Test the backup system by unplugging the primary pump or simulating a power outage. The backup pump should turn on and keep the pit free of water.How to Install a Sump Pump Backup System


How to Install a Sump Pump Backup System

/how-to-install-sump-pumps-1398056-hero-abd3b18a98ce46559bed3cd99054963f.jpg)

A sump pump alarm is a device that alerts you when the water level in the pit is too high, indicating a potential problem with your sump pump. It's a crucial component for preventing flooding and water damage in your home. Here's how to install a sump pump alarm. First, gather all the necessary tools and materials. This includes a sump pump alarm, a float switch, and a battery. Next, locate the sump pump discharge pipe. Cut a section of the pipe using the PVC cutter. Using the PVC primer, clean the ends of the pipe and the inside of the float switch. Then, apply PVC cement to both surfaces and attach the float switch to the pipe. Make sure the float switch is positioned so that it can move freely up and down. Next, connect the alarm to the float switch using the provided wires. Install the battery in the alarm and turn it on. Test the alarm by pouring water into the pit. The alarm should sound when the float switch rises, indicating a high water level in the pit.How to Install a Sump Pump Alarm
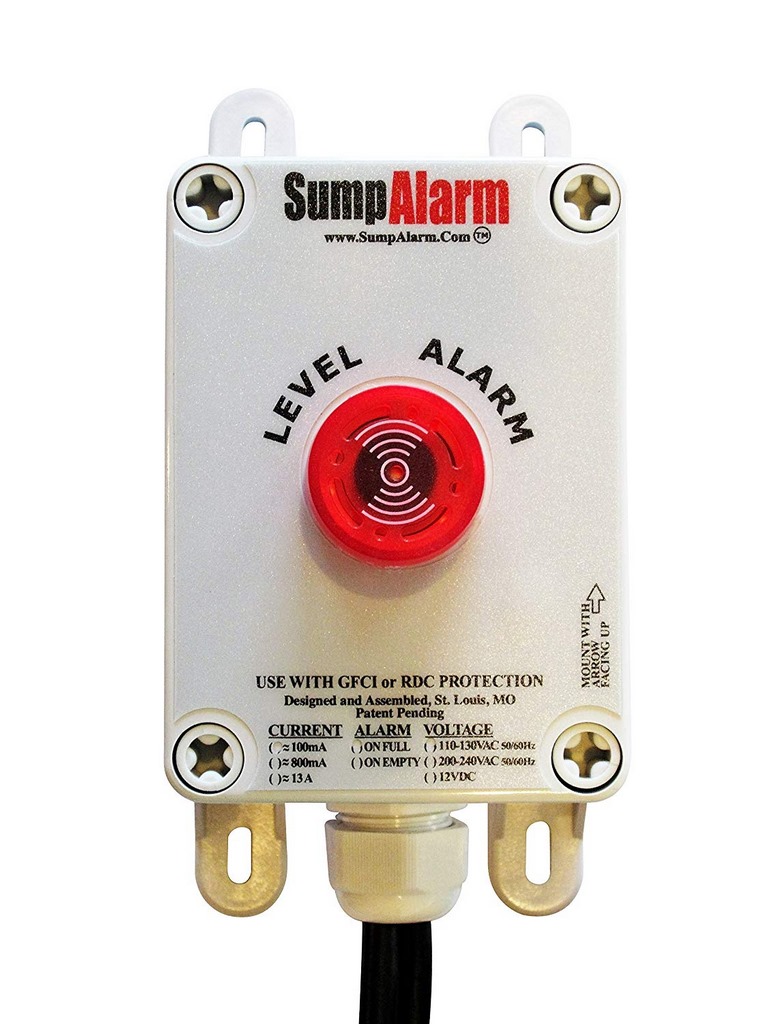


How to Install a Sump Pump Alarm


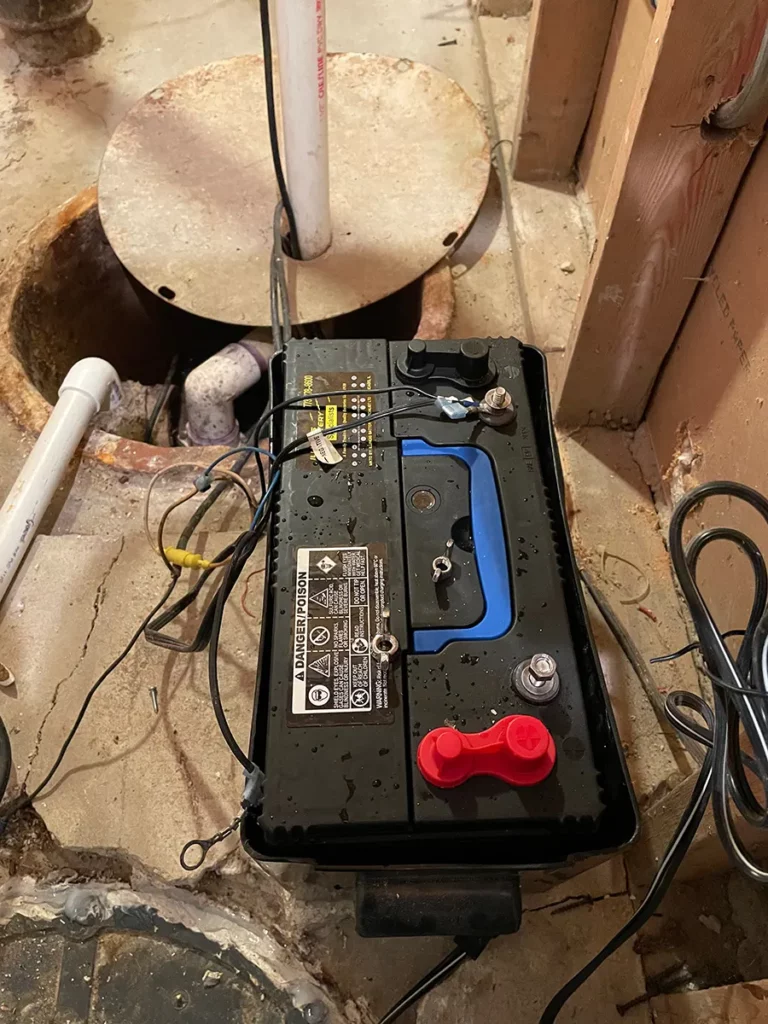
A sump pump battery backup is a crucial component of a sump pump system. It ensures that your pump will continue to work even during a power outage. Here's how to install a sump pump battery backup. First, gather all the necessary tools and materials. This includes a battery backup system, a battery, and a battery case. Next, locate the primary sump pump. Install the battery backup system next to it, making sure it doesn't interfere with the primary pump's operation. Connect the backup system to the discharge pipe using couplings and elbows if needed. Make sure the system is positioned correctly and securely in place. Install the battery in the battery case and connect it to the backup system. Some systems may also include a charger that keeps the battery charged and ready for use. Test the backup system by unplugging the primary pump or simulating a power outage. The backup system should turn on and keep the pit free of water.How to Install a Sump Pump Battery Backup

How to Install a Sump Pump Battery Backup


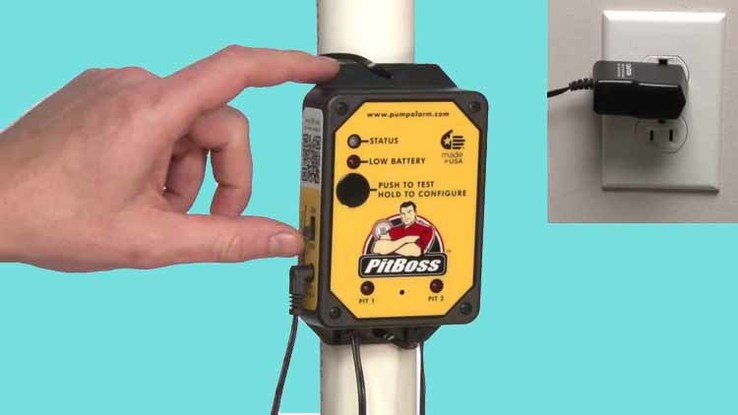
A sump pump water alarm is a device that alerts you when the water level in the pit is too high, indicating a potential problem with your sump pump. It's an important component for preventing flooding and water damage in your home. Here's how to install a sump pump water alarm. First, gather all the necessary tools and materials. This includes a water alarm, a float switch, and a battery. Next, locate the sump pump discharge pipe. Cut a section of the pipe using the PVC cutter. Using the PVC primer, clean the ends of the pipe and the inside of the float switch. Then, apply PVC cement to both surfaces and attach the float switch to the pipe. Make sure the float switch is positioned so that it can move freely up and down. Next, connect the alarm to the float switch using the provided wires. Install the battery in the alarm and turn it on.How to Install a Sump Pump Water Alarm

How to Install a Sump Pump Water Alarm

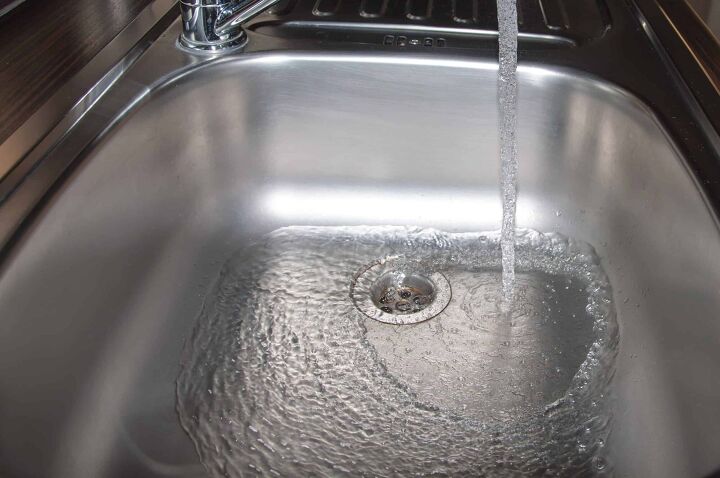
The Benefits of Having a Kitchen Sink Drain into a Sump Pit

Improved Drainage System
 When designing a house, homeowners often overlook the importance of the
drainage system
. However, this plays a crucial role in ensuring that your home is safe from water damage. By having your kitchen sink drain into a sump pit, you are effectively improving your drainage system. The sump pit collects excess water and directs it away from your house, preventing it from seeping into your foundation and causing costly damage.
When designing a house, homeowners often overlook the importance of the
drainage system
. However, this plays a crucial role in ensuring that your home is safe from water damage. By having your kitchen sink drain into a sump pit, you are effectively improving your drainage system. The sump pit collects excess water and directs it away from your house, preventing it from seeping into your foundation and causing costly damage.
Reduced Risk of Basement Flooding
 Basement flooding is a common issue that many homeowners face, especially during heavy rains. This can lead to significant damage to your property and belongings. However, by having your kitchen sink drain into a sump pit, you are
protecting
your basement from flooding. The sump pit acts as a barrier, preventing excess water from entering your basement and keeping it dry and safe.
Basement flooding is a common issue that many homeowners face, especially during heavy rains. This can lead to significant damage to your property and belongings. However, by having your kitchen sink drain into a sump pit, you are
protecting
your basement from flooding. The sump pit acts as a barrier, preventing excess water from entering your basement and keeping it dry and safe.
Cost-Effective Solution
 Installing a sump pit for your kitchen sink may seem like an added expense, but it can actually save you money in the long run. If your home is prone to flooding, you may end up spending thousands of dollars on repairs and damages. By investing in a sump pit, you are
preventing
potential damage and avoiding costly repairs. Additionally, sump pits are relatively easy to install and maintain, making them a cost-effective solution for homeowners.
Installing a sump pit for your kitchen sink may seem like an added expense, but it can actually save you money in the long run. If your home is prone to flooding, you may end up spending thousands of dollars on repairs and damages. By investing in a sump pit, you are
preventing
potential damage and avoiding costly repairs. Additionally, sump pits are relatively easy to install and maintain, making them a cost-effective solution for homeowners.
Increased Home Value
/how-to-install-a-sink-drain-2718789-hero-b5b99f72b5a24bb2ae8364e60539cece.jpg) In today's real estate market, homeowners are always looking for ways to increase the value of their homes. By having a kitchen sink drain into a sump pit, you are
adding
a valuable feature to your home. This can be a selling point for potential buyers, especially in areas prone to flooding. It also shows that you are a responsible homeowner who takes care of their property, making your home more attractive to buyers.
In today's real estate market, homeowners are always looking for ways to increase the value of their homes. By having a kitchen sink drain into a sump pit, you are
adding
a valuable feature to your home. This can be a selling point for potential buyers, especially in areas prone to flooding. It also shows that you are a responsible homeowner who takes care of their property, making your home more attractive to buyers.
Environmental Benefits
 Having a sump pit for your kitchen sink can also have
environmental benefits
. The collected water can be reused for tasks such as watering plants or washing your car, reducing your water consumption and
contributing
to a more sustainable environment.
In conclusion, having a kitchen sink drain into a sump pit has numerous benefits for homeowners. It improves your drainage system, prevents basement flooding, is a cost-effective solution, increases your home value, and has environmental benefits. If you are considering designing or renovating your home, it is worth considering this feature for a safer and more functional household.
Having a sump pit for your kitchen sink can also have
environmental benefits
. The collected water can be reused for tasks such as watering plants or washing your car, reducing your water consumption and
contributing
to a more sustainable environment.
In conclusion, having a kitchen sink drain into a sump pit has numerous benefits for homeowners. It improves your drainage system, prevents basement flooding, is a cost-effective solution, increases your home value, and has environmental benefits. If you are considering designing or renovating your home, it is worth considering this feature for a safer and more functional household.