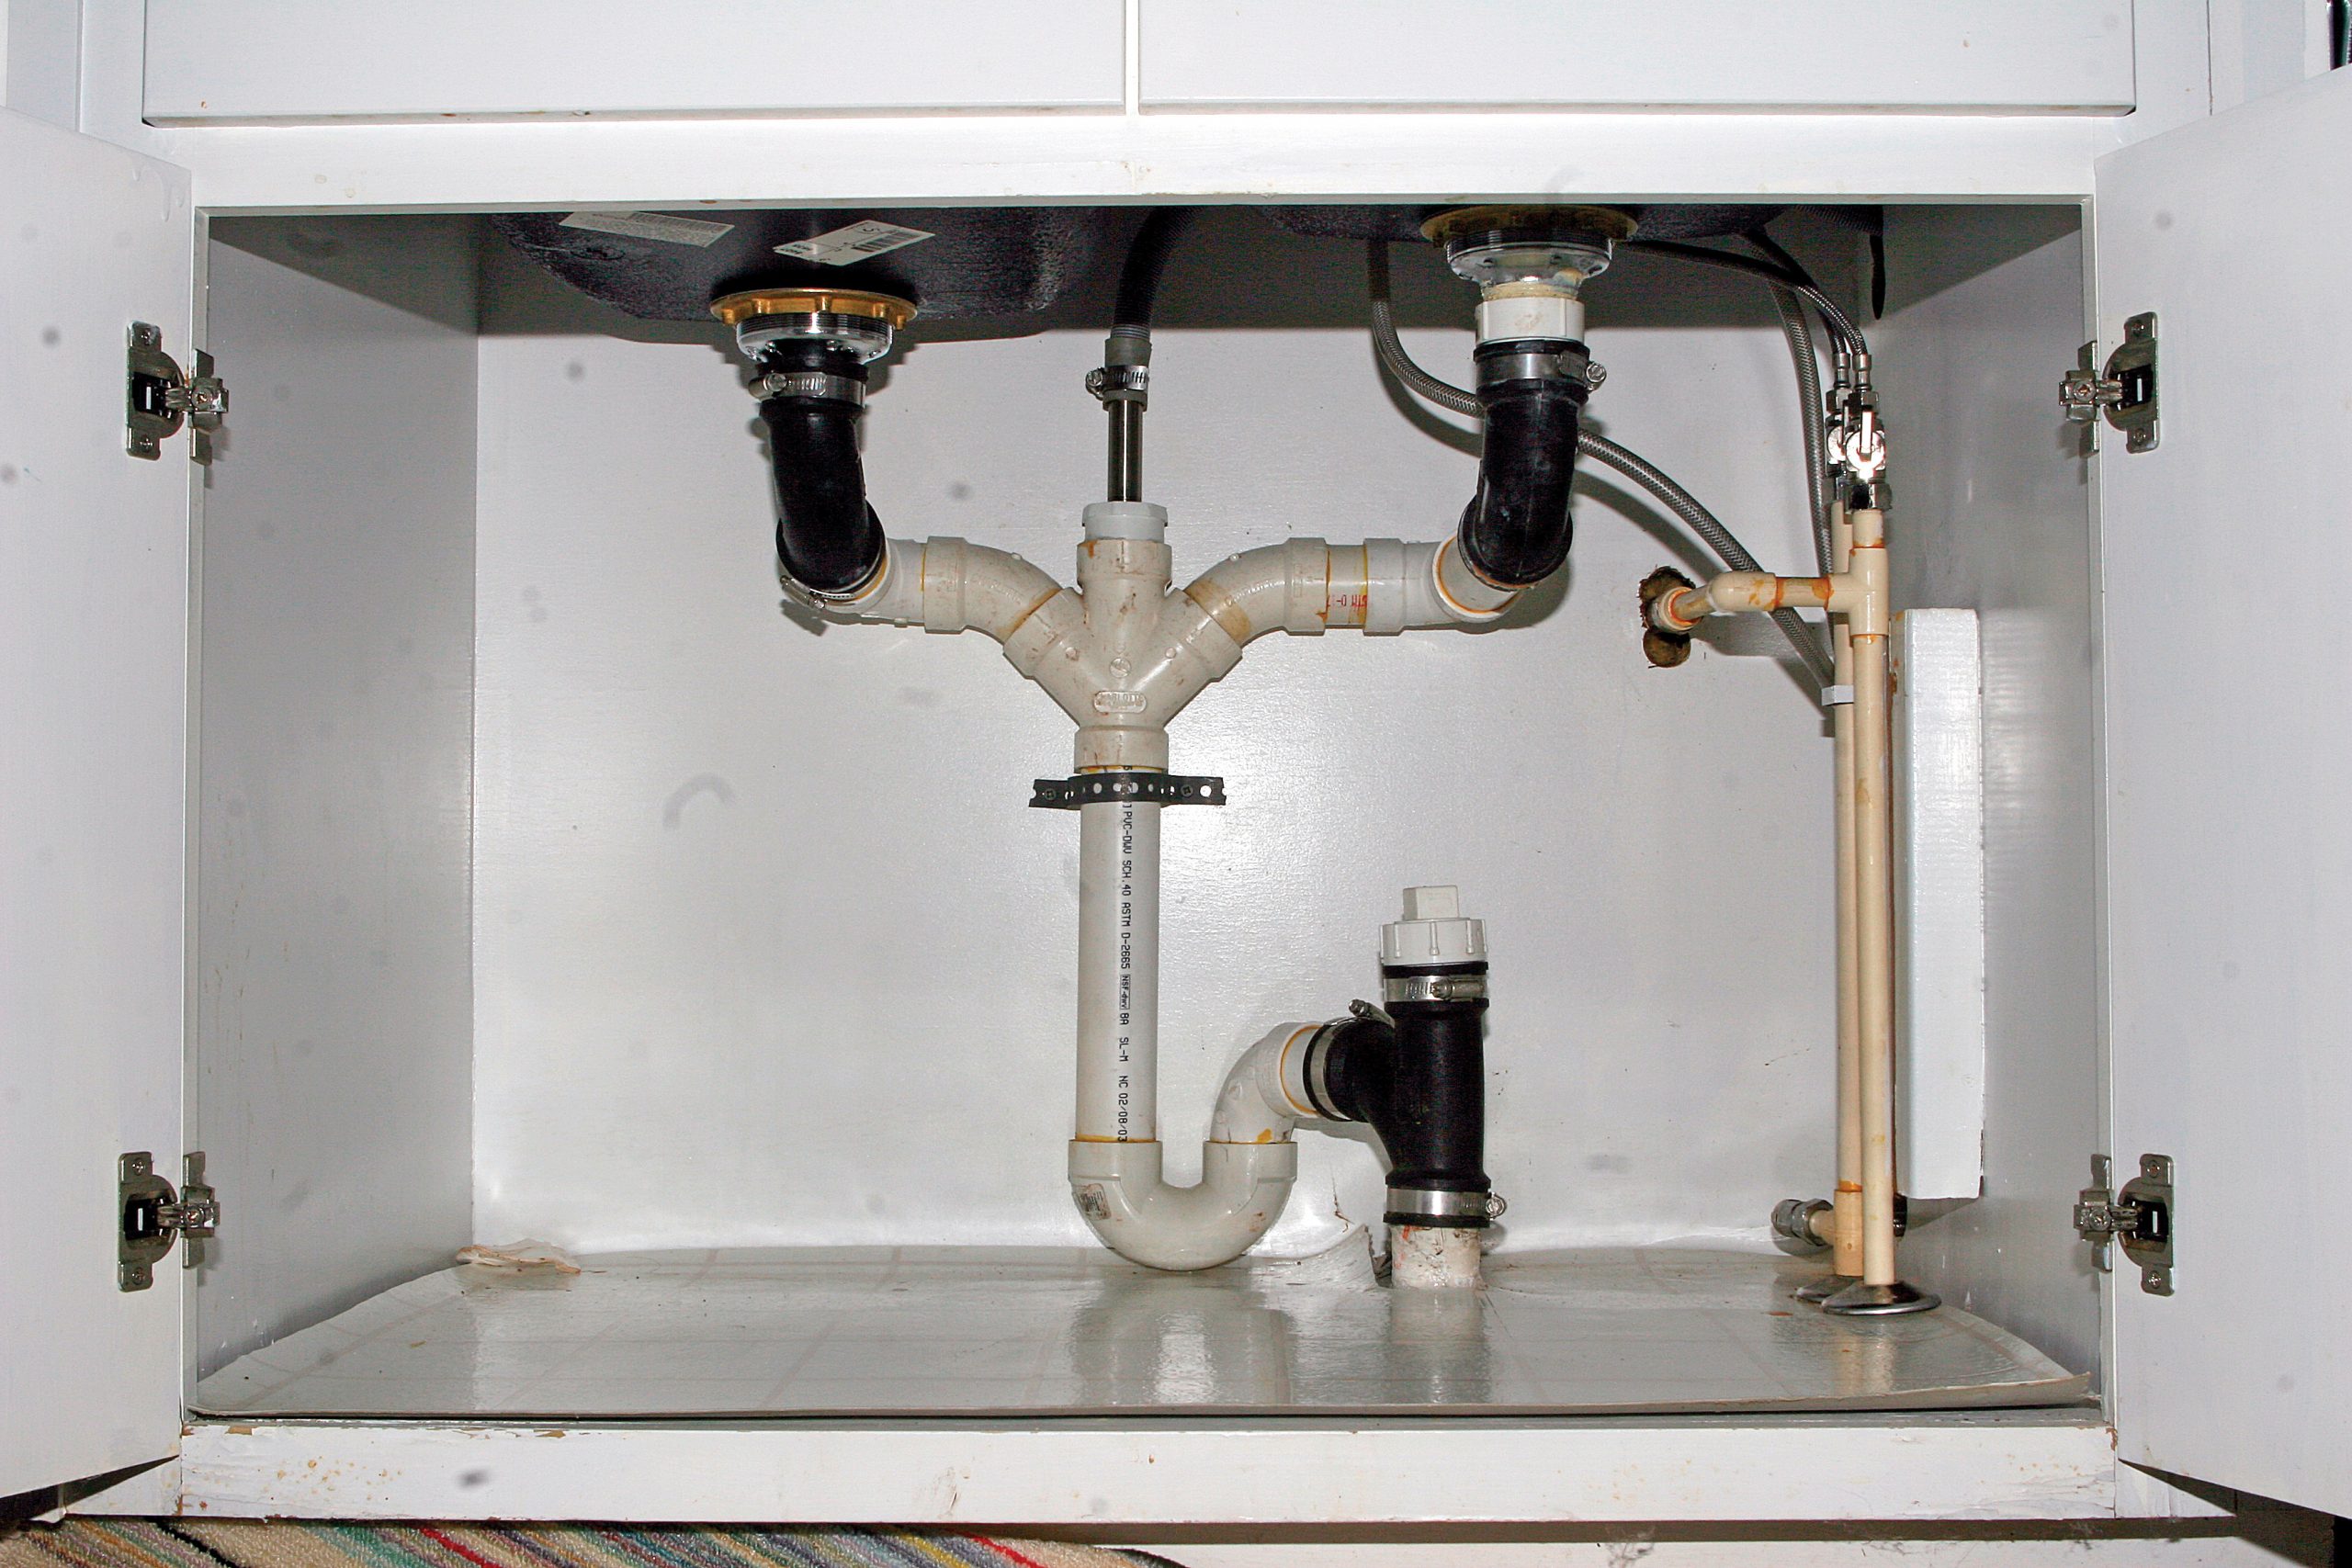
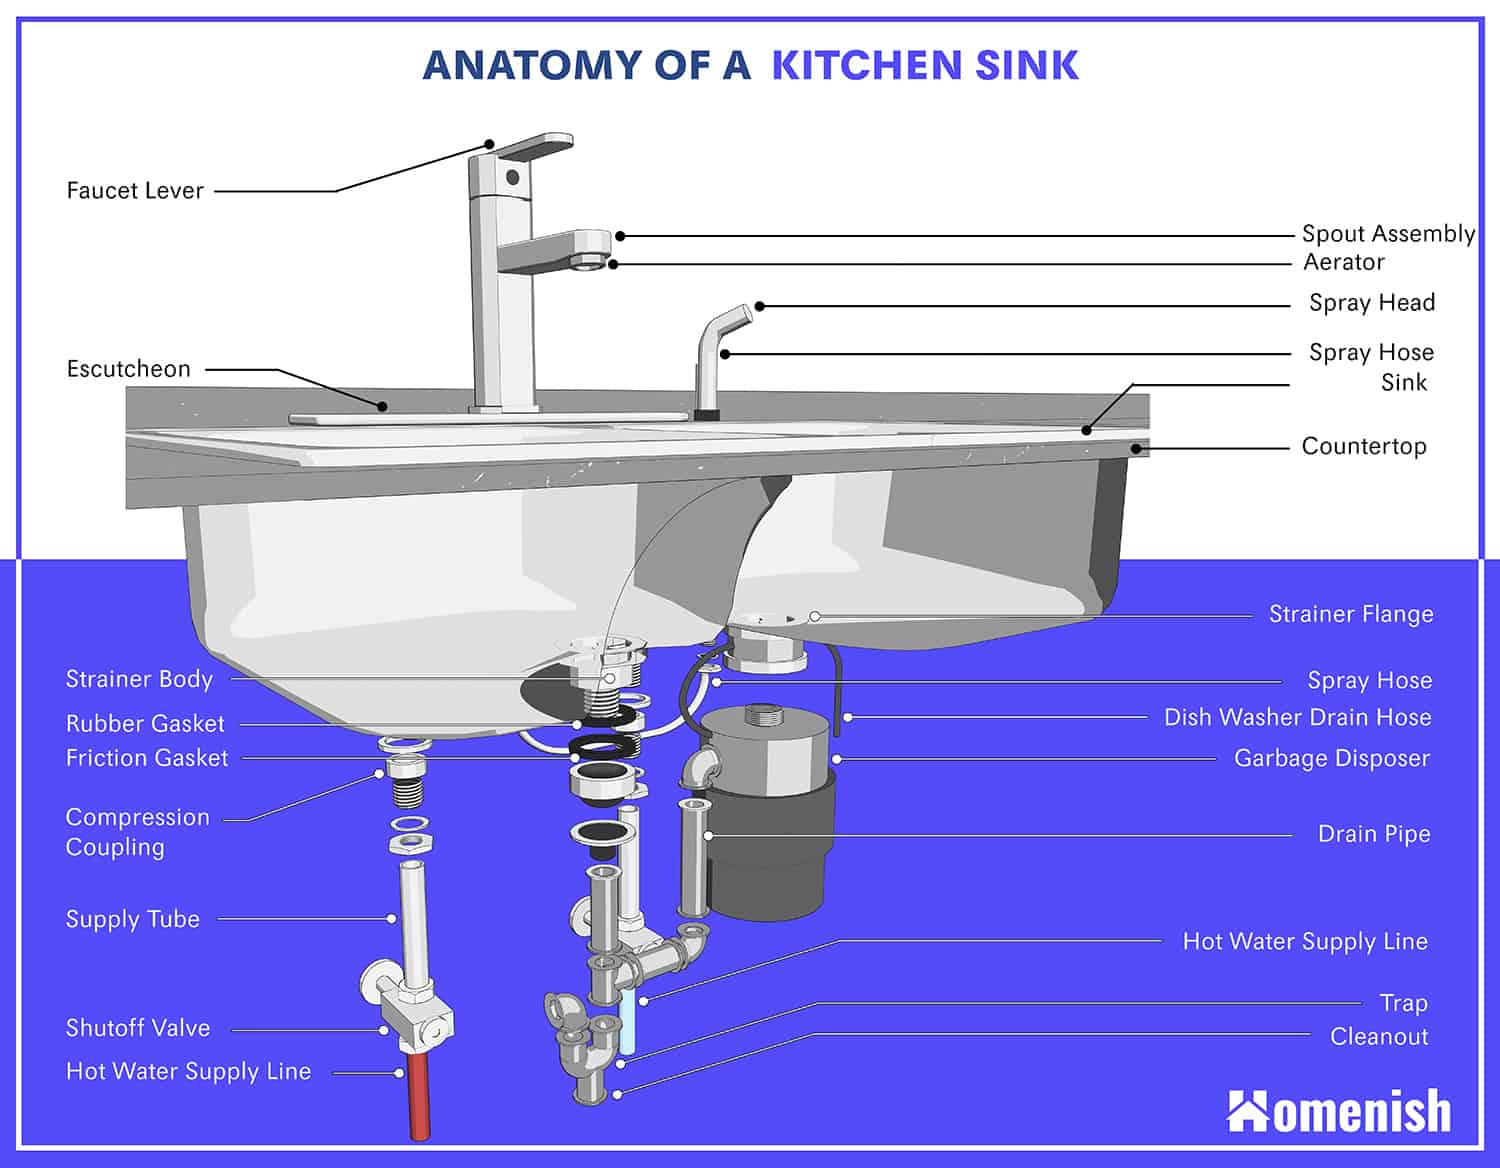
Before you start any plumbing project, it's important to have a good understanding of the plumbing diagram. This will help you to properly plan and execute your installation, ensuring that everything is connected and working correctly. The kitchen sink drain plumbing diagram is a visual representation of how the various components of a kitchen sink drain system are connected. It shows the pipes, traps, and other parts that make up the system, as well as how they interact with each other. Having a clear understanding of this diagram will make it easier for you to install and maintain your kitchen sink drain, saving you time and hassle in the long run.1. Understanding the Kitchen Sink Drain Plumbing Diagram
Before you start installing your kitchen sink drain, you will need to gather all the necessary tools and materials. This will ensure that you have everything you need to complete the job efficiently and effectively. Some of the tools and materials you will need include a pipe wrench, adjustable pliers, plumber's putty, Teflon tape, and the various components of the drain system such as pipes, traps, and fittings. Having all these items on hand will save you from multiple trips to the hardware store and keep your installation process on track.2. Gathering the Necessary Tools and Materials
If you are replacing an old kitchen sink drain, you will need to remove the existing drain system first. This is an essential step in the installation process and requires careful disassembly of the old components. Start by using the pipe wrench to loosen the nuts that connect the trap to the drainpipe and the sink strainer. Then, use the adjustable pliers to remove the nuts and washers that hold the drainpipe to the sink strainer. Once all the components are disconnected, you can remove the old drain system and clean the area before proceeding with the installation.3. Removing the Old Drain System
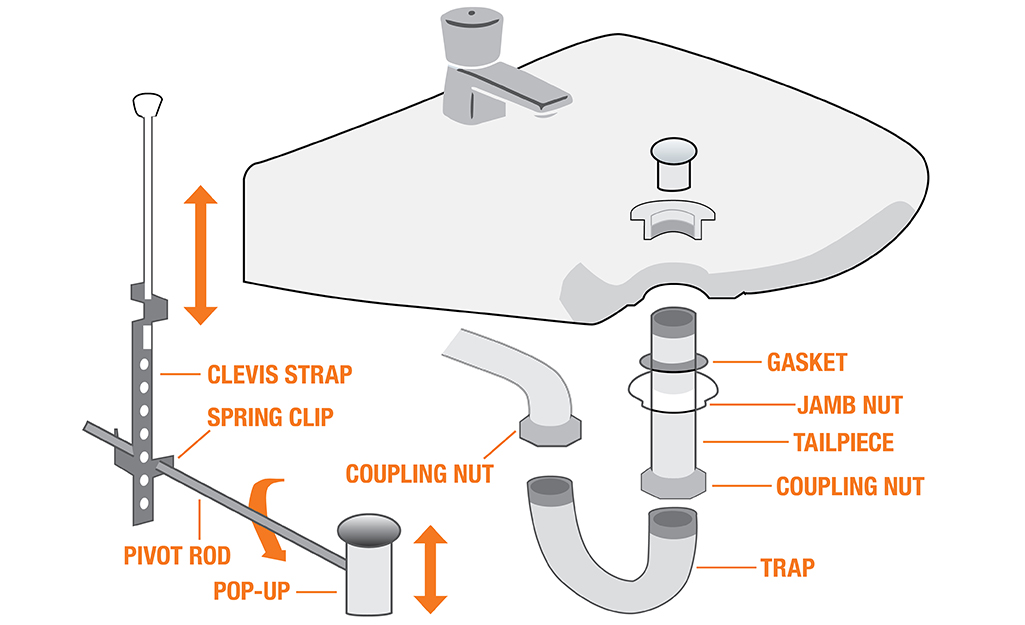
With the old drain system removed, you can now start assembling the new one. Begin by attaching the tailpiece to the sink strainer using the nuts and washers provided. Next, attach the trap to the tailpiece, making sure to use Teflon tape on the threads for a secure connection. Then, attach the other end of the trap to the drainpipe, again using Teflon tape on the threads. Make sure all the connections are tight and secure before moving on to the next step.4. Assembling the New Drain System
Now that the main components of the drain system are in place, it's time to install the drainpipe. This is the pipe that connects the sink to the main plumbing system. Start by measuring the length of the drainpipe needed and cut it to size using a hacksaw. Then, use the adjustable pliers to attach the drainpipe to the trap and the main plumbing line. Ensure that the connections are tight and secure to prevent any leaks.5. Installing the Drainpipe
One of the final steps in installing a kitchen sink drain is sealing it with plumber's putty. This is a soft, pliable material that helps to create a watertight seal between the sink and the drain system. To use plumber's putty, roll it into a thin rope and wrap it around the underside of the sink strainer. Then, press the strainer into place on the sink, making sure it is centered and level. Wipe away any excess putty and let it dry for a few hours before using the sink.6. Sealing with Plumber's Putty
After completing the installation, it's important to test your kitchen sink drain for any leaks. This will help to identify any potential issues and ensure that your system is working correctly. Run water through the sink and check all the connections for any signs of leaks. If you notice any, tighten the connections or add more plumber's putty as needed. Once you are satisfied that there are no leaks, you can proceed to use your new kitchen sink drain with confidence.7. Testing for Leaks
To keep your kitchen sink drain functioning properly, it's important to maintain it regularly. This includes cleaning out any debris or buildup in the drainpipe and traps, as well as checking for and fixing any leaks. You can also use a drain cleaner once a month to prevent clogs and keep your drain smelling fresh.8. Maintaining Your Kitchen Sink Drain
Despite proper installation and maintenance, you may encounter some issues with your kitchen sink drain. These can include slow draining, strange noises, or foul odors. If you experience any of these issues, you can troubleshoot them by checking for clogs, cleaning the drain with a mixture of baking soda and vinegar, or using a plunger to clear any blockages.9. Troubleshooting Common Issues
If you are not confident in your plumbing skills or encounter a more serious issue with your kitchen sink drain, it's best to call a professional plumber for assistance. A professional plumber can help diagnose and fix any problems quickly and efficiently, saving you from potential headaches and costly repairs in the future. With these tips and a good understanding of your kitchen sink drain plumbing diagram, you can confidently install and maintain your own drain system. Remember to always follow safety precautions and seek professional help if needed.10. Calling a Professional
The Importance of Understanding Kitchen Sink Drain Plumbing Diagrams in House Design

Proper Plumbing: The Backbone of a Functional Kitchen
:max_bytes(150000):strip_icc()/how-to-install-a-sink-drain-2718789-hero-24e898006ed94c9593a2a268b57989a3.jpg) When it comes to designing a house, the kitchen is undoubtedly one of the most important areas. It is where we prepare and cook our meals, and it also serves as a gathering place for family and friends. However, a functional kitchen is not just about having the right appliances and decorations – it also needs to have a well-designed plumbing system, specifically for the kitchen sink. This is where a kitchen sink drain plumbing diagram comes in handy.
Kitchen sink drain plumbing diagrams
are visual representations of the pipes and fixtures that make up the plumbing system in your kitchen sink. They show the exact location of the pipes, the connections between them, and the flow of water through the system. These diagrams are essential for understanding how your kitchen sink's plumbing works and for troubleshooting any issues that may arise.
When it comes to designing a house, the kitchen is undoubtedly one of the most important areas. It is where we prepare and cook our meals, and it also serves as a gathering place for family and friends. However, a functional kitchen is not just about having the right appliances and decorations – it also needs to have a well-designed plumbing system, specifically for the kitchen sink. This is where a kitchen sink drain plumbing diagram comes in handy.
Kitchen sink drain plumbing diagrams
are visual representations of the pipes and fixtures that make up the plumbing system in your kitchen sink. They show the exact location of the pipes, the connections between them, and the flow of water through the system. These diagrams are essential for understanding how your kitchen sink's plumbing works and for troubleshooting any issues that may arise.
Understanding the Diagram
 At first glance, a kitchen sink drain plumbing diagram may seem overwhelming and confusing. However, with a little bit of knowledge, it can be quite simple to understand. The diagram typically consists of three main components: the sink, the trap, and the waste pipe. The sink is where the water goes in and out, the trap is a curved piece of pipe that prevents sewer gases from entering your home, and the waste pipe is where the used water exits your home.
It is important to understand the different parts of the plumbing system
as they can affect the functionality and maintenance of your kitchen sink. For instance, if the trap is incorrectly installed, it can lead to foul odors coming from your sink. Or if the waste pipe is clogged, it can cause water to back up and potentially damage your sink and surrounding cabinets.
The Benefits of Knowing Your Kitchen Sink Drain Plumbing Diagram
 Having a basic understanding of your kitchen sink drain plumbing diagram can save you time, money, and hassle in the long run. With this knowledge, you can easily identify and fix any issues that may arise with your kitchen sink's plumbing. You can also make more informed decisions when it comes to remodeling or upgrading your kitchen, as you will know how the new plumbing will fit into the existing system.
Additionally, understanding your plumbing diagram can also help prevent potential disasters
such as leaks or burst pipes. By regularly checking and maintaining your kitchen sink's plumbing, you can avoid costly repairs and potential water damage to your home.
In Conclusion
 In summary, a kitchen sink drain plumbing diagram is an essential tool for any homeowner who wants to have a functional and worry-free kitchen. By understanding the diagram, you can ensure that your kitchen sink's plumbing is properly installed and maintained, and you can also make well-informed decisions when it comes to any upgrades or repairs. So next time you are designing a house, don't forget to pay attention to the plumbing and make sure to consult a professional if needed.


/how-to-install-a-sink-drain-2718789-hero-b5b99f72b5a24bb2ae8364e60539cece.jpg)


:max_bytes(150000):strip_icc()/how-to-install-a-sink-drain-2718789-04-5715d67f5b7d41429d42bf705bb70e2c.jpg)


