Installing a new kitchen sink drain assembly may seem like a daunting task, but with the right tools and some basic knowledge, you can do it yourself. Follow these steps to successfully install a new kitchen sink drain assembly: Step 1: Gather Your Tools Before you begin, make sure you have all the necessary tools and materials. You will need a screwdriver, adjustable pliers, plumber's putty, and a new kitchen sink drain assembly. It's also a good idea to have a bucket or towel handy in case of any spills. Step 2: Remove the Old Drain Assembly The first step in installing a new kitchen sink drain assembly is to remove the old one. Start by loosening the nut that connects the drain pipe to the sink strainer. You may need to use pliers to fully loosen the nut. Once the nut is loose, gently pull the drain pipe away from the sink strainer. Step 3: Clean the Area After removing the old drain assembly, clean the area around the sink strainer and the drain hole. Use a rag or sponge to wipe away any debris or residue. Step 4: Apply Plumber's Putty Plumber's putty is a soft, moldable substance that helps create a watertight seal. Take a small amount of putty and roll it into a thin rope. Place the putty around the edge of the sink strainer, making sure to cover the entire surface that will come in contact with the sink. Step 5: Install the New Drain Assembly Place the new kitchen sink drain assembly into the sink hole, making sure it is centered and level. Next, insert the rubber gasket and metal washer onto the bottom of the sink strainer. From below the sink, screw on the retaining nut and tighten with pliers. Step 6: Connect the Drain Pipe Take the drain pipe and connect it to the bottom of the sink strainer. Use pliers to tighten the nut and ensure a secure connection. Step 7: Test for Leaks Turn on the water and check for any leaks. If you notice any, try tightening the connections or adding more plumber's putty to create a better seal. Step 8: Clean Up Once you have successfully installed the new kitchen sink drain assembly and tested for leaks, clean up any excess plumber's putty or debris around the sink.How to Install a Kitchen Sink Drain Assembly


How to Install a Kitchen Sink Drain Assembly

/how-to-install-a-sink-drain-2718789-hero-b5b99f72b5a24bb2ae8364e60539cece.jpg)

:max_bytes(150000):strip_icc()/how-to-install-a-sink-drain-2718789-hero-24e898006ed94c9593a2a268b57989a3.jpg)


If your current kitchen sink drain assembly is damaged or outdated, it may be time to replace it. Here's how to replace a kitchen sink drain assembly: Step 1: Gather Your Tools Before you begin, make sure you have all the necessary tools and materials. You will need a screwdriver, adjustable pliers, plumber's putty, and a new kitchen sink drain assembly. It's also a good idea to have a bucket or towel handy in case of any spills. Step 2: Remove the Old Drain Assembly The first step in replacing a kitchen sink drain assembly is to remove the old one. Start by loosening the nut that connects the drain pipe to the sink strainer. You may need to use pliers to fully loosen the nut. Once the nut is loose, gently pull the drain pipe away from the sink strainer. Step 3: Clean the Area After removing the old drain assembly, clean the area around the sink strainer and the drain hole. Use a rag or sponge to wipe away any debris or residue. Step 4: Apply Plumber's Putty Plumber's putty is a soft, moldable substance that helps create a watertight seal. Take a small amount of putty and roll it into a thin rope. Place the putty around the edge of the sink strainer, making sure to cover the entire surface that will come in contact with the sink. Step 5: Install the New Drain Assembly Place the new kitchen sink drain assembly into the sink hole, making sure it is centered and level. Next, insert the rubber gasket and metal washer onto the bottom of the sink strainer. From below the sink, screw on the retaining nut and tighten with pliers. Step 6: Connect the Drain Pipe Take the drain pipe and connect it to the bottom of the sink strainer. Use pliers to tighten the nut and ensure a secure connection. Step 7: Test for Leaks Turn on the water and check for any leaks. If you notice any, try tightening the connections or adding more plumber's putty to create a better seal. Step 8: Clean Up Once you have successfully replaced the kitchen sink drain assembly and tested for leaks, clean up any excess plumber's putty or debris around the sink.How to Replace a Kitchen Sink Drain Assembly


How to Replace a Kitchen Sink Drain Assembly


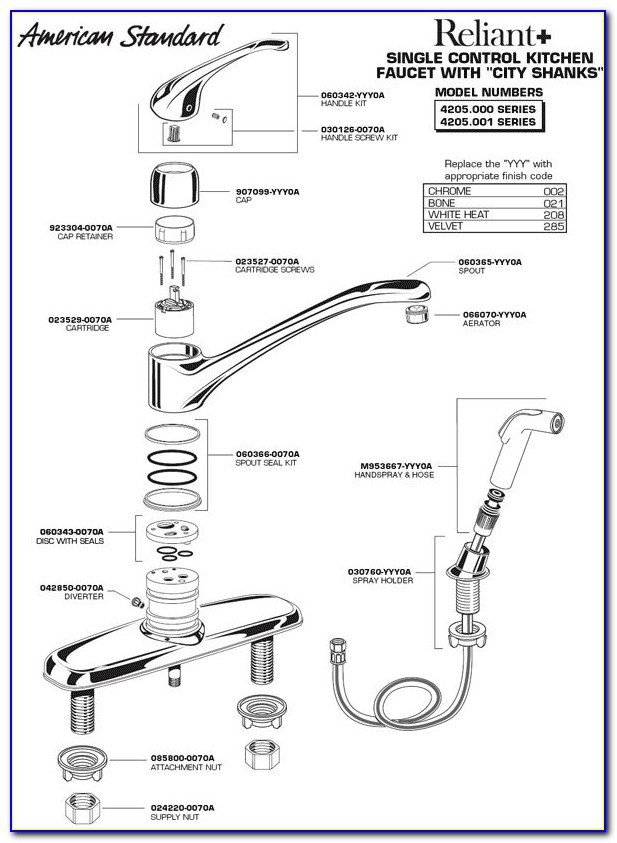
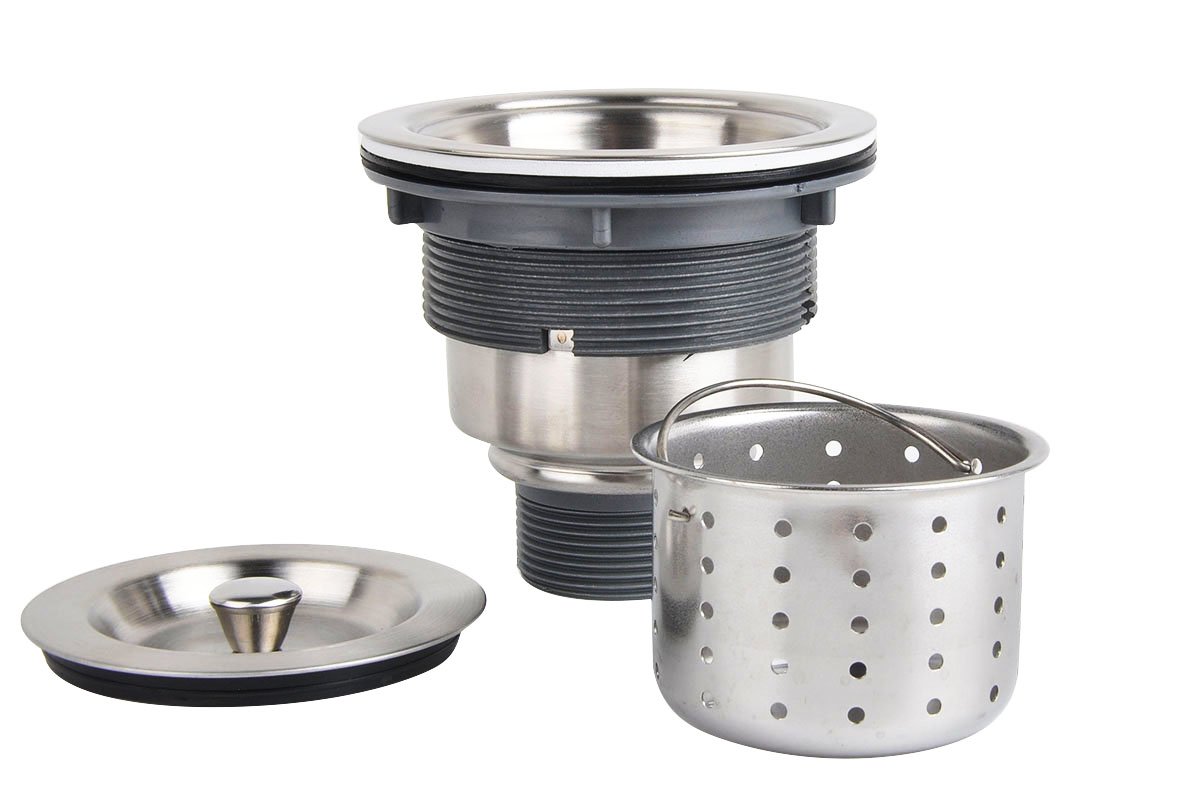
A kitchen sink drain assembly is made up of several parts, each with its own important role in keeping your sink running smoothly. Here are the main parts of a kitchen sink drain assembly: Sink Strainer The sink strainer is the part of the drain assembly that sits in the sink and catches any large pieces of food or debris. It is typically made of metal and has small holes to allow water to pass through while keeping larger objects out. Flange The flange is the part of the drain assembly that sits below the sink and connects to the sink strainer. It is usually made of metal and has a lip that sits on top of the sink to create a watertight seal. Retaining Nut The retaining nut is a circular piece that screws onto the bottom of the sink strainer and holds it in place. It is typically made of metal and can be tightened with pliers. Drain Pipe The drain pipe is the long, curved piece that connects the sink strainer to the main plumbing line. It allows water to flow out of the sink and into the main sewer line. Washer and Gasket These two pieces work together to create a watertight seal between the sink strainer and the sink. The gasket is a rubber or plastic ring that sits between the sink and the flange, while the washer is a metal disk that sits between the retaining nut and the sink strainer.Kitchen Sink Drain Assembly Parts


Kitchen Sink Drain Assembly Parts


Visual learners may benefit from a diagram of a kitchen sink drain assembly. Here is a simple diagram showing the main parts of a kitchen sink drain assembly:Kitchen Sink Drain Assembly Diagram


Kitchen Sink Drain Assembly Diagram


If you're installing a new kitchen sink drain assembly, here are some general instructions to follow: Step 1: Gather Your Tools Before you begin, make sure you have all the necessary tools and materials. You will need a screwdriver, adjustable pliers, plumber's putty, and a new kitchen sink drain assembly. It's also a good idea to have a bucket or towel handy in case of any spills. Step 2: Remove the Old Drain Assembly The first step in installing a new kitchen sink drain assembly is to remove the old one. Start by loosening the nut that connects the drain pipe to the sink strainer. You may need to use pliers to fully loosen the nut. Once the nut is loose, gently pull the drain pipe away from the sink strainer. Step 3: Clean the Area After removing the old drain assembly, clean the area around the sink strainer and the drain hole. Use a rag or sponge to wipe away any debris or residue. Step 4: Apply Plumber's Putty Plumber's putty is a soft, moldable substance that helps create a watertight seal. Take a small amount of putty and roll it into a thin rope. Place the putty around the edge of the sink strainer, making sure to cover the entire surface that will come in contact with the sink. Step 5: Install the New Drain Assembly Place the new kitchen sink drain assembly into the sink hole, making sure it is centered and level. Next, insert the rubber gasket and metal washer onto the bottom of the sink strainer. From below the sink, screw on the retaining nut and tighten with pliers. Step 6: Connect the Drain Pipe Take the drain pipe and connect it to the bottom of the sink strainer. Use pliers to tighten the nut and ensure a secure connection. Step 7: Test for Leaks Turn on the water and check for any leaks. If you notice any, try tightening the connections or adding more plumber's putty to create a better seal. Step 8: Clean Up Once you have successfully installed the new kitchen sink drain assembly and tested for leaks, clean up any excess plumber's putty or debris around the sink.Kitchen Sink Drain Assembly Installation Instructions


Kitchen Sink Drain Assembly Installation Instructions


If your current kitchen sink drain assembly is damaged or outdated, you may need to replace it. Here are some steps to follow when replacing a kitchen sink drain assembly: Step 1: Gather Your Tools Before you begin, make sure you have all the necessary tools and materials. You will need a screwdriver, adjustable pliers, plumber's putty, and a new kitchen sink drain assembly. It's also a good idea to have a bucket or towel handy in case of any spills. Step 2: Remove the Old Drain Assembly The first step in replacing a kitchen sink drain assembly is to remove the old one. Start by loosening the nut that connects the drain pipe to the sink strainer. You may need to use pliers to fully loosen the nut. Once the nut is loose, gently pull the drain pipe away from the sink strainer. Step 3: Clean the Area After removing the old drain assembly, clean the area around the sink strainer and the drain hole. Use a rag or sponge to wipe away any debris or residue. Step 4: Apply Plumber's Putty Plumber's putty is a soft, moldable substance that helps create a watertight seal. Take a small amount of putty and roll it into a thin rope. Place the putty around the edge of the sink strainer, making sure to cover the entire surface that will come in contact with the sink. Step 5: Install the New Drain Assembly Place the new kitchen sink drain assembly into the sink hole, making sure it is centered and level. Next, insert the rubber gasket and metal washer onto the bottom of the sink strainer. From below the sink, screw on the retaining nut and tighten with pliers. Step 6: Connect the Drain Pipe Take the drain pipe and connect it to the bottom of the sink strainer. Use pliers to tighten the nut and ensure a secure connection. Step 7: Test for Leaks Turn on the water and check for any leaks. If you notice any, try tightening the connections or adding more plumber's putty to create a better seal. Step 8: Clean Up Once you have successfully replaced the kitchen sink drain assembly and tested for leaks, clean up any excess plumber's putty or debris around the sink.Kitchen Sink Drain Assembly Replacement


Kitchen Sink Drain Assembly Replacement


If your kitchen sink drain assembly is not functioning properly, you may be able to repair it instead of replacing it. Here's how to repair a kitchen sink drain assembly:Kitchen Sink Drain Assembly Repair


Kitchen Sink Drain Assembly Repair

Kitchen Sink Drain Assembly: A Crucial Component in House Design

The Importance of a Properly Functioning Kitchen Sink Drain
/how-to-install-a-sink-drain-2718789-hero-24e898006ed94c9593a2a268b57989a3.jpg) The kitchen sink drain assembly may seem like a small and insignificant part of your house design, but it plays a crucial role in the functionality and overall aesthetic of your kitchen. A properly functioning kitchen sink drain not only allows for efficient water drainage, but it also prevents unpleasant odors and clogs that can disrupt your daily routine.
Proper Installation is Key
The first step in ensuring a functional and efficient kitchen sink drain assembly is proper installation. This includes selecting the right type of drain for your sink, as well as following the manufacturer's instructions carefully. Incorrect installation can lead to leaks, clogs, and other issues that can be costly and time-consuming to fix.
Choosing the Right Materials
When it comes to the materials for your kitchen sink drain assembly, there are several options available. Stainless steel, plastic, and brass are some of the most common materials used. Stainless steel is durable and corrosion-resistant, while plastic is budget-friendly and easy to install. Brass, although more expensive, offers a timeless and elegant look to your kitchen.
Functionality and Design
When selecting a kitchen sink drain assembly, it's important to consider both functionality and design. A pop-up drain with a lever or push-button mechanism allows for easy opening and closing of the drain, making it ideal for busy households. For a more modern look, a grid-style drain cover can add a touch of sophistication to your sink. Additionally, choosing a drain assembly in a matching finish to your faucet can create a cohesive and stylish look in your kitchen.
The Final Touch
The kitchen sink drain assembly may seem like a small detail, but it's the final touch that completes your kitchen design. It not only ensures the proper functioning of your sink but also adds to the overall aesthetic and appeal of your kitchen. So, when planning your house design, don't overlook the importance of a high-quality and well-installed kitchen sink drain assembly.
The kitchen sink drain assembly may seem like a small and insignificant part of your house design, but it plays a crucial role in the functionality and overall aesthetic of your kitchen. A properly functioning kitchen sink drain not only allows for efficient water drainage, but it also prevents unpleasant odors and clogs that can disrupt your daily routine.
Proper Installation is Key
The first step in ensuring a functional and efficient kitchen sink drain assembly is proper installation. This includes selecting the right type of drain for your sink, as well as following the manufacturer's instructions carefully. Incorrect installation can lead to leaks, clogs, and other issues that can be costly and time-consuming to fix.
Choosing the Right Materials
When it comes to the materials for your kitchen sink drain assembly, there are several options available. Stainless steel, plastic, and brass are some of the most common materials used. Stainless steel is durable and corrosion-resistant, while plastic is budget-friendly and easy to install. Brass, although more expensive, offers a timeless and elegant look to your kitchen.
Functionality and Design
When selecting a kitchen sink drain assembly, it's important to consider both functionality and design. A pop-up drain with a lever or push-button mechanism allows for easy opening and closing of the drain, making it ideal for busy households. For a more modern look, a grid-style drain cover can add a touch of sophistication to your sink. Additionally, choosing a drain assembly in a matching finish to your faucet can create a cohesive and stylish look in your kitchen.
The Final Touch
The kitchen sink drain assembly may seem like a small detail, but it's the final touch that completes your kitchen design. It not only ensures the proper functioning of your sink but also adds to the overall aesthetic and appeal of your kitchen. So, when planning your house design, don't overlook the importance of a high-quality and well-installed kitchen sink drain assembly.