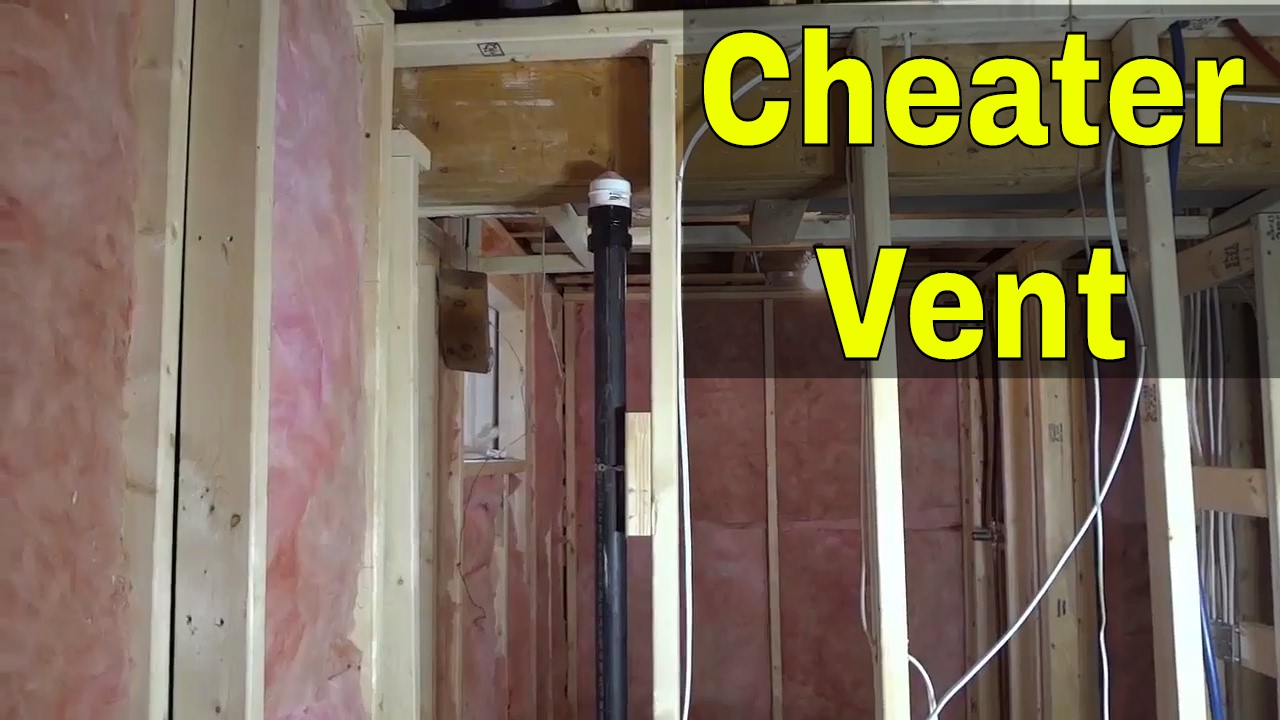
If you're looking to improve the functionality of your kitchen sink, installing a cheater vent can be a game changer. A cheater vent is a simple and affordable solution for homes that do not have a vent stack installed. Not only will it help eliminate unpleasant odors, but it also prevents the need for a costly and time-consuming plumbing project. So, if you're ready to upgrade your kitchen sink, here's a step-by-step guide on how to install a cheater vent.How to Install a Cheater Vent Under a Kitchen Sink


How to Install a Cheater Vent Under a Kitchen Sink


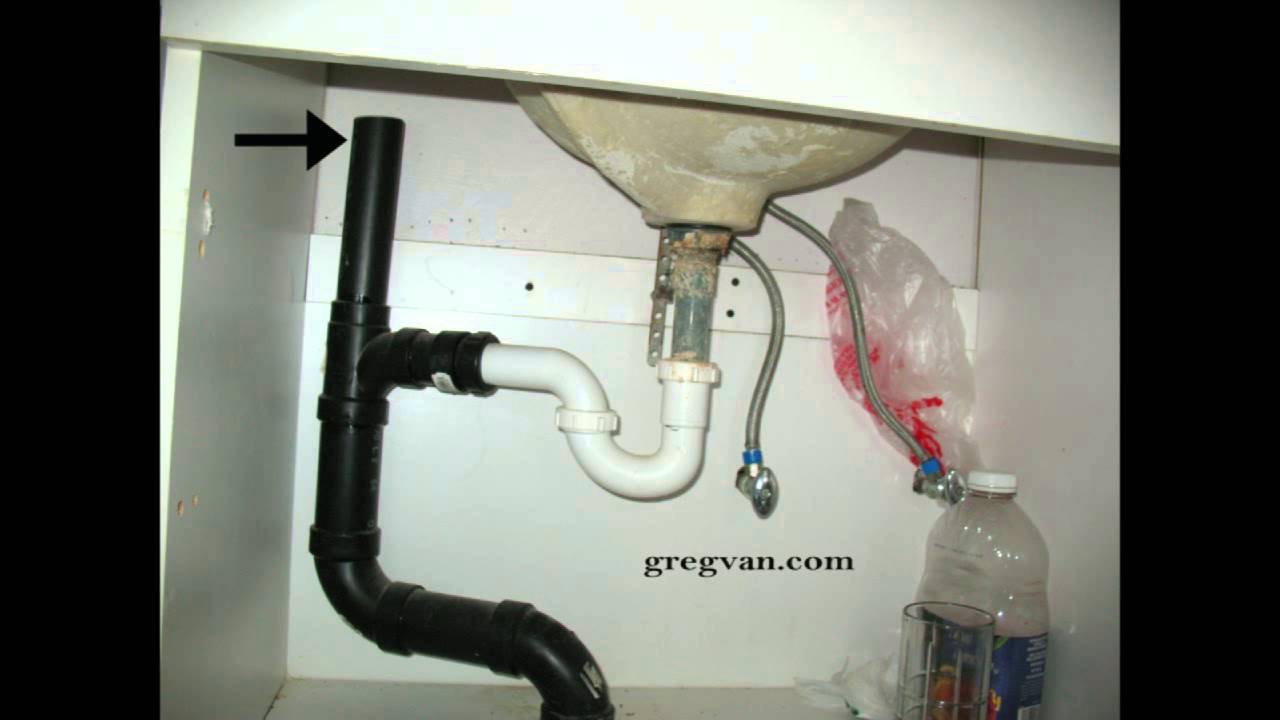
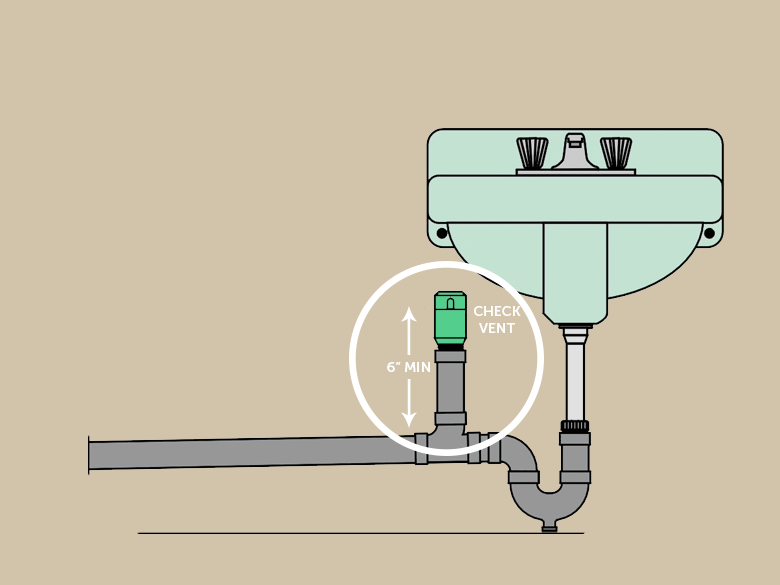
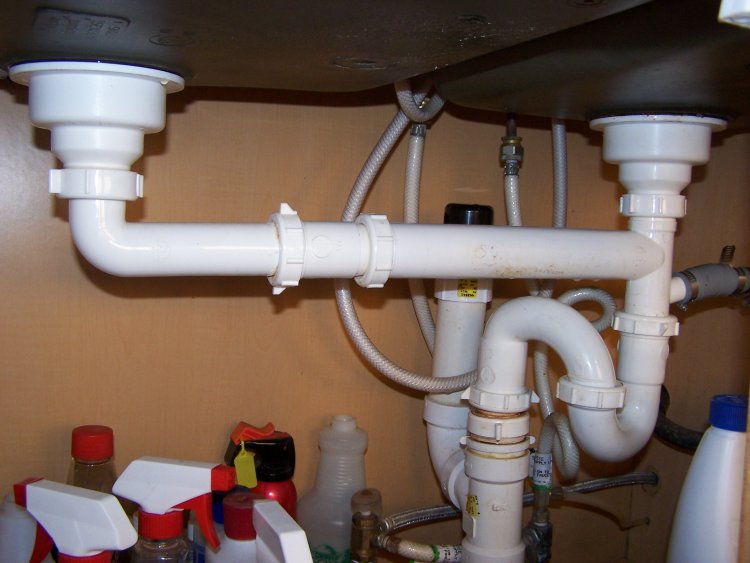
The first step to installing a cheater vent is to gather all the necessary tools and materials. You will need a cheater vent (also known as an air admittance valve), a hacksaw, plumber's tape, and pipe glue. It's always a good idea to read the instructions that come with the cheater vent before starting the installation process. Now, let's get started! The first thing you need to do is locate the P-trap under your kitchen sink. The P-trap is a curved pipe that connects the drainpipe to the main sewer line. It's usually found under the sink and is shaped like a "U" or "P".Installing a Cheater Vent Under Your Kitchen Sink


Installing a Cheater Vent Under Your Kitchen Sink
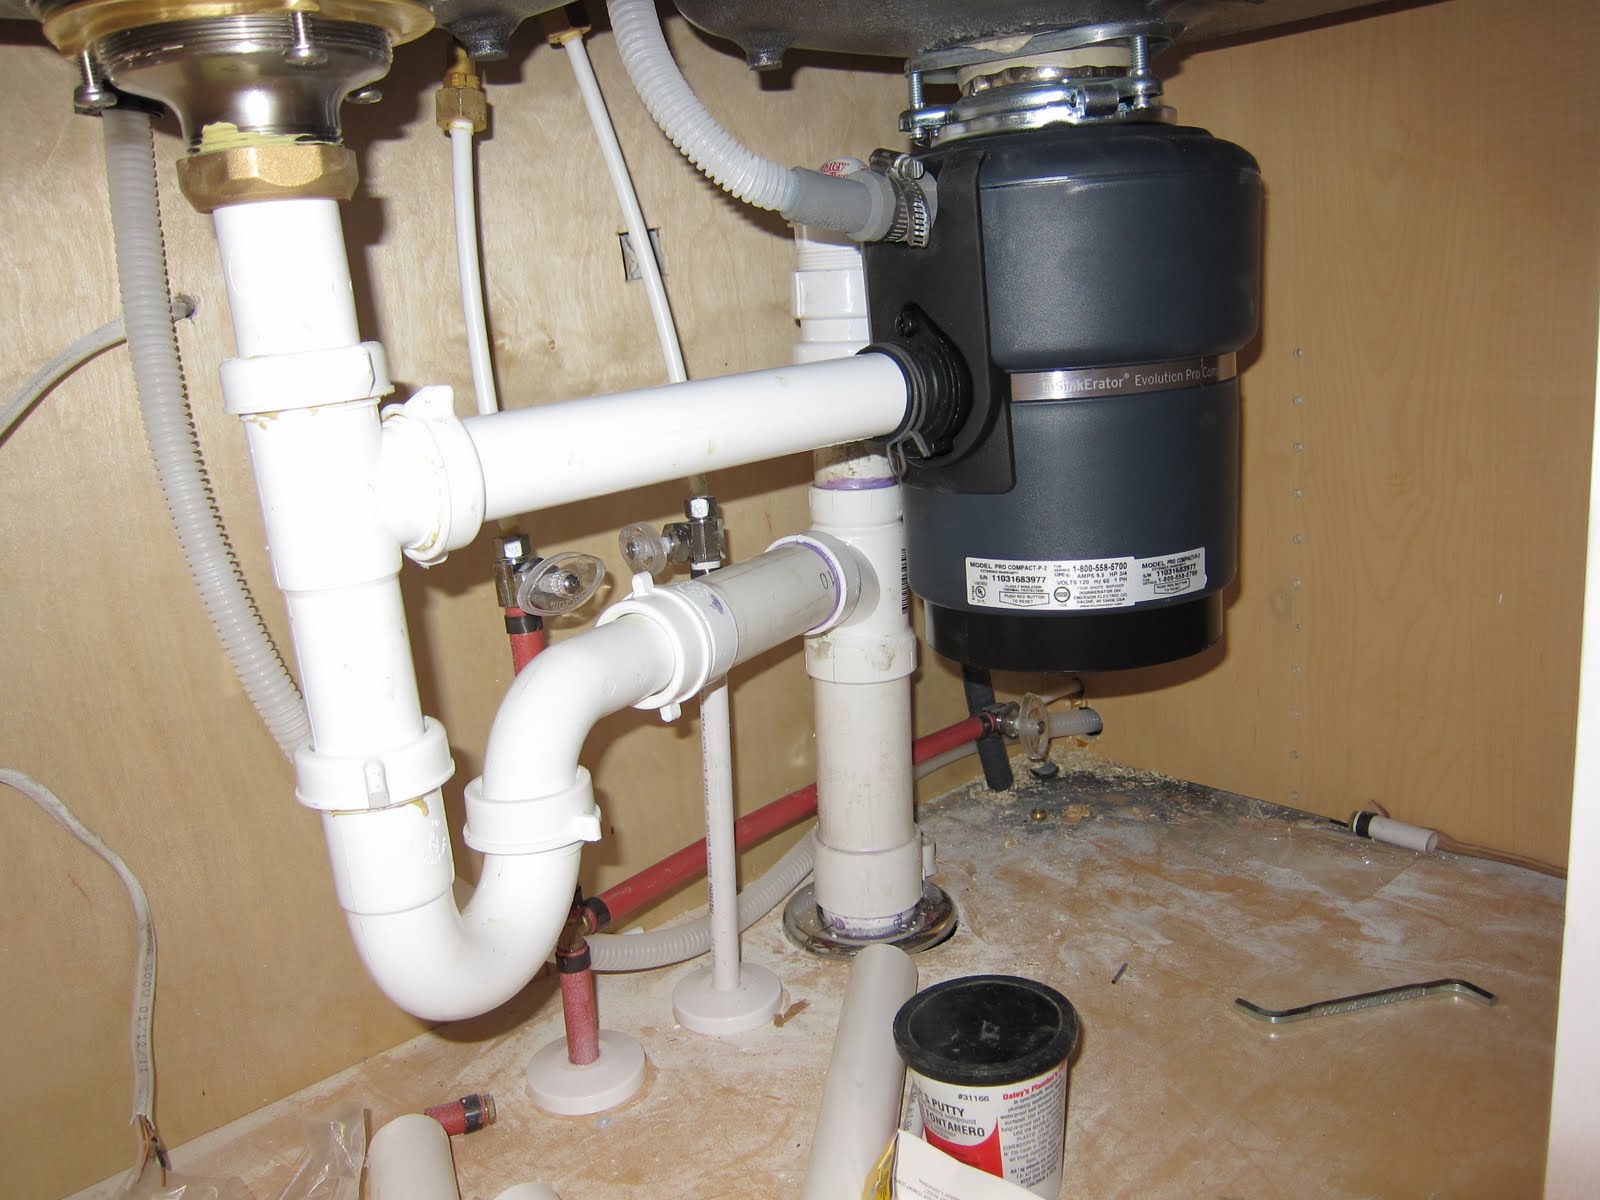
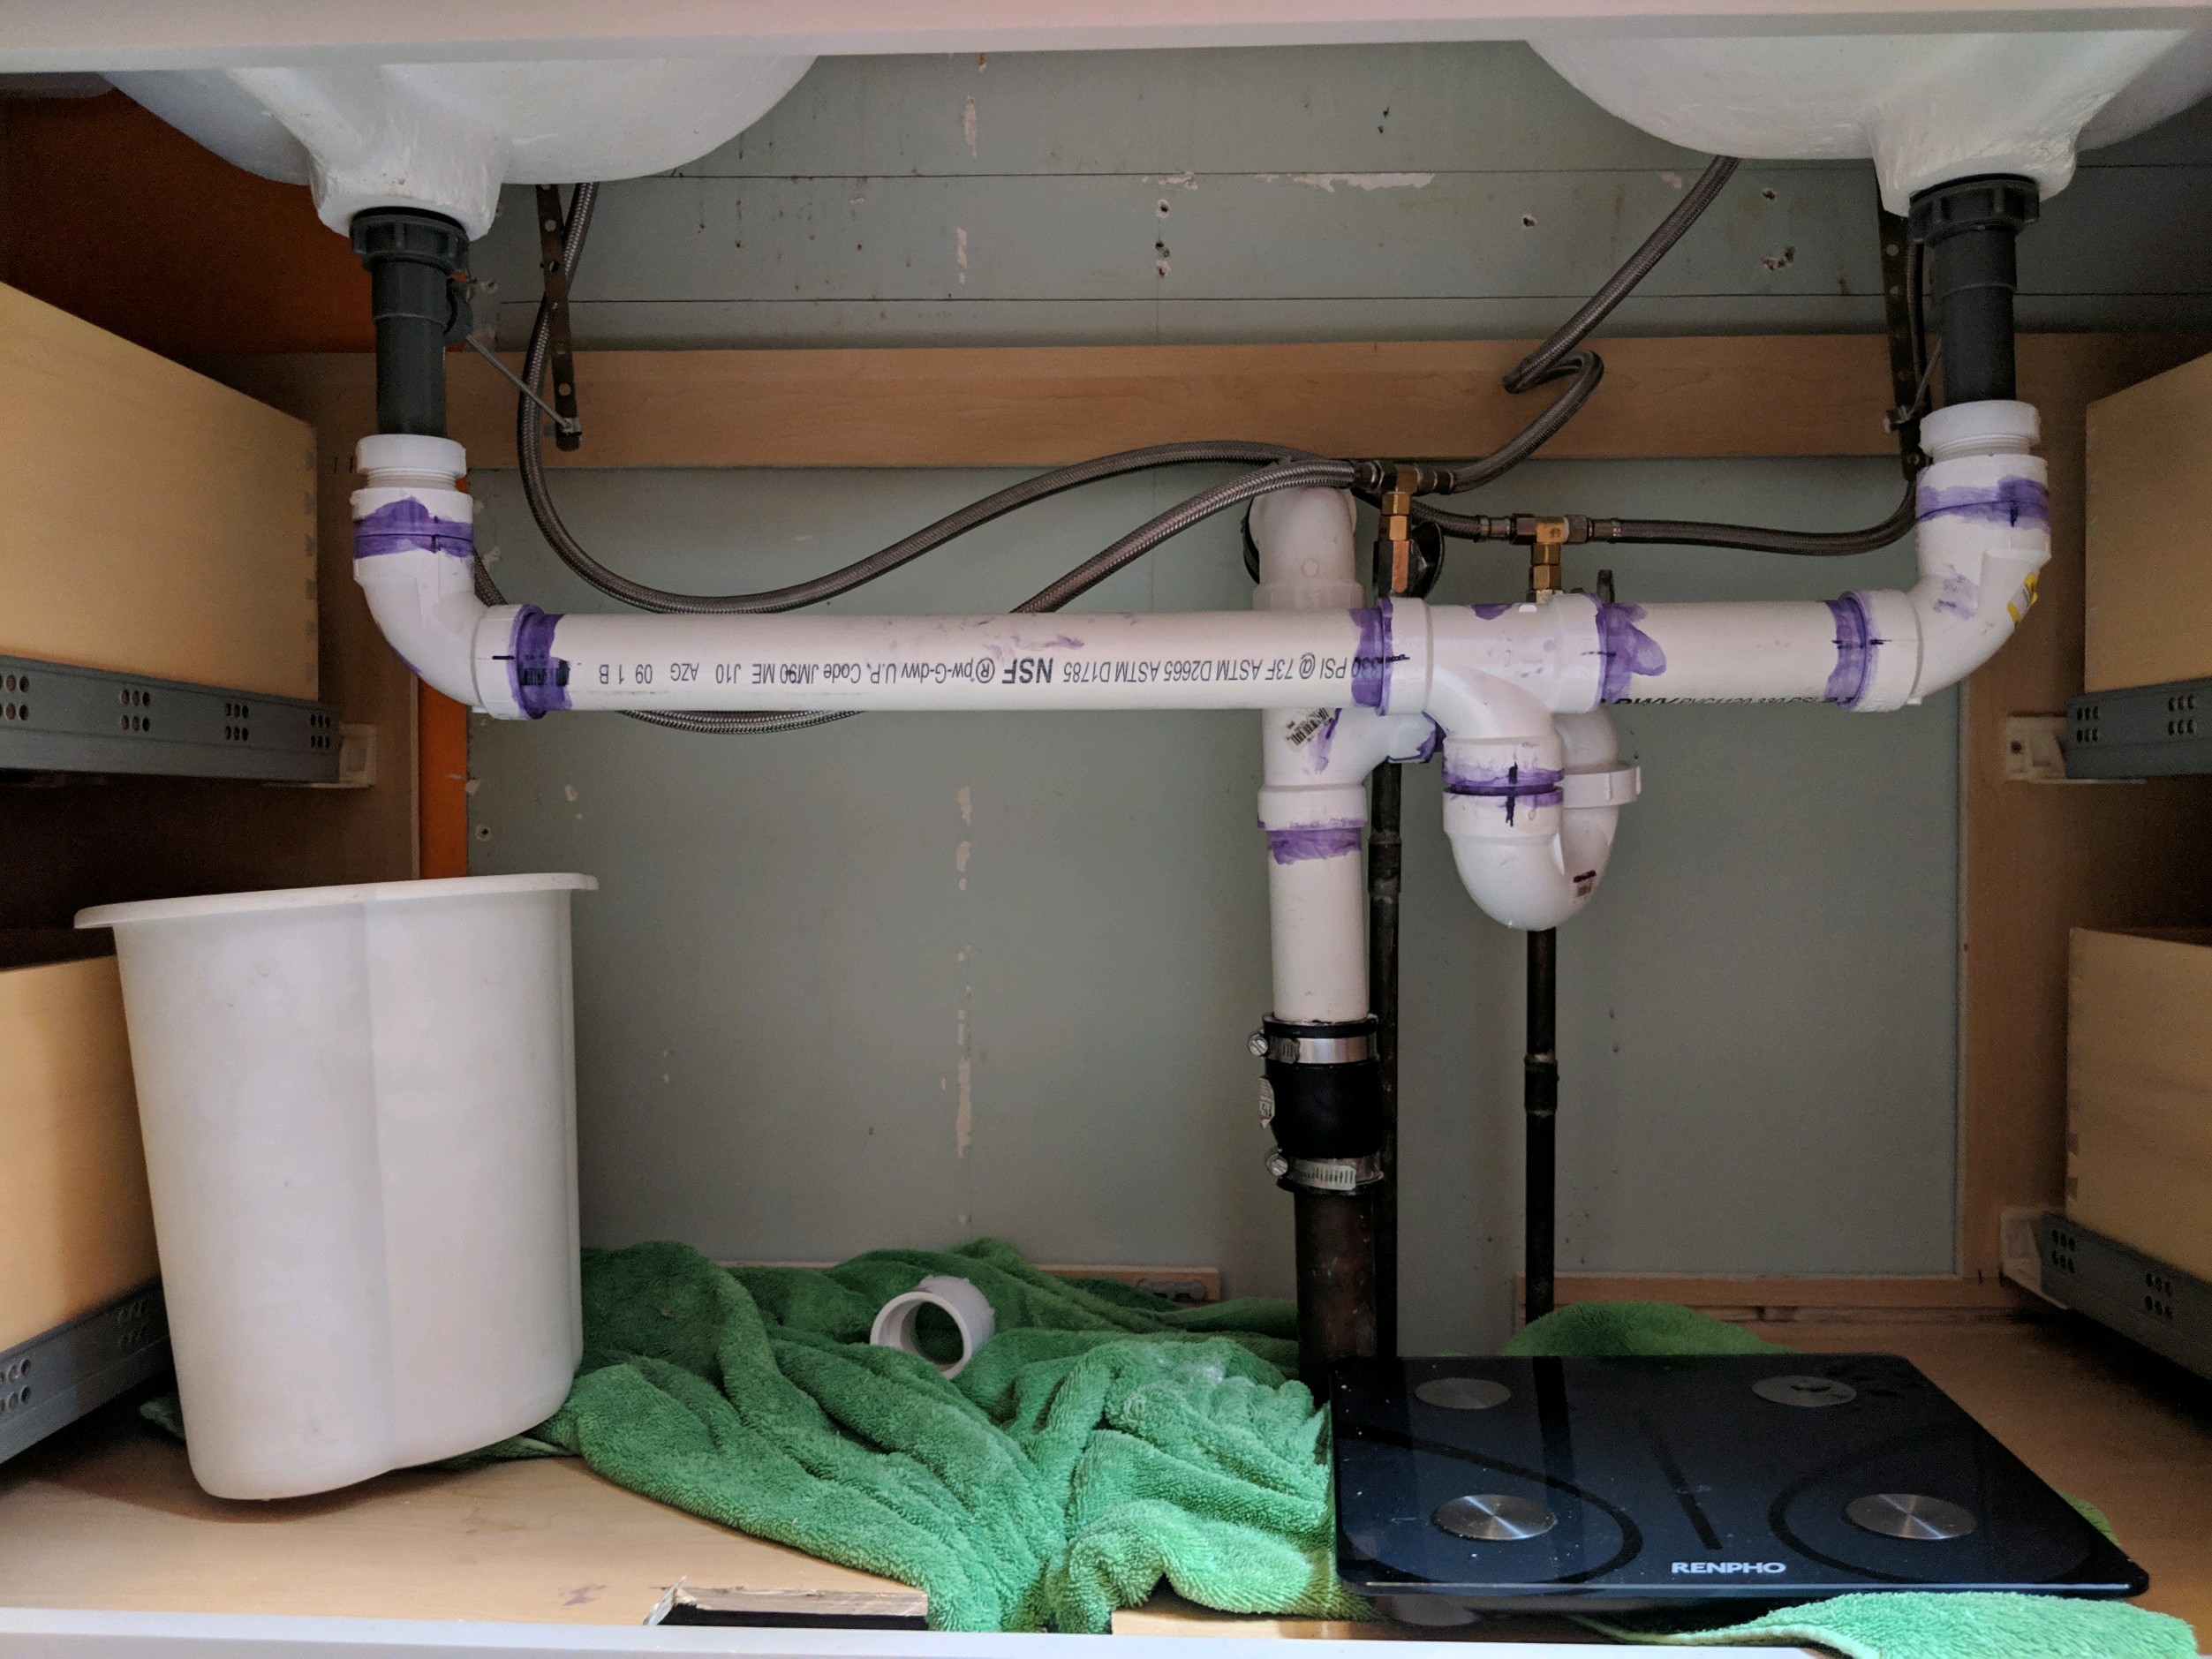

1. Measure the distance between the P-trap and the drainpipe. This will determine the length of the cheater vent you will need. Make sure to add an extra inch to the measurement to allow for any adjustments. 2. Use a hacksaw to cut the cheater vent to the appropriate length. 3. Apply a small amount of plumber's tape to the threads of the cheater vent. This will create a tight seal and prevent any leaks. 4. Carefully insert the cheater vent into the opening of the drainpipe. Make sure it is securely in place. 5. Using pipe glue, connect the other end of the cheater vent to the P-trap. Again, make sure it is securely in place. 6. Allow the glue to dry for at least 30 minutes before testing the cheater vent. You can test it by running water down the drain and checking for any leaks.Step-by-Step Guide to Installing a Cheater Vent Under Your Kitchen Sink
:max_bytes(150000):strip_icc()/venting-sink-diagram-f8f9759a-1047c08369d24101b00c8340ba048950.jpg)

Step-by-Step Guide to Installing a Cheater Vent Under Your Kitchen Sink


Installing a cheater vent is a relatively simple DIY project that can be completed in under an hour. It's a cost-effective way to improve the functionality of your kitchen sink without having to hire a professional plumber. Just make sure to follow the instructions carefully and take your time during the installation process.DIY: Installing a Cheater Vent Under Your Kitchen Sink


DIY: Installing a Cheater Vent Under Your Kitchen Sink


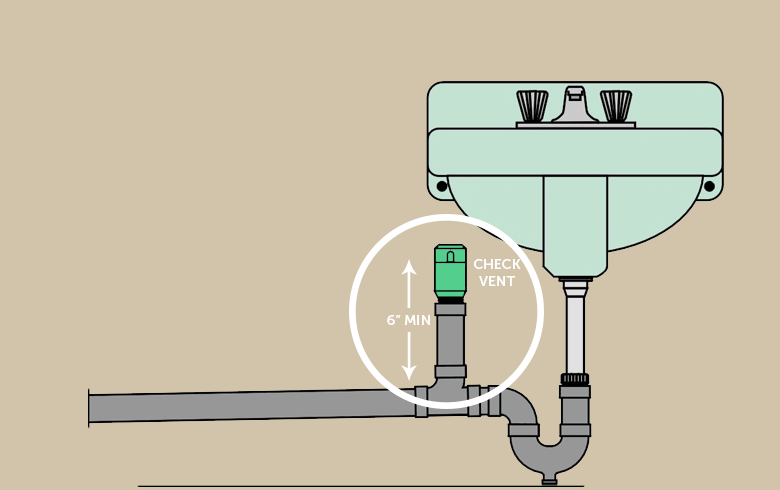
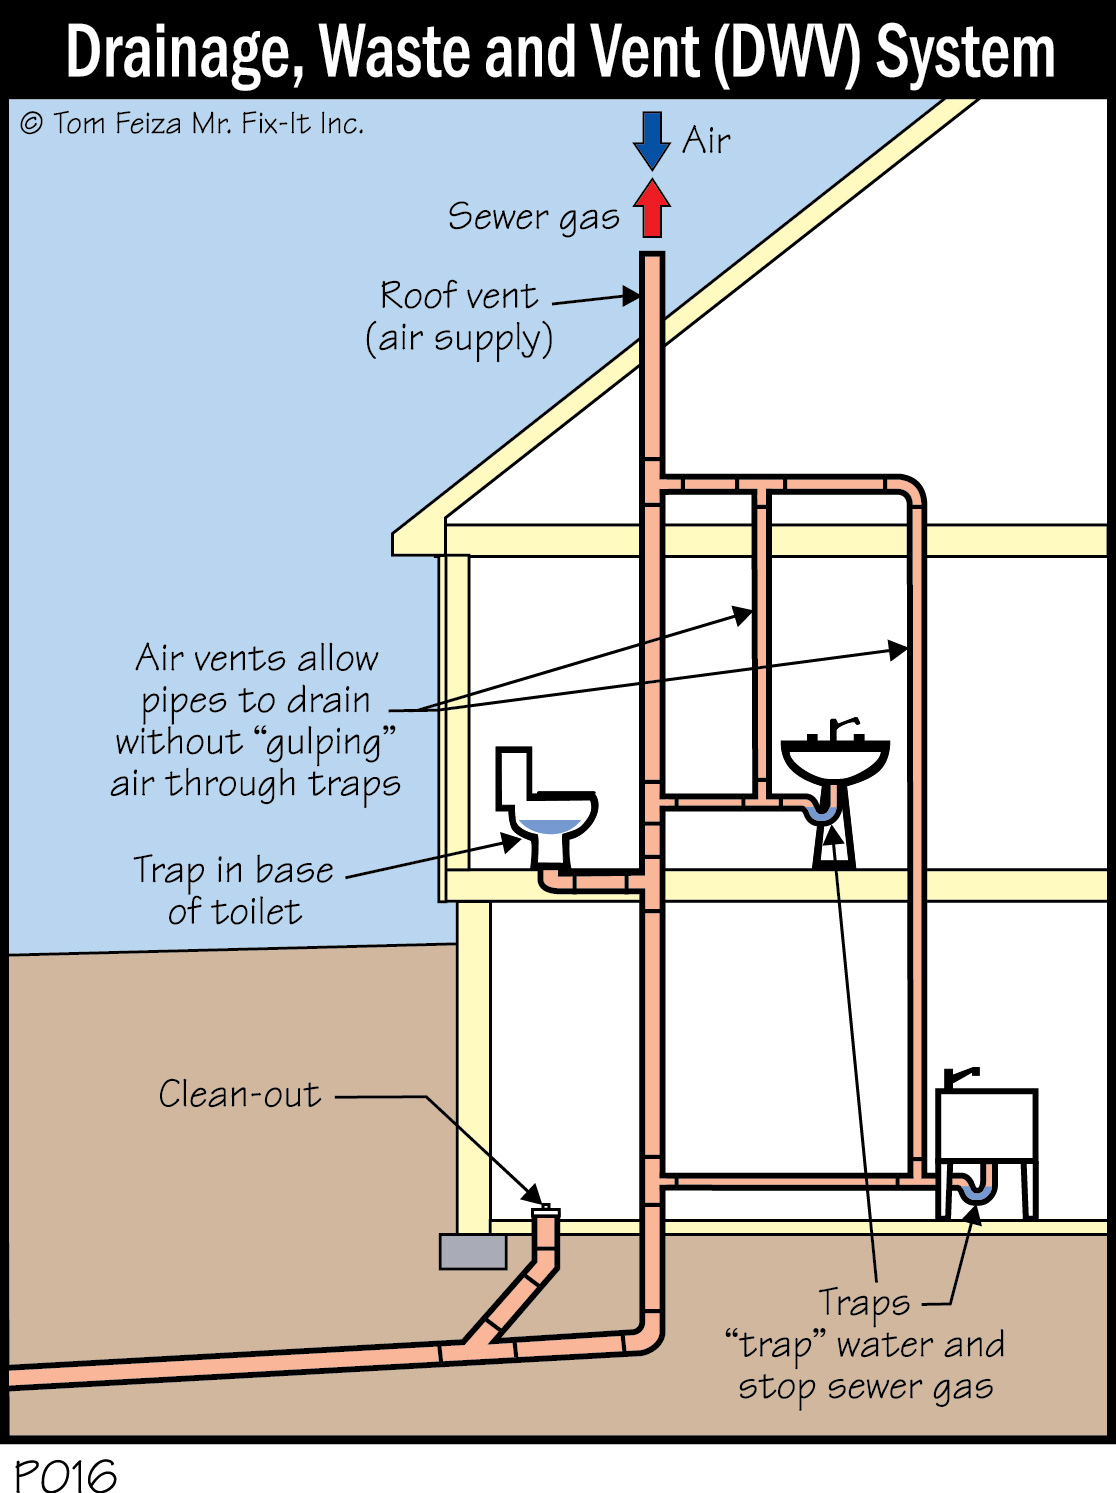
Before installing a cheater vent, it's important to understand its purpose and limitations. A cheater vent is designed to allow air to enter the drainpipe, which prevents any negative pressure from building up and causing the water to drain slowly. It's not meant to replace a full vent stack, so it's not suitable for all plumbing situations.What You Need to Know About Installing a Cheater Vent Under Your Kitchen Sink


What You Need to Know About Installing a Cheater Vent Under Your Kitchen Sink

If you're still unsure about installing a cheater vent, here's a quick and easy breakdown of the steps: 1. Gather all the necessary tools and materials. 2. Measure and cut the cheater vent to the appropriate length. 3. Apply plumber's tape to the threads of the cheater vent. 4. Connect the cheater vent to the drainpipe and P-trap using pipe glue. 5. Let the glue dry for 30 minutes before testing for any leaks.Easy Steps for Installing a Cheater Vent Under Your Kitchen Sink

Easy Steps for Installing a Cheater Vent Under Your Kitchen Sink
Aside from improving the functionality of your kitchen sink, installing a cheater vent has other benefits as well. It can help eliminate odors and prevent the need for costly plumbing projects. Additionally, it can also improve the overall health and safety of your home by preventing the buildup of harmful gases in the drainpipe.The Benefits of Installing a Cheater Vent Under Your Kitchen Sink

The Benefits of Installing a Cheater Vent Under Your Kitchen Sink
While installing a cheater vent is a simple task, there are some common mistakes that can be easily avoided: 1. Using the wrong size cheater vent is one of the most common mistakes. Make sure to measure the distance between the P-trap and drainpipe accurately. 2. Not using enough plumber's tape can result in leaks. Make sure to apply a sufficient amount to create a tight seal. 3. Forgetting to let the pipe glue dry before testing for leaks can cause the cheater vent to become loose and result in leaks.Common Mistakes to Avoid When Installing a Cheater Vent Under Your Kitchen Sink

Common Mistakes to Avoid When Installing a Cheater Vent Under Your Kitchen Sink


To recap, here's a list of tools and materials you will need for a successful installation: - Cheater vent (air admittance valve) - Hacksaw - Plumber's tape - Pipe glueTools and Materials Needed for Installing a Cheater Vent Under Your Kitchen Sink


Tools and Materials Needed for Installing a Cheater Vent Under Your Kitchen Sink

Lastly, here are some tips to keep in mind for a smooth and successful installation: - Follow the instructions that come with the cheater vent carefully. - Take your time and make sure to measure and cut accurately. - Use a level to ensure the cheater vent is installed straight. - Test for leaks before using your kitchen sink regularly. With these easy steps and tips, you can easily install a cheater vent under your kitchen sink and enjoy a more functional and odor-free kitchen. So, go ahead and give it a try – you'll be glad you did!Tips for a Successful Installation of a Cheater Vent Under Your Kitchen Sink


Tips for a Successful Installation of a Cheater Vent Under Your Kitchen Sink

Why You Should Install a Cheater Vent Under Your Kitchen Sink
The Importance of Proper Ventilation in Your Home
 Proper ventilation is an essential aspect of any well-designed home. It not only helps to maintain a healthy and comfortable living environment, but it also plays a crucial role in preventing potential hazards. One area of the home that often gets overlooked when it comes to ventilation is the kitchen sink. We tend to focus on installing vents above stoves and in bathrooms, but the kitchen sink also requires proper ventilation to function efficiently and safely. This is where a
cheater vent
comes into play.
Proper ventilation is an essential aspect of any well-designed home. It not only helps to maintain a healthy and comfortable living environment, but it also plays a crucial role in preventing potential hazards. One area of the home that often gets overlooked when it comes to ventilation is the kitchen sink. We tend to focus on installing vents above stoves and in bathrooms, but the kitchen sink also requires proper ventilation to function efficiently and safely. This is where a
cheater vent
comes into play.
What is a Cheater Vent and How Does it Work?
 A
cheater vent
, also known as an air admittance valve, is a one-way valve that allows air to enter the plumbing system but does not allow gases to escape. It is typically installed under the sink and connects to the drain line. When water flows through the drain, it creates suction, which can lead to negative pressure in the plumbing system. This negative pressure can cause gurgling noises, slow drainage, and even sewer gas odors. The
cheater vent
acts as a secondary vent and allows air to enter the plumbing system, balancing the pressure and preventing these issues from occurring.
A
cheater vent
, also known as an air admittance valve, is a one-way valve that allows air to enter the plumbing system but does not allow gases to escape. It is typically installed under the sink and connects to the drain line. When water flows through the drain, it creates suction, which can lead to negative pressure in the plumbing system. This negative pressure can cause gurgling noises, slow drainage, and even sewer gas odors. The
cheater vent
acts as a secondary vent and allows air to enter the plumbing system, balancing the pressure and preventing these issues from occurring.
The Benefits of Installing a Cheater Vent
 There are several benefits to installing a
cheater vent
under your kitchen sink. Firstly, it helps to prevent sewer gas from entering your home. Sewer gas can be hazardous to your health, and its foul odor can be unpleasant. Secondly, a
cheater vent
can improve the efficiency of your drainage system. Without proper ventilation, water can flow slowly, causing clogs and backups. The
cheater vent
ensures that air can enter the system, allowing water to flow freely and preventing any potential issues.
There are several benefits to installing a
cheater vent
under your kitchen sink. Firstly, it helps to prevent sewer gas from entering your home. Sewer gas can be hazardous to your health, and its foul odor can be unpleasant. Secondly, a
cheater vent
can improve the efficiency of your drainage system. Without proper ventilation, water can flow slowly, causing clogs and backups. The
cheater vent
ensures that air can enter the system, allowing water to flow freely and preventing any potential issues.
Easy Installation and Cost-Effective Solution
 One of the best things about a
cheater vent
is that it is easy to install and relatively inexpensive. Unlike traditional vents that require extensive plumbing work, a
cheater vent
can be installed in a matter of minutes. This makes it a cost-effective solution for homeowners looking to improve the ventilation in their kitchen sink without breaking the bank. Additionally, the
cheater vent
does not require any maintenance, making it a hassle-free option.
One of the best things about a
cheater vent
is that it is easy to install and relatively inexpensive. Unlike traditional vents that require extensive plumbing work, a
cheater vent
can be installed in a matter of minutes. This makes it a cost-effective solution for homeowners looking to improve the ventilation in their kitchen sink without breaking the bank. Additionally, the
cheater vent
does not require any maintenance, making it a hassle-free option.
Conclusion
 In conclusion, proper ventilation is crucial for maintaining a safe and healthy home. Installing a
cheater vent
under your kitchen sink is a simple and effective way to improve the ventilation in your home. It prevents sewer gas odors, improves drainage, and is a cost-effective solution. So, if you want to ensure your kitchen sink is functioning efficiently and safely, consider installing a
cheater vent
today.
In conclusion, proper ventilation is crucial for maintaining a safe and healthy home. Installing a
cheater vent
under your kitchen sink is a simple and effective way to improve the ventilation in your home. It prevents sewer gas odors, improves drainage, and is a cost-effective solution. So, if you want to ensure your kitchen sink is functioning efficiently and safely, consider installing a
cheater vent
today.


.jpg)

