If you've noticed a leak under your bathroom sink, it may be time to replace the tailpiece. This essential plumbing component connects the sink drain to the main drain pipe and is responsible for carrying away wastewater. Over time, wear and tear can cause the tailpiece to crack or become clogged, leading to leaks and other issues. In this article, we'll discuss everything you need to know about bathroom sink tailpiece replacement.Bathroom Sink Tailpiece Replacement


Bathroom Sink Tailpiece Replacement


Replacing a bathroom sink tailpiece may seem daunting, but with the right tools and a little know-how, it can be a simple DIY project. Before you begin, gather your tools, including a wrench, plumber's tape, and a new tailpiece. Start by turning off the water supply and removing any items from under the sink. Next, loosen the slip nuts and remove the old tailpiece. It's important to clean the area thoroughly before installing the new one. Finally, attach the new tailpiece and tighten the slip nuts to secure it in place.How to Replace a Bathroom Sink Tailpiece


How to Replace a Bathroom Sink Tailpiece


While it's possible to replace a bathroom sink tailpiece on your own, it's essential to have the right tools and some basic plumbing knowledge. If you're not confident in your DIY skills, it may be best to hire a professional to ensure the job is done correctly. However, with the right tools and a step-by-step guide, DIY bathroom sink tailpiece replacement can save you time and money.DIY Bathroom Sink Tailpiece Replacement


DIY Bathroom Sink Tailpiece Replacement


Replacing a bathroom sink tailpiece is a relatively simple process, but it's essential to follow a step-by-step guide to ensure you do it correctly. Start by gathering your tools and materials and turning off the water supply. Next, remove the old tailpiece and clean the area. Then, attach the new tailpiece and tighten the slip nuts. Finally, turn the water supply back on and test for leaks. If everything looks good, you're all set!Step-by-Step Bathroom Sink Tailpiece Replacement

Step-by-Step Bathroom Sink Tailpiece Replacement
/Bathroomsink-GettyImages-73452873-595fb1ce5f9b583f1809c7ad.jpg)

Having the right tools is crucial for any DIY project, including bathroom sink tailpiece replacement. Some essential tools for this job include an adjustable wrench, plumber's tape, and a new tailpiece. It's also helpful to have a bucket or towels on hand to catch any water that may leak during the process. With these tools, you'll be on your way to a successful bathroom sink tailpiece replacement.Best Tools for Bathroom Sink Tailpiece Replacement


Best Tools for Bathroom Sink Tailpiece Replacement
There are several common problems that can occur with bathroom sink tailpieces, including leaks, cracks, and clogs. These issues can be caused by wear and tear over time or improper installation. It's essential to address these problems promptly to prevent further damage to your plumbing system. If you're experiencing any issues with your bathroom sink tailpiece, it may be time for a replacement.Common Problems with Bathroom Sink Tailpiece

Common Problems with Bathroom Sink Tailpiece


When selecting a new bathroom sink tailpiece, it's essential to consider the material, size, and compatibility with your sink and drain pipe. Most tailpieces are made of brass or plastic, but brass tends to be more durable. It's also crucial to measure the length and diameter of your old tailpiece to ensure the new one will fit correctly. If you're unsure, consult a professional for help choosing the right replacement.Tips for Choosing a Bathroom Sink Tailpiece Replacement
Tips for Choosing a Bathroom Sink Tailpiece Replacement


The cost of bathroom sink tailpiece replacement can vary depending on several factors, such as the material, brand, and installation fees. On average, a new tailpiece can cost anywhere from $10 to $50. If you hire a professional plumber, you can expect to pay an additional $50 to $100 for labor. However, DIY replacement can save you money on installation fees.Cost of Bathroom Sink Tailpiece Replacement

:max_bytes(150000):strip_icc()/8-IMG_3750-56a4a2e55f9b58b7d0d7f04c.JPG)

Cost of Bathroom Sink Tailpiece Replacement


Deciding whether to hire a professional or tackle the job yourself depends on your DIY skills and comfort level. While hiring a professional can ensure the job is done correctly, it can also be more expensive. DIY replacement can save you money, but it's essential to have the right tools and knowledge to complete the project successfully. Consider your abilities and budget before deciding which option is best for you.Professional vs DIY Bathroom Sink Tailpiece Replacement

Professional vs DIY Bathroom Sink Tailpiece Replacement
If you encounter any issues during or after replacing your bathroom sink tailpiece, there are a few troubleshooting tips you can try. If you notice leaks, make sure all slip nuts are tightly secured and that you've used plumber's tape on all connections. If you experience clogs, use a plunger or drain snake to clear the blockage. If the problem persists, it may be best to consult a professional plumber for further assistance. In conclusion, bathroom sink tailpiece replacement may seem intimidating, but with the right tools and knowledge, it can be a manageable DIY project. Remember to turn off the water supply, clean the area, and properly install the new tailpiece. If you encounter any issues, don't hesitate to seek professional help. With proper maintenance, your new bathroom sink tailpiece should last for years to come.Troubleshooting Bathroom Sink Tailpiece Replacement

Troubleshooting Bathroom Sink Tailpiece Replacement

Bathroom Sink Tailpiece Replacement: A Simple Guide to Upgrade Your House Design
/bathroom-sink-drain-installation-2718843-03-6fee5b9d9f7d475abfe06a95ddb1f695.jpg)
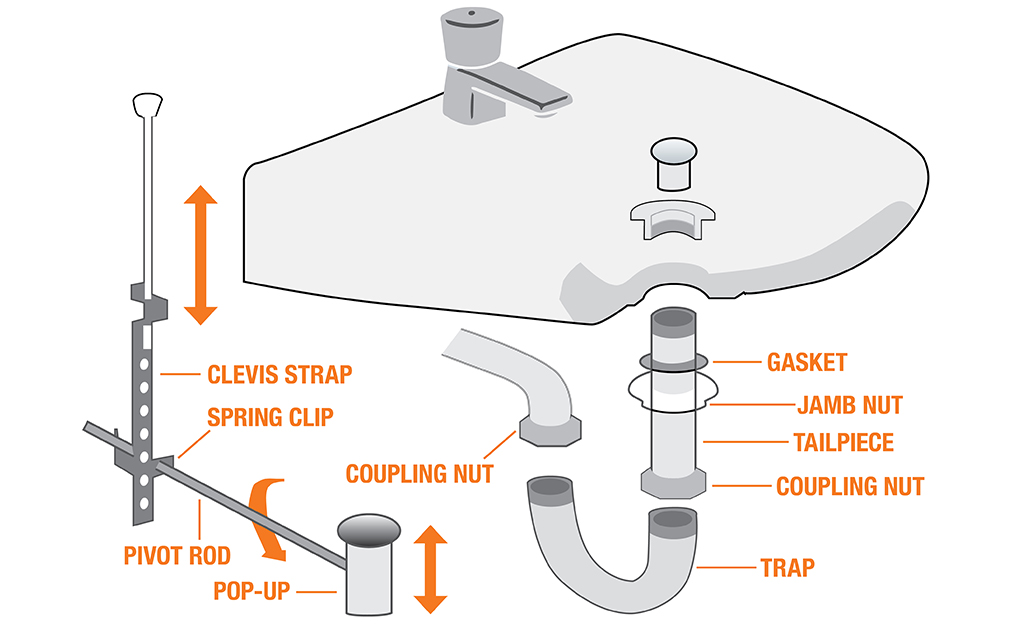
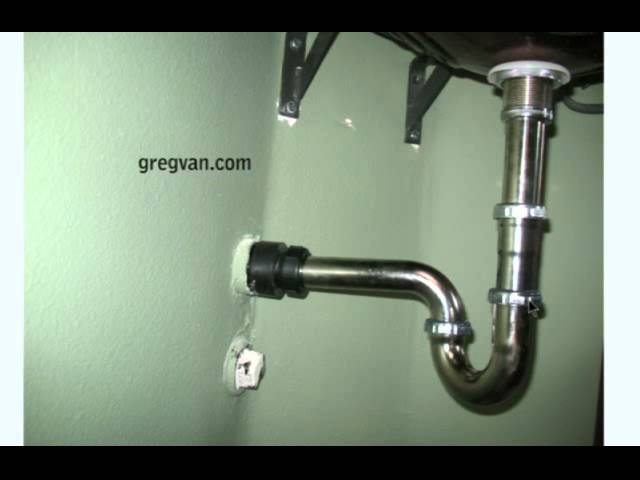
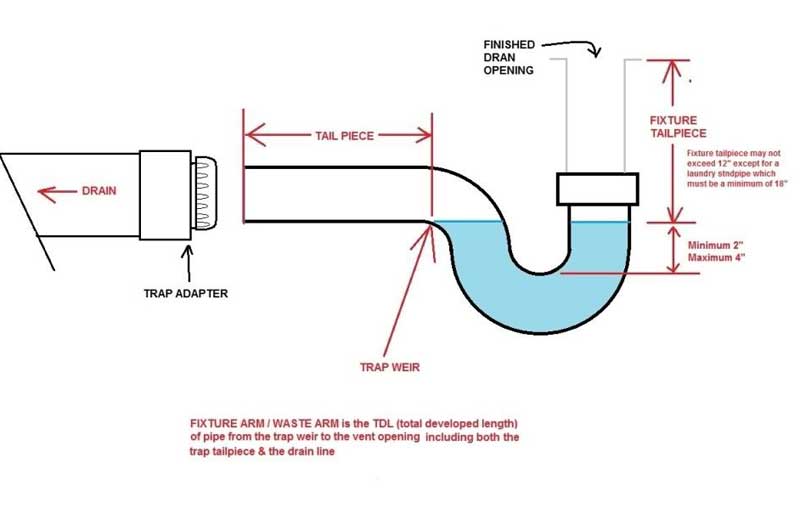
What is a Bathroom Sink Tailpiece?
 If you're looking to upgrade your bathroom design, one area you may want to consider is your bathroom sink tailpiece. This small but important component is essential in connecting your sink to the drainpipe and ensuring proper drainage. The tailpiece is typically made of metal and comes in different lengths and sizes to accommodate different sink designs.
Why Replace Your Bathroom Sink Tailpiece?
 Over time, your bathroom sink tailpiece can become worn out or damaged, leading to leaks and clogs. It can also become discolored or rusted, affecting the overall aesthetic of your bathroom. Replacing your tailpiece can prevent these issues and give your bathroom a fresh, updated look.
How to Replace Your Bathroom Sink Tailpiece
 Step 1: Gather Your Materials
Before you begin, make sure you have all the necessary materials. This includes a new tailpiece, plumber's tape, a basin wrench, and a bucket to catch any water that may leak during the process.
Step 2: Turn Off the Water Supply
Locate the water shut-off valves under your sink and turn them off. This will prevent any water from flowing while you work.
Step 3: Disconnect the Old Tailpiece
Using a basin wrench, loosen and remove the nuts connecting the tailpiece to the sink drain and the drainpipe. Gently pull the tailpiece out and set it aside.
Step 4: Install the New Tailpiece
Wrap plumber's tape around the threads of the new tailpiece to create a tight seal. Then, insert the tailpiece into the sink drain and secure it with the nut and washer provided. Next, connect the other end of the tailpiece to the drainpipe and tighten the nut.
Step 5: Turn the Water Supply Back On
Once the new tailpiece is securely in place, turn the water supply back on and check for any leaks. If everything looks good, you're all set!
Step 1: Gather Your Materials
Before you begin, make sure you have all the necessary materials. This includes a new tailpiece, plumber's tape, a basin wrench, and a bucket to catch any water that may leak during the process.
Step 2: Turn Off the Water Supply
Locate the water shut-off valves under your sink and turn them off. This will prevent any water from flowing while you work.
Step 3: Disconnect the Old Tailpiece
Using a basin wrench, loosen and remove the nuts connecting the tailpiece to the sink drain and the drainpipe. Gently pull the tailpiece out and set it aside.
Step 4: Install the New Tailpiece
Wrap plumber's tape around the threads of the new tailpiece to create a tight seal. Then, insert the tailpiece into the sink drain and secure it with the nut and washer provided. Next, connect the other end of the tailpiece to the drainpipe and tighten the nut.
Step 5: Turn the Water Supply Back On
Once the new tailpiece is securely in place, turn the water supply back on and check for any leaks. If everything looks good, you're all set!
Upgrade Your Bathroom Design with a New Tailpiece
 Replacing your bathroom sink tailpiece may seem like a small task, but it can make a big difference in the overall design and functionality of your bathroom. With just a few simple steps, you can upgrade your bathroom and ensure proper drainage for years to come. So why wait? Get started on your bathroom sink tailpiece replacement today!


:max_bytes(150000):strip_icc()/how-bathroom-vanity-tops-work-1821317-f7107f5d02904f6eaa96c51c62b03dfc.jpg)

