Is your bathroom sink faucet constantly dripping? This could be a sign that the washer needs to be replaced. Fortunately, replacing a washer on a bathroom sink faucet is a simple and cost-effective DIY project that can save you from expensive plumbing repairs. In this article, we will walk you through the steps of replacing a washer on a bathroom sink faucet.How to Replace a Washer on a Bathroom Sink Faucet
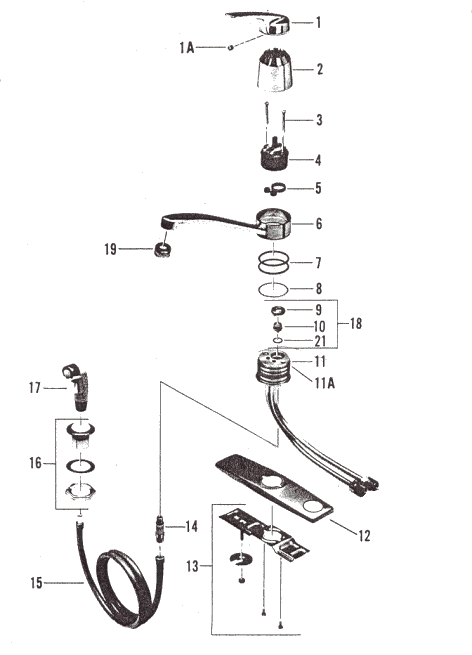
Before you begin, make sure to turn off the water supply to your bathroom sink. You can do this by shutting off the main water valve or turning off the water supply valves under the sink. Once the water is turned off, follow these steps to replace the washer: Step 1: Remove the faucet handle by unscrewing the set screw or by prying off the decorative cap and unscrewing the handle. Step 2: Use pliers to loosen and remove the packing nut that holds the faucet stem in place. Step 3: Pull out the stem and locate the rubber washer at the bottom. Step 4: Remove the old washer and replace it with a new one of the same size and shape. Make sure the washer is positioned correctly, with the flat side facing down. Step 5: Reinstall the stem and packing nut, making sure everything is securely tightened. Step 6: Put the faucet handle back in place and tighten the set screw or replace the decorative cap. Step 7: Turn the water supply back on and test the faucet. The dripping should have stopped, and your bathroom sink faucet is now as good as new!Replacing a Washer on a Bathroom Sink Faucet: Step-by-Step Guide
Replacing a washer on a bathroom sink faucet is a relatively easy task that can be done by anyone, even if you have no plumbing experience. By doing it yourself, you can save money on hiring a professional plumber and gain a sense of accomplishment.DIY: Replacing a Washer on a Bathroom Sink Faucet
To ensure a successful replacement of the washer on your bathroom sink faucet, here are some helpful tips and tricks to keep in mind: • Use the correct size and shape of the washer for your faucet to ensure a proper seal. • Clean the faucet stem and packing nut before installing the new washer to prevent any debris from getting into the faucet. • If the faucet handle is difficult to remove, use a handle puller tool to avoid damaging it. • If the faucet is still leaking after replacing the washer, check for any cracks or damage on the faucet stem and replace it if necessary.Replacing a Washer on a Bathroom Sink Faucet: Tips and Tricks
Replacing a washer on a bathroom sink faucet is a quick and easy process that can be completed in under 30 minutes. With just a few simple steps, you can fix a dripping faucet and save money on your water bill.Quick and Easy Guide to Replacing a Washer on a Bathroom Sink Faucet
While replacing a washer on a bathroom sink faucet is a relatively simple task, there are some common mistakes that you should avoid: • Using the wrong size or shape of the washer, which can cause the faucet to leak. • Forgetting to turn off the water supply before starting the replacement, which can lead to a flooded bathroom. • Overtightening the packing nut, which can damage the faucet stem.Replacing a Washer on a Bathroom Sink Faucet: Common Mistakes to Avoid
If you prefer a visual guide, check out this step-by-step tutorial video on how to replace a washer on a bathroom sink faucet: [Insert link to tutorial video here]Step-by-Step Tutorial: Replacing a Washer on a Bathroom Sink Faucet
To successfully replace a washer on a bathroom sink faucet, you will need the following tools and materials: • Adjustable wrench • Pliers • Screwdriver • New washerReplacing a Washer on a Bathroom Sink Faucet: Tools and Materials You'll Need
If you encounter any issues while replacing the washer on your bathroom sink faucet, here are some troubleshooting tips to help you out: • If the faucet handle is stuck, try loosening it with penetrating oil. • If the faucet is still leaking after replacing the washer, check for any mineral build-up or debris and clean it out. • If the faucet is still leaking, the issue may be with the faucet seat. You may need to replace it or clean it thoroughly with a seat wrench.Replacing a Washer on a Bathroom Sink Faucet: Troubleshooting Common Issues
To ensure a successful replacement of the washer on your bathroom sink faucet, here are some expert tips to help you out: • Turn off the water supply and drain any remaining water before starting the replacement. • Take a photo of the faucet before disassembling it to help with reassembly. • If you are unsure of how to replace the washer, consult a professional plumber for guidance. Now that you know how to replace a washer on a bathroom sink faucet, you can easily fix any dripping faucets in your home. Remember to turn off the water supply before starting the replacement and use the correct size and shape of the washer. With these tips and tricks, you can successfully complete this DIY project and save money on plumbing repairs.Expert Tips for Replacing a Washer on a Bathroom Sink Faucet
Why Replacing the Washer on Your Bathroom Sink Faucet is Important for House Design

The Importance of Maintaining Your Bathroom Sink Faucet
 When it comes to designing and maintaining your house, the bathroom is often one of the most overlooked areas. However, the bathroom is a space that is used daily and can greatly impact the overall look and functionality of your home. One crucial component of a well-designed bathroom is a properly functioning sink faucet. Over time, the washers in your bathroom sink faucet can wear down and cause leaks, which can lead to water damage and a decrease in the aesthetic appeal of your bathroom. That’s why it’s important to regularly check and replace the washer on your bathroom sink faucet.
The Role of the Washer in Your Bathroom Sink Faucet
 The washer in your bathroom sink faucet is a small but essential part that helps to create a watertight seal and prevent leaks. It is located inside the faucet handle and is constantly under pressure from the water flow. Over time, this pressure can cause the washer to wear down, resulting in leaks and a decrease in water pressure. Not only does this affect the functionality of your faucet, but it can also lead to higher water bills and potential water damage to your bathroom.
Benefits of Replacing the Washer on Your Bathroom Sink Faucet
 By regularly replacing the washer on your bathroom sink faucet, you can avoid the aforementioned issues and keep your bathroom in top shape. Here are some of the benefits of this simple maintenance task:
1. Prevent Leaks:
By replacing the worn-out washer, you can prevent leaks and potential water damage to your bathroom.
2. Maintain Water Pressure:
The washer plays a crucial role in maintaining water pressure in your faucet. By replacing it, you can ensure a steady flow of water.
3. Save Money:
A leaking faucet can lead to an increase in water bills. By replacing the washer, you can save money in the long run.
4. Keep Your Bathroom Looking Great:
A functioning and leak-free faucet is essential for a well-designed bathroom. By regularly replacing the washer, you can maintain the aesthetic appeal of your space.
Conclusion
 In conclusion, replacing the washer on your bathroom sink faucet is an important task that should not be overlooked in house design. Regular maintenance of your faucet can prevent leaks, maintain water pressure, save you money, and keep your bathroom looking great. So make sure to add this simple task to your home maintenance checklist and keep your bathroom in top shape.




/modern-laundry-room-with-washer-and-dryer--607041485-5af90c0beb97de003df26d14.jpg)


