How to Replace a Kitchen Sink Drain Basket
If your kitchen sink is constantly clogged and water is not draining properly, it may be time to replace the drain basket. The drain basket is an essential part of your sink that catches food debris and prevents it from clogging your pipes. Replacing it is a relatively easy and affordable DIY project that can improve the functionality and hygiene of your kitchen sink. In this guide, we will walk you through the process of replacing a kitchen sink drain basket.
How to Install a Kitchen Sink Drain Basket
The first step to installing a new kitchen sink drain basket is to remove the old one. Start by turning off the water supply to your sink and placing a bucket or towel underneath the sink to catch any excess water. Then, use a pipe wrench to loosen the slip nuts and remove the drain basket. Next, clean the area around the drain thoroughly to remove any remaining debris or old plumber's putty.
Replacing a Kitchen Sink Drain Basket: A Step-by-Step Guide
Once you have removed the old drain basket, it's time to install the new one. Here's a step-by-step guide to help you through the process:
Step 1: Apply a thin layer of plumber's putty around the flange of the new drain basket.
Step 2: Insert the new drain basket into the sink's drain hole and press down firmly.
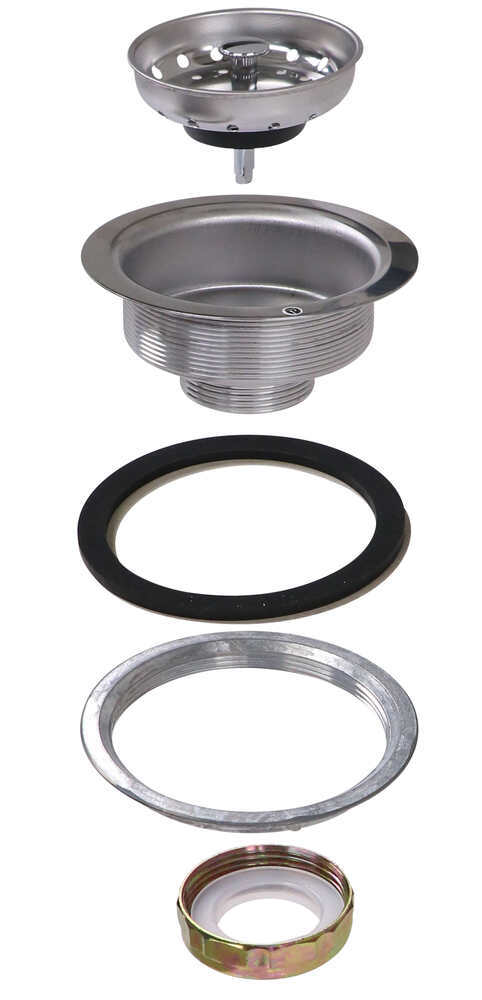
Step 3: From underneath the sink, place the rubber gasket on top of the drain basket and secure it with the mounting nut.
Step 4: Screw the slip nut onto the drain pipe and tighten it with a pipe wrench. Make sure not to over-tighten, as this can cause leaks.
Step 5: Wipe off any excess putty around the drain basket and let it dry for a few hours before using the sink.
DIY Kitchen Sink Drain Basket Replacement
Replacing a kitchen sink drain basket is a task that can easily be done by homeowners with basic DIY skills. It can save you money on hiring a plumber and can be completed in just a few hours. With the right tools and instructions, you can easily replace your drain basket and improve the functionality of your kitchen sink.
Replacing a Kitchen Sink Drain Basket: Tips and Tricks
Here are some tips and tricks to keep in mind when replacing a kitchen sink drain basket:
Tip 1: Always turn off the water supply before starting the replacement process.
Tip 2: Use a pipe wrench to loosen the slip nuts, and be careful not to damage the drain pipes.
Tip 3: Make sure to clean the area thoroughly before installing the new drain basket.
Tip 4: Apply a thin layer of plumber's putty around the flange of the new drain basket for a secure seal.
Tip 5: Let the putty dry for a few hours before using the sink to prevent leaks.
The Importance of Replacing a Kitchen Sink Drain Basket
Replacing a kitchen sink drain basket is important for the overall functionality and hygiene of your sink. A clogged or damaged drain basket can lead to water backup, foul odors, and even mold growth. By replacing it, you can ensure that your sink drains properly and maintains a clean and sanitary environment for food preparation and dishwashing.
Replacing a Kitchen Sink Drain Basket: Common Mistakes to Avoid
Even though replacing a kitchen sink drain basket is a relatively simple task, there are some common mistakes that homeowners make. Here are a few to avoid:
Mistake 1: Forgetting to turn off the water supply before starting the replacement process.
Mistake 2: Using too much plumber's putty, which can cause it to ooze out and create a messy installation.
Mistake 3: Over-tightening the slip nuts, which can cause leaks and damage the pipes.
Mistake 4: Not cleaning the area thoroughly before installing the new drain basket, which can compromise the seal.
Mistake 5: Using the wrong size drain basket for your sink, which can lead to improper fit and functionality.
Tools You'll Need to Replace a Kitchen Sink Drain Basket
Before starting the replacement process, make sure you have the following tools on hand:
Pipe wrench
Plumber's putty
Rubber gloves
Bucket or towel
Screwdriver
How to Choose the Right Kitchen Sink Drain Basket for Your Sink
When choosing a new drain basket for your kitchen sink, there are a few factors to consider:
Size: Make sure to measure your sink's drain hole to ensure that you purchase the correct size drain basket.
Material: Drain baskets are available in various materials such as stainless steel, plastic, and brass. Choose one that is durable and matches your sink's aesthetics.
Style: You can choose between a standard or a decorative drain basket, depending on your preferences.
Replacing a Kitchen Sink Drain Basket: Professional vs. DIY
While replacing a kitchen sink drain basket is a task that can easily be done by homeowners, some may prefer to hire a professional plumber. A professional can ensure that the replacement is done correctly and can troubleshoot any issues that may arise. However, if you have basic DIY skills and the right tools, it is a project that you can confidently tackle on your own.
Now that you know how to replace a kitchen sink drain basket, you can improve the functionality and hygiene of your kitchen sink with ease. Follow these steps and tips, and you'll have a new drain basket installed in no time.
How to Replace a Kitchen Sink Drain Basket: A Step-by-Step Guide

Understanding the Importance of a Kitchen Sink Drain Basket
 Before we dive into the process of replacing a kitchen sink drain basket, it's important to understand why this component is crucial for your kitchen's functionality. The drain basket, also known as a strainer or strainer basket, is located at the bottom of your sink and is responsible for catching food scraps, debris, and other solid materials that may clog your pipes. Not only does it prevent clogs and potential damage to your plumbing system, but it also helps keep your kitchen clean and hygienic. That's why it's essential to regularly clean and replace your drain basket when necessary.
Tools and Materials You Will Need
 To successfully replace your kitchen sink drain basket, you will need the following tools and materials:
- Screwdriver (flathead or Phillips, depending on your sink's design)
- Plunger
- Adjustable pliers
- Putty knife
- Replacement drain basket
- Plumber's putty
- Silicone sealant
- Clean rag or towel
Step 1: Prepare Your Sink
 Before you begin the replacement process, make sure to clear out any dishes or items from your sink and remove any standing water. Next, use a plunger to remove any debris or residue from the drain.
Step 2: Remove the Old Drain Basket
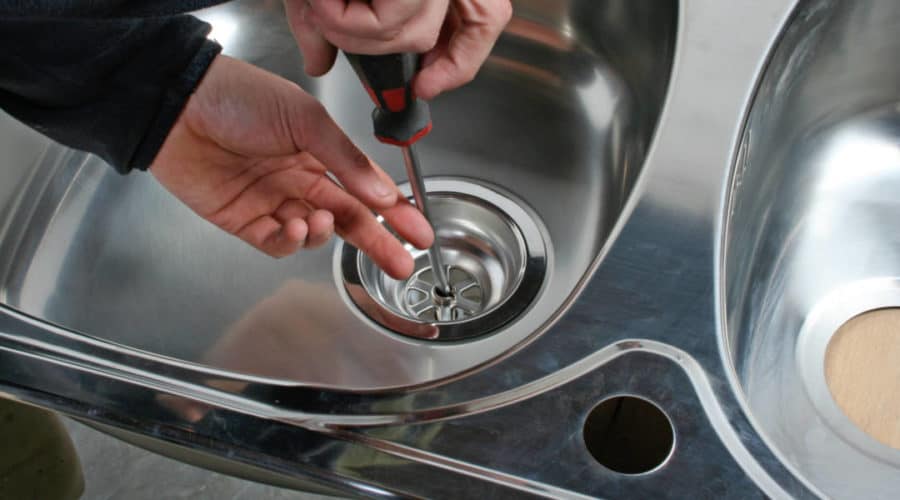
 Using a screwdriver, remove the screws that hold the old drain basket in place. If your sink has a garbage disposal, you may need to disconnect it first before removing the drain basket. Once the screws are removed, use adjustable pliers to loosen and remove the locknut and mounting assembly that holds the drain basket in place. You may need to use a putty knife to break the seal between the drain basket and sink.
Step 3: Clean the Area
 After removing the old drain basket, clean the area thoroughly to remove any remaining putty or debris. Use a clean rag or towel to wipe away any residue and ensure the area is dry and clean.
Step 4: Install the New Drain Basket
 Take your new drain basket and apply plumber's putty around the underside of the flange. Place the drain basket into the sink's opening and press down firmly. From underneath the sink, secure the drain basket in place by tightening the locknut and mounting assembly. Wipe away any excess putty that may have squeezed out.
Step 5: Seal the Drain Basket
/how-to-install-a-sink-drain-2718789-hero-b5b99f72b5a24bb2ae8364e60539cece.jpg) To ensure a watertight seal, apply a thin layer of silicone sealant around the edge of the drain basket where it meets the sink. This will prevent any leaks and ensure a secure fit.
To ensure a watertight seal, apply a thin layer of silicone sealant around the edge of the drain basket where it meets the sink. This will prevent any leaks and ensure a secure fit.
Step 6: Reattach the Garbage Disposal (if applicable)
 If your sink has a garbage disposal, reattach it by following the manufacturer's instructions. Make sure all connections are secure and test the garbage disposal to ensure it is working correctly.
Step 7: Test and Clean Up
 Turn on the water and check for any leaks around the drain basket. If everything looks good, clean up any excess putty or sealant with a damp cloth. Congratulations, you have successfully replaced your kitchen sink drain basket!
In conclusion, replacing a kitchen sink drain basket may seem like a daunting task, but with the right tools and materials, it can be a simple and straightforward process. Remember to regularly clean and replace your drain basket to keep your kitchen functioning properly and hygienic.





:max_bytes(150000):strip_icc()/how-to-install-a-sink-drain-2718789-hero-24e898006ed94c9593a2a268b57989a3.jpg)






/how-to-install-a-sink-drain-2718789-hero-24e898006ed94c9593a2a268b57989a3.jpg)


