Installing a P-trap under your kitchen sink is an essential part of plumbing maintenance. While it may seem like a daunting task, with the right tools and knowledge, you can easily install a P-trap yourself. This guide will take you through the step-by-step process of installing a P-trap under your kitchen sink.How to Install a P-Trap Under a Kitchen Sink


How to Install a P-Trap Under a Kitchen Sink


:max_bytes(150000):strip_icc()/replacing-a-sink-p-trap-2718773-hero-f3f65fbc400e41438c4d8280de025fc6.jpg)


The P-trap is a vital part of your kitchen sink's drain system, preventing sewer gases from entering your home and keeping your sink free of clogs. Here's a simple guide to help you install a P-trap under your kitchen sink: Step 1: Gather Your Tools and Materials Before you start the installation process, make sure you have all the necessary tools and materials. You will need a P-trap kit, which typically includes a trap arm, trap bend, and two nuts. Additionally, you will need a pipe wrench, a hacksaw, plumber's putty, and Teflon tape. Step 2: Remove the Old P-Trap If you are replacing an old P-trap, start by removing it. Using a pipe wrench, loosen the nuts on both ends of the trap and remove it from the drainpipe and sink tailpiece. Step 3: Measure and Cut the New Trap Arm Measure the distance between the wall drain and the sink's tailpiece, and use a hacksaw to cut the trap arm to the appropriate length. Make sure to leave a little extra length in case you need to make adjustments during installation. Step 4: Assemble the P-Trap Insert the trap bend into the trap arm, making sure the bend is facing downward. Then, connect the other end of the trap arm to the sink's tailpiece. Use the nuts provided in the P-trap kit to secure the connections. Step 5: Apply Plumber's Putty Before attaching the P-trap to the wall drain, apply a thin layer of plumber's putty around the drain's opening. This will help create a watertight seal when you attach the trap. Step 6: Secure the P-Trap to the Wall Drain Place the P-trap over the wall drain, making sure the trap bend is facing downward. Use the nut provided in the P-trap kit to secure the trap to the wall drain. Step 7: Tighten the Connections Use a pipe wrench to tighten all the connections, making sure they are secure and leak-free. If you notice any leaks, use Teflon tape to create a better seal.Installing a P-Trap Under a Kitchen Sink: A Step-by-Step Guide


Installing a P-Trap Under a Kitchen Sink: A Step-by-Step Guide


The P-trap plays a crucial role in keeping your kitchen sink functioning properly. It traps debris and prevents it from clogging your drain, and it also blocks sewer gases from entering your home. Failing to install a P-trap or neglecting maintenance can lead to clogs, foul odors, and even health hazards.The Importance of Installing a P-Trap Under Your Kitchen Sink

DIY: Installing a P-Trap Under Your Kitchen Sink


As mentioned earlier, you will need a P-trap kit, a pipe wrench, a hacksaw, plumber's putty, and Teflon tape for this project. If you don't have these tools on hand, you can easily find them at your local hardware store.Tools and Materials Needed for Installing a P-Trap Under a Kitchen Sink


The Importance of Installing a P-Trap Under Your Kitchen Sink

To recap, here are the steps to follow when installing a P-trap under your kitchen sink: Step 1: Gather your tools and materials Step 2: Remove the old P-trap (if applicable) Step 3: Measure and cut the new trap arm Step 4: Assemble the P-trap Step 5: Apply plumber's putty Step 6: Secure the P-trap to the wall drain Step 7: Tighten the connectionsStep-by-Step Instructions for Installing a P-Trap Under a Kitchen Sink


Tools and Materials Needed for Installing a P-Trap Under a Kitchen Sink


While installing a P-trap is a relatively simple task, you may encounter some issues along the way. Here are some common problems and how to troubleshoot them: Leaky Connections: If you notice leaks at any of the connections, use Teflon tape to create a better seal. Difficult to Tighten: If you are having trouble tightening the connections, try using a pipe wrench or pliers for a better grip. Incorrect Length: If you cut the trap arm too short, you will need to purchase a new one. If it's too long, you can trim it down with a hacksaw.Troubleshooting Common Issues When Installing a P-Trap Under a Kitchen Sink


Step-by-Step Instructions for Installing a P-Trap Under a Kitchen Sink


If you prefer visual instructions, you can find many helpful video tutorials online that will guide you through the process of installing a P-trap under your kitchen sink.Video Tutorial: How to Install a P-Trap Under a Kitchen Sink
Troubleshooting Common Issues When Installing a P-Trap Under a Kitchen Sink
:max_bytes(150000):strip_icc()/replacing-a-sink-p-trap-2718773-hero-f3f65fbc400e41438c4d8280de025fc6.jpg)
Here are some additional tips to keep in mind when installing a P-trap under your kitchen sink: Use Plumber's Putty: Applying plumber's putty around the drain's opening will help create a watertight seal and prevent leaks. Don't Overtighten: While it's essential to tighten the connections, be careful not to overtighten them, as this can cause damage or cracks in the pipes. Check for Leaks: After installation, make sure to run water through the sink and check for any leaks in the connections. If you notice any, use Teflon tape to create a better seal.Tips and Tricks for Installing a P-Trap Under a Kitchen Sink


Video Tutorial: How to Install a P-Trap Under a Kitchen Sink
If you are not comfortable with DIY projects or encounter any major issues during the installation process, it's best to call a professional plumber. They have the expertise and tools to ensure your P-trap is installed correctly and without any complications. Installing a P-trap under your kitchen sink may seem like a daunting task, but with the right tools and knowledge, you can easily do it yourself. Remember to take your time, follow the steps carefully, and don't hesitate to call a professional if needed. A properly installed P-trap will keep your sink functioning smoothly and prevent any potential plumbing issues in the future.When to Call a Professional for Installing a P-Trap Under a Kitchen Sink

Tips and Tricks for Installing a P-Trap Under a Kitchen Sink

Why You Need to Install a P Trap under Your Kitchen Sink
The Importance of a P Trap in Your Plumbing System
 When it comes to designing and maintaining your home, one area that often gets overlooked is the plumbing system. However, having a well-functioning plumbing system is essential for the overall functionality and cleanliness of your home. One crucial component of your plumbing system is the
p trap
, especially when it comes to your kitchen sink.
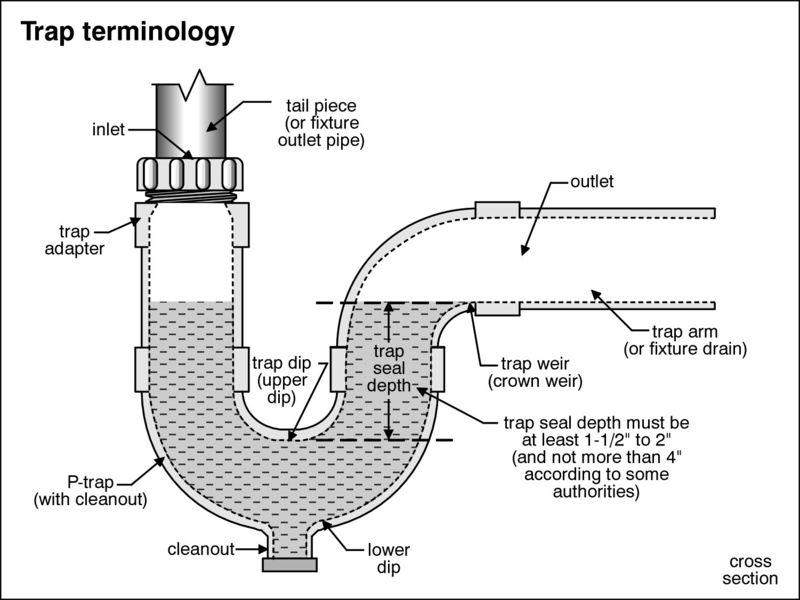
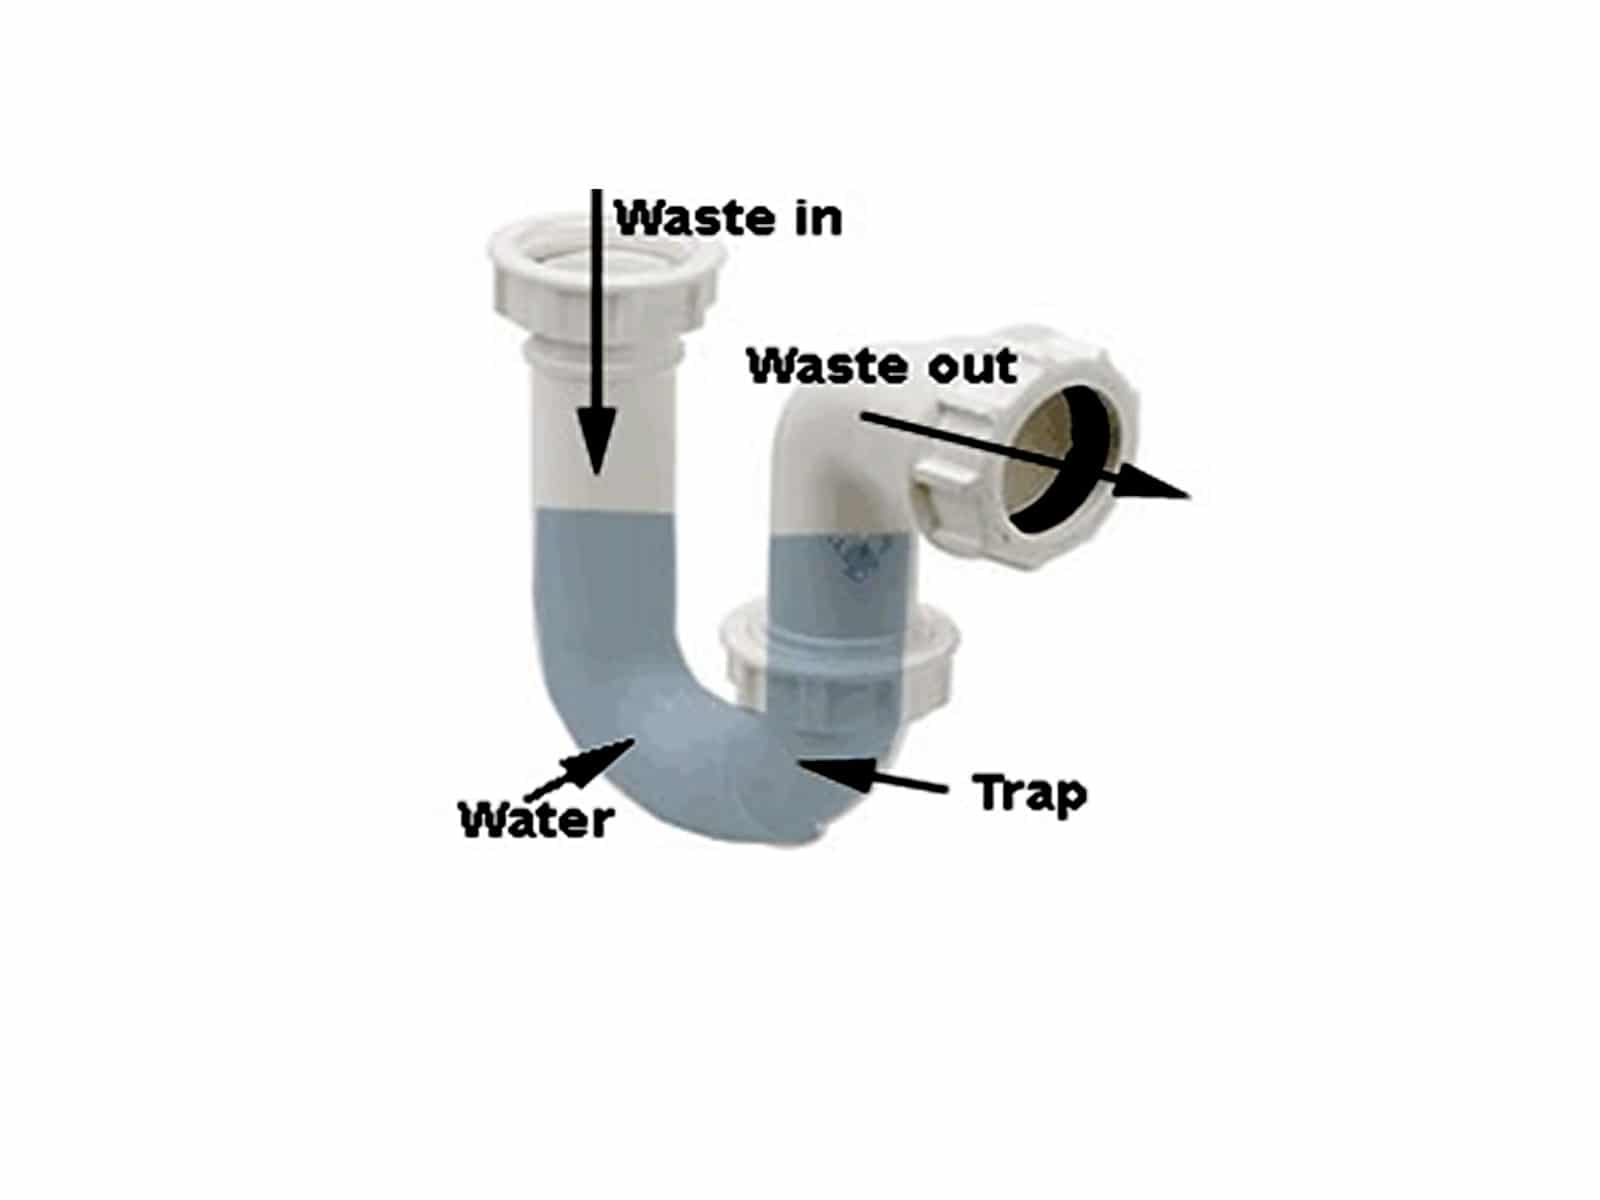
A p trap is a section of piping that is shaped like a "P," hence the name. It is typically installed under sinks, including kitchen sinks, to prevent sewer gases from entering your home. These gases can be harmful to your health, and the p trap acts as a barrier to keep them from entering your living space.
When it comes to designing and maintaining your home, one area that often gets overlooked is the plumbing system. However, having a well-functioning plumbing system is essential for the overall functionality and cleanliness of your home. One crucial component of your plumbing system is the
p trap
, especially when it comes to your kitchen sink.
A p trap is a section of piping that is shaped like a "P," hence the name. It is typically installed under sinks, including kitchen sinks, to prevent sewer gases from entering your home. These gases can be harmful to your health, and the p trap acts as a barrier to keep them from entering your living space.
The Benefits of Installing a P Trap under Your Kitchen Sink
 Now that you understand the importance of a p trap in your plumbing system, it's time to focus on why you specifically need to install one under your kitchen sink. Here are some of the top benefits of having a p trap in this area of your home:
1. Prevents Clogs and Odors
One of the main reasons why you need a p trap under your kitchen sink is to prevent clogs and unpleasant odors. The p trap's curved shape allows water to collect and create a seal, preventing food particles and other debris from entering your plumbing system and causing clogs. It also traps any odors from the sewer gases, keeping your kitchen smelling fresh.
2. Protects Your Health
As mentioned earlier, sewer gases can be harmful to your health if they enter your home. These gases contain various toxins and bacteria that can cause respiratory problems, nausea, and other health issues. By installing a p trap under your kitchen sink, you are creating a barrier to keep these gases from entering your home and protecting your family's health.
3. Easy Maintenance and Cleaning
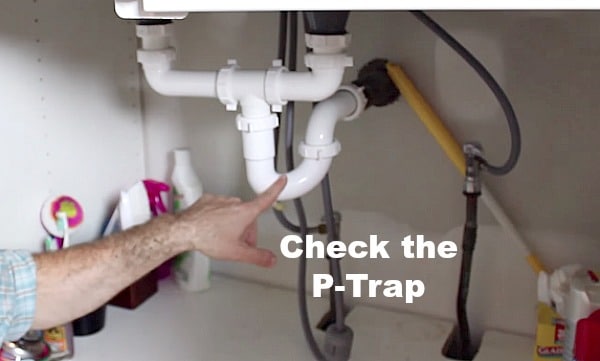
Another benefit of having a p trap under your kitchen sink is that it is easily accessible for maintenance and cleaning. If a clog does occur, you can easily remove and clean the p trap or call a professional to do it for you. This simple maintenance can save you from costly repairs and ensure that your kitchen sink continues to function properly.
Now that you understand the importance of a p trap in your plumbing system, it's time to focus on why you specifically need to install one under your kitchen sink. Here are some of the top benefits of having a p trap in this area of your home:
1. Prevents Clogs and Odors
One of the main reasons why you need a p trap under your kitchen sink is to prevent clogs and unpleasant odors. The p trap's curved shape allows water to collect and create a seal, preventing food particles and other debris from entering your plumbing system and causing clogs. It also traps any odors from the sewer gases, keeping your kitchen smelling fresh.
2. Protects Your Health
As mentioned earlier, sewer gases can be harmful to your health if they enter your home. These gases contain various toxins and bacteria that can cause respiratory problems, nausea, and other health issues. By installing a p trap under your kitchen sink, you are creating a barrier to keep these gases from entering your home and protecting your family's health.
3. Easy Maintenance and Cleaning
Another benefit of having a p trap under your kitchen sink is that it is easily accessible for maintenance and cleaning. If a clog does occur, you can easily remove and clean the p trap or call a professional to do it for you. This simple maintenance can save you from costly repairs and ensure that your kitchen sink continues to function properly.
Conclusion
 In conclusion, installing a p trap under your kitchen sink is essential for the overall functionality and cleanliness of your home. It not only prevents clogs and odors but also protects your health and is easy to maintain. So, if you haven't already, make sure to have a p trap installed in your kitchen sink to keep your plumbing system in top condition.


.jpg?v=48ac9a93)