Are you planning to install a new kitchen sink or replace an old one? One of the most important steps in this process is installing the faucet. The faucet is not only a functional part of the sink, but it also adds to the overall aesthetic of your kitchen. Follow these simple steps to install your kitchen sink faucet and give your kitchen a fresh look. First, gather all the necessary tools and materials. You will need a basin wrench, adjustable wrench, plumber's putty, Teflon tape, and the faucet itself. Make sure you have turned off the water supply before you begin the installation process. Next, determine the type of faucet you have. There are four main types: single-hole, center-set, widespread, and wall-mount. Each type has a different installation process, so it's important to know which one you have before starting. If you have a single-hole faucet, you can skip this step. For other types, you will need to install the baseplate or deck plate. This plate covers the extra holes in the sink and creates a cohesive look. Use plumber's putty to seal the plate before attaching it to the sink. Now it's time to install the faucet itself. Follow the manufacturer's instructions to ensure proper installation. Most faucets have a threaded shank that attaches to the baseplate or directly to the sink. Use a basin wrench to tighten the faucet in place. Once the faucet is securely in place, it's time to connect the water supply lines. Use Teflon tape on the threads to prevent leaks. Hand-tighten the supply lines and then use an adjustable wrench to give them a final turn. Make sure not to overtighten as it can damage the connections. Turn on the water supply and check for any leaks. If there are no leaks, congratulations, you have successfully installed your kitchen sink faucet!Installing a Kitchen Sink: How to Install the Faucet


Installing a Kitchen Sink: How to Install the Faucet


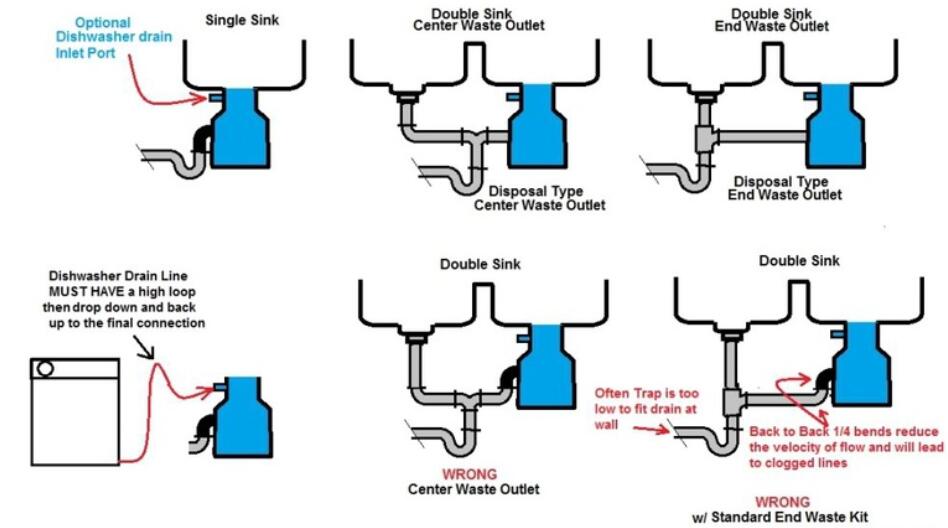
One of the most important parts of a kitchen sink is the drain. It is responsible for removing water and debris from the sink, keeping it clean and functional. Here's how you can install a kitchen sink drain in a few simple steps. First, gather all the necessary tools and materials. You will need a basin wrench, adjustable pliers, plumber's putty, Teflon tape, and the drain assembly. Make sure to turn off the water supply before you start. Next, remove the old drain assembly. Use a basin wrench or adjustable pliers to loosen the nuts and remove the old drain. Make sure to have a bucket or towel underneath to catch any water that may spill out. Now it's time to install the new drain assembly. Apply plumber's putty to the underside of the drain flange and place it in the sink drain. Use a rubber gasket and nut to secure the flange in place. Make sure not to overtighten. Next, attach the drain tailpiece to the bottom of the sink drain. Use Teflon tape on the threads to prevent leaks. Hand-tighten the connections and then use an adjustable wrench for a final turn. Finally, connect the P-trap to the drain tailpiece and the wall drain. Again, use Teflon tape and hand-tighten the connections. Make sure everything is aligned properly before giving it a final turn with the adjustable wrench. Turn on the water supply and check for any leaks. If there are no leaks, you have successfully installed your kitchen sink drain.How to Install a Kitchen Sink Drain


How to Install a Kitchen Sink Drain
/how-to-install-a-sink-drain-2718789-hero-b5b99f72b5a24bb2ae8364e60539cece.jpg)


:max_bytes(150000):strip_icc()/how-to-install-a-sink-drain-2718789-hero-24e898006ed94c9593a2a268b57989a3.jpg)


The basket strainer is an essential part of the kitchen sink. It prevents food and debris from clogging the drain and causing plumbing issues. Here's how you can install a kitchen sink basket strainer in a few simple steps. First, gather all the necessary tools and materials. You will need a basin wrench, adjustable pliers, plumber's putty, Teflon tape, and the basket strainer assembly. Make sure to turn off the water supply before you start. Next, remove the old basket strainer. Use a basin wrench or adjustable pliers to loosen the locknut and remove the old strainer. Make sure to have a bucket or towel underneath to catch any water that may spill out. Now it's time to install the new basket strainer. Apply plumber's putty to the underside of the strainer flange and place it in the sink drain. Use a rubber gasket and locknut to secure the flange in place. Make sure not to overtighten. Next, attach the strainer body to the bottom of the sink drain. Use Teflon tape on the threads to prevent leaks. Hand-tighten the connections and then use an adjustable wrench for a final turn. Finally, place the basket strainer into the body and tighten the locknut to secure it in place. Make sure everything is aligned properly before giving it a final turn with the adjustable wrench. Turn on the water supply and check for any leaks. If there are no leaks, you have successfully installed your kitchen sink basket strainer.How to Install a Kitchen Sink Basket Strainer

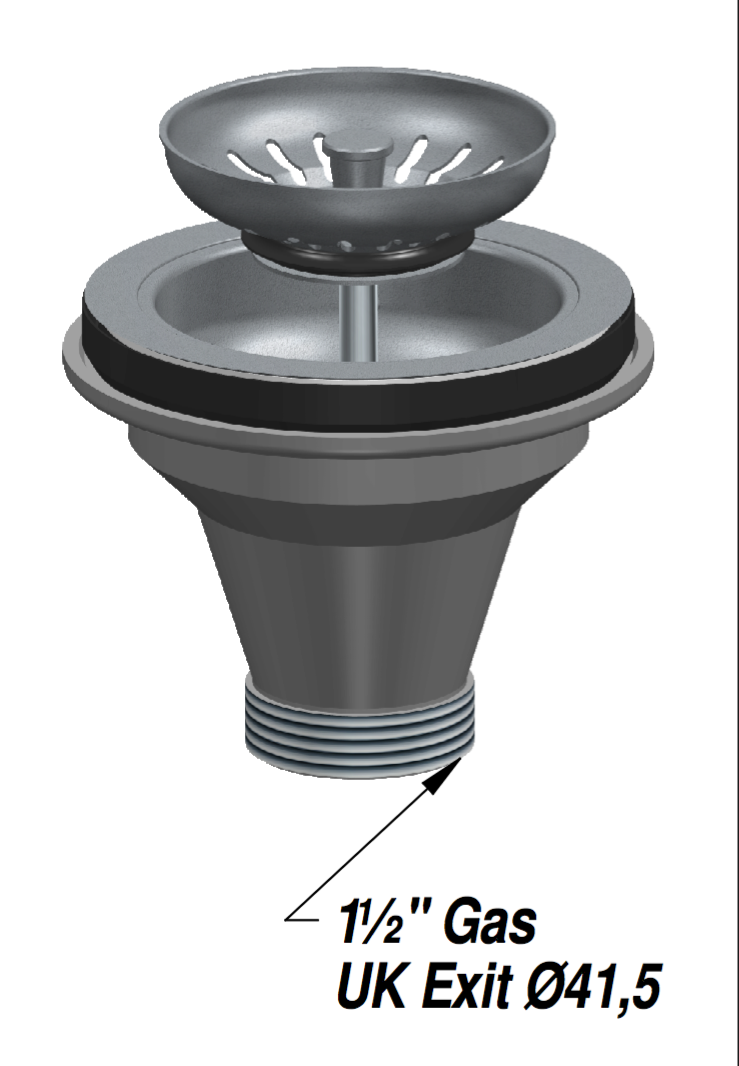
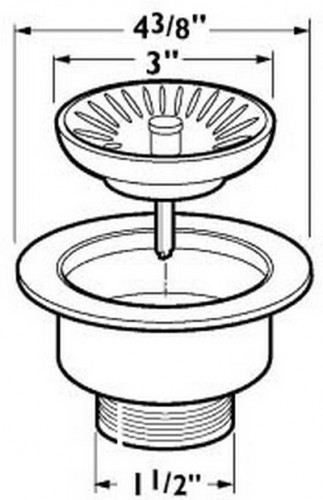
How to Install a Kitchen Sink Basket Strainer


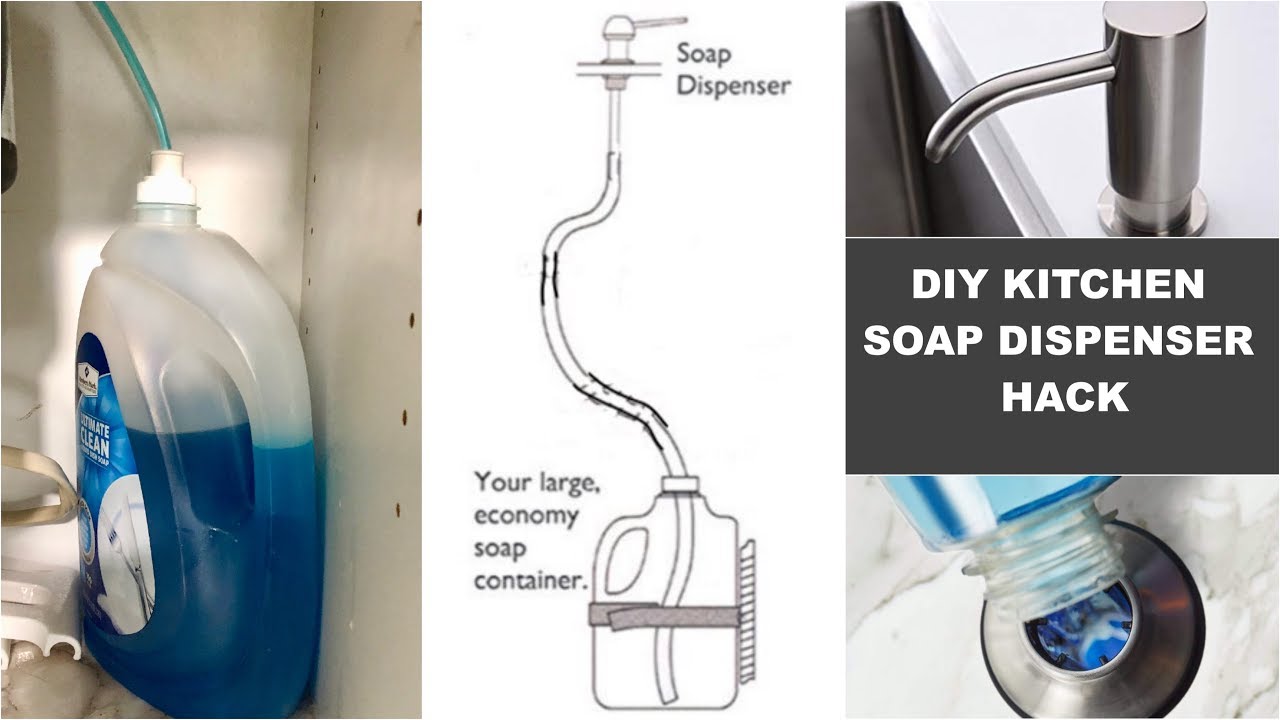
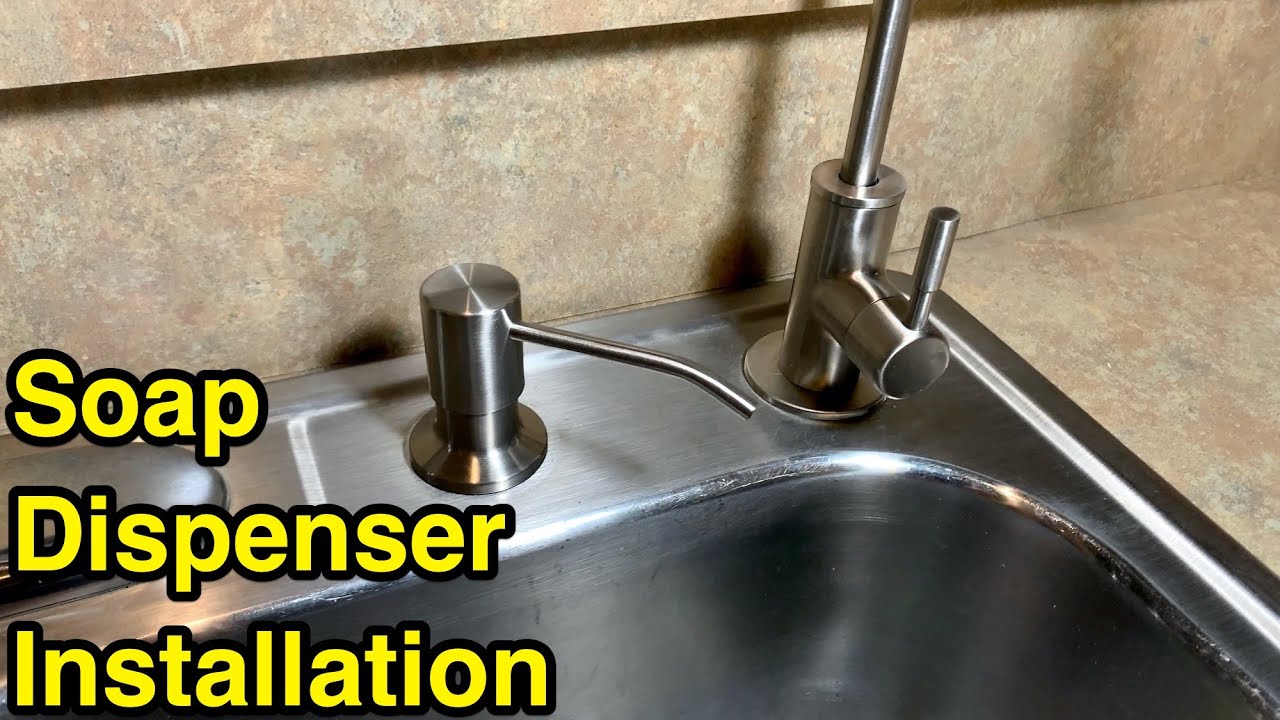
A soap dispenser is a convenient addition to any kitchen sink. It keeps your countertop clutter-free and provides easy access to soap for washing dishes. Here's how you can install a kitchen sink soap dispenser in a few simple steps. First, gather all the necessary tools and materials. You will need a basin wrench, adjustable pliers, plumber's putty, Teflon tape, and the soap dispenser assembly. Make sure to turn off the water supply before you start. Next, remove the soap dispenser cap and insert the pump into the hole on the sink. Make sure the pump is straight and level before proceeding. Now it's time to secure the soap dispenser in place. Use a rubber gasket and locknut to secure the pump under the sink. Make sure not to overtighten. Next, attach the soap dispenser bottle to the pump. Use Teflon tape on the threads to prevent leaks. Hand-tighten the connections and then use an adjustable wrench for a final turn. Fill the soap dispenser bottle with soap and test it out. If everything works properly, you have successfully installed your kitchen sink soap dispenser.How to Install a Kitchen Sink Soap Dispenser
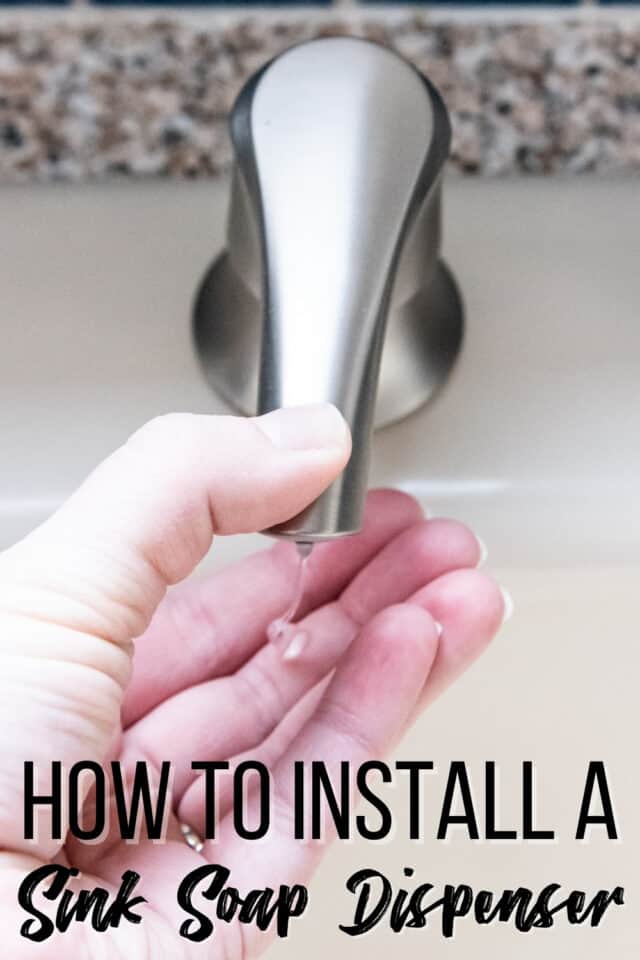


How to Install a Kitchen Sink Soap Dispenser

:max_bytes(150000):strip_icc()/Kitchensinksoapdispenser-GettyImages-91206440-59e82279054ad90011101a01.jpg)


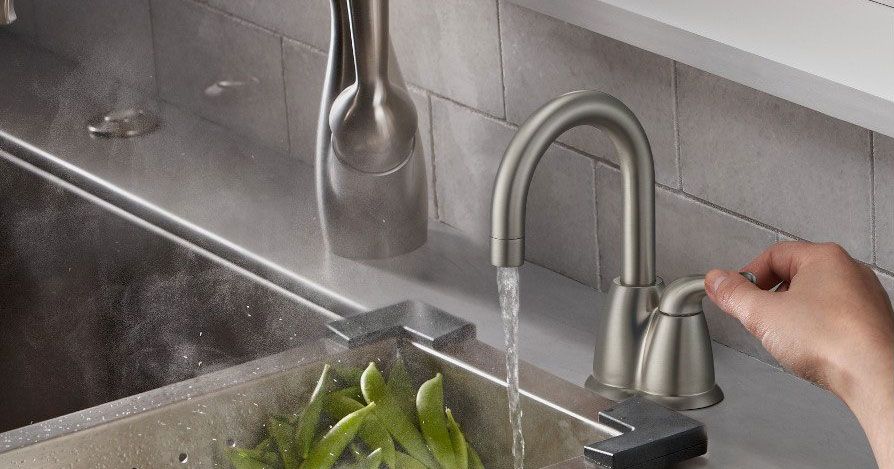
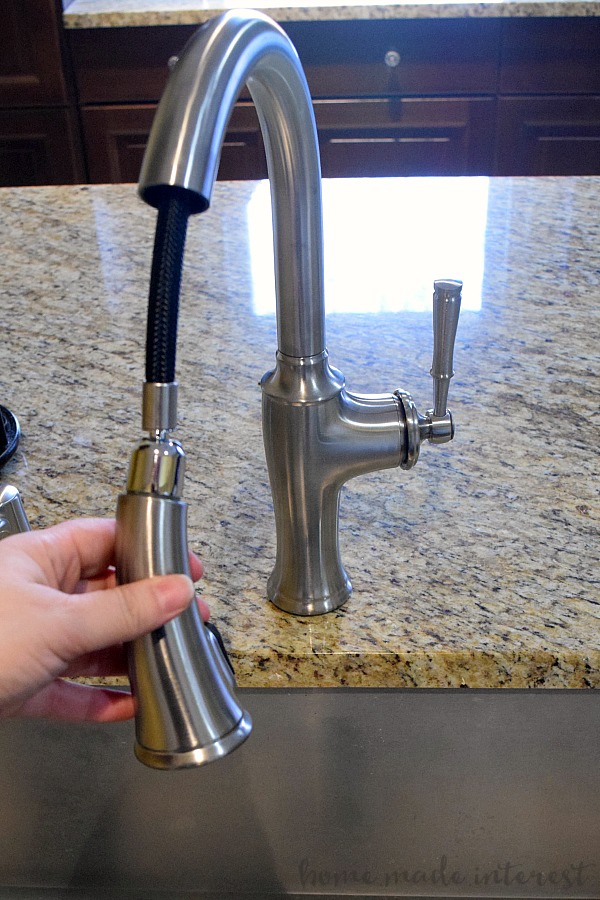
A kitchen sink sprayer is a great addition for cleaning dishes and the sink itself. It provides a more focused and powerful stream of water. Here's how you can install a kitchen sink sprayer in a few simple steps. First, gather all the necessary tools and materials. You will need a basin wrench, adjustable pliers, plumber's putty, Teflon tape, and the sprayer assembly. Make sure to turn off the water supply before you start. Next, remove the old sprayer if you have one. Use a basin wrench or adjustable pliers to loosen the nut and remove the old sprayer. Make sure to have a bucket or towel underneath to catch any water that may spill out. Now it's time to install the new sprayer. Place the rubber gasket on the sprayer hose and insert it into the hole on the sink. Make sure the sprayer is straight and level before proceeding. Next, secure the sprayer in place with the nut and hand-tighten. Use Teflon tape on the threads to prevent leaks. Hand-tighten the connections and then use an adjustable wrench for a final turn. Turn on the water supply and test the sprayer. If everything works properly, you have successfully installed your kitchen sink sprayer.How to Install a Kitchen Sink Sprayer


How to Install a Kitchen Sink Sprayer


:no_upscale()/cdn.vox-cdn.com/uploads/chorus_asset/file/19495086/drain_0.jpg)

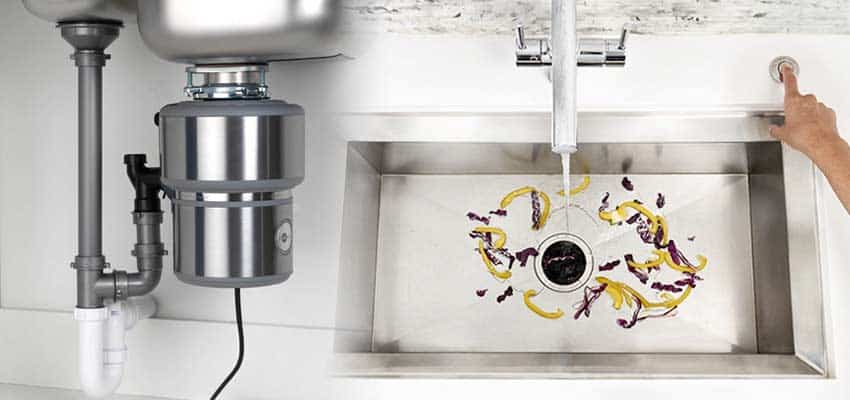
A garbage disposal is a handy appliance that helps to dispose of food waste. It is installed under the sink and shreds food into small pieces that can easily pass through the plumbing system. Here's how you can install a kitchen sink garbage disposal in a few simple steps. First, gather all the necessary tools and materials. You will need a screwdriver, plumber's putty, Teflon tape, and the garbage disposal unit. Make sure to turn off the electricity and water supply before you start. Next, remove the old disposal if you have one. Use a screwdriver to remove the mounting assembly, and then detach the disposal from the sink. Make sure to have a bucket or towel underneath to catch any water that may spill out. Now it's time to install the new garbage disposal. Place the rubber gasket on the disposal unit and insert it into the sink drain. Make sure the unit is straight and level before proceeding. Next, secure the disposal unit to the mounting assembly with screws. Use Teflon tape on the threads to prevent leaks. Hand-tighten the connections and then use an adjustable wrench for a final turn. Turn on the electricity and water supply and test the disposal. If everything works properly, you have successfully installed your kitchen sink garbage disposal.How to Install a Kitchen Sink Garbage Disposal


How to Install a Kitchen Sink Garbage Disposal


/garbage-disposal-installation-1824830-08-4a2a7bd4007f4f36a7a5392a58b07b6e.jpg)

/how-to-install-a-sink-drain-2718789-hero-24e898006ed94c9593a2a268b57989a3.jpg)

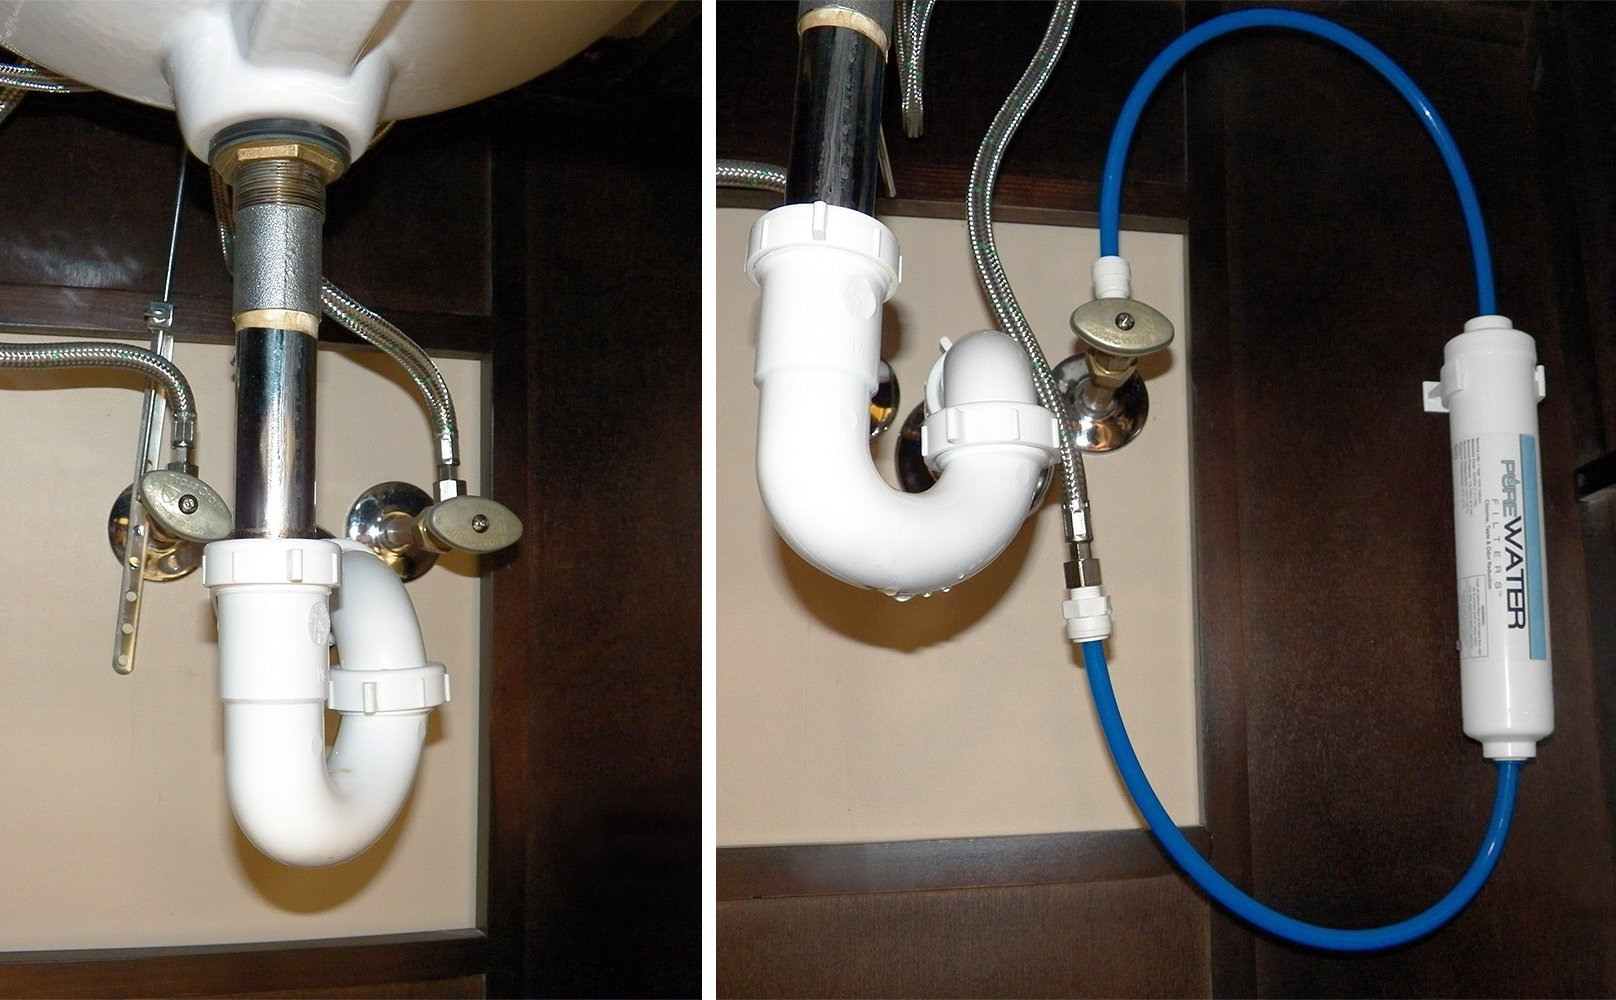
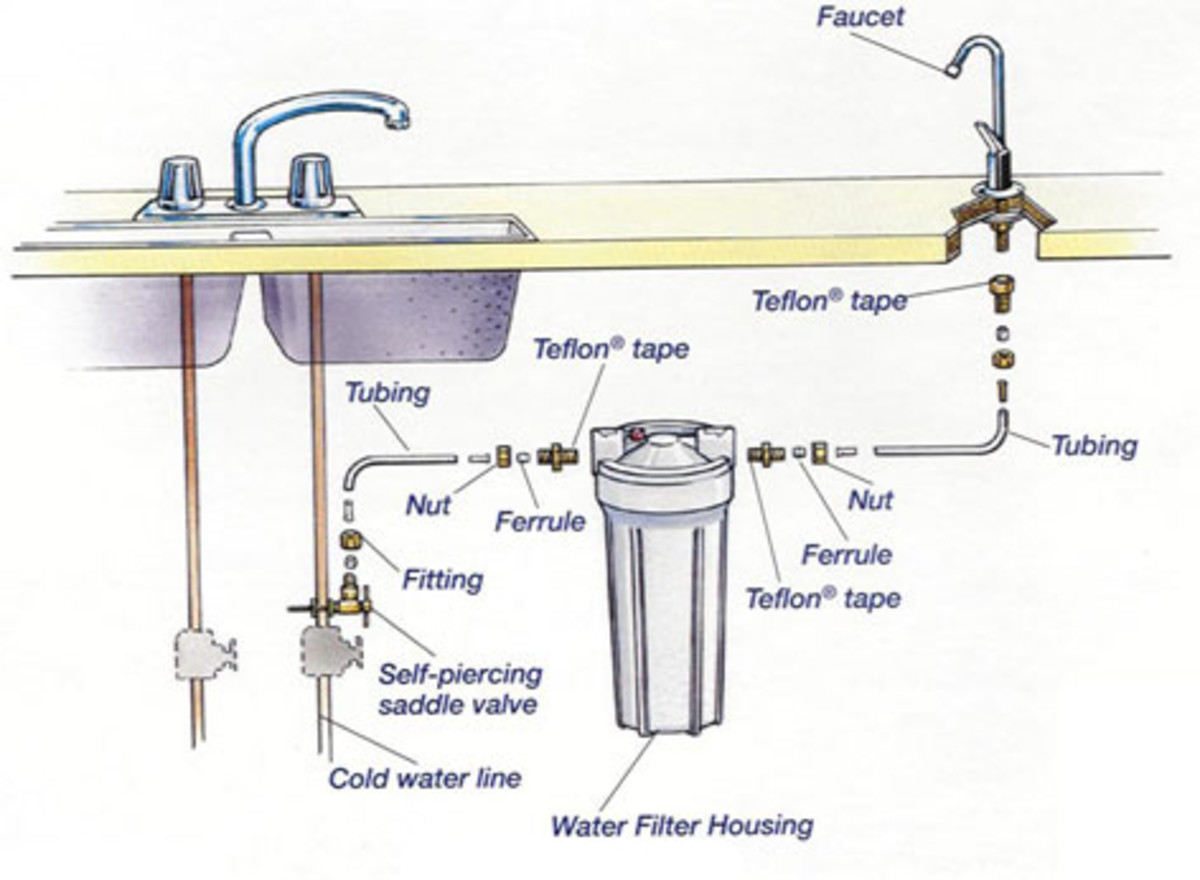
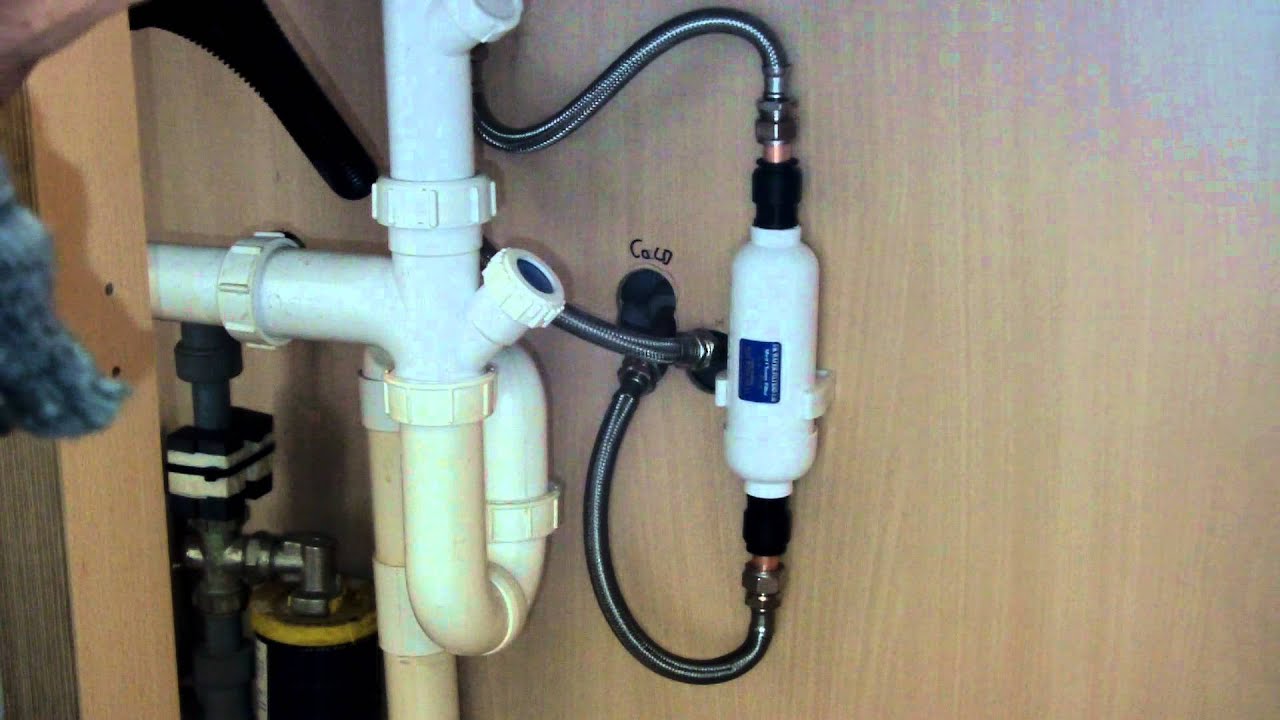
A water filter is a great addition to your kitchen sink as it provides clean and safe drinking water. It removes impurities and contaminants from the water, making it healthier to consume. Here's how you can install a kitchen sink water filter in a few simple steps. First, gather all the necessary tools and materials. You will need a screwdriver, adjustable pliers, Teflon tape, and the water filter unit. Make sure to turn off the water supply before you start. Next, remove the old water filter if you have one. Use a screwdriver to remove the mounting assembly, and then detach the filter from the sink. Make sure to have a bucket or towel underneath to catch any water that may spill out. Now it's time to install the new water filter. Place the rubber gasket on the filter unit and insert it into the sink drain. Make sure the unit is straight and level before proceeding. Next, secure the filter unit to the mounting assembly with screws. Use Teflon tape on the threads to prevent leaks. Hand-tighten the connections and then use an adjustable wrench for a final turn. Turn on the water supply and test the filter. If everything works properly, you have successfully installed your kitchen sink water filter.How to Install a Kitchen Sink Water Filter

.png)

How to Install a Kitchen Sink Water Filter


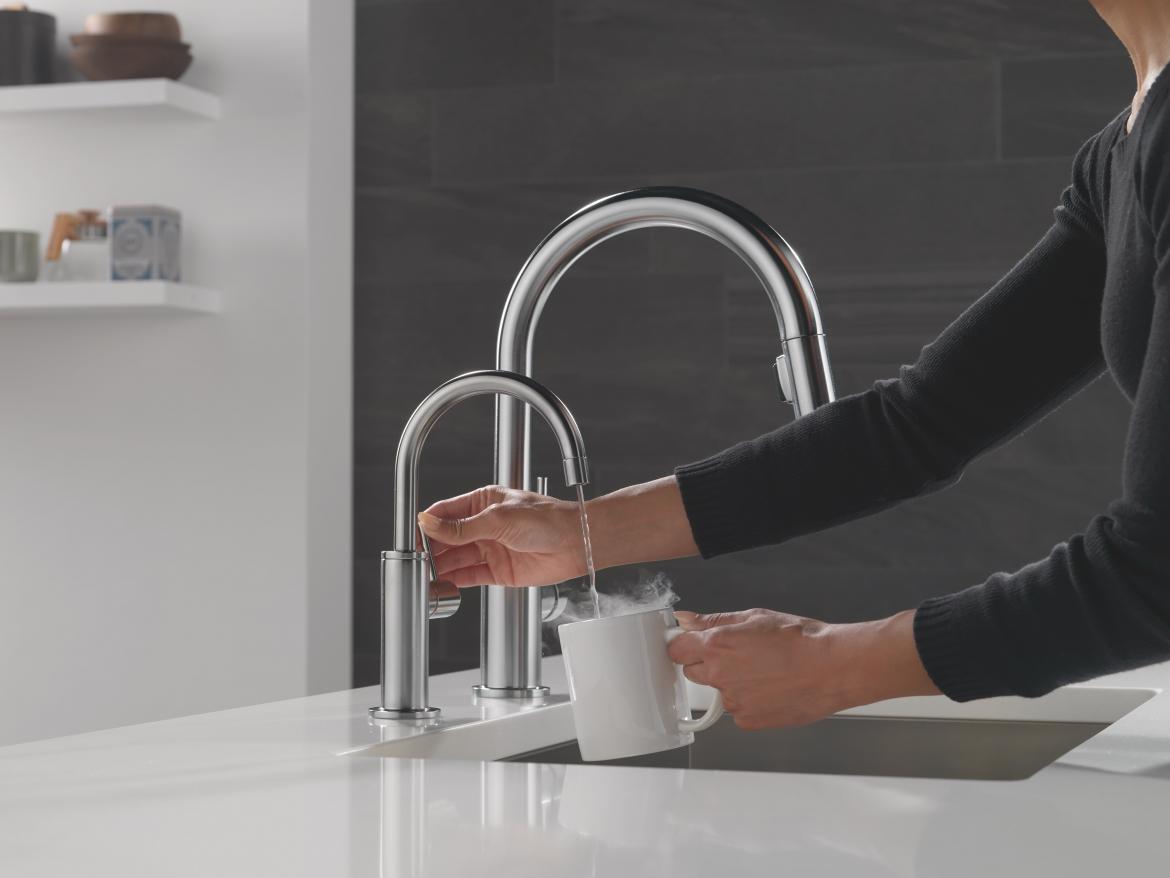
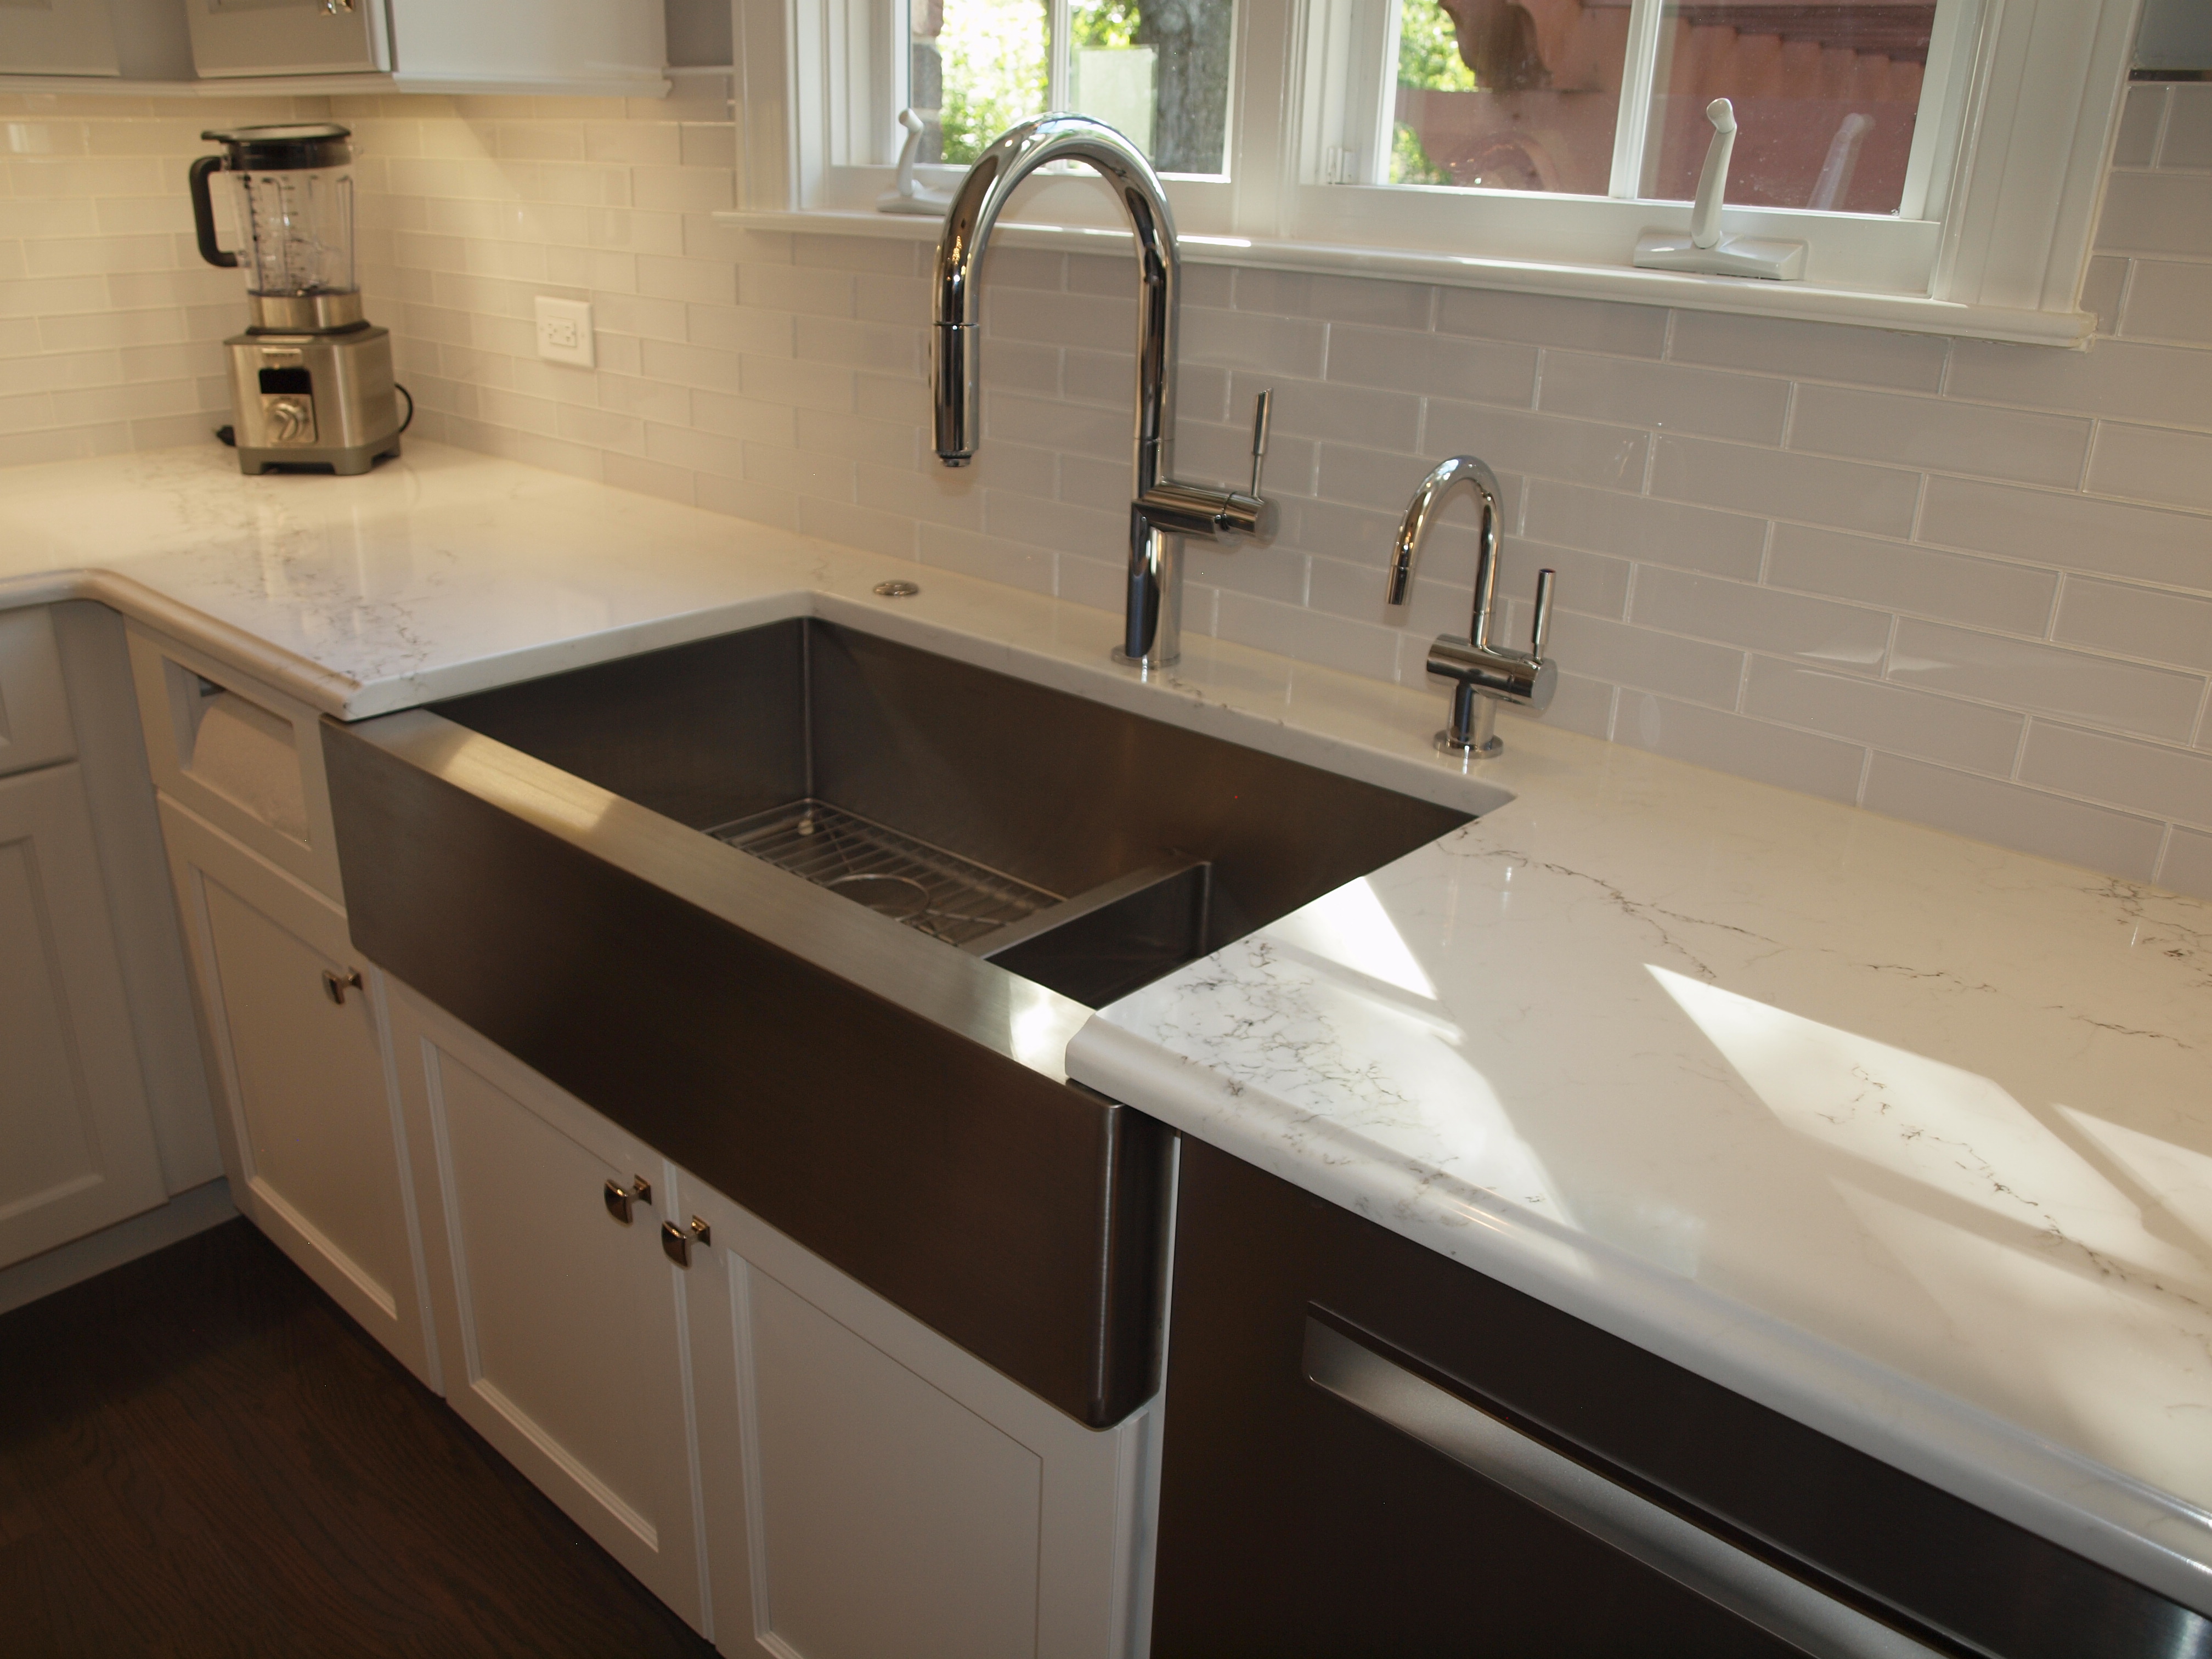
A hot water dispenser is a convenient addition to your kitchen sink. It provides instant hot water for making tea, coffee, or other hot drinks. Here's how you can install a kitchen sink hot water dispenser in a few simple steps. First, gather all the necessary tools and materials. You will need a screwdriver, adjustable pliers, Teflon tape, and the hot water dispenser unit. Make sure to turn off the electricity and water supply before you start. Next, remove the old hot water dispenser if you have one. Use a screwdriver to remove the mounting assembly, and then detach the dispenser from the sink. Make sure to have a bucket or towel underneath to catch any water that may spill out. Now it's time to install the new hot water dispenser. Place the rubber gasket on the dispenser unit and insert it into the sink drain. Make sure the unit is straight and level before proceeding. Next, secure the dispenser unit to the mounting assembly with screws. Use Teflon tape on the threads to prevent leaks. Hand-tighten the connections and then use an adjustable wrench for a final turn. Turn on the electricity and water supply and test the dispenser. If everything works properly, you have successfully installed your kitchen sink hot water dispenser.How to Install a Kitchen Sink Hot Water Dispenser


How to Install a Kitchen Sink Hot Water Dispenser


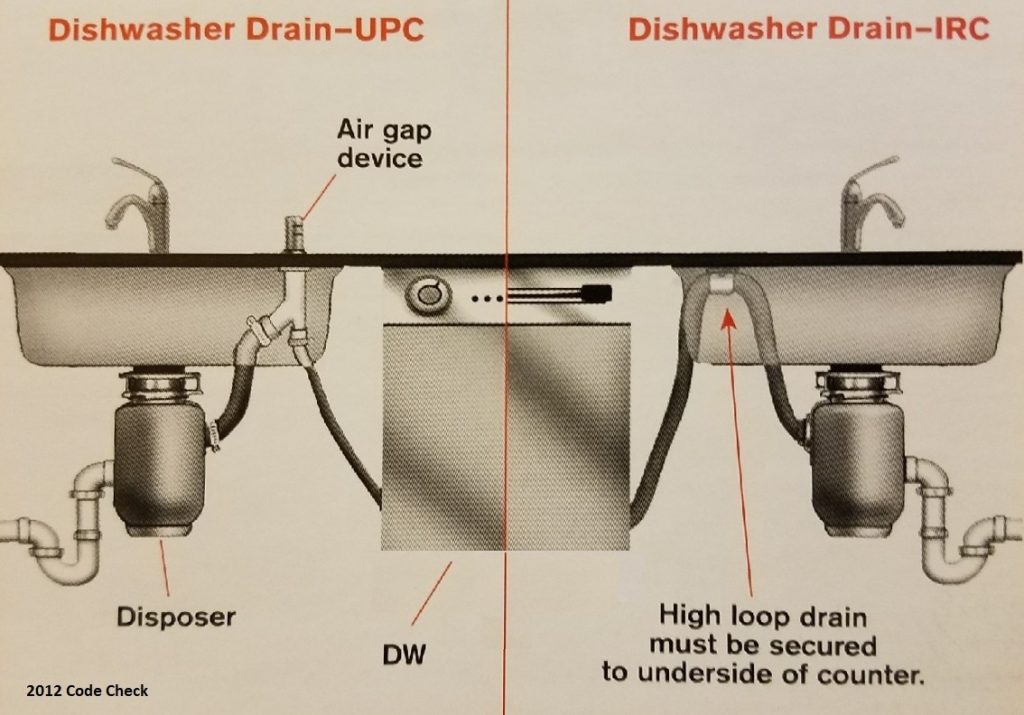
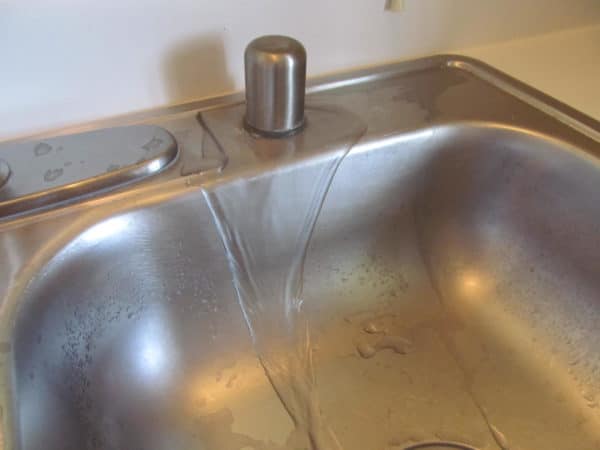
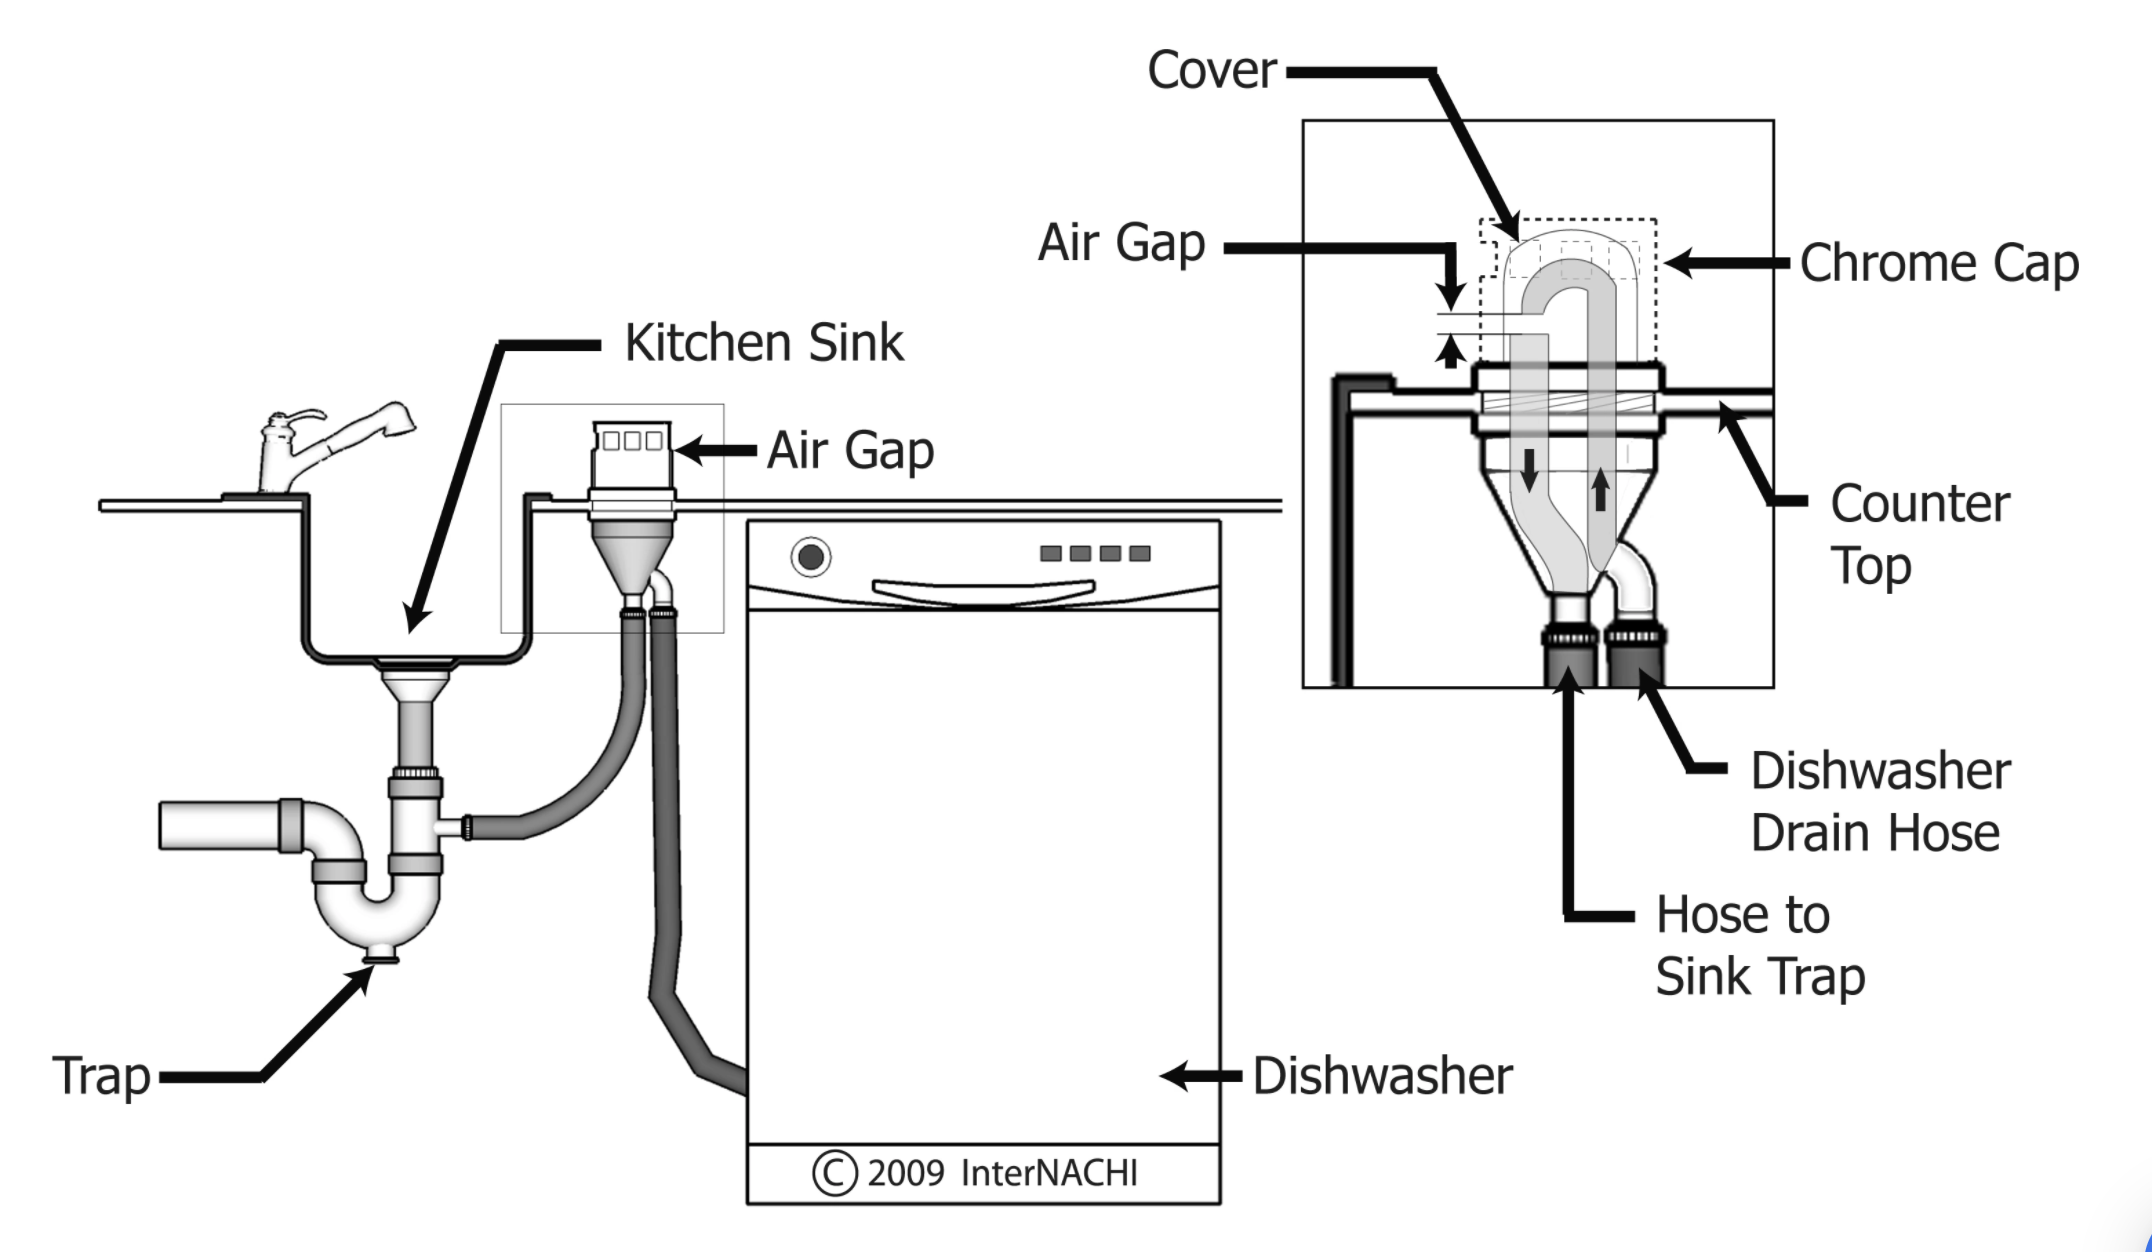
An air gap is a device that prevents contaminated water from flowing back into the sink. It is typically installed for dishwashers but can also be used for reverse osmosis systems. Here's how you can install a kitchen sink air gap in a few simple steps. First, gather all the necessary tools and materials. You will need a screwdriver, adjustable pliers, Teflon tape, and the air gap unit. Make sure to turn off the water supply before you start. Next, remove the old air gap if you have one. Use a screwdriver to remove the mounting assembly, and then detach the air gap from the sink. Make sure to have a bucket or towel underneath to catch any water that may spill out. Now it's time to install the new air gap. Place the rubber gasket on the air gap unit and insert it into the sink drain. Make sure the unit is straight and level before proceeding. Next, secure the air gap unit to the mounting assembly with screws. Use Teflon tape on the threads to prevent leaks. Hand-tighten the connections and then use an adjustable wrench for a final turn. Turn on the water supply and test the air gap. If everything works properly, you have successfully installed your kitchen sink air gap.How to Install a Kitchen Sink Air Gap


How to Install a Kitchen Sink Air Gap


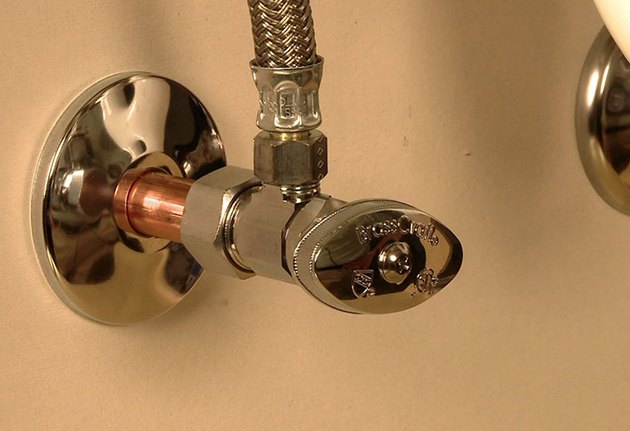
Shut off valves are essential for any plumbing system. They allow you to turn off the water supply to a specific fixture without disrupting the water supply to the entire house. Here's how you can install shut off valves for your kitchen sink in a few simple steps. First, gather all the necessary tools and materials. You will need a pipe cutter, adjustable pliers, Teflon tape, and the shut off valve assembly. Make sure to turn off the water supply before you start.How to Install a Kitchen Sink Shut Off Valves


How to Install a Kitchen Sink Shut Off Valves


The Importance of Choosing the Right Kitchen Sink Handle

Choosing the Perfect Handle for Your Kitchen Sink
 When it comes to designing your dream kitchen, every little detail matters. From the color of the cabinets to the type of flooring, each element contributes to the overall look and functionality of the space. One important aspect that often gets overlooked is the kitchen sink handle. Many people may not realize the impact that this seemingly small detail can have on the overall design and functionality of their kitchen. So, do you put a handle on the panel below your kitchen sink? The answer is yes, and here's why it's important to choose the right one.
Functionality:
The kitchen sink handle is not just for aesthetic purposes, it also plays a crucial role in the functionality of your sink. The right handle can make it easier to turn the water on and off, adjust the temperature, and control the flow.
Choosing a handle that is comfortable and easy to use can make your daily tasks in the kitchen much more efficient.
When it comes to designing your dream kitchen, every little detail matters. From the color of the cabinets to the type of flooring, each element contributes to the overall look and functionality of the space. One important aspect that often gets overlooked is the kitchen sink handle. Many people may not realize the impact that this seemingly small detail can have on the overall design and functionality of their kitchen. So, do you put a handle on the panel below your kitchen sink? The answer is yes, and here's why it's important to choose the right one.
Functionality:
The kitchen sink handle is not just for aesthetic purposes, it also plays a crucial role in the functionality of your sink. The right handle can make it easier to turn the water on and off, adjust the temperature, and control the flow.
Choosing a handle that is comfortable and easy to use can make your daily tasks in the kitchen much more efficient.
Matching Your Design Aesthetic
 Just like any other element in your kitchen, the sink handle should also match the overall design aesthetic.
Whether you have a modern, farmhouse, or traditional kitchen, there are plenty of handle options available to fit your style.
From sleek and minimalistic to intricate and detailed, the handle can add a touch of personality to your sink area.
Material:
The type of material you choose for your handle can also make a big difference in the overall look and feel of your kitchen. From stainless steel to brass, the material can complement your faucet, appliances, and other hardware in the space.
It's important to consider the durability and maintenance of the material as well, as the kitchen sink handle is often exposed to water and daily use.
Just like any other element in your kitchen, the sink handle should also match the overall design aesthetic.
Whether you have a modern, farmhouse, or traditional kitchen, there are plenty of handle options available to fit your style.
From sleek and minimalistic to intricate and detailed, the handle can add a touch of personality to your sink area.
Material:
The type of material you choose for your handle can also make a big difference in the overall look and feel of your kitchen. From stainless steel to brass, the material can complement your faucet, appliances, and other hardware in the space.
It's important to consider the durability and maintenance of the material as well, as the kitchen sink handle is often exposed to water and daily use.
Customization and Accessibility
 Another benefit of having a handle on the panel below your kitchen sink is the customization and accessibility it provides.
With the right handle, you can easily adjust the height and placement to fit your needs and preferences.
This is especially helpful for those with limited mobility or for households with young children who may need a lower handle for easier access.
In conclusion, the kitchen sink handle may seem like a small detail, but it can make a big impact on the overall design and functionality of your kitchen.
From choosing the right material and style to considering functionality and accessibility, it's important to carefully select a handle that suits your needs and complements your design aesthetic. So, don't overlook this important element when designing your dream kitchen.
Another benefit of having a handle on the panel below your kitchen sink is the customization and accessibility it provides.
With the right handle, you can easily adjust the height and placement to fit your needs and preferences.
This is especially helpful for those with limited mobility or for households with young children who may need a lower handle for easier access.
In conclusion, the kitchen sink handle may seem like a small detail, but it can make a big impact on the overall design and functionality of your kitchen.
From choosing the right material and style to considering functionality and accessibility, it's important to carefully select a handle that suits your needs and complements your design aesthetic. So, don't overlook this important element when designing your dream kitchen.