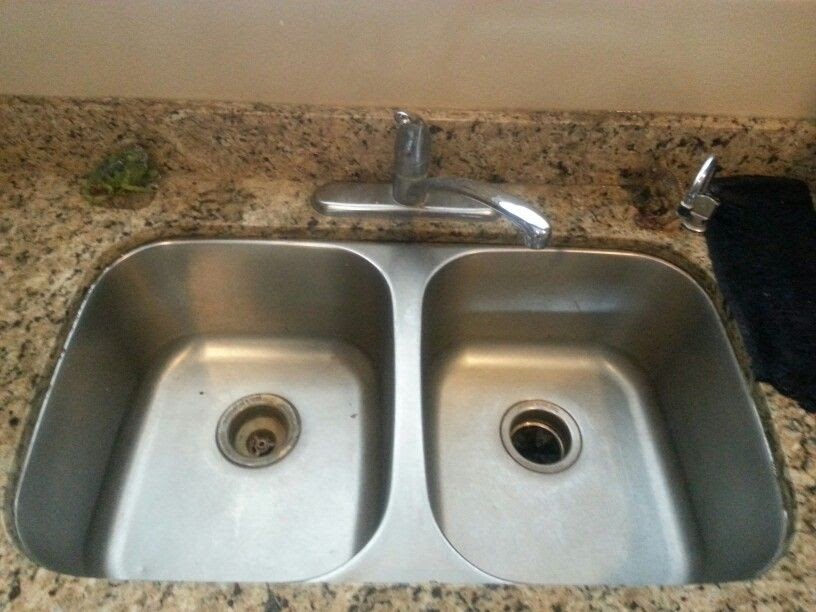
If you've noticed that the caulk around your kitchen sink is cracking or peeling, it's time to recaulk. Recaulking your kitchen sink not only improves the appearance of your sink but also helps prevent water damage and mold growth. While this may seem like a daunting task, with the right tools and techniques, you can recaulk your kitchen sink like a pro. The first step in recaulking your kitchen sink is to remove the old caulk. Using a putty knife, carefully scrape away the old caulk. Be sure to remove as much as possible, as any remaining caulk can prevent the new caulk from adhering properly. Next, clean the area thoroughly with a mixture of hot water and mild dish soap. This will remove any remaining residue and ensure a clean surface for the new caulk to stick to. Once the area is clean and dry, it's time to apply the new caulk. Using a caulk gun, apply a thin, even line of caulk along the seam between the sink and the countertop. Be sure to fill any gaps or cracks completely. Use your finger or a caulk smoothing tool to smooth out the caulk and remove any excess. Wipe away any excess caulk with a damp cloth and let the caulk dry for at least 24 hours before using the sink. Finally, to ensure a professional-looking finish, use a caulk finishing tool to smooth out the caulk once again. This will create a clean, seamless appearance and prevent water from getting under the caulk. With these simple steps, you can easily recaulk your kitchen sink and give it a fresh, updated look.1. How to Recaulk a Kitchen Sink: 12 Steps (with Pictures) - wikiHow


1. How to Recaulk a Kitchen Sink: 12 Steps (with Pictures) - wikiHow


Caulking your kitchen sink not only improves the appearance of your sink but also helps prevent water damage and mold growth. If you've noticed that the caulk around your sink is cracked or peeling, it's time to recaulk. With the right tools and techniques, you can easily caulk your kitchen sink and achieve a professional-looking finish. The first step in caulking your kitchen sink is to remove the old caulk. Using a putty knife, carefully scrape away the old caulk. Be sure to remove as much as possible, as any remaining caulk can prevent the new caulk from adhering properly. Next, clean the area thoroughly with a mixture of hot water and mild dish soap. This will remove any remaining residue and ensure a clean surface for the new caulk to stick to. Once the area is clean and dry, it's time to apply the new caulk. Using a caulk gun, apply a thin, even line of caulk along the seam between the sink and the countertop. Be sure to fill any gaps or cracks completely. Use your finger or a caulk smoothing tool to smooth out the caulk and remove any excess. Wipe away any excess caulk with a damp cloth and let the caulk dry for at least 24 hours before using the sink. Finally, to ensure a professional-looking finish, use a caulk finishing tool to smooth out the caulk once again. This will create a clean, seamless appearance and prevent water from getting under the caulk. By following these simple steps, you can easily caulk your kitchen sink and give it a fresh, updated look.2. How to Caulk a Kitchen Sink: 12 Steps (with Pictures) - wikiHow


2. How to Caulk a Kitchen Sink: 12 Steps (with Pictures) - wikiHow


Caulking your kitchen sink is an important part of routine maintenance. Over time, the caulk around your sink can crack or peel, creating an unsightly and potentially damaging situation. Fortunately, with the right tools and techniques, you can easily caulk your kitchen sink and achieve a professional-looking finish. The first step in caulking your kitchen sink is to remove the old caulk. Using a putty knife, carefully scrape away the old caulk. Be sure to remove as much as possible, as any remaining caulk can prevent the new caulk from adhering properly. Next, clean the area thoroughly with a mixture of hot water and mild dish soap. This will remove any remaining residue and ensure a clean surface for the new caulk to stick to. Once the area is clean and dry, it's time to apply the new caulk. Using a caulk gun, apply a thin, even line of caulk along the seam between the sink and the countertop. Be sure to fill any gaps or cracks completely. Use your finger or a caulk smoothing tool to smooth out the caulk and remove any excess. Wipe away any excess caulk with a damp cloth and let the caulk dry for at least 24 hours before using the sink. Finally, to ensure a professional-looking finish, use a caulk finishing tool to smooth out the caulk once again. This will create a clean, seamless appearance and prevent water from getting under the caulk. By following these simple steps, you can easily caulk your kitchen sink and maintain its appearance and functionality.3. The Best Way to Caulk a Kitchen Sink | Home Guides | SF Gate


3. The Best Way to Caulk a Kitchen Sink


Recaulking your kitchen sink is an important part of maintaining the appearance and functionality of your sink. If you've noticed that the caulk around your sink is cracking or peeling, it's time to recaulk. With the right tools and techniques, you can easily recaulk your kitchen sink and achieve a professional-looking finish. The first step in recaulking your kitchen sink is to remove the old caulk. Using a putty knife, carefully scrape away the old caulk. Be sure to remove as much as possible, as any remaining caulk can prevent the new caulk from adhering properly. Next, clean the area thoroughly with a mixture of hot water and mild dish soap. This will remove any remaining residue and ensure a clean surface for the new caulk to stick to. Once the area is clean and dry, it's time to apply the new caulk. Using a caulk gun, apply a thin, even line of caulk along the seam between the sink and the countertop. Be sure to fill any gaps or cracks completely. Use your finger or a caulk smoothing tool to smooth out the caulk and remove any excess. Wipe away any excess caulk with a damp cloth and let the caulk dry for at least 24 hours before using the sink. Finally, to ensure a professional-looking finish, use a caulk finishing tool to smooth out the caulk once again. This will create a clean, seamless appearance and prevent water from getting under the caulk. By following these simple steps, you can easily recaulk your kitchen sink and keep it looking like new.4. How to Recaulk a Kitchen Sink | The Home Depot


Home Guides


Caulking your kitchen sink is an important part of maintaining the appearance and functionality of your sink. Over time, the caulk around your sink can crack or peel, creating an unsightly and potentially damaging situation. Fortunately, with the right tools and techniques, you can easily caulk your kitchen sink and achieve a professional-looking finish. The first step in caulking your kitchen sink is to remove the old caulk. Using a putty knife, carefully scrape away the old caulk. Be sure to remove as much as possible, as any remaining caulk can prevent the new caulk from adhering properly. Next, clean the area thoroughly with a mixture of hot water and mild dish soap. This will remove any remaining residue and ensure a clean surface for the new caulk to stick to. Once the area is clean and dry, it's time to apply the new caulk. Using a caulk gun, apply a thin, even line of caulk along the seam between the sink and the countertop. Be sure to fill any gaps or cracks completely. Use your finger or a caulk smoothing tool to smooth out the caulk and remove any excess. Wipe away any excess caulk with a damp cloth and let the caulk dry for at least 24 hours before using the sink. Finally, to ensure a professional-looking finish, use a caulk finishing tool to smooth out the caulk once again. This will create a clean, seamless appearance and prevent water from getting under the caulk. By following these simple steps, you can easily caulk your kitchen sink and maintain its appearance and functionality.5. How to Caulk a Kitchen Sink: 9 Steps (with Pictures) - Instructables


SF Gate


Recaulking your kitchen sink is an important part of routine maintenance. Over time, the caulk around your sink can crack or peel, creating an unsightly and potentially damaging situation. Fortunately, with the right tools and techniques, you can easily recaulk your kitchen sink and achieve a professional-looking finish. The first step in recaulking your kitchen sink is to remove the old caulk. Using a putty knife, carefully scrape away the old caulk. Be sure to remove as much as possible, as any remaining caulk can prevent the new caulk from adhering properly. Next, clean the area thoroughly with a mixture of hot water and mild dish soap. This will remove any remaining residue and ensure a clean surface for the new caulk to stick to. Once the area is clean and dry, it's time to apply the new caulk. Using a caulk gun, apply a thin, even line of caulk along the seam between the sink and the countertop. Be sure to fill any gaps or cracks completely. Use your finger or a caulk smoothing tool to smooth out the caulk and remove any excess. Wipe away any excess caulk with a damp cloth and let the caulk dry for at least 24 hours before using the sink. Finally, to ensure a professional-looking finish, use a caulk finishing tool to smooth out the caulk once again. This will create a clean, seamless appearance and prevent water from getting under the caulk. By following these simple steps, you can easily recaulk your kitchen sink and keep it functioning and looking like new.6. How to Recaulk a Kitchen Sink - YouTube


4. How to Recaulk a Kitchen Sink


Caulking your kitchen sink not only improves the appearance of your sink but also helps prevent water damage and mold growth. If you've noticed that the caulk around your sink is cracked or peeling, it's time to recaulk. With the right tools and techniques, you can easily caulk your kitchen sink and achieve a professional-looking finish. The first step in caulking your kitchen sink is to remove the old caulk. Using a putty knife, carefully scrape away the old caulk. Be sure to remove as much as possible, as any remaining caulk can prevent the new caulk from adhering properly. Next, clean the area thoroughly with a mixture of hot water and mild dish soap. This will remove any remaining residue and ensure a clean surface for the new caulk to stick to. Once the area is clean and dry, it's time to apply the new caulk. Using a caulk gun, apply a thin, even line of caulk along the seam between the sink and the countertop. Be sure to fill any gaps or cracks completely. Use your finger or a caulk smoothing tool to smooth out the caulk and remove any excess. Wipe away any excess caulk with a damp cloth and let the caulk dry for at least 24 hours before using the sink. Finally, to ensure a professional-looking finish, use a caulk finishing tool to smooth out the caulk once again. This will create a clean, seamless appearance and prevent water from getting under the caulk. By following these simple steps, you can easily caulk your kitchen sink and maintain its appearance and functionality.7. How to Caulk a Kitchen Sink - The Spruce


The Home Depot


/iStock-459232917-min.jpg)


Recaulking your kitchen sink is an essential part of maintaining the appearance and functionality of your sink. If you've noticed that the caulk around your sink is cracking or peeling, it's time to recaulk. With the right tools and techniques, you can easily recaulk your kitchen sink and achieve a professional-looking finish. The first step in recaulking your kitchen sink is to remove the old caulk. Using a putty knife, carefully scrape away the old caulk. Be sure to remove as much as possible, as any remaining caulk can prevent the new caulk from adhering properly. Next, clean the area thoroughly with a mixture of hot water and mild dish soap. This will remove any remaining residue and ensure a clean surface for the new caulk to stick to. Once the area is clean and dry, it's time to apply the new caulk. Using a caulk gun, apply a thin, even line of caulk along the seam between the sink and the countertop. Be sure to fill any gaps or cracks completely. Use your finger or a caulk smoothing tool to smooth out the caulk and remove any excess. Wipe away any excess caulk with a damp cloth and let the caulk dry for at least 24 hours before using the sink.8. How to Recaulk a Kitchen Sink | DoItYourself.com


5. How to Caulk a Kitchen Sink: 9 Steps (with Pictures) - Instructables

The Importance of Recaulking Your Kitchen Sink

Why is Recaulking Necessary?
 When it comes to maintaining your kitchen, the sink may not be the first thing that comes to mind. However, the caulking around your kitchen sink plays a crucial role in keeping your kitchen clean and functional. Over time, the caulking can deteriorate due to water exposure and everyday use, allowing for water to seep into the gaps and potentially cause mold and mildew growth. This not only affects the appearance of your kitchen but also poses a health risk to you and your family. Therefore, it is important to regularly check and recaulk your kitchen sink to prevent any potential problems.
Best Materials for Recaulking
 When it comes to recaulking your kitchen sink, it is important to use the right materials for a long-lasting and effective seal.
Silicone caulk
is the most recommended option as it is waterproof, flexible, and can withstand high temperatures. It also comes in a variety of colors to match your sink. Another option is
polyurethane caulk
, which is also waterproof and more durable than silicone caulk, but it can be more difficult to work with and requires more time to dry. Whichever material you choose, make sure to avoid using
acrylic caulk
as it is not suitable for wet areas and can easily crack and peel.
When it comes to recaulking your kitchen sink, it is important to use the right materials for a long-lasting and effective seal.
Silicone caulk
is the most recommended option as it is waterproof, flexible, and can withstand high temperatures. It also comes in a variety of colors to match your sink. Another option is
polyurethane caulk
, which is also waterproof and more durable than silicone caulk, but it can be more difficult to work with and requires more time to dry. Whichever material you choose, make sure to avoid using
acrylic caulk
as it is not suitable for wet areas and can easily crack and peel.
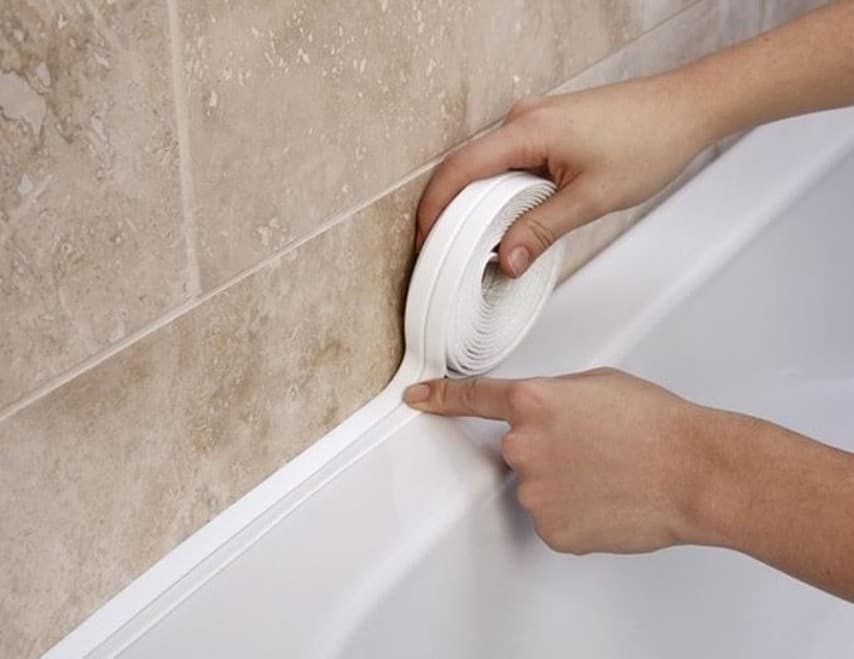
Steps to Recaulking Your Kitchen Sink
 To recaulk your kitchen sink properly, follow these simple steps:
Step 1:
Remove the old caulk using a caulk remover tool or a utility knife. Make sure to clean the area thoroughly to remove any residue.
Step 2:
Prepare the new caulk by cutting the tip of the tube at a 45-degree angle. This will allow for a smoother and more precise application.
Step 3:
Apply the caulk evenly along the edges of the sink, making sure to fill in any gaps or cracks. Use your finger or a caulk smoothing tool to create a smooth and neat finish.
Step 4:
Clean up any excess caulk with a damp cloth before it dries.
To recaulk your kitchen sink properly, follow these simple steps:
Step 1:
Remove the old caulk using a caulk remover tool or a utility knife. Make sure to clean the area thoroughly to remove any residue.
Step 2:
Prepare the new caulk by cutting the tip of the tube at a 45-degree angle. This will allow for a smoother and more precise application.
Step 3:
Apply the caulk evenly along the edges of the sink, making sure to fill in any gaps or cracks. Use your finger or a caulk smoothing tool to create a smooth and neat finish.
Step 4:
Clean up any excess caulk with a damp cloth before it dries.
Additional Tips for a Successful Recaulking
 To ensure a successful recaulking, here are some additional tips to keep in mind:
- Make sure the area is completely dry before applying the new caulk.
- Use painter's tape to create a straight line for a neater finish.
- Allow the caulk to dry for at least 24 hours before using the sink.
- Regularly check and recaulk your kitchen sink every 1-2 years to prevent any potential problems.
To ensure a successful recaulking, here are some additional tips to keep in mind:
- Make sure the area is completely dry before applying the new caulk.
- Use painter's tape to create a straight line for a neater finish.
- Allow the caulk to dry for at least 24 hours before using the sink.
- Regularly check and recaulk your kitchen sink every 1-2 years to prevent any potential problems.
In Conclusion
 Recaulking your kitchen sink may seem like a daunting task, but it is a necessary one to maintain the cleanliness and functionality of your kitchen. By following the steps and tips mentioned above, you can easily recaulk your kitchen sink and prevent any potential problems in the future. Remember to use the right materials and regularly check for any signs of deterioration to keep your kitchen in top condition.