If your kitchen sink is leaking or you want to upgrade your old valves, it's important to know how to replace the hot and cold water valves under your kitchen sink. This may seem like a daunting task, but with the right tools and knowledge, you can easily complete this DIY project yourself. Follow this step-by-step guide for a successful valve replacement and enjoy a leak-free sink in no time.How to Replace Hot and Cold Water Valves Under Kitchen Sink


How to Replace Hot and Cold Water Valves Under Kitchen Sink


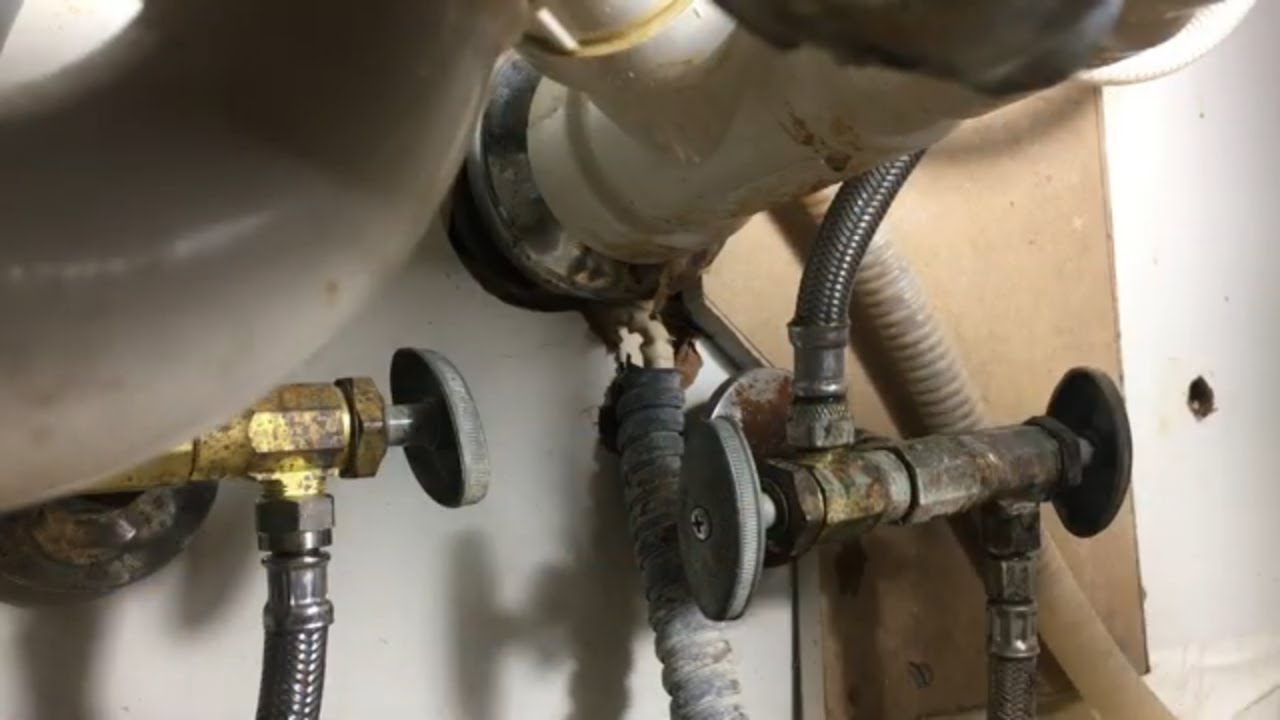
Step 1: Before you begin, shut off the water supply to your kitchen sink. Locate the main water valve and turn it clockwise until it stops. Then, open the faucet to drain any remaining water. Step 2: Next, you'll need to remove the old valves. Use a wrench to loosen the connection between the valve and the pipe underneath the sink. Once it's loose, you should be able to easily unscrew the valve and remove it. Step 3: Now it's time to install the new valves. Start by wrapping some plumber's tape around the threads of the pipes. This will create a tight seal and prevent any leaks. Step 4: Screw the new valves onto the pipes, making sure they are tightly secured. You can use a wrench to give them an extra turn if needed. Step 5: Once the valves are installed, turn the water supply back on and check for any leaks. If you notice any, use the wrench to tighten the connections a little more. Step 6: Finally, test the valves by turning the hot and cold water on and off. If everything is working properly, you have successfully replaced the hot and cold water valves under your kitchen sink.Replacing Hot and Cold Water Valves Under Kitchen Sink: Step-by-Step Guide


Replacing Hot and Cold Water Valves Under Kitchen Sink: Step-by-Step Guide
:max_bytes(150000):strip_icc()/sink-pipe-under-wash-basin-119001607-6f28aec4c66944efb7a9a38cb622ab8b.jpg)


Replacing hot and cold water valves under your kitchen sink is a simple DIY project that can save you time and money. By following the steps outlined above, you can avoid the hassle of hiring a professional and have the satisfaction of completing the project yourself.DIY: Replacing Hot and Cold Water Valves Under Kitchen Sink


DIY: Replacing Hot and Cold Water Valves Under Kitchen Sink


While replacing hot and cold water valves under your kitchen sink may seem straightforward, there are a few tips and tricks that can make the process even easier. For example, make sure to turn off the water supply before beginning and use plumber's tape to ensure a tight seal. You can also refer to online tutorials or ask for advice from a hardware store employee if you encounter any difficulties.Replacing Hot and Cold Water Valves Under Kitchen Sink: Tips and Tricks


Replacing Hot and Cold Water Valves Under Kitchen Sink: Tips and Tricks
To recap, here is a step-by-step guide for replacing hot and cold water valves under your kitchen sink: 1. Shut off the water supply. 2. Remove the old valves. 3. Wrap plumber's tape around the threads of the pipes. 4. Install the new valves. 5. Turn the water supply back on and check for leaks. 6. Test the valves to ensure they are working properly.Step-by-Step Guide for Replacing Hot and Cold Water Valves Under Kitchen Sink

Step-by-Step Guide for Replacing Hot and Cold Water Valves Under Kitchen Sink


As with any DIY project, there are a few common mistakes to avoid when replacing hot and cold water valves under your kitchen sink. These include not turning off the water supply, not using plumber's tape, and not tightening the connections enough. By being aware of these mistakes, you can ensure a successful valve replacement.Replacing Hot and Cold Water Valves Under Kitchen Sink: Common Mistakes to Avoid
Replacing Hot and Cold Water Valves Under Kitchen Sink: Common Mistakes to Avoid
Don't be intimidated by the thought of replacing hot and cold water valves under your kitchen sink. With the right tools and knowledge, this task can be easily completed. Just remember to turn off the water supply, use plumber's tape, and test the valves for any leaks before considering the project a success.How to Easily Replace Hot and Cold Water Valves Under Kitchen Sink

How to Easily Replace Hot and Cold Water Valves Under Kitchen Sink

To replace hot and cold water valves under your kitchen sink, you will need the following tools and materials: - Wrench - Plumber's tape - New valves - Towels or rags - Bucket (to catch any water)Replacing Hot and Cold Water Valves Under Kitchen Sink: Tools and Materials Needed

Replacing Hot and Cold Water Valves Under Kitchen Sink: Tools and Materials Needed

While this DIY project is relatively simple, it's important to take some safety precautions before and during the valve replacement. Make sure to wear protective gloves and eyewear to avoid any injuries. It's also a good idea to have towels or rags nearby to clean up any spills or leaks.Replacing Hot and Cold Water Valves Under Kitchen Sink: Safety Precautions to Take

Replacing Hot and Cold Water Valves Under Kitchen Sink: Safety Precautions to Take
If you encounter any problems while replacing hot and cold water valves under your kitchen sink, don't panic. Some common issues include difficulty removing the old valves, leaks after installation, and difficulty turning the valves on and off. Refer back to this guide or seek advice from a professional if needed. With this guide, you now have the knowledge and confidence to replace the hot and cold water valves under your kitchen sink. Remember to take your time, follow the steps carefully, and don't hesitate to ask for help if needed. You'll have a leak-free sink in no time!Replacing Hot and Cold Water Valves Under Kitchen Sink: Troubleshooting Common Issues

Replacing Hot and Cold Water Valves Under Kitchen Sink: Troubleshooting Common Issues


Why You Should Consider Replacing Your Hot and Cold Water Valves Under the Kitchen Sink

The Importance of Functional Valves in Your Kitchen
 When it comes to the functionality of your kitchen, there are many different components that play a crucial role. From the appliances to the plumbing, each element works together to create a smooth and efficient cooking and cleaning experience. One often overlooked but essential aspect of a well-functioning kitchen is the hot and cold water valves under the sink. These valves control the flow of water to your sink, and without them working properly, you may encounter a range of issues. That's why it's essential to regularly check and replace these valves if needed.
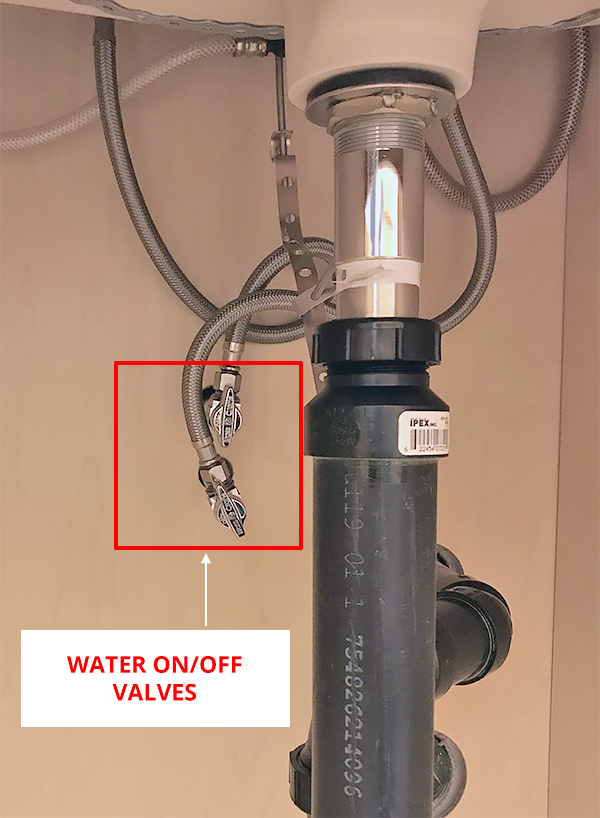
Hot and cold water valves
are typically found under the kitchen sink, and they are responsible for controlling the flow of both hot and cold water to your faucet. These valves are crucial for everyday tasks such as washing dishes, filling up pots with water, and even getting a glass of water. They provide easy access to both hot and cold water and allow you to adjust the temperature to your liking. Without functional valves, you may have to resort to using water from other sources or even dealing with scalding hot or freezing cold water from your faucet.
When it comes to the functionality of your kitchen, there are many different components that play a crucial role. From the appliances to the plumbing, each element works together to create a smooth and efficient cooking and cleaning experience. One often overlooked but essential aspect of a well-functioning kitchen is the hot and cold water valves under the sink. These valves control the flow of water to your sink, and without them working properly, you may encounter a range of issues. That's why it's essential to regularly check and replace these valves if needed.
Hot and cold water valves
are typically found under the kitchen sink, and they are responsible for controlling the flow of both hot and cold water to your faucet. These valves are crucial for everyday tasks such as washing dishes, filling up pots with water, and even getting a glass of water. They provide easy access to both hot and cold water and allow you to adjust the temperature to your liking. Without functional valves, you may have to resort to using water from other sources or even dealing with scalding hot or freezing cold water from your faucet.
The Benefits of Replacing Old Valves
 Replacing
your hot and cold water valves under the kitchen sink may not be at the top of your list when it comes to home renovations. However, there are many advantages to doing so. One of the main benefits is that it ensures your valves are functioning correctly. Over time, valves can become worn out or damaged, leading to leaks or even a complete loss of water flow. By replacing them, you can avoid potential water damage to your kitchen and prevent any inconvenience caused by a lack of running water.
Another advantage of replacing your valves is that it allows you to upgrade to more efficient and modern options. Older valves may not have the same level of control or precision as newer models, which can impact your water usage and utility bills. By opting for
new and improved valves
, you can save money in the long run and have better control over the temperature and flow of your water.
Replacing
your hot and cold water valves under the kitchen sink may not be at the top of your list when it comes to home renovations. However, there are many advantages to doing so. One of the main benefits is that it ensures your valves are functioning correctly. Over time, valves can become worn out or damaged, leading to leaks or even a complete loss of water flow. By replacing them, you can avoid potential water damage to your kitchen and prevent any inconvenience caused by a lack of running water.
Another advantage of replacing your valves is that it allows you to upgrade to more efficient and modern options. Older valves may not have the same level of control or precision as newer models, which can impact your water usage and utility bills. By opting for
new and improved valves
, you can save money in the long run and have better control over the temperature and flow of your water.
Conclusion
 In conclusion, it's crucial to regularly check and replace your hot and cold water valves under the kitchen sink. They play a significant role in the functionality of your kitchen and can impact your daily tasks and utility bills. By opting for modern and efficient valves, you can ensure a smooth and enjoyable experience in your kitchen. So, don't overlook the importance of these small but essential components and consider replacing them if needed to improve your overall kitchen design.