Are you tired of dealing with a clogged sink? Removing the bathroom sink drain may seem like a daunting task, but with the right tools and knowledge, it can be a simple and stress-free process. In this guide, we will walk you through the 10 easy steps to remove your bathroom sink drain and get your sink running smoothly again. So put on your DIY hat and let's get started!Removing Bathroom Sink Drain: A Step-by-Step Guide


Removing Bathroom Sink Drain: A Step-by-Step Guide


/bathroom-sink-drain-installation-2718843-01-4955fe1f576b447a91abe51c126d220b.jpg)
:max_bytes(150000):strip_icc()/bathroom-sink-drain-installation-2718843-02-61e5ecbee1e949be8d8f45ac4f5a6797.jpg)
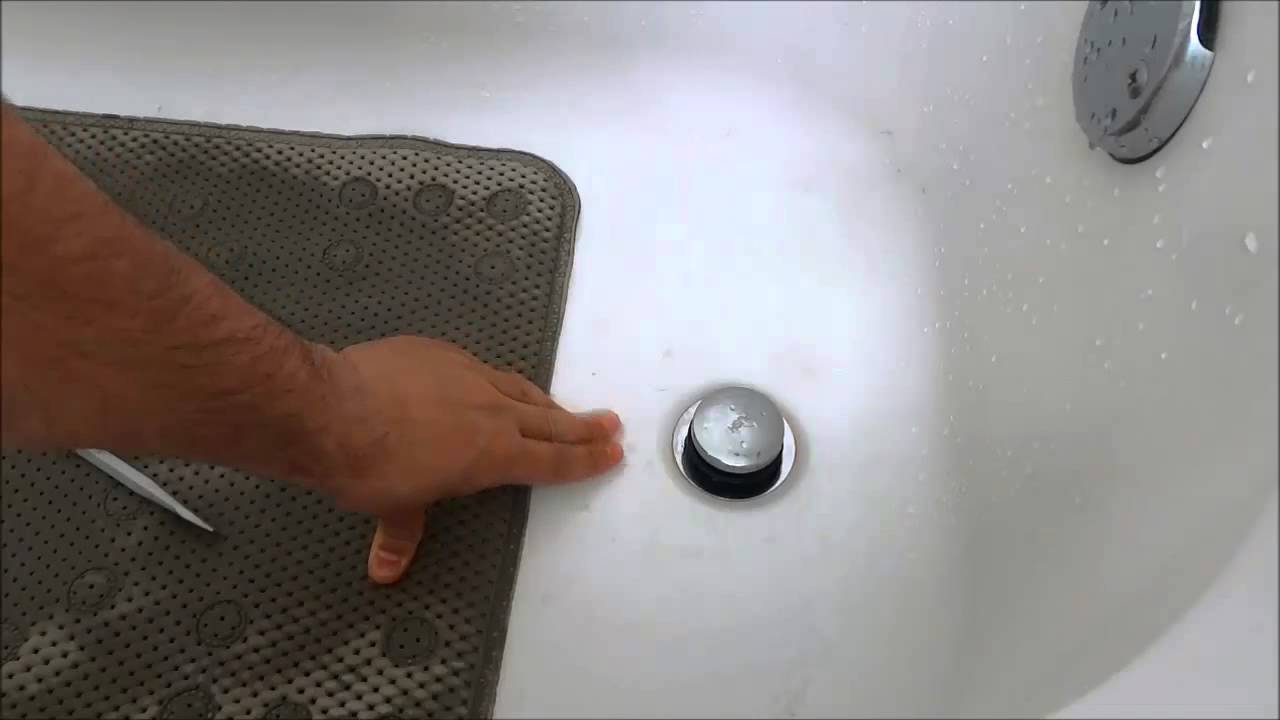
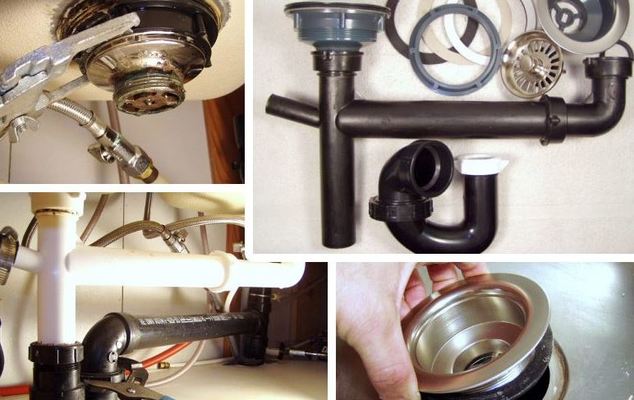
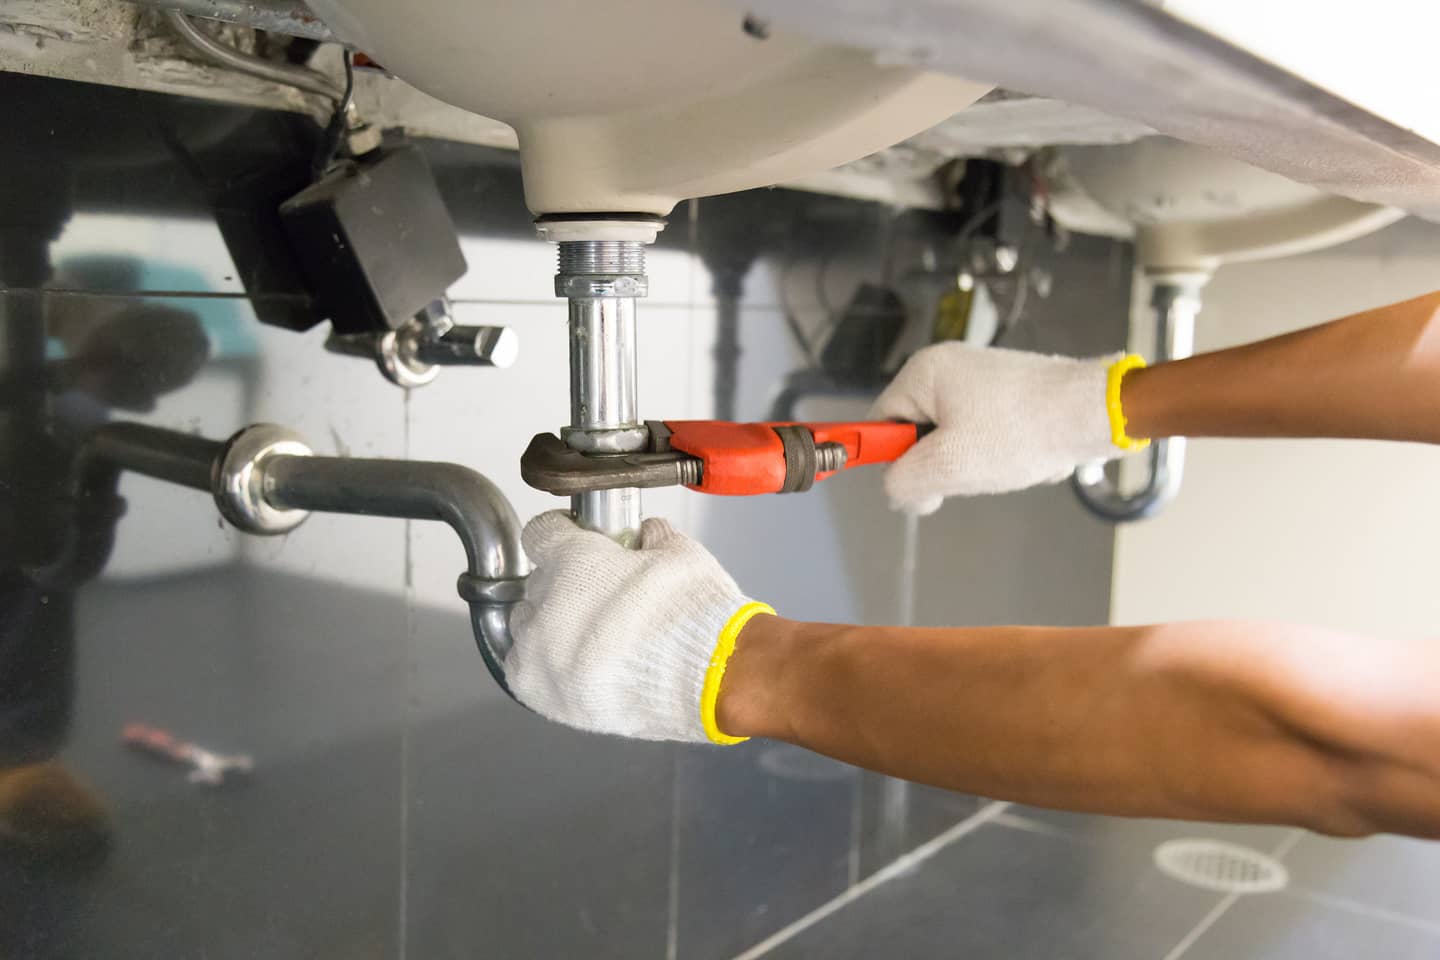
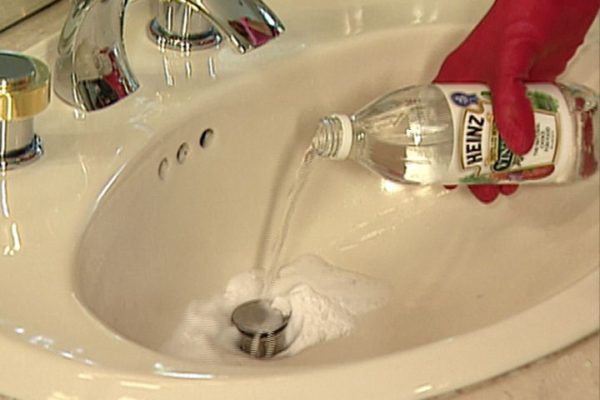
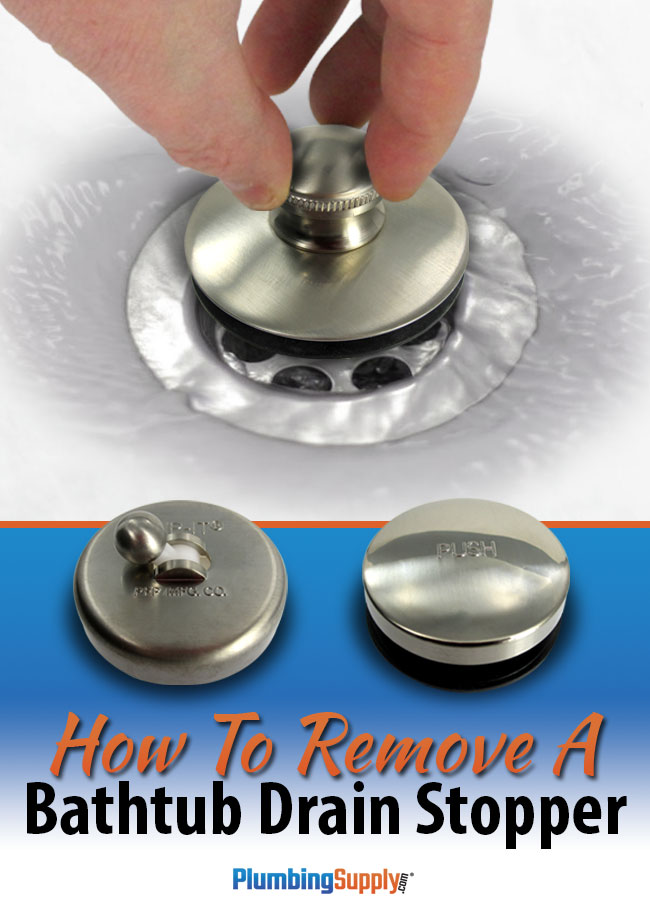
Before you begin, make sure you have all the necessary tools on hand. These include a pair of pliers, a screwdriver, and a drain wrench. Once you have these, follow these 10 simple steps to remove your bathroom sink drain: Step 1: Locate the stopper at the bottom of your sink. This is the circular metal or plastic piece that covers the drain. Step 2: If your stopper has a visible screw, use a screwdriver to loosen and remove it. If there is no screw, skip to step 4. Step 3: Once the screw is removed, gently lift the stopper out of the drain. If it is stuck, you can use pliers to help loosen it. Step 4: If your stopper does not have a visible screw, there will be a metal ring surrounding the stopper. Use a pair of pliers to grasp the ring and turn it counterclockwise to unscrew it. Step 5: Once the ring is removed, you should be able to easily lift the stopper out of the drain. Step 6: Use a drain wrench to remove the drain flange. Insert the wrench into the drain and turn it counterclockwise to loosen and remove the flange. Step 7: If the flange is stuck, you can use pliers to help loosen it. Be careful not to damage the flange or your sink. Step 8: Once the flange is removed, you will see the drain pipe. Use pliers to loosen and remove the nut connecting the drain pipe to the bottom of the sink. Step 9: Pull the drain pipe down and out of the sink. You may need to wiggle it a bit to loosen it. Step 10: You have successfully removed your bathroom sink drain! You can now clean the drain and sink thoroughly before reassembling everything.How to Remove a Bathroom Sink Drain in 10 Easy Steps


How to Remove a Bathroom Sink Drain in 10 Easy Steps


Removing a bathroom sink drain is a simple task that you can do yourself without calling a plumber. It not only saves you money but also gives you a sense of accomplishment. Just follow the steps above, and you'll have a clean and unclogged sink in no time.DIY: Removing a Bathroom Sink Drain


DIY: Removing a Bathroom Sink Drain


Here are a few tips and tricks to make the process of removing a bathroom sink drain even easier: Tip 1: Before you start, place a towel or bucket underneath the sink to catch any water or debris that may fall out. Tip 2: If your sink has a pop-up drain, you may need to remove the pivot rod before removing the flange. This can be done by unscrewing the pivot nut and pulling the rod out. Tip 3: If you are having trouble loosening the flange or drain pipe, you can use a lubricant like WD-40 to help loosen them. Tip 4: If your sink has a stubborn clog, you can use a plumber's snake to remove it before removing the drain.Removing a Bathroom Sink Drain: Tips and Tricks
Removing a Bathroom Sink Drain: Tips and Tricks


Now that you know the step-by-step process and some helpful tips, you are well on your way to becoming a pro at removing bathroom sink drains. Remember to take your time and be gentle to avoid damaging your sink or drain.The Ultimate Guide to Removing a Bathroom Sink Drain


The Ultimate Guide to Removing a Bathroom Sink Drain

While removing a bathroom sink drain may seem like a simple task, there are some common mistakes that people make which can lead to bigger problems. Here are a few mistakes to avoid: Mistake 1: Not turning off the water supply before starting. This can lead to a flooded bathroom and potential water damage. Mistake 2: Using too much force when removing the drain or flange. This can cause damage to your sink and make the process more difficult. Mistake 3: Forgetting to clean the drain and sink before reassembling. This can lead to a buildup of gunk and cause future clogs.Removing a Bathroom Sink Drain: Common Mistakes to Avoid

Removing a Bathroom Sink Drain: Common Mistakes to Avoid


If you prefer visual aids, there are many helpful tutorials available online that can guide you through the process of removing a bathroom sink drain. Just make sure to follow the steps carefully and use the right tools for the job.Step-by-Step Tutorial for Removing a Bathroom Sink Drain


Step-by-Step Tutorial for Removing a Bathroom Sink Drain


As mentioned earlier, the tools you'll need to remove a bathroom sink drain are a pair of pliers, a screwdriver, and a drain wrench. Additional tools like lubricant and a plumber's snake may also come in handy. Make sure to have all of these on hand before you start the process.Removing a Bathroom Sink Drain: Tools You'll Need


Removing a Bathroom Sink Drain: Tools You'll Need
The key to removing a bathroom sink drain without damaging your sink is to be gentle and patient. Avoid using excessive force, and make sure to clean the drain and sink before reassembling to prevent future problems.How to Remove a Bathroom Sink Drain Without Damaging Your Sink


How to Remove a Bathroom Sink Drain Without Damaging Your Sink

If you encounter any issues while removing your bathroom sink drain, don't panic. There are many resources available to help troubleshoot common problems. You can also reach out to a professional plumber for assistance. Now that you know the step-by-step process, tips and tricks, and common mistakes to avoid, you are well-equipped to remove your bathroom sink drain with ease. Remember to take your time and be gentle, and you'll have a clean and functional sink in no time!Removing a Bathroom Sink Drain: Troubleshooting Common Issues

Removing a Bathroom Sink Drain: Troubleshooting Common Issues


Why You Should Consider Removing Your Bathroom Sink Drain for a Better House Design

Maximizing Space and Improving Aesthetics
 When it comes to designing your bathroom, every inch counts. Removing the bathroom sink drain can help you maximize the space and improve the overall aesthetics of your bathroom. By eliminating the drain, you can create more room for storage or other features such as a larger vanity or a bathtub. This can make a huge difference, especially if you have a small bathroom where space is limited.
Not only does removing the bathroom sink drain free up space, but it also gives your bathroom a sleek and modern look. With the drain out of the way, you can opt for a wall-mounted sink or a pedestal sink, which can make your bathroom appear more spacious and open. This can be particularly beneficial in smaller bathrooms, where a bulky sink and drain can make the space feel cramped and cluttered.
When it comes to designing your bathroom, every inch counts. Removing the bathroom sink drain can help you maximize the space and improve the overall aesthetics of your bathroom. By eliminating the drain, you can create more room for storage or other features such as a larger vanity or a bathtub. This can make a huge difference, especially if you have a small bathroom where space is limited.
Not only does removing the bathroom sink drain free up space, but it also gives your bathroom a sleek and modern look. With the drain out of the way, you can opt for a wall-mounted sink or a pedestal sink, which can make your bathroom appear more spacious and open. This can be particularly beneficial in smaller bathrooms, where a bulky sink and drain can make the space feel cramped and cluttered.
Preventing Clogs and Improving Drainage
 Another reason to consider removing your bathroom sink drain is to prevent clogs and improve drainage. Over time, hair, soap scum, and other debris can accumulate in the drain, causing it to clog. This can lead to unpleasant odors and even water backup, which can be a major inconvenience. By removing the drain, you eliminate this potential problem and make it easier to keep your bathroom clean and hygienic.
Furthermore, removing the bathroom sink drain can improve the drainage of your sink. With the drain out of the way, water can flow more freely, reducing the likelihood of standing water and potential mold or mildew growth. This can also help with the overall maintenance of your bathroom, making it easier to keep it clean and preventing any potential water damage.
Another reason to consider removing your bathroom sink drain is to prevent clogs and improve drainage. Over time, hair, soap scum, and other debris can accumulate in the drain, causing it to clog. This can lead to unpleasant odors and even water backup, which can be a major inconvenience. By removing the drain, you eliminate this potential problem and make it easier to keep your bathroom clean and hygienic.
Furthermore, removing the bathroom sink drain can improve the drainage of your sink. With the drain out of the way, water can flow more freely, reducing the likelihood of standing water and potential mold or mildew growth. This can also help with the overall maintenance of your bathroom, making it easier to keep it clean and preventing any potential water damage.
Increasing Accessibility and Ease of Use
 For those with mobility issues or disabilities, removing the bathroom sink drain can make the sink more accessible and easier to use. With the drain out of the way, a wheelchair can fit comfortably under the sink, allowing for easier access to the faucet. This can also be beneficial for children who may struggle to reach the sink with a drain in the way.
In addition, removing the bathroom sink drain can also make cleaning the sink easier. Without the drain and its components, there are no crevices for dirt and grime to build up, making it easier to wipe down and keep clean. This can be especially helpful for those who are short on time or have limited mobility.
For those with mobility issues or disabilities, removing the bathroom sink drain can make the sink more accessible and easier to use. With the drain out of the way, a wheelchair can fit comfortably under the sink, allowing for easier access to the faucet. This can also be beneficial for children who may struggle to reach the sink with a drain in the way.
In addition, removing the bathroom sink drain can also make cleaning the sink easier. Without the drain and its components, there are no crevices for dirt and grime to build up, making it easier to wipe down and keep clean. This can be especially helpful for those who are short on time or have limited mobility.
Conclusion
 In conclusion, removing the bathroom sink drain can have many benefits for your house design. It can help maximize space, improve aesthetics, prevent clogs, improve drainage, increase accessibility, and make cleaning easier. If you are considering a bathroom remodel or looking for ways to improve the functionality and appearance of your bathroom, removing the sink drain is definitely worth considering. Not only will it give your bathroom a modern and sleek look, but it can also make your daily routine more convenient and enjoyable.