How to Install a Kitchen Sink Strainer
If you're looking to upgrade your kitchen sink with a strainer, you may be wondering how to install it. Fortunately, installing a kitchen sink strainer is a simple and straightforward process that you can do yourself. In this guide, we'll walk you through the steps of installing a kitchen sink strainer, as well as provide some helpful tips and tricks along the way.


How to Install a Kitchen Sink Strainer


How to Install a Kitchen Sink Strainer Basket
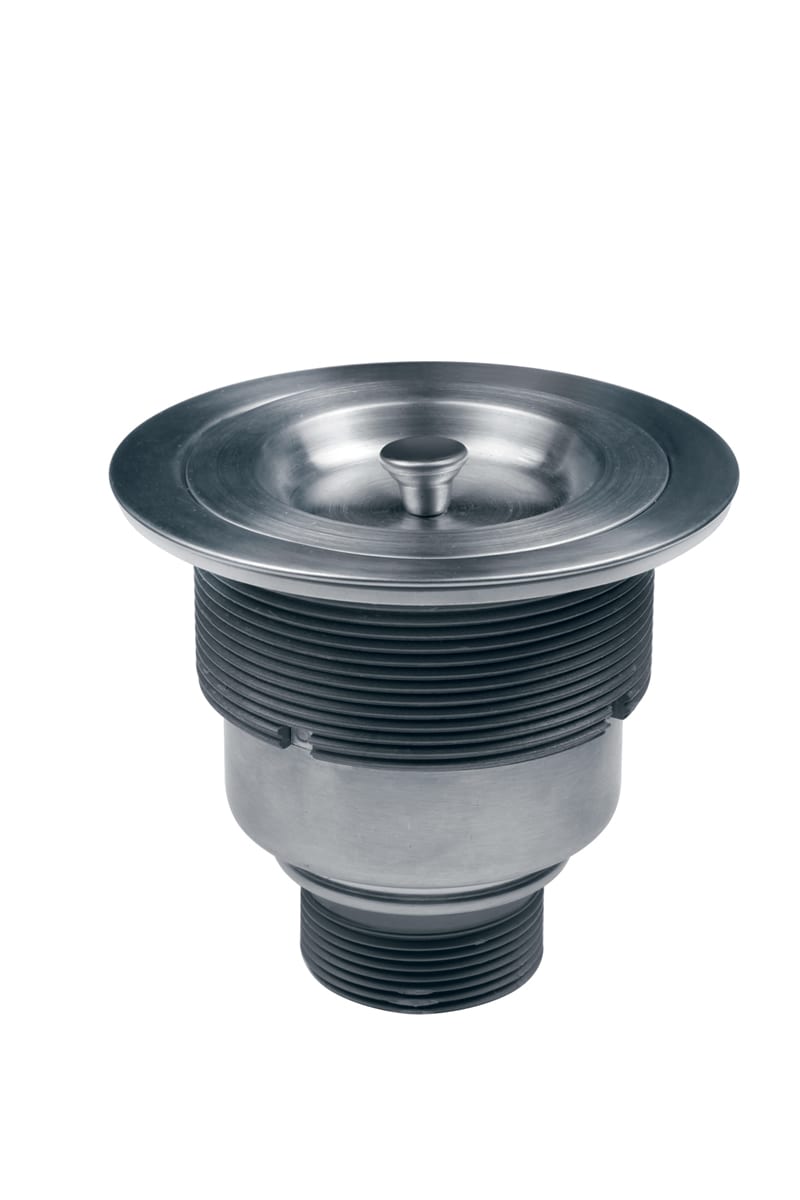
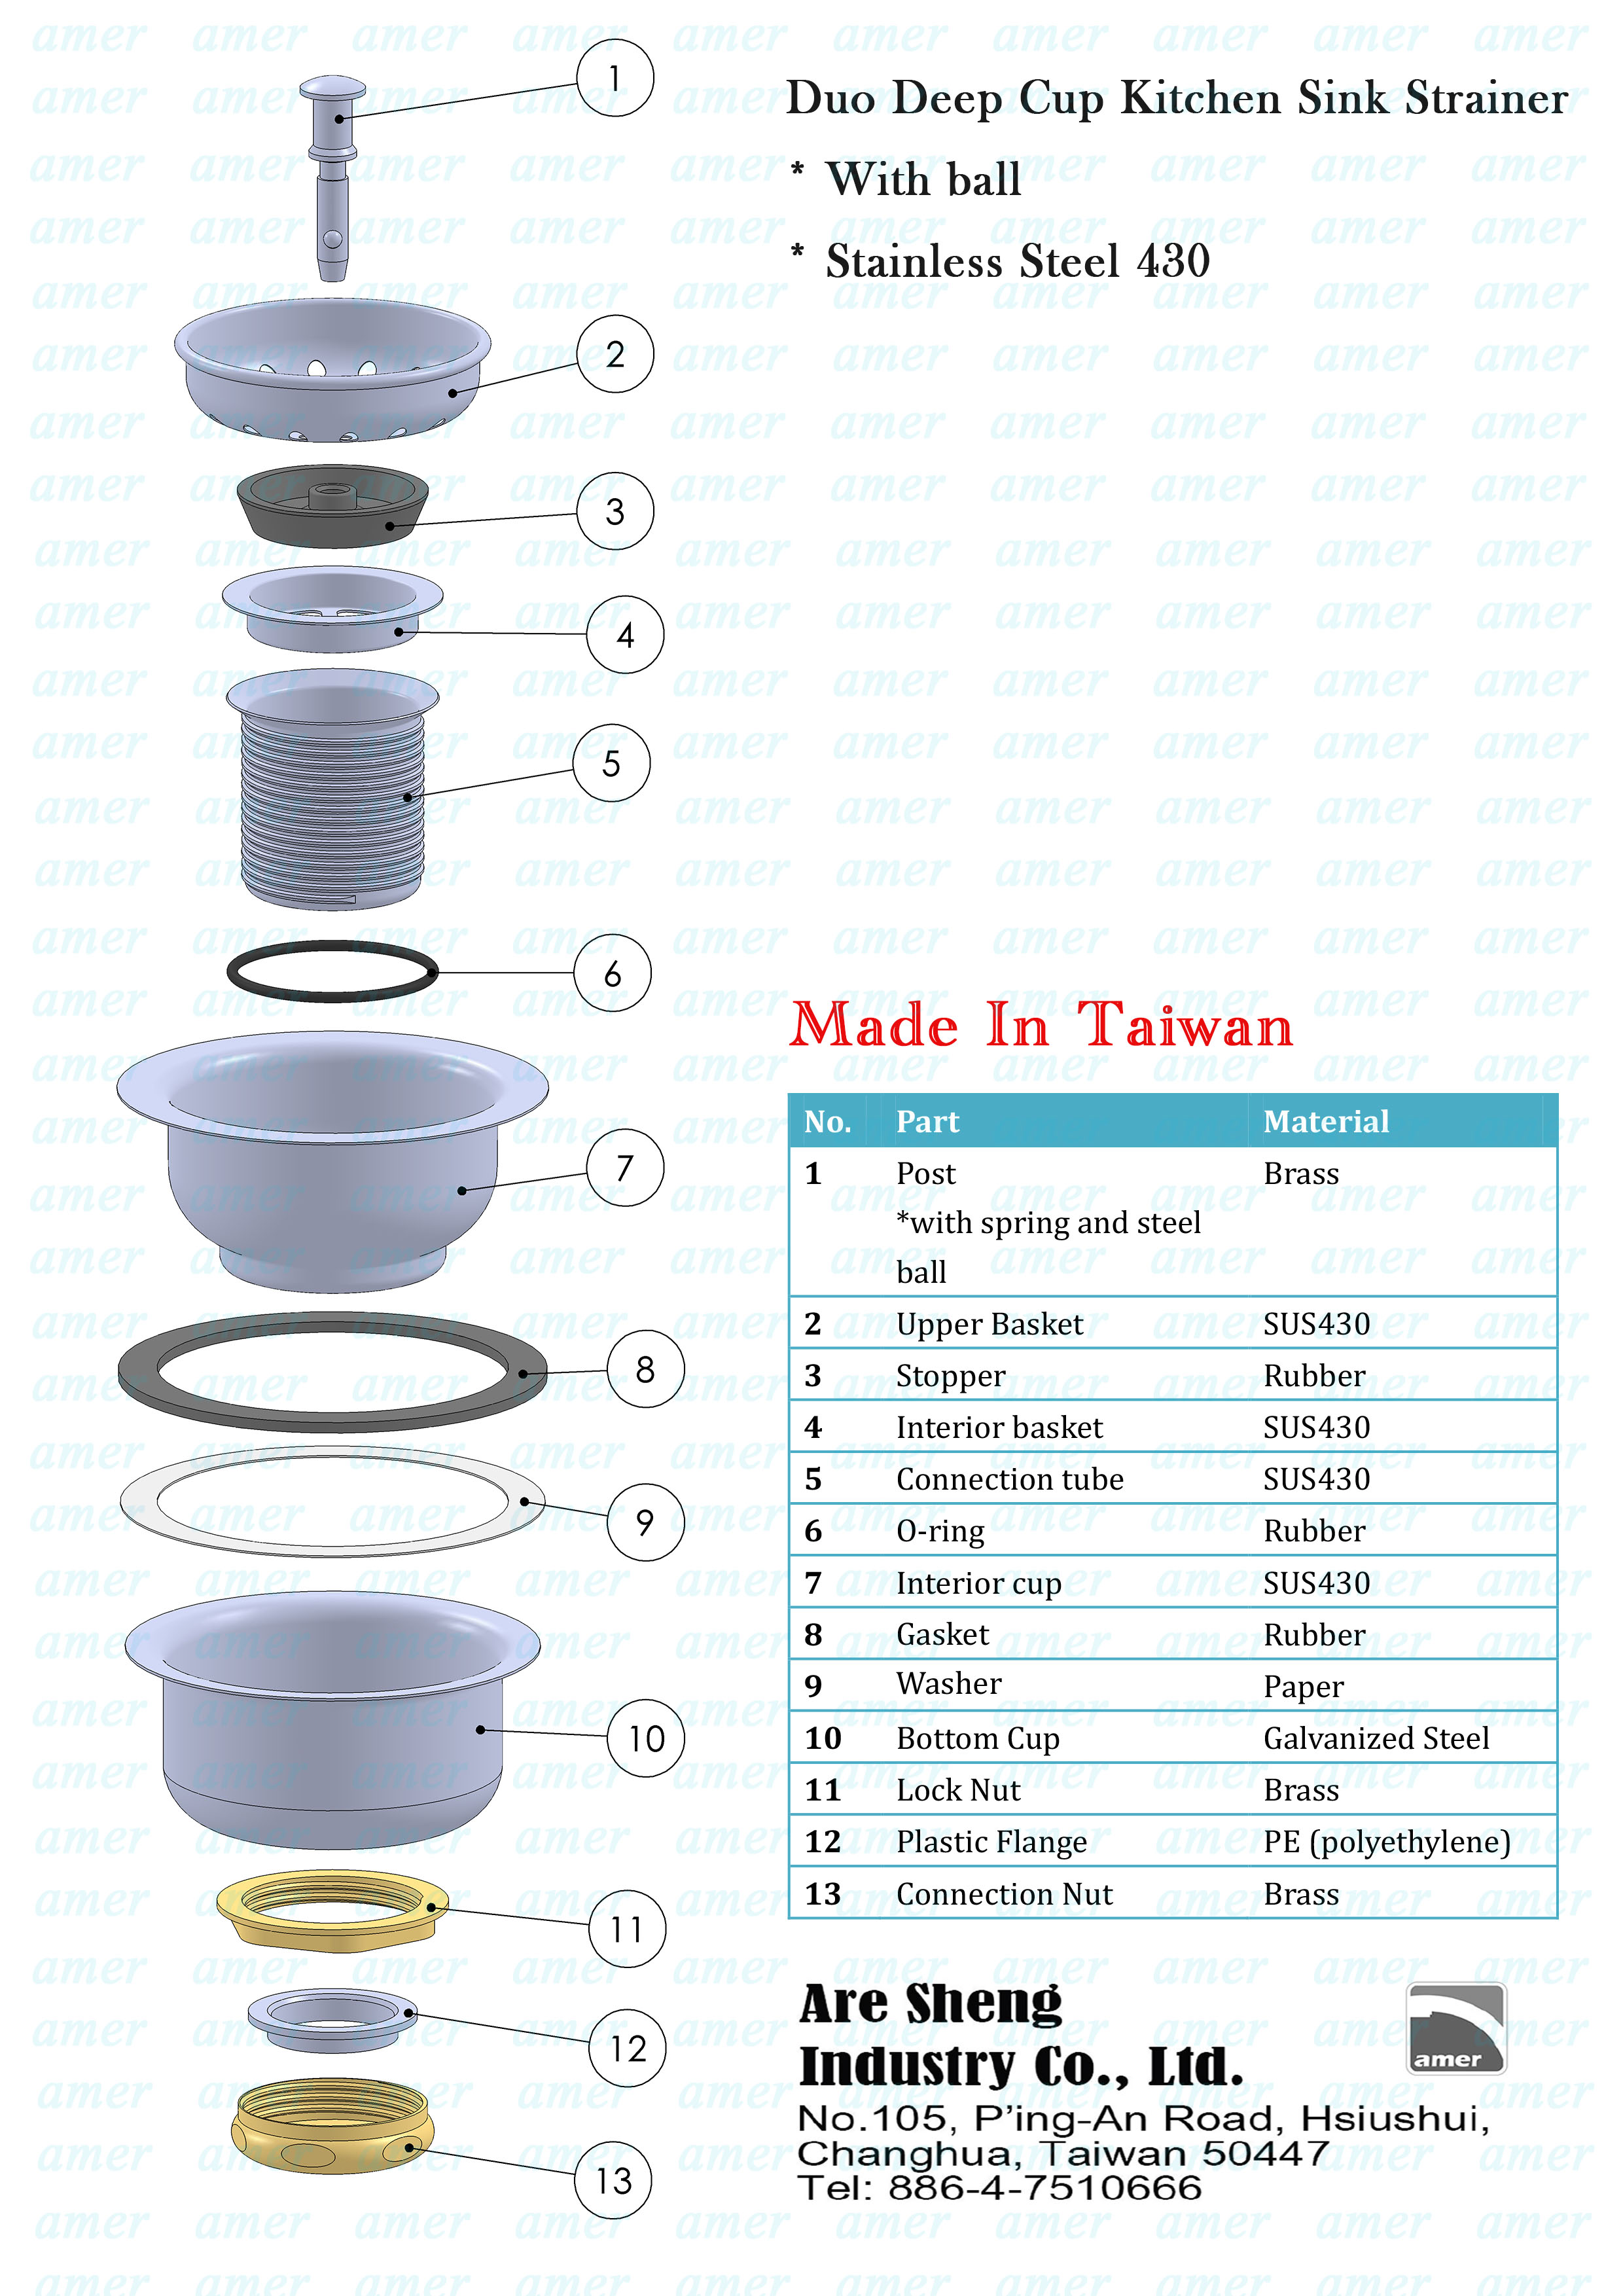
The first step in installing a kitchen sink strainer is to assemble the strainer basket. This includes attaching the strainer body, the gasket, and the locknut. Ensure that all components are securely attached before moving on to the next step.


How to Install a Kitchen Sink Strainer Basket


Step-by-Step Kitchen Sink Strainer Installation Guide
Now that you have your strainer basket assembled, it's time to install it into your kitchen sink. Begin by placing the strainer body into the drain hole from the top of the sink. Then, place the gasket on top of the strainer body, followed by the locknut.
Next, from underneath the sink, tighten the locknut by hand. Once it is hand-tight, use a pair of pliers to tighten it even further. This will ensure a secure and watertight seal.
Finally, attach the strainer basket to the strainer body by twisting it clockwise. This will lock it in place and prevent it from moving around.

Step-by-Step Kitchen Sink Strainer Installation Guide


DIY Kitchen Sink Strainer Installation Tutorial
If you're a fan of DIY projects, installing a kitchen sink strainer is a great one to take on. Not only is it a simple process, but it can also save you money by not having to hire a professional. Simply follow the steps outlined in this guide and you'll have a new strainer installed in no time.


DIY Kitchen Sink Strainer Installation Tutorial


Quick and Easy Kitchen Sink Strainer Installation
One of the best things about installing a kitchen sink strainer is that it's a quick and easy process. With just a few simple steps, you can have a new strainer installed and ready to use in your kitchen sink. Say goodbye to pesky food scraps clogging up your drain and hello to a clean and efficient sink.

Quick and Easy Kitchen Sink Strainer Installation

Installing a Kitchen Sink Strainer: Tips and Tricks
While installing a kitchen sink strainer may seem like a straightforward process, there are a few tips and tricks that can make it even easier. For example, using plumber's putty or silicone caulk can help create a better seal and prevent leaks. Additionally, using a strainer with a removable basket can make cleaning and maintenance a breeze.


Installing a Kitchen Sink Strainer: Tips and Tricks


Proper Installation of a Kitchen Sink Strainer
Proper installation of a kitchen sink strainer is crucial for ensuring a leak-free and functional sink. Take the time to carefully follow the steps outlined in this guide and make sure all components are securely attached. This will help prevent any future issues and ensure your sink strainer works effectively.
Proper Installation of a Kitchen Sink Strainer
/how-to-install-a-sink-drain-2718789-hero-24e898006ed94c9593a2a268b57989a3.jpg)

Kitchen Sink Strainer Installation: Common Mistakes to Avoid
While installing a kitchen sink strainer is a fairly simple process, there are a few common mistakes that can easily be avoided. These include not tightening the locknut enough, not using enough plumber's putty or caulk, and not properly aligning the strainer basket with the strainer body. By being aware of these mistakes, you can ensure a successful installation.


Kitchen Sink Strainer Installation: Common Mistakes to Avoid


Tools and Materials Needed for Kitchen Sink Strainer Installation
Before you begin the installation process, make sure you have all the necessary tools and materials. These include a strainer assembly, plumber's putty or silicone caulk, an adjustable wrench or pliers, and a screwdriver. Having these items on hand will make the installation process go smoothly.


Tools and Materials Needed for Kitchen Sink Strainer Installation

:max_bytes(150000):strip_icc()/how-to-install-a-sink-drain-2718789-hero-24e898006ed94c9593a2a268b57989a3.jpg)

Video Tutorial: How to Install a Kitchen Sink Strainer
If you're more of a visual learner, there are plenty of video tutorials available online that can guide you through the process of installing a kitchen sink strainer. Seeing the steps in action can make it easier to understand and follow along. Just be sure to choose a reputable source for your tutorial.
Video Tutorial: How to Install a Kitchen Sink Strainer


Why a Kitchen Sink Strainer is an Essential Addition to Your Kitchen Design

The Importance of Proper Drainage in the Kitchen
 When it comes to designing a functional and efficient kitchen, proper drainage is often overlooked. Yet, it is a crucial aspect that can greatly impact the functionality and cleanliness of your kitchen.
Kitchen sink strainers
play a vital role in ensuring that your sink and pipes are free from clogs and debris, preventing potential plumbing issues and maintaining a hygienic environment.
When it comes to designing a functional and efficient kitchen, proper drainage is often overlooked. Yet, it is a crucial aspect that can greatly impact the functionality and cleanliness of your kitchen.
Kitchen sink strainers
play a vital role in ensuring that your sink and pipes are free from clogs and debris, preventing potential plumbing issues and maintaining a hygienic environment.
Easy Installation with Kitchen Sink Strainer
 Fortunately, installing a kitchen sink strainer is a simple and straightforward process that can be done by anyone with basic plumbing knowledge. With the right tools and instructions, you can easily install a kitchen sink strainer in just a few steps.
Kitchen sink strainer installation instructions
usually come with the product itself, but in case they are not included, here is a guide to help you through the process.
Fortunately, installing a kitchen sink strainer is a simple and straightforward process that can be done by anyone with basic plumbing knowledge. With the right tools and instructions, you can easily install a kitchen sink strainer in just a few steps.
Kitchen sink strainer installation instructions
usually come with the product itself, but in case they are not included, here is a guide to help you through the process.
Gather Your Materials
Prepare Your Sink and Strainer
 Start by cleaning the area around your sink drain and removing any old putty or residue. Next, apply a thin layer of plumber's putty around the rim of the strainer. This will create a watertight seal between the strainer and the sink.
Install the Strainer
 Place the strainer into the sink drain and press down firmly to create a good seal. Then, place the rubber gasket and cardboard ring onto the strainer from underneath the sink. Secure them in place by tightening the lock nut with a wrench.
Connect the Pipes
 Next, you will need to connect the pipes to the strainer. This process may vary depending on your sink and plumbing setup, so it is best to consult the manufacturer's instructions or seek professional help if needed.
Test and Adjust
 Once the strainer is securely installed, run water through the sink to check for any leaks. If you notice any, tighten the connections as needed. You can also adjust the strainer by loosening the lock nut and repositioning it before tightening it again.
Adding a kitchen sink strainer to your kitchen design
not only ensures proper drainage but also adds a stylish and functional element to your sink. With these easy installation instructions, you can quickly and effectively incorporate a kitchen sink strainer into your kitchen design. Say goodbye to clogged drains and hello to a well-functioning and hygienic kitchen!
Once the strainer is securely installed, run water through the sink to check for any leaks. If you notice any, tighten the connections as needed. You can also adjust the strainer by loosening the lock nut and repositioning it before tightening it again.
Adding a kitchen sink strainer to your kitchen design
not only ensures proper drainage but also adds a stylish and functional element to your sink. With these easy installation instructions, you can quickly and effectively incorporate a kitchen sink strainer into your kitchen design. Say goodbye to clogged drains and hello to a well-functioning and hygienic kitchen!