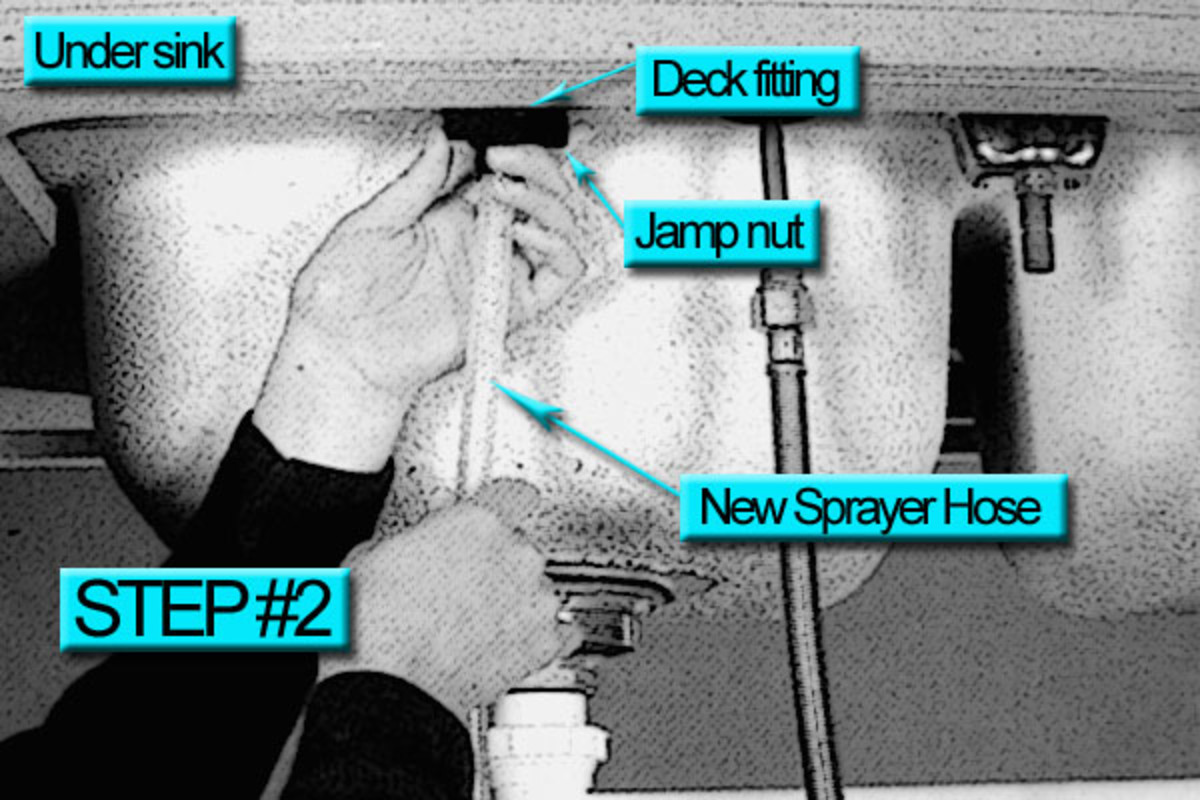
If you're experiencing issues with your kitchen sink sprayer hose connection, it may be time for a replacement. Over time, these connections can become worn or damaged, leading to leaks and decreased performance. Luckily, replacing a kitchen sink sprayer hose connection is a relatively simple task that can be done in just a few steps. Step 1: Gather Your Supplies To replace your kitchen sink sprayer hose connection, you'll need a few key supplies. These include a new sprayer hose connection, adjustable pliers, and a towel or rag. It's also a good idea to have a bucket or bowl on hand to catch any water that may leak out during the process. Step 2: Turn Off the Water Supply Before you begin, make sure to turn off the water supply to your sink. This can usually be done by turning off the shut-off valves located underneath the sink. Once the water is off, turn on the faucet to release any remaining water pressure. Step 3: Remove the Old Hose Connection Using your adjustable pliers, grip the old hose connection where it connects to the sprayer. Slowly twist and loosen the connection until it can be easily removed. Be sure to hold onto the hose itself so it doesn't fall back into the cabinet. Step 4: Install the New Hose Connection Take your new hose connection and slide it onto the sprayer. Make sure it is securely attached and tightened with your pliers. Then, thread the other end of the hose through the hole in the sink and reattach it to the water supply underneath the sink. Step 5: Test for Leaks Once the new hose connection is installed, turn the water supply back on and test for any leaks. If you notice any, try tightening the connection a bit more. If the leak persists, you may need to replace the hose itself. Step 6: Reattach the Sprayer With the new hose connection in place, you can now reattach the sprayer to the hose. Make sure it is securely attached and test it out by turning on the water and using the sprayer.How to Replace a Kitchen Sink Sprayer Hose Connection


How to Replace a Kitchen Sink Sprayer Hose Connection


If you're installing a new kitchen sink sprayer hose connection, follow these steps for a successful installation. Step 1: Gather Your Supplies Before you begin, gather all of your supplies including a new hose connection, adjustable pliers, and a towel or rag. It's also a good idea to have a bucket or bowl on hand to catch any water that may leak out during the process. Step 2: Turn Off the Water Supply To begin installation, turn off the water supply to your sink. This can usually be done by turning off the shut-off valves located underneath the sink. Once the water is off, turn on the faucet to release any remaining water pressure. Step 3: Remove the Old Hose Connection Using your adjustable pliers, grip the old hose connection where it connects to the sprayer. Slowly twist and loosen the connection until it can be easily removed. Be sure to hold onto the hose itself so it doesn't fall back into the cabinet. Step 4: Install the New Hose Connection Take your new hose connection and slide it onto the sprayer. Make sure it is securely attached and tightened with your pliers. Then, thread the other end of the hose through the hole in the sink and reattach it to the water supply underneath the sink. Step 5: Test for Leaks Once the new hose connection is installed, turn the water supply back on and test for any leaks. If you notice any, try tightening the connection a bit more. If the leak persists, you may need to replace the hose itself. Step 6: Reattach the Sprayer Finally, reattach the sprayer to the hose and make sure it is securely attached. Test it out by turning on the water and using the sprayer.How to Install a Kitchen Sink Sprayer Hose Connection

How to Install a Kitchen Sink Sprayer Hose Connection


If you're dealing with a leaky kitchen sink sprayer hose connection, follow these steps to fix the issue. Step 1: Turn Off the Water Supply The first step in fixing a leaky hose connection is to turn off the water supply. This can usually be done by turning off the shut-off valves located underneath the sink. Once the water is off, turn on the faucet to release any remaining water pressure. Step 2: Tighten the Connection Using adjustable pliers, try tightening the connection where the hose meets the sprayer. If the leak persists, you may need to replace the hose connection altogether. Step 3: Replace the Hose Connection If tightening the connection doesn't fix the leak, you may need to replace the hose connection. Follow the steps mentioned in the previous sections for replacing a kitchen sink sprayer hose connection.How to Fix a Leaky Kitchen Sink Sprayer Hose Connection

How to Fix a Leaky Kitchen Sink Sprayer Hose Connection


If you need to remove your kitchen sink sprayer hose connection, follow these steps. Step 1: Turn Off the Water Supply Before removing the hose connection, turn off the water supply to your sink. This can usually be done by turning off the shut-off valves located underneath the sink. Once the water is off, turn on the faucet to release any remaining water pressure. Step 2: Loosen the Connection Using adjustable pliers, grip the hose connection where it connects to the sprayer. Slowly twist and loosen the connection until it can be easily removed. Be sure to hold onto the hose itself so it doesn't fall back into the cabinet.How to Remove a Kitchen Sink Sprayer Hose Connection


How to Remove a Kitchen Sink Sprayer Hose Connection
:max_bytes(150000):strip_icc()/installing-a-kitchen-sink-sprayer-2718817-03-514088ddb922466eb3d4cd73f3aa85f4.jpg)
:max_bytes(150000):strip_icc()/installing-a-kitchen-sink-sprayer-2718817-07-362bee47568f48bab7f3bdff600e4092.jpg)


:max_bytes(150000):strip_icc()/installing-a-kitchen-sink-sprayer-2718817-hero-2b7047468d594da6be2494ba0eebb480.jpg)
/25089301983_c5145fe85d_o-58418ef15f9b5851e5f392b5.jpg)
If your kitchen sink sprayer hose connection is loose, follow these steps to tighten it. Step 1: Turn Off the Water Supply Before tightening the connection, turn off the water supply to your sink. This can usually be done by turning off the shut-off valves located underneath the sink. Once the water is off, turn on the faucet to release any remaining water pressure. Step 2: Use Adjustable Pliers Using adjustable pliers, grip the hose connection where it connects to the sprayer. Slowly twist and tighten the connection until it is secure.How to Tighten a Kitchen Sink Sprayer Hose Connection

How to Tighten a Kitchen Sink Sprayer Hose Connection


To keep your kitchen sink sprayer hose connection in top condition, it's important to clean it regularly. Follow these steps for a thorough cleaning. Step 1: Turn Off the Water Supply Before cleaning the hose connection, turn off the water supply to your sink. This can usually be done by turning off the shut-off valves located underneath the sink. Once the water is off, turn on the faucet to release any remaining water pressure. Step 2: Remove the Hose Connection Using adjustable pliers, grip the hose connection where it connects to the sprayer. Slowly twist and remove the connection. Then, use a small brush or toothbrush to clean any buildup or debris from the connection. Step 3: Reattach the Connection Once the connection is clean, reattach it to the sprayer and tighten it using your pliers. Test it out by turning on the water and using the sprayer.How to Clean a Kitchen Sink Sprayer Hose Connection


How to Clean a Kitchen Sink Sprayer Hose Connection


If your kitchen sink sprayer hose connection is clogged, follow these steps to unclog it. Step 1: Turn Off the Water Supply Before unclogging the hose connection, turn off the water supply to your sink. This can usually be done by turning off the shut-off valves located underneath the sink. Once the water is off, turn on the faucet to release any remaining water pressure. Step 2: Use a Plunger Place a plunger over the end of the hose connection and push up and down to create suction. This can help dislodge any clogs in the connection. Step 3: Remove the Connection If the plunger doesn't work, use adjustable pliers to remove the connection and manually clean any debris or buildup from the connection.How to Unclog a Kitchen Sink Sprayer Hose Connection

How to Unclog a Kitchen Sink Sprayer Hose Connection
/how-to-unclog-a-kitchen-sink-2718799_sketch_FINAL-8c5caa805a69493ab22dfb537c72a1b7.png)

If your kitchen sink sprayer hose is damaged or worn, it may need to be replaced. Follow these steps for a successful replacement. Step 1: Turn Off the Water Supply Before replacing the hose, turn off the water supply to your sink. This can usually be done by turning off the shut-off valves located underneath the sink. Once the water is off, turn on the faucet to release any remaining water pressure. Step 2: Remove the Old Hose Using adjustable pliers, grip the old hose where it connects to the sprayer and slowly twist and remove it. Then, remove the other end of the hose from the water supply underneath the sink. Step 3: Install the New Hose Take your new hose and thread one end through the hole in the sink and attach it to the water supply underneath. Then, attach the other end to the sprayer. Step 4: Turn On the Water Supply Turn the water supply back on and test the new hose for any leaks or issues. If everything looks good, your new hose is now installed and ready to use.How to Replace a Kitchen Sink Sprayer Hose

How to Replace a Kitchen Sink Sprayer Hose


If you're installing a new kitchen sink sprayer hose, follow these steps for a successful installation. Step 1: Turn Off the Water Supply Before installing the new hose, turn off the water supply to your sink. This can usually be done by turning off the shut-off valves located underneath the sink. Once the water is off, turn on the faucet to release any remaining water pressure. Step 2: Gather Your Supplies Gather all of your supplies including the new hose, adjustable pliers, and a towel or rag. It's also a good idea to have a bucket or bowl on hand to catch any water that may leak out during the process. Step 3: Install the Hose Thread one end of the hose through the hole in the sink and attach it to the water supply underneath. Then, attach the other end to the sprayer. Step 4: Turn On the Water Supply Turn the water supply back on and test the new hose for any leaks or issues. If everything looks good, your new hose is now installed and ready to use.How to Install a New Kitchen Sink Sprayer Hose

How to Install a New Kitchen Sink Sprayer Hose

If you're experiencing issues with your kitchen sink sprayer hose connection, here are a few troubleshooting tips. Problem: Leaks Solution: Tighten the connection where the hose meets the sprayer. If the leak persists, you may need to replace the hose connection. Problem: Clogs Solution: Use a plunger to dislodge any clogs in the connection. If that doesn't work, remove the connection and manually clean any debris or buildup. Problem: Low Pressure Solution: Check for any kinks or bends in the hose. If the hose is damaged, it may need to be replaced. Problem: No Water Flow Solution: Check that the water supply is turned on and the hose is properly attached to the water source. If everything appears to be in order, the hose may need to be replaced.How to Troubleshoot a Kitchen Sink Sprayer Hose Connection

How to Troubleshoot a Kitchen Sink Sprayer Hose Connection
The Importance of a Kitchen Sink Sprayer Hose Connection in House Design

Efficient Use of Water
 When designing a house, one of the most important factors to consider is water efficiency. With the increasing concern for environmental sustainability, it is crucial to implement features that can help reduce water wastage. A
kitchen sink sprayer hose connection
is one such feature that can contribute to water efficiency in a household.
The sprayer hose connection allows for
precise and targeted water usage
when washing dishes or cleaning the sink. This means that only the necessary amount of water is being used, instead of letting the faucet run continuously. This can make a significant difference in water consumption and ultimately reduce the household's water bill.
When designing a house, one of the most important factors to consider is water efficiency. With the increasing concern for environmental sustainability, it is crucial to implement features that can help reduce water wastage. A
kitchen sink sprayer hose connection
is one such feature that can contribute to water efficiency in a household.
The sprayer hose connection allows for
precise and targeted water usage
when washing dishes or cleaning the sink. This means that only the necessary amount of water is being used, instead of letting the faucet run continuously. This can make a significant difference in water consumption and ultimately reduce the household's water bill.
Increase in Convenience
 Apart from water efficiency, a kitchen sink sprayer hose connection also adds convenience to daily tasks. The sprayer hose can be easily pulled out and extended, making it
easier to reach every corner of the sink
or to fill up larger pots and containers. This feature is especially helpful for those with limited mobility, as it reduces the need to bend or stretch in order to clean the sink.
Moreover, the sprayer hose also
provides different spray options
such as a steady stream, shower, and jet, making it versatile for various cleaning tasks. This eliminates the need for multiple cleaning tools or constantly adjusting the faucet to get the desired water flow.
Apart from water efficiency, a kitchen sink sprayer hose connection also adds convenience to daily tasks. The sprayer hose can be easily pulled out and extended, making it
easier to reach every corner of the sink
or to fill up larger pots and containers. This feature is especially helpful for those with limited mobility, as it reduces the need to bend or stretch in order to clean the sink.
Moreover, the sprayer hose also
provides different spray options
such as a steady stream, shower, and jet, making it versatile for various cleaning tasks. This eliminates the need for multiple cleaning tools or constantly adjusting the faucet to get the desired water flow.
Aesthetically Pleasing
 Apart from its practical uses, a kitchen sink sprayer hose connection can also add to the overall aesthetic of a kitchen design. With various styles and finishes available, it can complement the sink and faucet, giving a more cohesive and polished look. This small addition can make a big difference in the overall appearance of a kitchen, especially for those who are design-conscious.
In conclusion, a
kitchen sink sprayer hose connection
is a small yet significant feature that should not be overlooked in house design. It not only contributes to water efficiency and convenience but also adds to the overall aesthetic of a kitchen. So, when planning your next house design, be sure to include this feature for a more functional and visually appealing kitchen.
Apart from its practical uses, a kitchen sink sprayer hose connection can also add to the overall aesthetic of a kitchen design. With various styles and finishes available, it can complement the sink and faucet, giving a more cohesive and polished look. This small addition can make a big difference in the overall appearance of a kitchen, especially for those who are design-conscious.
In conclusion, a
kitchen sink sprayer hose connection
is a small yet significant feature that should not be overlooked in house design. It not only contributes to water efficiency and convenience but also adds to the overall aesthetic of a kitchen. So, when planning your next house design, be sure to include this feature for a more functional and visually appealing kitchen.