Are you tired of dealing with a leaky kitchen sink? The culprit might be a worn-out or faulty sink strainer. Fortunately, replacing a kitchen sink strainer is a simple and straightforward process that you can do on your own. In this Top 10 MAIN_installing kitchen sink strainer video, we will guide you through the steps of replacing a kitchen sink strainer. So, get your tools ready and let's get started!How to Install a Kitchen Sink Strainer


How to Install a Kitchen Sink Strainer


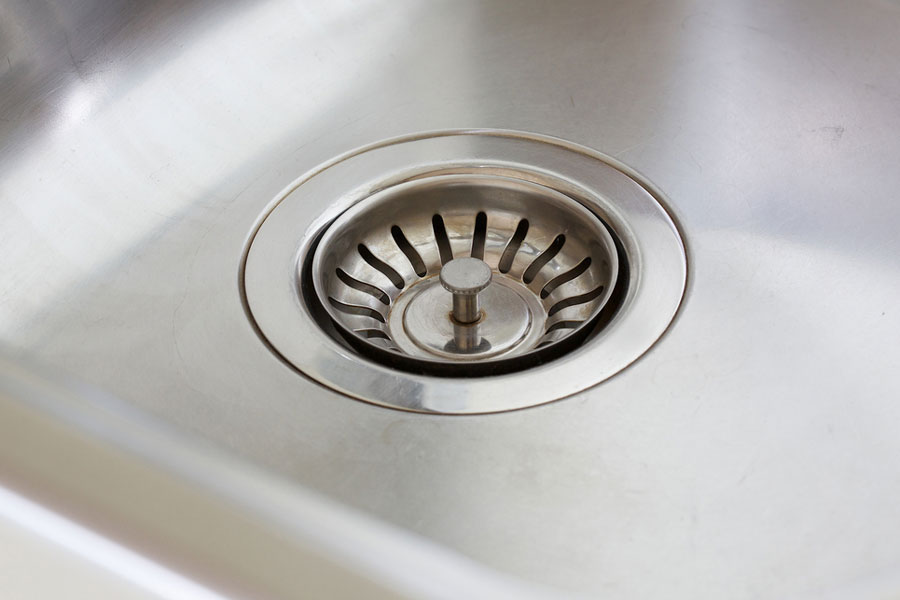
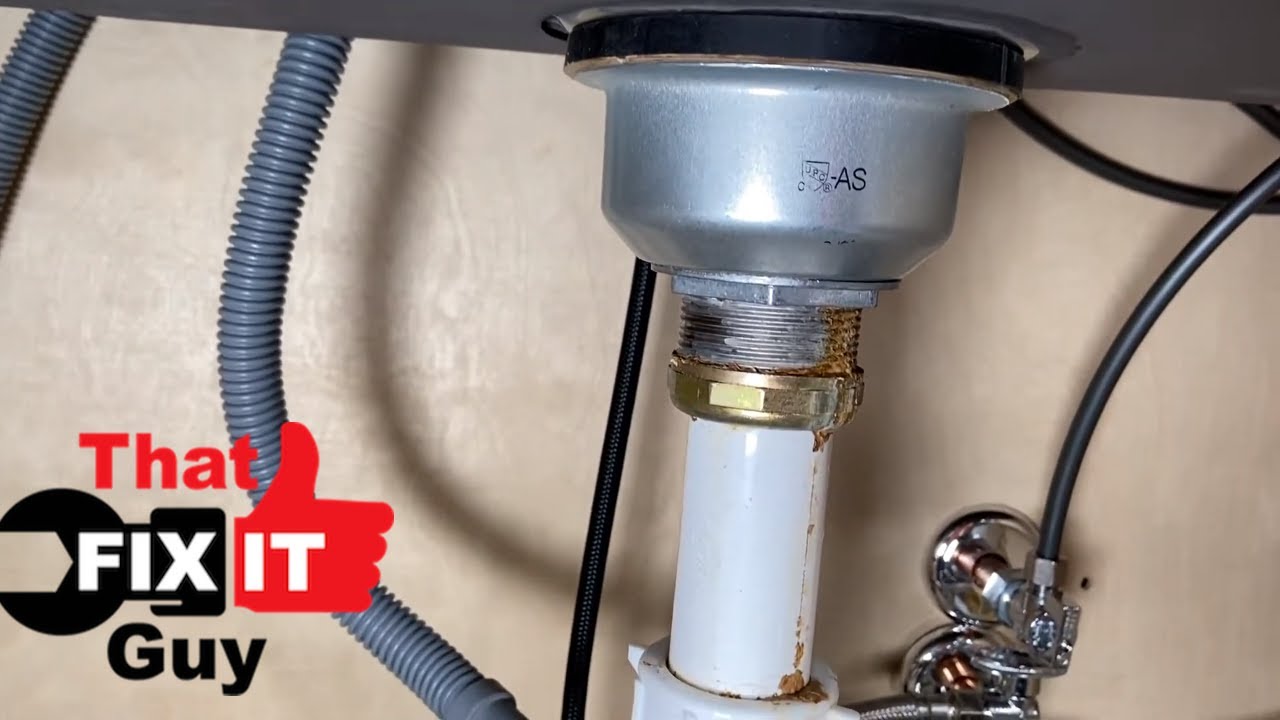
Before we begin, let's make sure you have all the necessary tools and materials. You will need a new kitchen sink strainer, plumber's putty, a screwdriver, a pair of pliers, and a bucket or towel to catch any water that may spill out. Once you have everything ready, follow these simple steps: Step 1: Remove the old strainer. Start by unscrewing the locknut underneath the sink using your pliers. Once the locknut is loose, you can easily remove the old strainer from the sink. Step 2: Clean the sink area. Use a cleaning agent to remove any old putty or debris from the sink area where the strainer sits. This will ensure a proper seal for the new strainer. Step 3: Apply plumber's putty. Take a small amount of plumber's putty and roll it into a thin cord. Place the putty around the underside of the new strainer's lip. Step 4: Insert the new strainer. Carefully place the new strainer into the sink hole, making sure the putty creates a seal between the strainer and the sink. Step 5: Tighten the locknut. From underneath the sink, reposition the locknut and tighten it using your pliers. This will secure the strainer in place. Step 6: Wipe off any excess putty. Use a damp cloth to remove any excess putty from around the strainer. This will give your sink a clean and polished look. Congratulations, you have successfully replaced your kitchen sink strainer! It's a simple process that can save you time and money from calling a plumber. But if you're not confident in doing it yourself, don't hesitate to seek professional help.How to Replace a Kitchen Sink Strainer


How to Replace a Kitchen Sink Strainer


If you're a fan of DIY projects, then installing a kitchen sink strainer is right up your alley. Not only will you save money, but you'll also feel a sense of accomplishment knowing you did it yourself. Here are a few tips to keep in mind when installing a kitchen sink strainer: Tip 1: Choose a high-quality strainer. Invest in a good quality strainer that will last longer and prevent any future issues. Tip 2: Don't over-tighten the locknut. Over-tightening the locknut can damage the sink and cause leaks. Tighten it just enough to secure the strainer in place. Tip 3: Check for leaks. After installing the strainer, run some water in the sink and check for any leaks. If you notice any, tighten the locknut a little more.DIY Kitchen Sink Strainer Installation


DIY Kitchen Sink Strainer Installation


Installing a kitchen sink strainer may seem intimidating, but it's a simple process that anyone can do. Here's a step-by-step guide to help you through the installation process: Step 1: Remove the old strainer. Follow the steps mentioned above to remove the old strainer from the sink. Step 2: Clean the sink area. Use a cleaning agent to remove any residue left behind by the old strainer. Step 3: Apply plumber's putty. Take a small amount of plumber's putty and roll it into a thin cord. Place the putty around the underside of the new strainer's lip. Step 4: Insert the new strainer. Carefully place the new strainer into the sink hole, making sure the putty creates a seal between the strainer and the sink. Step 5: Tighten the locknut. From underneath the sink, reposition the locknut and tighten it using your pliers. This will secure the strainer in place. Step 6: Wipe off any excess putty. Use a damp cloth to remove any excess putty from around the strainer. This will give your sink a clean and polished look. And that's it, you have successfully installed a new kitchen sink strainer! It may seem like a lot of steps, but it's a simple and quick process that will save you time and money in the long run.Step-by-Step Kitchen Sink Strainer Installation Guide


Step-by-Step Kitchen Sink Strainer Installation Guide


If you prefer visual instructions, this easy kitchen sink strainer installation tutorial is perfect for you. Follow along with our detailed video tutorial to learn how to install a kitchen sink strainer in no time. Remember, it's always a good idea to watch a few different tutorials before attempting to do it yourself. This will help you understand the process better and avoid any mistakes.Easy Kitchen Sink Strainer Installation Tutorial

Easy Kitchen Sink Strainer Installation Tutorial


Are you a beginner when it comes to DIY projects? Don't worry, installing a kitchen sink strainer is a beginner-friendly task that you can easily tackle. Just follow our simple step-by-step guide, and you'll have a leak-free sink in no time! And if you encounter any difficulties, don't hesitate to seek advice from a professional. It's always better to ask for help than to cause more damage to your sink.Installing a Kitchen Sink Strainer: A Beginner's Guide


Installing a Kitchen Sink Strainer: A Beginner's Guide

If you're a visual learner, this video tutorial on installing a kitchen sink strainer will be a great resource for you. It's always helpful to see someone else do the task before attempting it yourself. Remember to take your time and follow the steps carefully. Rushing through the process can lead to mistakes that can cause leaks or damage to your sink.Video Tutorial: Installing a Kitchen Sink Strainer


Video Tutorial: Installing a Kitchen Sink Strainer


In a rush to get your kitchen sink strainer replaced? This quick and simple installation method is perfect for you. Just follow the steps mentioned above, and you'll have a new strainer installed in no time. But remember, even though it's a quick method, it's essential to take your time and follow the steps carefully to ensure a proper installation.Quick and Simple Kitchen Sink Strainer Installation Method


Quick and Simple Kitchen Sink Strainer Installation Method
:max_bytes(150000):strip_icc()/how-to-install-a-sink-drain-2718789-hero-24e898006ed94c9593a2a268b57989a3.jpg)

Now that you know how to install a kitchen sink strainer, here are a few expert tips to help you through the process: Tip 1: Remove any excess putty. Use a damp cloth to remove any excess putty from around the strainer. This will give your sink a clean and polished look. Tip 2: Test for leaks before securing the locknut. Run some water in the sink to check for any leaks before tightening the locknut. This will save you from having to undo everything if there are any issues. Tip 3: Use silicone caulk for a stronger seal. If you want a stronger and more durable seal, you can use silicone caulk instead of plumber's putty.Expert Tips for Installing a Kitchen Sink Strainer


Expert Tips for Installing a Kitchen Sink Strainer


To summarize, here are the 5 easy steps to install a kitchen sink strainer: Step 1: Remove the old strainer. Step 2: Clean the sink area. Step 3: Apply plumber's putty. Step 4: Insert the new strainer. Step 5: Tighten the locknut and wipe off any excess putty. By following these steps and our expert tips, you'll have a new kitchen sink strainer installed in no time. Remember to take your time and seek professional help if needed. Happy DIY-ing!How to Install a Kitchen Sink Strainer in 5 Easy Steps
How to Install a Kitchen Sink Strainer in 5 Easy Steps

Why Installing a Kitchen Sink Strainer is Essential for Your House Design

The Importance of a Kitchen Sink Strainer
 When it comes to designing your dream kitchen, every little detail matters. From the color of the cabinets to the type of flooring, each element contributes to the overall look and functionality of the space. One often overlooked but essential aspect of kitchen design is the
kitchen sink strainer
. This small yet mighty tool plays a crucial role in keeping your kitchen clean and functioning properly.
A kitchen sink strainer is a small device that fits into your sink's drain to catch food scraps and debris, preventing them from clogging your pipes. By installing a strainer, you can avoid costly plumbing repairs and keep your sink and pipes in top condition. But beyond its practical function, a kitchen sink strainer also adds to the aesthetic appeal of your kitchen. With various designs and finishes available, you can choose one that complements your kitchen's style and adds a touch of elegance.
When it comes to designing your dream kitchen, every little detail matters. From the color of the cabinets to the type of flooring, each element contributes to the overall look and functionality of the space. One often overlooked but essential aspect of kitchen design is the
kitchen sink strainer
. This small yet mighty tool plays a crucial role in keeping your kitchen clean and functioning properly.
A kitchen sink strainer is a small device that fits into your sink's drain to catch food scraps and debris, preventing them from clogging your pipes. By installing a strainer, you can avoid costly plumbing repairs and keep your sink and pipes in top condition. But beyond its practical function, a kitchen sink strainer also adds to the aesthetic appeal of your kitchen. With various designs and finishes available, you can choose one that complements your kitchen's style and adds a touch of elegance.
The Benefits of Installing a Kitchen Sink Strainer
 Installing a kitchen sink strainer offers numerous benefits for your house design, both in terms of functionality and aesthetics. Let's take a closer look at some of the advantages:
1. Prevents Clogs and Damage to Pipes
The primary purpose of a kitchen sink strainer is to catch food particles and debris that can potentially clog your pipes. By preventing these substances from entering your drainage system, you can avoid costly repairs and keep your pipes in good condition.
2. Keeps Your Kitchen Clean and Hygienic
Leaving food scraps in your sink can not only lead to clogs but also attract insects and cause unpleasant odors. A kitchen sink strainer captures these scraps and makes it easier for you to dispose of them, keeping your kitchen clean and hygienic.
3. Adds to the Aesthetic Appeal of Your Kitchen
With a wide range of designs and finishes available, a kitchen sink strainer can add a touch of style to your kitchen. Whether you prefer a classic chrome finish or a more modern matte black, there is a strainer to suit every taste and complement your house design.
Installing a kitchen sink strainer offers numerous benefits for your house design, both in terms of functionality and aesthetics. Let's take a closer look at some of the advantages:
1. Prevents Clogs and Damage to Pipes
The primary purpose of a kitchen sink strainer is to catch food particles and debris that can potentially clog your pipes. By preventing these substances from entering your drainage system, you can avoid costly repairs and keep your pipes in good condition.
2. Keeps Your Kitchen Clean and Hygienic
Leaving food scraps in your sink can not only lead to clogs but also attract insects and cause unpleasant odors. A kitchen sink strainer captures these scraps and makes it easier for you to dispose of them, keeping your kitchen clean and hygienic.
3. Adds to the Aesthetic Appeal of Your Kitchen
With a wide range of designs and finishes available, a kitchen sink strainer can add a touch of style to your kitchen. Whether you prefer a classic chrome finish or a more modern matte black, there is a strainer to suit every taste and complement your house design.
The Easy Process of Installing a Kitchen Sink Strainer
 Installing a kitchen sink strainer may seem like a daunting task, but it is a relatively simple and straightforward process. With a few basic tools and some
DIY skills
, you can easily install a strainer yourself and save on installation costs.
First, remove the old strainer (if you have one) by loosening the locknut underneath the sink and pulling out the old strainer. Then, clean the area around the drain and apply plumber's putty to the underside of the new strainer's flange. Next, insert the strainer into the drain hole and secure it with the locknut. Finally, wipe away any excess putty and let it dry before using your sink.
Installing a kitchen sink strainer may seem like a daunting task, but it is a relatively simple and straightforward process. With a few basic tools and some
DIY skills
, you can easily install a strainer yourself and save on installation costs.
First, remove the old strainer (if you have one) by loosening the locknut underneath the sink and pulling out the old strainer. Then, clean the area around the drain and apply plumber's putty to the underside of the new strainer's flange. Next, insert the strainer into the drain hole and secure it with the locknut. Finally, wipe away any excess putty and let it dry before using your sink.
Conclusion
 A kitchen sink strainer may seem like a small detail, but it plays a significant role in maintaining the functionality and cleanliness of your kitchen. By installing a strainer, you can prevent clogs and damage to your pipes, keep your kitchen clean and hygienic, and add a touch of style to your house design. So, next time you're designing or renovating your kitchen, don't forget to include a kitchen sink strainer in your plans.