If you're looking to give your kitchen a fresh new look, one of the best ways to do so is by installing a new kitchen sink. This may seem like a daunting task, but with the right tools and a little know-how, it can be a DIY project that you can easily tackle. In this article, we'll walk you through the steps of installing a kitchen sink, from preparation to completion.1. How to Install a Kitchen Sink


1. How to Install a Kitchen Sink


Installing a kitchen sink can be a great way to save money on a kitchen renovation. While hiring a professional may seem like the easier option, doing it yourself can save you hundreds of dollars. Plus, there's a sense of satisfaction that comes from completing a project on your own. With the right tools and a little patience, you can have a brand new kitchen sink in no time.2. DIY Kitchen Sink Installation


2. DIY Kitchen Sink Installation
/how-to-install-a-sink-drain-2718789-hero-24e898006ed94c9593a2a268b57989a3.jpg)


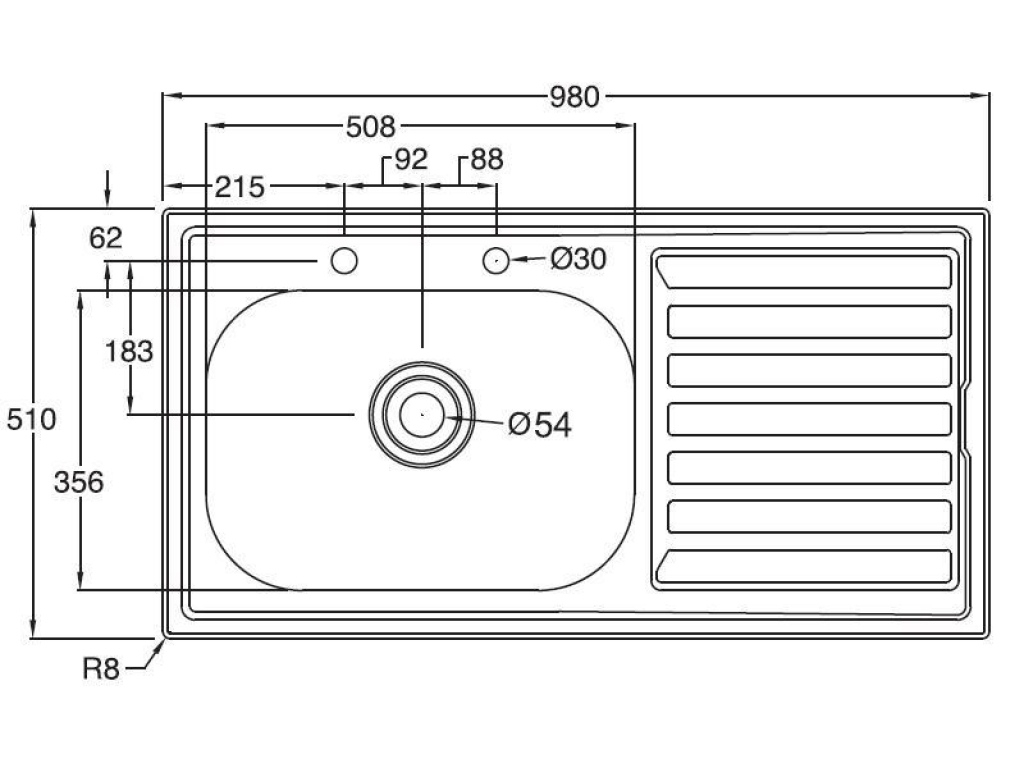
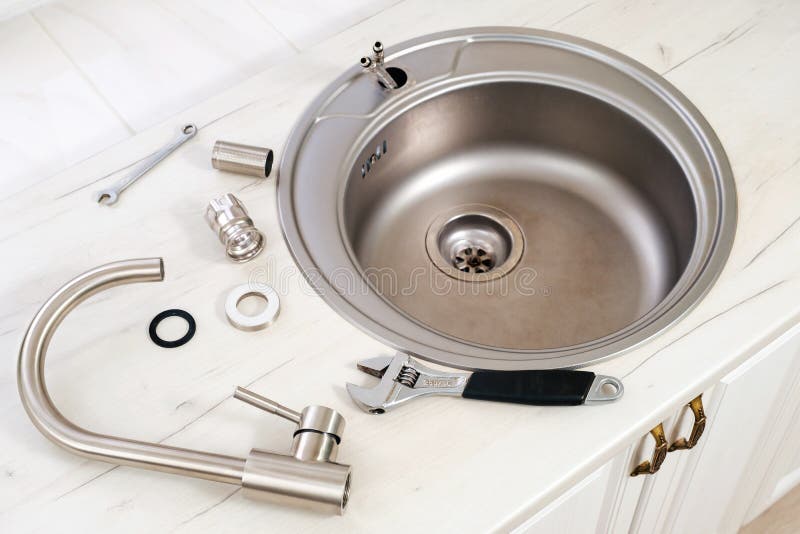
Before you begin the installation process, it's important to have all the necessary tools and materials on hand. This includes a new kitchen sink, a wrench, pliers, plumber's putty, silicone caulk, and a screwdriver. Once you have everything you need, follow these steps: Step 1: Turn off the water supply to your kitchen sink by shutting off the valves under the sink. Step 2: Remove the old sink by disconnecting the plumbing and unscrewing the clips underneath the sink. Step 3: Place the new sink into the hole on top of the countertop and secure it with clips. Step 4: Connect the plumbing to the new sink and tighten with a wrench. Step 5: Apply plumber's putty around the edge of the sink to create a seal with the countertop. Step 6: Install the faucet and any other accessories onto the sink. Step 7: Apply silicone caulk around the edge of the sink and let it dry completely. Step 8: Turn the water supply back on and test for any leaks.3. Step-by-Step Guide for Installing a Kitchen Sink


3. Step-by-Step Guide for Installing a Kitchen Sink


While installing a kitchen sink may seem like a straightforward process, there are a few tips that can make the job easier and ensure a successful installation: - Measure twice, cut once: Before cutting any holes in your countertop, make sure to measure and double-check your measurements to avoid any mistakes. - Use a silicone caulk gun: Using a caulk gun to apply silicone caulk will give you more control and a neater finish. - Don't overtighten: When connecting the plumbing and installing the faucet, be careful not to overtighten as this can cause damage. - Have a helper: Installing a kitchen sink can be a two-person job, especially when it comes to lifting and securing the sink in place.4. Tips for Installing a Kitchen Sink


4. Tips for Installing a Kitchen Sink


While installing a kitchen sink is a relatively simple task, there are a few mistakes that are commonly made. These include: - Forgetting to shut off the water supply: Before beginning any installation, make sure to turn off the water supply to avoid any water damage. - Not properly sealing the sink: Properly sealing the sink with plumber's putty and silicone caulk is crucial to prevent any leaks or water damage. - Using the wrong tools: Make sure to use the correct tools for the job to avoid any damage to your sink or countertop. - Rushing the installation: Taking your time and following the steps carefully will ensure a successful and long-lasting installation.5. Common Mistakes to Avoid When Installing a Kitchen Sink


5. Common Mistakes to Avoid When Installing a Kitchen Sink


As mentioned earlier, there are a few key tools and materials you'll need to have on hand for a successful kitchen sink installation. These include: Tools: Wrench, pliers, screwdriver, caulk gun Materials: New kitchen sink, plumber's putty, silicone caulk6. Tools and Materials Needed for Installing a Kitchen Sink


6. Tools and Materials Needed for Installing a Kitchen Sink


If you're new to DIY projects, installing a kitchen sink may seem like a daunting task. However, with the right tools and following the steps carefully, it can be an easy and satisfying project to tackle. Just remember to take your time and be patient, and you'll have a beautiful new kitchen sink in no time.7. Installing a Kitchen Sink: A Beginner's Guide

7. Installing a Kitchen Sink: A Beginner's Guide


Replacing an old kitchen sink can be a great way to update your kitchen without breaking the bank. While the process of replacing and installing a new sink is similar to installing a new one, there are a few additional steps you'll need to take: Step 1: Disconnect and remove the old sink. Step 2: Measure and cut any necessary holes in the countertop for the new sink and faucet. Step 3: Install any accessories onto the sink, such as a soap dispenser or sprayer. Step 4: Place the new sink into the hole on top of the countertop and secure it with clips. Step 5: Connect the plumbing to the new sink and tighten with a wrench. Step 6: Apply plumber's putty around the edge of the sink to create a seal with the countertop. Step 7: Install the faucet and any other accessories onto the sink. Step 8: Apply silicone caulk around the edge of the sink and let it dry completely. Step 9: Turn the water supply back on and test for any leaks.8. How to Replace and Install a Kitchen Sink


8. How to Replace and Install a Kitchen Sink
:max_bytes(150000):strip_icc()/how-to-install-a-sink-drain-2718789-hero-24e898006ed94c9593a2a268b57989a3.jpg)


Before beginning the installation process, there are a few important things to keep in mind: - Follow manufacturer instructions: Make sure to read and follow the instructions provided by the manufacturer of your sink for the best results. - Check for any damage or defects: Before beginning the installation, inspect the sink for any damage or defects that may affect the installation process. - Don't be afraid to ask for help: If you're unsure about any part of the installation, don't hesitate to ask for help from a friend or professional.9. Installing a Kitchen Sink: What You Need to Know


9. Installing a Kitchen Sink: What You Need to Know


Properly installing a kitchen sink is not only important for aesthetic purposes, but also for the functionality and longevity of your sink. A well-installed sink will prevent leaks and potential water damage, and will also ensure that your sink lasts for years to come. By following the steps and tips outlined in this article, you can confidently tackle the installation process and enjoy your beautiful new kitchen sink.10. The Importance of Properly Installing a Kitchen Sink


10. The Importance of Properly Installing a Kitchen Sink


:max_bytes(150000):strip_icc()/HowtoProperlyWashHands_770729_Final_1-53dd333dbd5c4d4c82fea8d48c8ff3bd.png)

The Importance of a Properly Installed Kitchen Sink

A Functional and Aesthetic Addition to Your Kitchen
 When it comes to designing a kitchen, the sink is often an overlooked element. However, it plays a crucial role in the functionality and aesthetic of the space. A properly installed kitchen sink not only provides a place to wash dishes and prepare food, but it also adds to the overall design of the room. Whether you are renovating your kitchen or building a new one, it is important to understand the significance of a well-installed sink.
Maximizing Space and Efficiency
 One of the main benefits of a properly installed kitchen sink is maximizing space and efficiency. A sink that is installed in the wrong location or at the wrong height can create a lot of inconvenience and make daily tasks more difficult. On the other hand, a well-placed sink can make the kitchen more functional and efficient. It should be easily accessible from both the cooking and cleaning areas, allowing for a smooth workflow in the kitchen.
Preventing Leaks and Damage
 Another important reason to ensure your kitchen sink is properly installed is to prevent leaks and damage. A sink that is not installed correctly can lead to water leakage, causing damage to the surrounding cabinets, flooring, and walls. This can result in costly repairs and a lot of frustration. To avoid this, it is essential to have a professional plumber install your sink, ensuring all connections are secure and there are no potential leak points.
Enhancing the Design of Your Kitchen
 In addition to functionality, a properly installed kitchen sink can also enhance the design of your kitchen. With a wide range of sink styles, materials, and finishes available, you can choose a sink that complements the overall design of your kitchen. From sleek and modern to traditional and farmhouse, the right sink can tie the whole look together and add a touch of elegance to your space.
A Long-Lasting Investment
 Proper installation of your kitchen sink is not just about the short-term benefits, it is also an investment for the long run. By hiring a professional to install your sink, you are ensuring that it is done correctly and will last for years to come. This will save you from the hassle and expense of having to fix any potential issues down the line.
In conclusion, the installation of a kitchen sink is a crucial step in creating a functional and aesthetically pleasing kitchen. From maximizing space and efficiency to preventing leaks and enhancing the design, a properly installed sink has numerous benefits. So, when planning your kitchen design, make sure to give adequate attention to the installation of your sink. It will not only make your daily tasks easier but also add value to your home in the long run.
Proper installation of your kitchen sink is not just about the short-term benefits, it is also an investment for the long run. By hiring a professional to install your sink, you are ensuring that it is done correctly and will last for years to come. This will save you from the hassle and expense of having to fix any potential issues down the line.
In conclusion, the installation of a kitchen sink is a crucial step in creating a functional and aesthetically pleasing kitchen. From maximizing space and efficiency to preventing leaks and enhancing the design, a properly installed sink has numerous benefits. So, when planning your kitchen design, make sure to give adequate attention to the installation of your sink. It will not only make your daily tasks easier but also add value to your home in the long run.