Spotlights are a great way to add extra lighting and ambiance to your living room. However, there may come a time when you need to take apart your spotlight for cleaning or replacement purposes. Disassembling a spotlight may seem like a daunting task, but with the right tools and techniques, it can be a breeze. In this article, we will walk you through the steps of disassembling a spotlight in your living room.How to Disassemble a Spotlight in the Living Room


How to Disassemble a Spotlight in the Living Room


Before you begin disassembling your spotlight, make sure to turn off the power to the room. This will ensure your safety while working with electrical components. Once you have done that, follow these steps: Step 1: Remove the light bulb from the spotlight by gently twisting it counterclockwise. Set the bulb aside in a safe place. Step 2: Locate the clips that are holding the spotlight in place on the ceiling. These can typically be found on the sides of the spotlight housing. Step 3: Using a flathead screwdriver, gently pry open the clips and release them from the housing. Be careful not to use too much force as this can cause damage to the clips. Step 4: Once the clips are released, carefully lower the spotlight from the ceiling and place it on a stable surface. Step 5: If your spotlight has a glass cover, remove it by unscrewing any screws or gently prying it off with a flathead screwdriver. Step 6: Next, use a screwdriver to remove any screws that are holding the housing of the spotlight together. Set these screws aside in a safe place. Step 7: Once the housing is open, you can access the internal components of the spotlight and disassemble them as needed. Step 8: If you are only planning on cleaning the spotlight, you can use a soft cloth and mild cleaning solution to wipe down the internal components. Be sure to dry them thoroughly before reassembling. Step 9: To reassemble the spotlight, simply follow these steps in reverse order. Step 10: Once everything is back in place, reattach the spotlight to the ceiling and turn the power back on. Your living room spotlight should now be fully disassembled and ready to use.Step-by-Step Guide to Taking Apart a Living Room Spotlight


Step-by-Step Guide to Taking Apart a Living Room Spotlight


If you need to remove the spotlight from your living room ceiling completely, follow these steps: Step 1: Turn off the power to the room and remove the light bulb from the spotlight. Step 2: Locate the screws or clips that are holding the spotlight in place on the ceiling. Step 3: Using a screwdriver or pliers, remove the screws or release the clips to detach the spotlight from the ceiling. Step 4: Carefully lower the spotlight from the ceiling and set it on a stable surface. Step 5: If you plan on reusing the spotlight in a different location, be sure to label and organize all the components for easy reassembly.Removing a Spotlight from the Living Room Ceiling


Removing a Spotlight from the Living Room Ceiling


If you are disassembling your living room spotlight for cleaning or replacement purposes, follow these additional tips: Tip 1: If your spotlight has a glass cover, be sure to clean it thoroughly before reattaching it. This will ensure your spotlight gives off the maximum amount of light. Tip 2: If you are replacing any internal components, make sure to purchase ones that are compatible with your specific spotlight model. Tip 3: If you are unsure of how to reassemble your spotlight, refer to the manufacturer's instructions or seek the help of a professional.Disassembling a Living Room Spotlight for Cleaning or Replacement


Disassembling a Living Room Spotlight for Cleaning or Replacement


.jpg)


Taking apart a living room spotlight may seem like a daunting task, but with the right tools and knowledge, it can be a simple DIY project. By following the steps outlined in this article, you can successfully disassemble your living room spotlight for cleaning or replacement purposes.DIY: How to Take Apart a Living Room Spotlight


DIY: How to Take Apart a Living Room Spotlight


When disassembling a living room spotlight, here are a few tips and tricks to keep in mind: Tip 1: Always turn off the power to the room before working with electrical components to ensure your safety. Tip 2: Use the right tools for the job, such as a flathead screwdriver or pliers, to avoid damaging any components. Tip 3: Take your time and be gentle when removing clips or screws to avoid causing any damage.Living Room Spotlight Disassembly: Tips and Tricks


Living Room Spotlight Disassembly: Tips and Tricks


Taking apart a living room spotlight may seem like a daunting task, but by following the steps outlined in this article, you can easily break down your spotlight for cleaning or replacement purposes. Remember to always prioritize safety and use the right tools for the job to avoid any mishaps.Breaking Down a Living Room Spotlight: What You Need to Know


Breaking Down a Living Room Spotlight: What You Need to Know


Removing a living room spotlight may be necessary for a variety of reasons, such as changing the lighting in your room or replacing a broken spotlight. By following the steps in this article, you can successfully remove your living room spotlight without any hassle.Living Room Spotlight Removal: A Comprehensive Guide

Living Room Spotlight Removal: A Comprehensive Guide


When taking apart a living room spotlight, there are a few common mistakes to avoid: Mistake 1: Not turning off the power to the room before working with electrical components. Mistake 2: Using too much force when removing clips or screws, which can cause damage. Mistake 3: Not properly labeling and organizing components when disassembling for cleaning or replacement.Disassembling a Living Room Spotlight: Common Mistakes to Avoid


Disassembling a Living Room Spotlight: Common Mistakes to Avoid


To recap, here is a step-by-step tutorial for disassembling a living room spotlight: Step 1: Turn off the power to the room and remove the light bulb from the spotlight. Step 2: Locate and release the clips or screws holding the spotlight in place on the ceiling. Step 3: Carefully lower the spotlight and remove any glass covers or internal screws. Step 4: Clean or replace any necessary components. Step 5: Reassemble the spotlight and reattach it to the ceiling. Step 6: Turn the power back on and enjoy your newly disassembled and reassembled living room spotlight. With the right tools and knowledge, disassembling a living room spotlight can be a simple and easy task. By following the steps outlined in this article, you can successfully take apart your spotlight for cleaning or replacement purposes. Remember to always prioritize safety and use caution when working with electrical components. Happy disassembling!Step-by-Step Tutorial for Disassembling a Living Room Spotlight


Step-by-Step Tutorial for Disassembling a Living Room Spotlight


How to Disassemble a Spotlight in Your Living Room for Better House Design
Introduction
 When it comes to house design, lighting is an important element that can make a huge difference in the overall look and feel of a space. Spotlights, in particular, are a popular choice for living rooms as they provide focused and adjustable lighting. However, there may come a time when you need to disassemble your living room spotlight, whether it be for maintenance, updates, or a complete redesign of your living space. In this article, we will guide you on how to properly disassemble a spotlight in your living room to achieve better house design.
Why Disassemble a Spotlight in Your Living Room?
 Spotlights, like any other lighting fixture, require maintenance and may need to be replaced over time. This is especially important if you notice that the light output has significantly diminished or if there are any signs of damage. Additionally, disassembling your living room spotlight can also be necessary if you are planning on updating your house design or rearranging furniture. It allows you to change the positioning of your spotlight or even replace it with a new one to better suit your new house design.
Step-by-Step Guide to Disassembling a Spotlight in Your Living Room
 Step 1:
Turn off the power - Before you begin disassembling your living room spotlight, make sure to turn off the power to avoid any accidents. You can do this by flipping the designated switch in your circuit breaker or turning off the light switch that controls the spotlight.
Step 2:
Gather your tools - To properly disassemble your living room spotlight, you will need a few tools such as a screwdriver, pliers, and a ladder or step stool.
Step 3:
Remove the light bulb - Carefully remove the light bulb from the spotlight fixture and set it aside. This will make it easier to access and disassemble the rest of the spotlight.
Step 4:
Remove the trim - Using your fingers or a small screwdriver, gently pry off the trim around the spotlight. This is usually held in place by small clips or springs and can be easily removed.
Step 5:
Unscrew the spotlight housing - Using a screwdriver, unscrew the housing of the spotlight from the ceiling or wall. Make sure to support the housing with your other hand to prevent it from falling and causing damage.
Step 6:
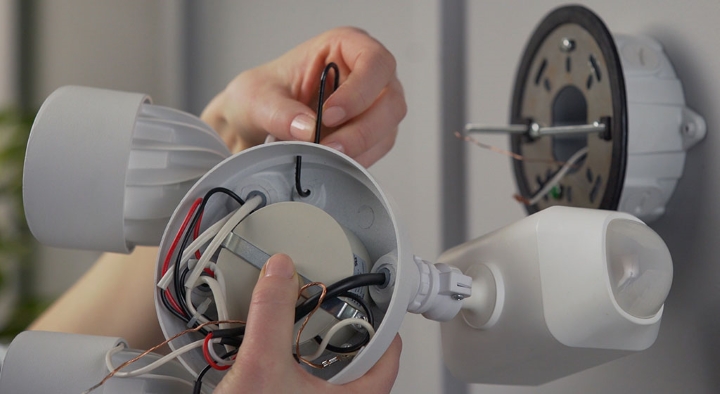
Disconnect the wires - Once the housing is removed, you will see the wires connecting the spotlight to the electrical supply. Use pliers to disconnect the wires from the housing, taking note of which wire is connected to which terminal.
Step 7:
Remove the mounting bracket - If your spotlight is mounted on a bracket, use a screwdriver to remove it from the ceiling or wall.
Step 8:
Clean and inspect - Now that your spotlight is disassembled, take the time to clean any dust or debris from the parts and inspect them for any damage that may require replacement.
Step 1:
Turn off the power - Before you begin disassembling your living room spotlight, make sure to turn off the power to avoid any accidents. You can do this by flipping the designated switch in your circuit breaker or turning off the light switch that controls the spotlight.
Step 2:
Gather your tools - To properly disassemble your living room spotlight, you will need a few tools such as a screwdriver, pliers, and a ladder or step stool.
Step 3:
Remove the light bulb - Carefully remove the light bulb from the spotlight fixture and set it aside. This will make it easier to access and disassemble the rest of the spotlight.
Step 4:
Remove the trim - Using your fingers or a small screwdriver, gently pry off the trim around the spotlight. This is usually held in place by small clips or springs and can be easily removed.
Step 5:
Unscrew the spotlight housing - Using a screwdriver, unscrew the housing of the spotlight from the ceiling or wall. Make sure to support the housing with your other hand to prevent it from falling and causing damage.
Step 6:
Disconnect the wires - Once the housing is removed, you will see the wires connecting the spotlight to the electrical supply. Use pliers to disconnect the wires from the housing, taking note of which wire is connected to which terminal.
Step 7:
Remove the mounting bracket - If your spotlight is mounted on a bracket, use a screwdriver to remove it from the ceiling or wall.
Step 8:
Clean and inspect - Now that your spotlight is disassembled, take the time to clean any dust or debris from the parts and inspect them for any damage that may require replacement.
In Conclusion
 Disassembling a spotlight in your living room may seem like a daunting task, but with the right tools and knowledge, it can be done easily. Whether you need to replace your spotlight or simply want to update your house design, following these steps will ensure a safe and successful disassembly process. Remember to always turn off the power before starting and to take your time to properly clean and inspect the parts. By disassembling your living room spotlight, you can achieve better house design and create a more inviting and well-lit space for you and your family to enjoy.