If you have a Delta kitchen sink faucet, chances are you've encountered a leak at some point. Leaks can be frustrating and wasteful, not to mention costly if left untreated. But don't worry, with a little know-how and some basic tools, you can easily fix the leak yourself. In this article, we'll go over the top 10 ways to repair a Delta kitchen sink faucet leak and get your faucet running like new again.Delta Kitchen Sink Faucet Leak Repair: Tips and Tricks for Fixing the Most Common Issue


Delta Kitchen Sink Faucet Leak Repair
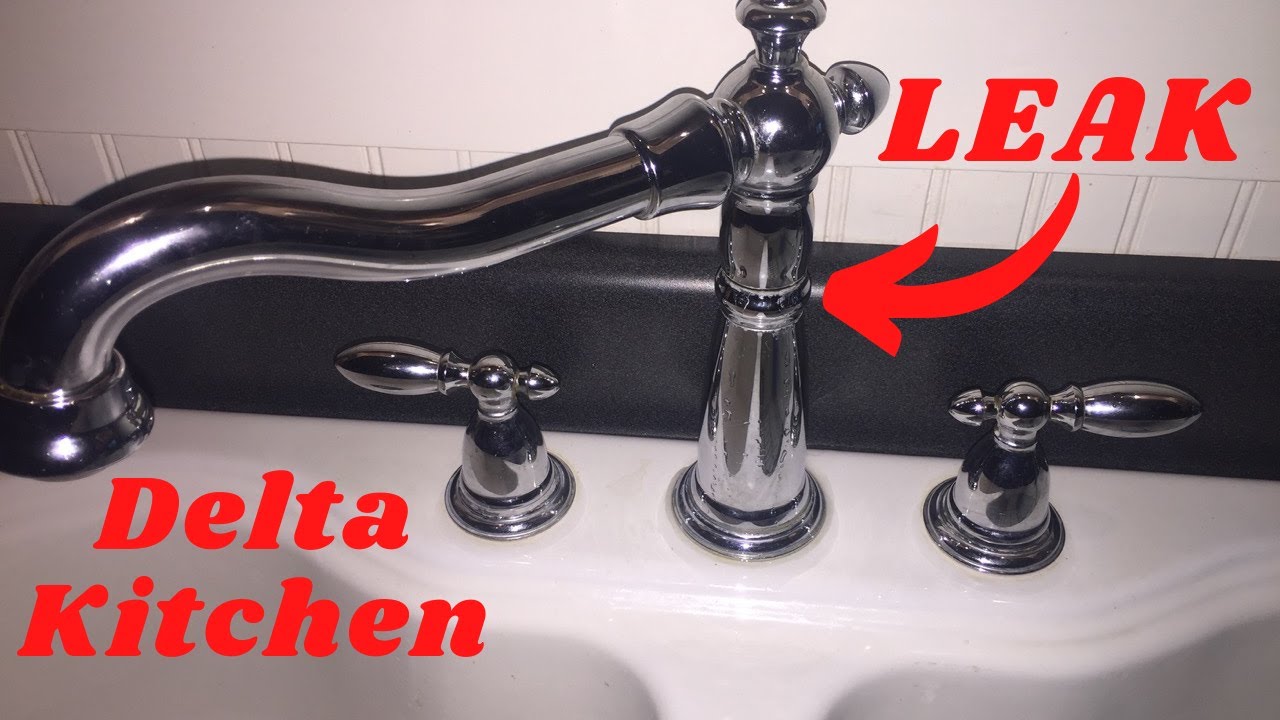
The first step in fixing any leak is to determine where it's coming from. Check all the connections and joints on your faucet to see if there are any obvious signs of leaking. If you can't find the source, it's likely coming from inside the faucet itself. In this case, you'll need to disassemble the faucet to find the exact location.1. Identify the Source of the Leak


Delta Kitchen Sink Faucet Repair


Before you start taking apart your faucet, be sure to shut off the water supply. This will prevent any accidental flooding or water damage. Most faucets have a shut-off valve located under the sink. Turn this valve clockwise to shut off the water supply.2. Shut Off the Water Supply


Delta Kitchen Sink Faucet Leak


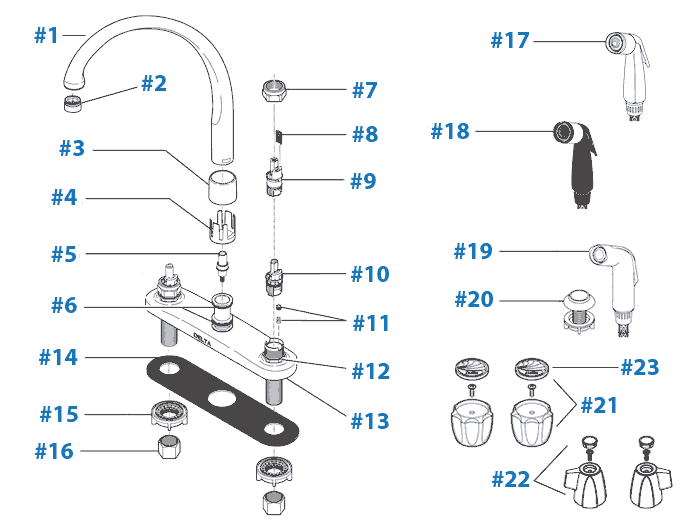
Using a screwdriver, remove the handle and any decorative caps or covers on your faucet. Then, use a wrench to loosen and remove the packing nut and valve stem. You may also need to remove the cartridge or ball depending on your faucet model. Refer to the manufacturer's instructions for specific guidance.3. Disassemble the Faucet

Delta Kitchen Sink Faucet Leak Fix

Once you have all the parts removed, inspect them for any signs of damage or wear. If you notice any cracks or corrosion, you'll need to replace the damaged parts. If everything looks good, clean the parts with a mild detergent and vinegar solution to remove any built-up residue.4. Inspect and Clean the Parts

Delta Kitchen Sink Faucet Dripping
/faucet-with-water-dripping-creating-waste-516717656-d76c41a8d3284901880606e6c1c62e25.jpg)


The most common cause of a Delta kitchen sink faucet leak is worn out O-rings. These small rubber rings create a tight seal to prevent leaks, but over time they can become brittle and crack. Replace any worn or damaged O-rings with new ones from your local hardware store.5. Replace the O-Rings


Delta Kitchen Sink Faucet Leak Troubleshooting

If your faucet has a cartridge or ball, now is a good time to replace it. These components can wear out over time and cause leaks. Refer to your manufacturer's instructions for the correct replacement part and installation process.6. Install a New Cartridge or Ball


Delta Kitchen Sink Faucet Leak Fix DIY
Once you have replaced any damaged parts, it's time to put everything back together. Follow the reverse steps of disassembly, making sure all the parts are properly aligned and tightened. Be careful not to over-tighten any screws or nuts, as this can cause damage to the faucet.7. Reassemble the Faucet


Delta Kitchen Sink Faucet Leak Repair Cost
Once your faucet is reassembled, turn the water supply back on and test the faucet for leaks. If you still notice a leak, you may need to check and tighten any connections or replace additional parts.8. Turn the Water Supply Back On


Delta Kitchen Sink Faucet Leak Repair Kit
If your faucet is old or has multiple leaks, using a leak repair kit may be a more cost-effective solution than buying individual parts. These kits come with all the necessary components to fix most common leaks and can save you time and money in the long run.9. Consider Using a Leak Repair Kit

Delta Kitchen Sink Faucet Leak Repair Video
Understanding the Cause of a Delta Kitchen Sink Faucet Leak

Detecting the Leak
 If you've noticed a constant drip or a pool of water forming around your kitchen sink faucet, you may have a leak. But before you can start repairing it, you need to determine the source of the leak. In the case of a Delta kitchen sink faucet, there are a few common causes that could be contributing to the leak.
Worn Out Seals
 One of the most common causes of a leaky Delta kitchen sink faucet is worn out seals. The faucet is made up of several moving parts, and the seals are responsible for keeping everything in place and preventing water from leaking out. Over time, these seals can become worn out or damaged, allowing water to escape and causing a leak.
Loose Connections
 Another common cause of a leaky Delta kitchen sink faucet is loose connections. As you use your faucet, the connections can become loose and cause water to leak out. This can happen over time due to regular wear and tear, or it could be the result of improper installation. Either way, loose connections need to be addressed in order to stop the leak.
Corrosion and Mineral Build-Up
 Corrosion and mineral build-up can also contribute to a leaky Delta kitchen sink faucet. Over time, the metal parts of the faucet can become corroded due to exposure to water and other elements. This can cause small cracks or holes to form, allowing water to leak out. Additionally, hard water can cause mineral build-up in the faucet, which can also lead to leaks.
Fixing the Leak

Replacing Seals and Gaskets
 If the seals and gaskets in your Delta kitchen sink faucet are worn out, they will need to be replaced. This is a fairly simple process that involves removing the old seals and gaskets and installing new ones. Be sure to use the correct size and type of seals and gaskets for your specific faucet to ensure a proper fit and prevent future leaks.
Tightening Connections
 If loose connections are the cause of your leak, simply tightening them should do the trick. Use a wrench to tighten any loose nuts or bolts, being careful not to over-tighten them. You can also use plumber's tape to help create a better seal and prevent future leaks.
Cleaning and Descaling
 If corrosion or mineral build-up is the issue, you will need to clean and descale your Delta kitchen sink faucet. This can be done using a mixture of equal parts water and vinegar. Soak a cloth in the mixture and wrap it around the affected area for about an hour. Then, use a soft-bristled brush to gently scrub away any build-up. Rinse the area thoroughly and dry it before reassembling the faucet.
Preventing Future Leaks
 To ensure your Delta kitchen sink faucet stays leak-free, there are a few steps you can take. Regularly check and clean your faucet, and address any leaks as soon as you notice them. You can also install a faucet aerator to help reduce the amount of water pressure and prevent wear and tear on the faucet's seals and connections. By taking these preventative measures, you can keep your Delta kitchen sink faucet functioning properly for years to come.

.png)


