The bathroom sink is one of the most essential fixtures in any home. It not only serves a functional purpose but also adds to the overall aesthetic of the space. When it comes to installing or replacing a bathroom sink, having the right parts is crucial. To help you with your next bathroom project, we have compiled a list of the top 10 bathroom sink assembly parts that you'll need for a smooth and successful installation. Bathroom Sink Assembly Parts: Everything You Need for a Perfect Sink Installation


Bathroom Sink Assembly Parts


Before we dive into the specific parts, let's first understand what a sink assembly is. A sink assembly is a complete set of components that work together to make your sink function properly. These parts include everything from the drain to the faucet and everything in between. Now, let's take a closer look at the individual parts that make up a sink assembly. Sink Assembly Parts: The Building Blocks of a Fully Functional Sink

Sink Assembly Parts


When purchasing bathroom sink parts, it's essential to have a clear understanding of each component's purpose. This will ensure that you get the right parts for your sink and avoid any potential installation issues. Here are the top 10 bathroom sink parts you'll need for a successful assembly. Bathroom Sink Parts: A Comprehensive Guide to Getting the Right Components

Bathroom Sink Parts


:max_bytes(150000):strip_icc()/what-is-under-the-bathroom-sink-3973574-05-9ef14e22679246c1ba6d64209d4f561e.jpg)
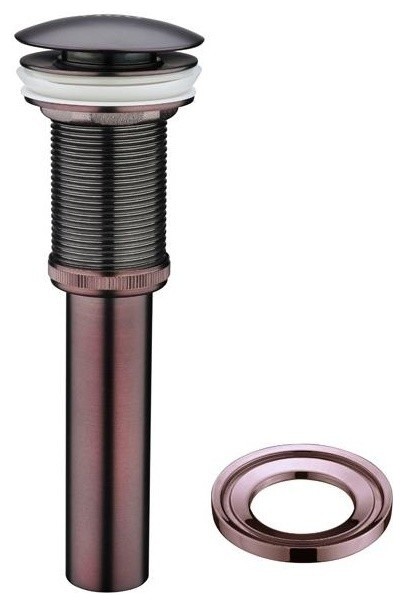
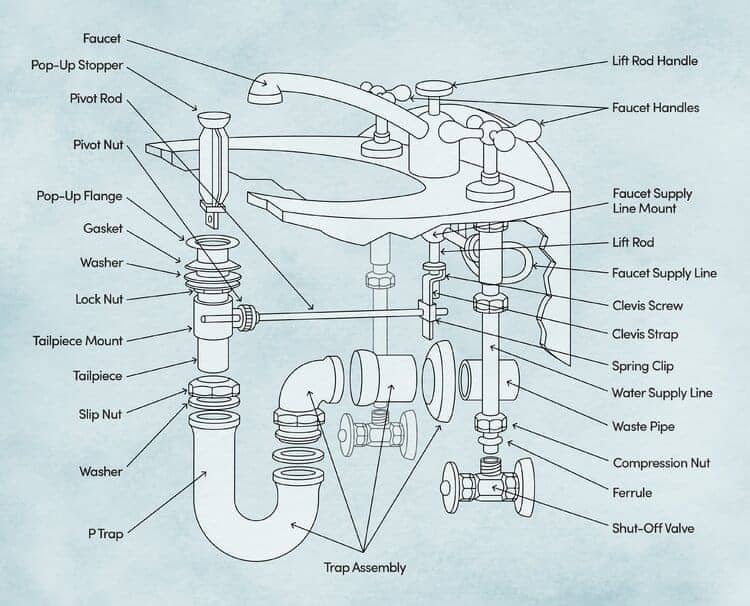
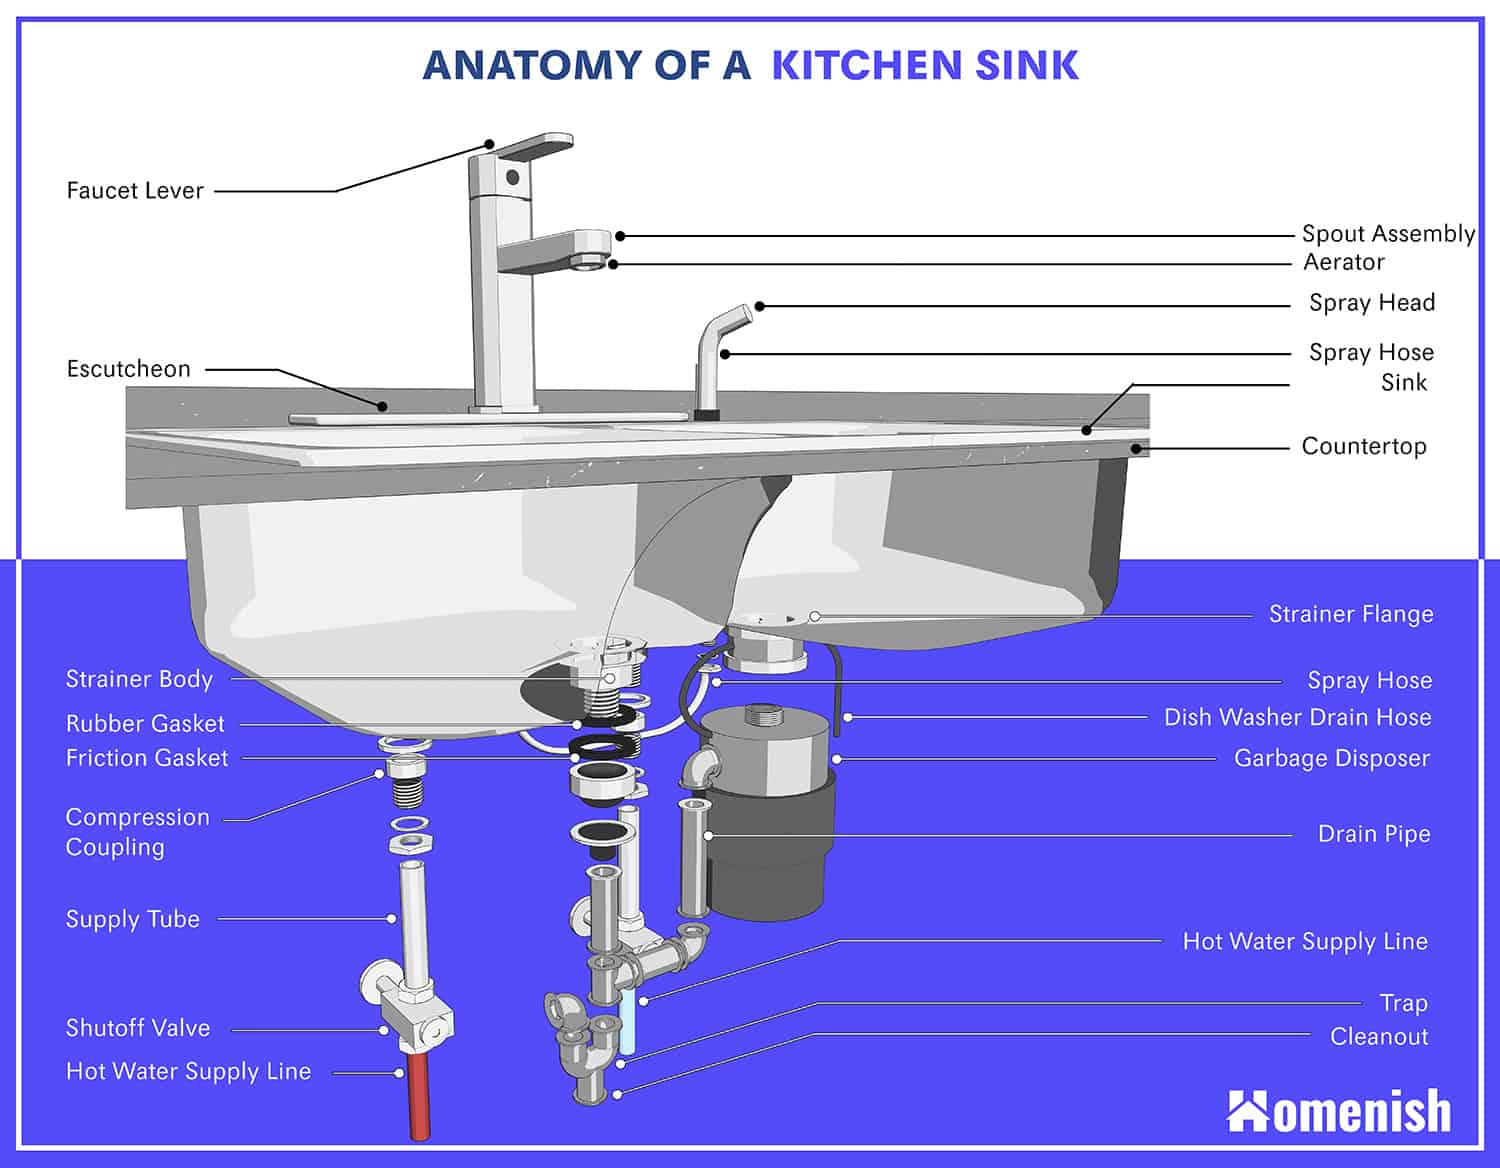
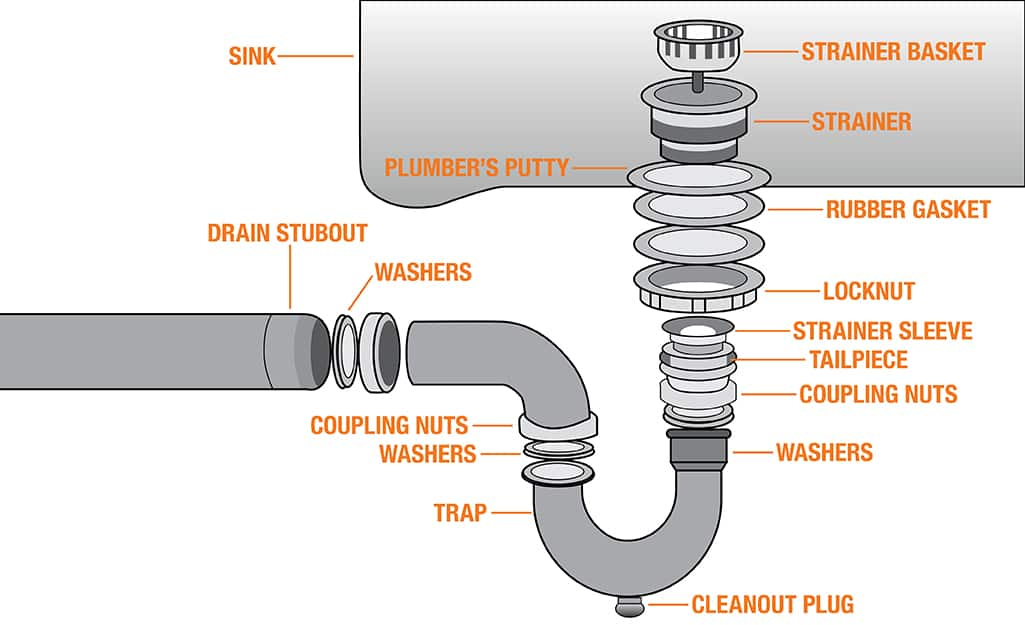
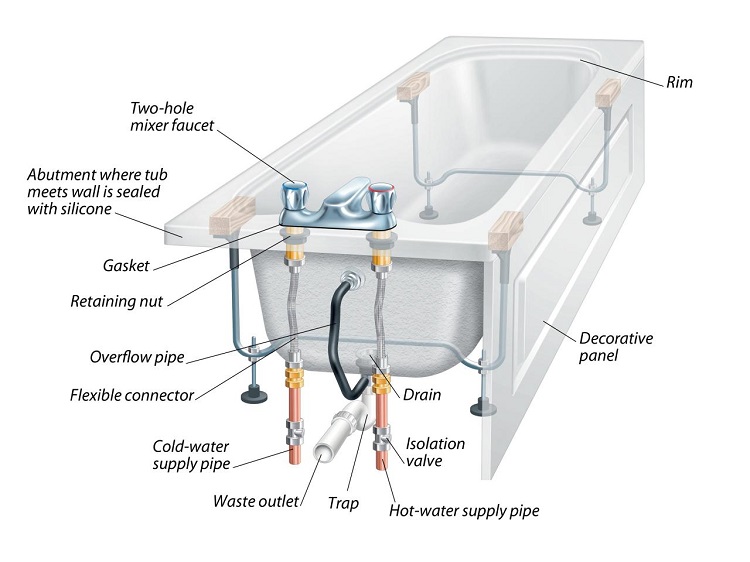
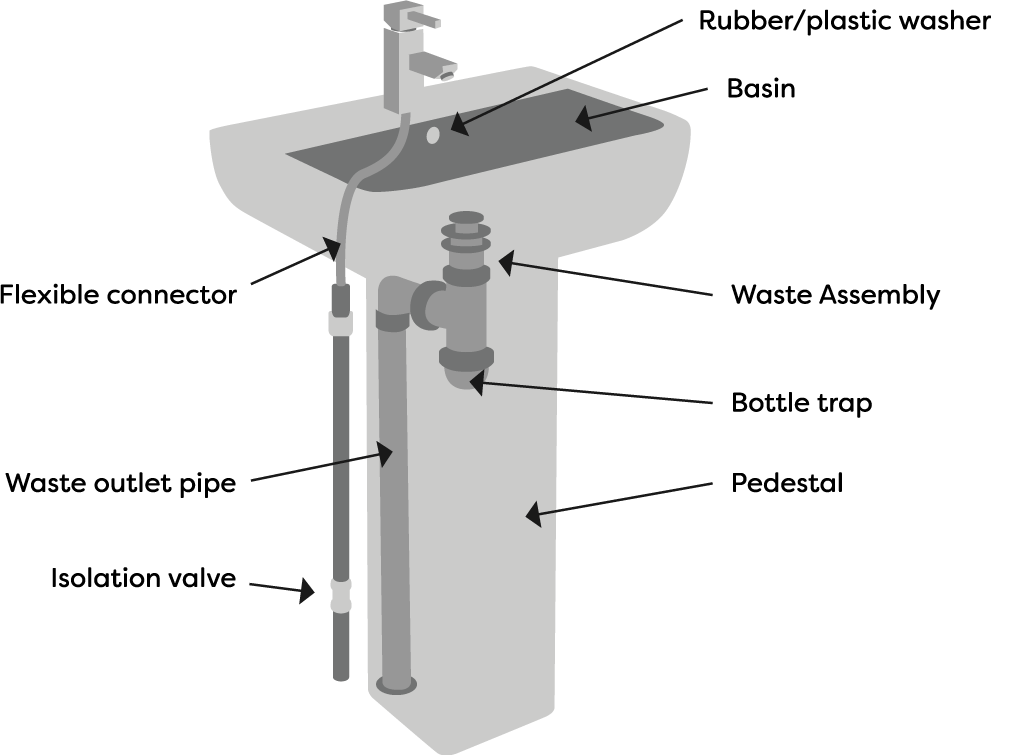
1. Drain Assembly - This is the part that connects your sink to the plumbing system. It includes the stopper, flange, and tailpiece.
Sink Parts: From Drain to Faucet, Here's What You'll Need
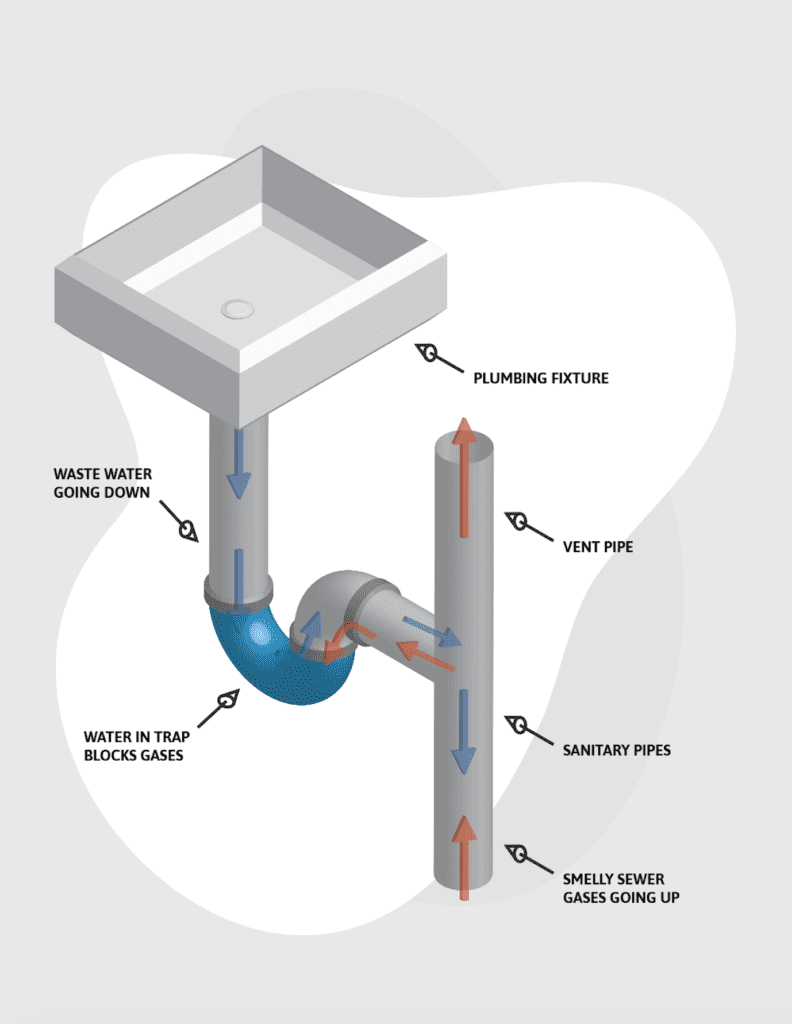
2. P-Trap - This curved pipe prevents sewer gases from entering your bathroom by trapping a small amount of water in the bend.
3. Supply Lines - These are the pipes that connect the sink to the hot and cold water supply.
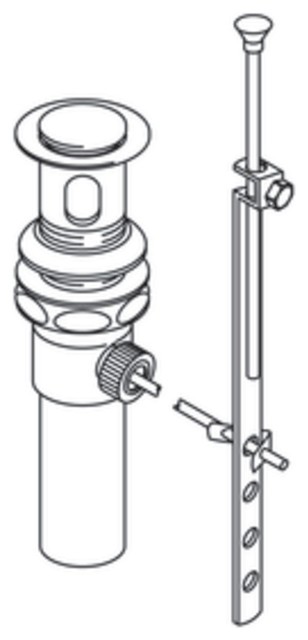
4. Pop-Up Assembly - This is the mechanism that allows you to open and close the drain stopper.
5. Sink Clips - These are used to secure the sink to the countertop.
6. Sink Strainer - This is the part that prevents food, hair, and other debris from clogging the drain.
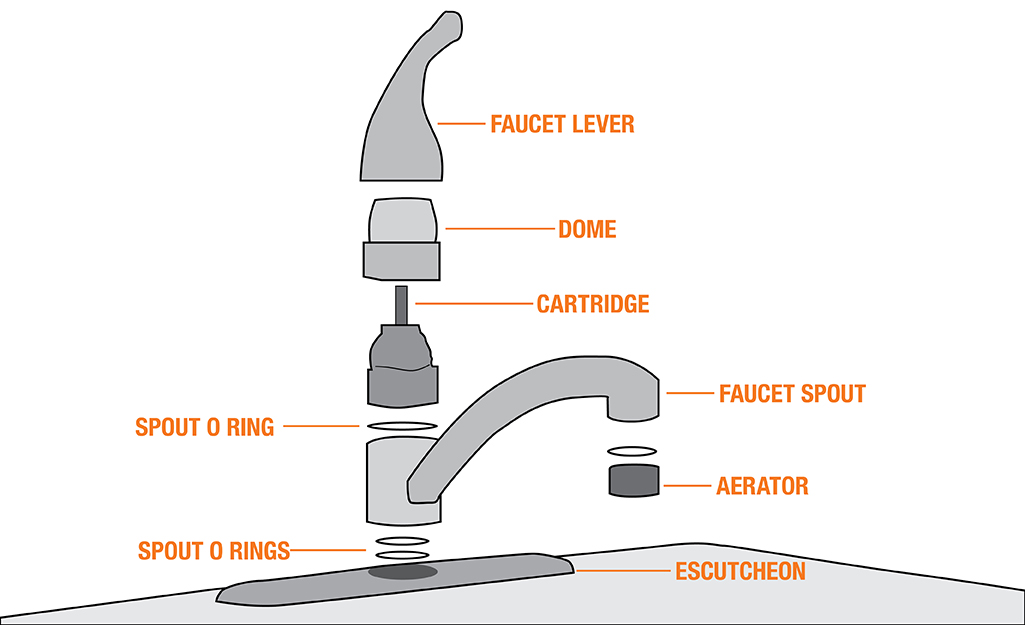
7. Faucet - The faucet is the main component of the sink that controls the flow of water.
8. Handles and Valves - These are the parts that allow you to turn the water on and off and control the water temperature.
9. Escutcheon Plate - This is a decorative cover that hides the holes in the sink or countertop where the faucet and handles are installed.
10. Mounting Hardware - This includes screws, bolts, and brackets that are used to secure the sink to the countertop or wall.

Sink Parts
Now that we have covered the main sink parts, let's take a closer look at some additional components that are essential for a complete bathroom assembly. Bathroom Assembly Parts: A Closer Look at the Components


Bathroom Assembly Parts


1. Caulk - This waterproof sealant is used to prevent water from seeping between the sink and the countertop.
Assembly Parts: The Essential Components for a Successful Install
2. Plumbers Tape - Also known as Teflon tape, this is used to create a watertight seal on threaded connections.
3. Silicone Sealant - This is a waterproof adhesive used to seal joints and seams in the sink assembly.
4. Plumbers Putty - This is a soft, pliable material used to create a watertight seal around sink drains and faucets.
5. Drain Auger - This tool is used to clear clogs in the sink drain.
6. Plunger - In case of a clogged sink, a plunger can help dislodge the blockage.
7. Channel Lock Pliers - These are used to tighten and loosen plumbing connections.
8. Adjustable Wrench - This tool is essential for tightening and loosening nuts and bolts.
9. Hacksaw - A hacksaw may be needed to cut pipes to the correct length during installation.
10. Screwdriver - Depending on the type of screws used, a screwdriver may be necessary to secure parts of the sink assembly.

Assembly Parts

.jpg)

Now that you know the essential parts for a bathroom sink assembly, let's go through the installation process step by step.
Bathroom Sink Assembly: Putting It All Together
1. Install the drain assembly by threading it into the sink drain and securing it with a rubber gasket and locknut.
2. Apply plumber's putty around the drain flange and press it into place.
3. Install the P-trap by connecting it to the drain assembly and the wall pipe.
4. Connect the supply lines to the faucet and shut-off valves.
5. Install the faucet and handles onto the sink according to the manufacturer's instructions.
6. Attach the sink to the countertop using sink clips.
7. Connect the supply lines to the faucet and turn on the water to test for leaks.
8. Apply silicone sealant around the edges of the sink to create a waterproof seal.
9. Install the escutcheon plate over the faucet and handles.
10. Secure the sink to the wall or countertop with mounting hardware.


Bathroom Sink Assembly


Installing a bathroom sink may seem like a daunting task, but with the right parts and a little bit of know-how, it can be a simple and rewarding DIY project. Make sure to choose high-quality parts that are compatible with your sink and plumbing system. And remember to always follow the manufacturer's instructions for installation. With the right parts and a little bit of elbow grease, you'll have a fully functional and stylish bathroom sink in no time. Sink Assembly: A Complete Guide to Choosing and Installing the Right Parts

Sink Assembly


Why Choosing the Right Bathroom Sink Assembly Parts is Essential for Your House Design

Importance of Bathroom Sink Assembly Parts
 When designing a house, every detail matters. From the color of the walls to the type of flooring, each element contributes to the overall aesthetic and functionality of the space. The bathroom, in particular, is a room that requires careful consideration when it comes to design. One important aspect of bathroom design is the sink and its assembly parts.
Choosing the right bathroom sink assembly parts is crucial for both the look and functionality of your bathroom.
When designing a house, every detail matters. From the color of the walls to the type of flooring, each element contributes to the overall aesthetic and functionality of the space. The bathroom, in particular, is a room that requires careful consideration when it comes to design. One important aspect of bathroom design is the sink and its assembly parts.
Choosing the right bathroom sink assembly parts is crucial for both the look and functionality of your bathroom.
Enhance the Aesthetics
 The sink is often one of the first things people notice when they enter a bathroom. It is a focal point that can make or break the overall design of the room.
By selecting the right bathroom sink assembly parts, you can enhance the aesthetics of your bathroom and elevate its overall design.
From modern and sleek to traditional and classic, there are a variety of sink styles and assembly parts to choose from. You can opt for a vessel sink with a waterfall faucet for a contemporary look or a pedestal sink for a more traditional feel. The assembly parts, such as the faucet and handles, can also add a touch of style to the sink and tie in with the rest of your bathroom's design.
The sink is often one of the first things people notice when they enter a bathroom. It is a focal point that can make or break the overall design of the room.
By selecting the right bathroom sink assembly parts, you can enhance the aesthetics of your bathroom and elevate its overall design.
From modern and sleek to traditional and classic, there are a variety of sink styles and assembly parts to choose from. You can opt for a vessel sink with a waterfall faucet for a contemporary look or a pedestal sink for a more traditional feel. The assembly parts, such as the faucet and handles, can also add a touch of style to the sink and tie in with the rest of your bathroom's design.
Functionality and Durability
 Aside from aesthetics, the functionality and durability of your bathroom sink assembly parts are also important factors to consider.
Choosing high-quality parts will ensure that your sink functions properly and lasts for years to come.
The right assembly parts will not only make your sink easy and efficient to use, but they will also prevent any potential leaks or other plumbing issues. This can save you from costly repairs in the future.
Aside from aesthetics, the functionality and durability of your bathroom sink assembly parts are also important factors to consider.
Choosing high-quality parts will ensure that your sink functions properly and lasts for years to come.
The right assembly parts will not only make your sink easy and efficient to use, but they will also prevent any potential leaks or other plumbing issues. This can save you from costly repairs in the future.
Customization and Personalization
 Every homeowner has their own unique style and preferences, and the bathroom is no exception.
Choosing the right bathroom sink assembly parts allows you to customize and personalize your bathroom to your liking.
You can mix and match different parts to create a one-of-a-kind look or choose from a variety of finishes, such as chrome, brushed nickel, or bronze, to complement your bathroom's design. This level of customization allows you to create a bathroom that truly reflects your personality and style.
Every homeowner has their own unique style and preferences, and the bathroom is no exception.
Choosing the right bathroom sink assembly parts allows you to customize and personalize your bathroom to your liking.
You can mix and match different parts to create a one-of-a-kind look or choose from a variety of finishes, such as chrome, brushed nickel, or bronze, to complement your bathroom's design. This level of customization allows you to create a bathroom that truly reflects your personality and style.
Conclusion
 In conclusion, bathroom sink assembly parts play a crucial role in the design of your bathroom. They not only enhance the aesthetics of the space but also contribute to its functionality, durability, and customization. When designing your bathroom, be sure to carefully consider the sink and its assembly parts to create a cohesive and visually appealing space. By choosing the right bathroom sink assembly parts, you can transform your bathroom into a beautiful and functional oasis.