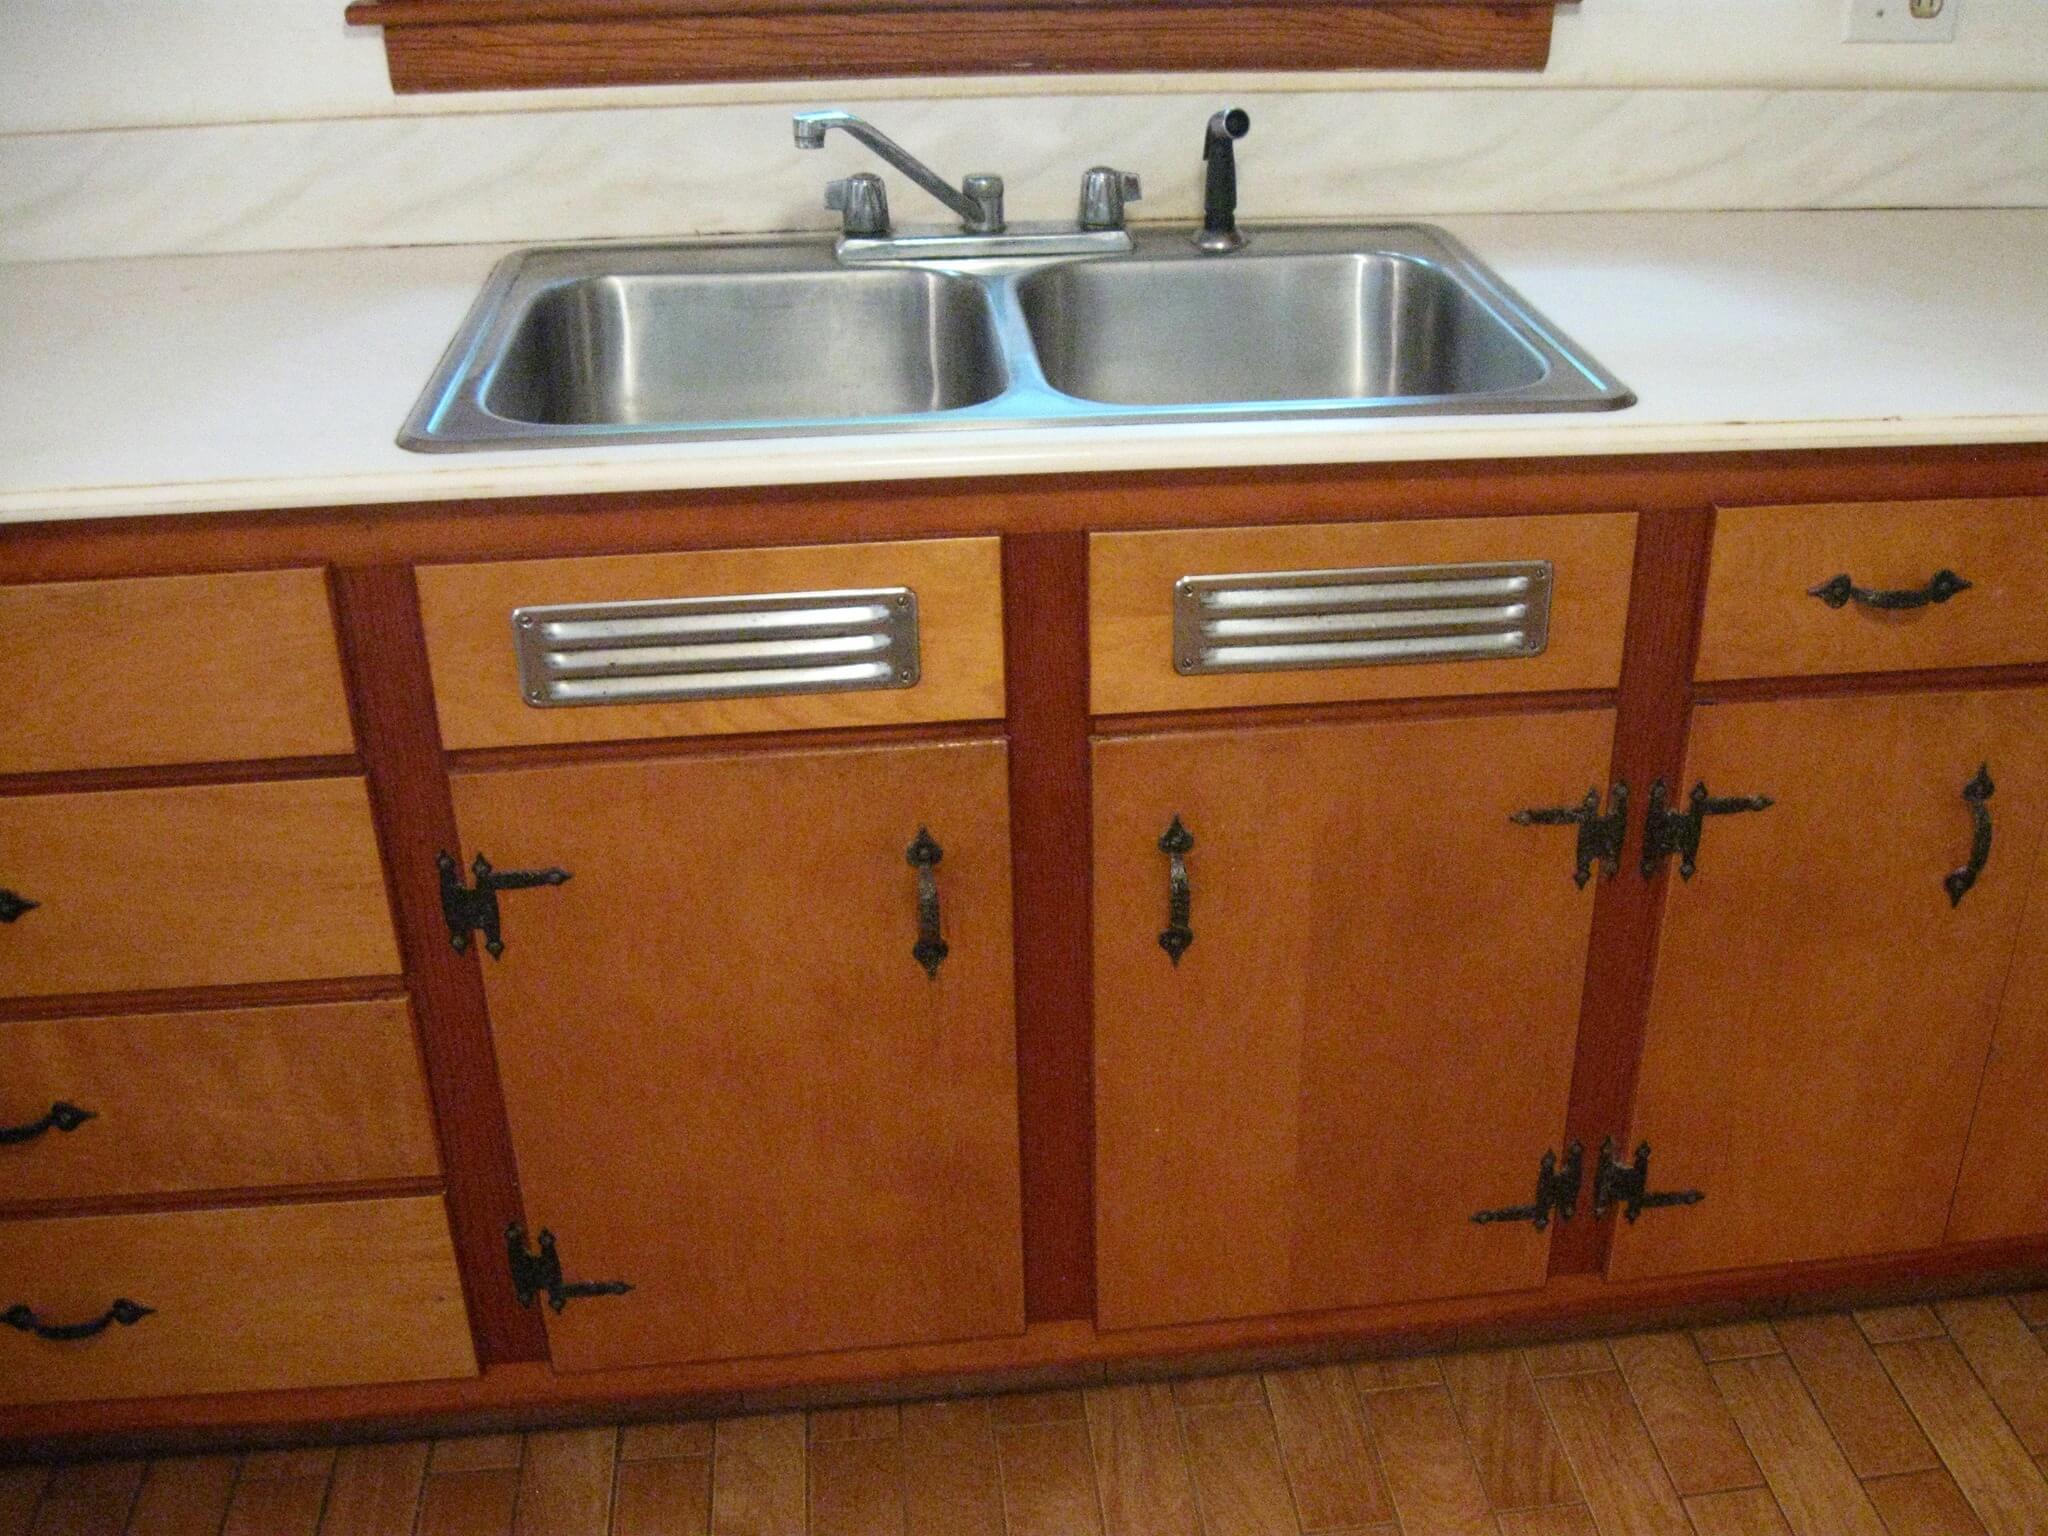
Adding a vent to your kitchen sink can seem like a daunting task, but with the right tools and knowledge, it can be a simple and straightforward process. A vent is an essential component of any plumbing system, and it plays a crucial role in keeping your kitchen sink functioning properly. Without a vent, your sink may experience slow draining, gurgling noises, and even foul odors. In this guide, we will walk you through the steps of adding a vent to your kitchen sink, so you can enjoy a fully functioning and odor-free sink.1. How to Add a Vent to Your Kitchen Sink


1. How to Add a Vent to Your Kitchen Sink


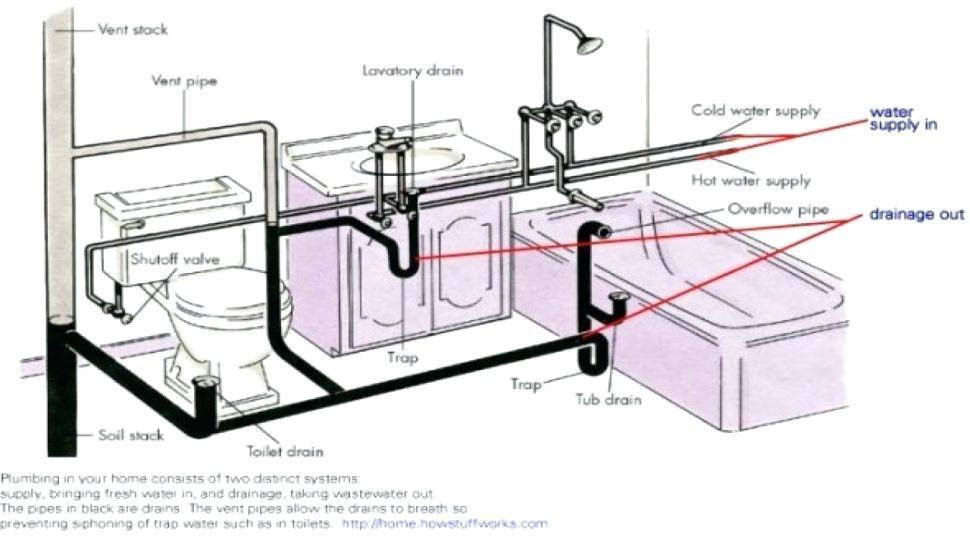
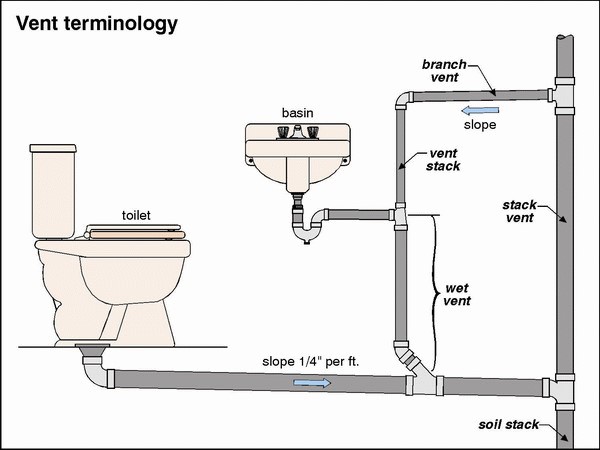
Before you begin the installation process, it is essential to understand the purpose of a vent for your kitchen sink. A vent is a pipe that connects to your plumbing system and extends outside your home. Its main function is to release any built-up air pressure in your pipes, allowing water to flow freely and preventing any blockages or slow draining. Installing a vent for your kitchen sink is a relatively simple process that can be done in a few easy steps.2. Installing a Vent for Your Kitchen Sink


2. Installing a Vent for Your Kitchen Sink


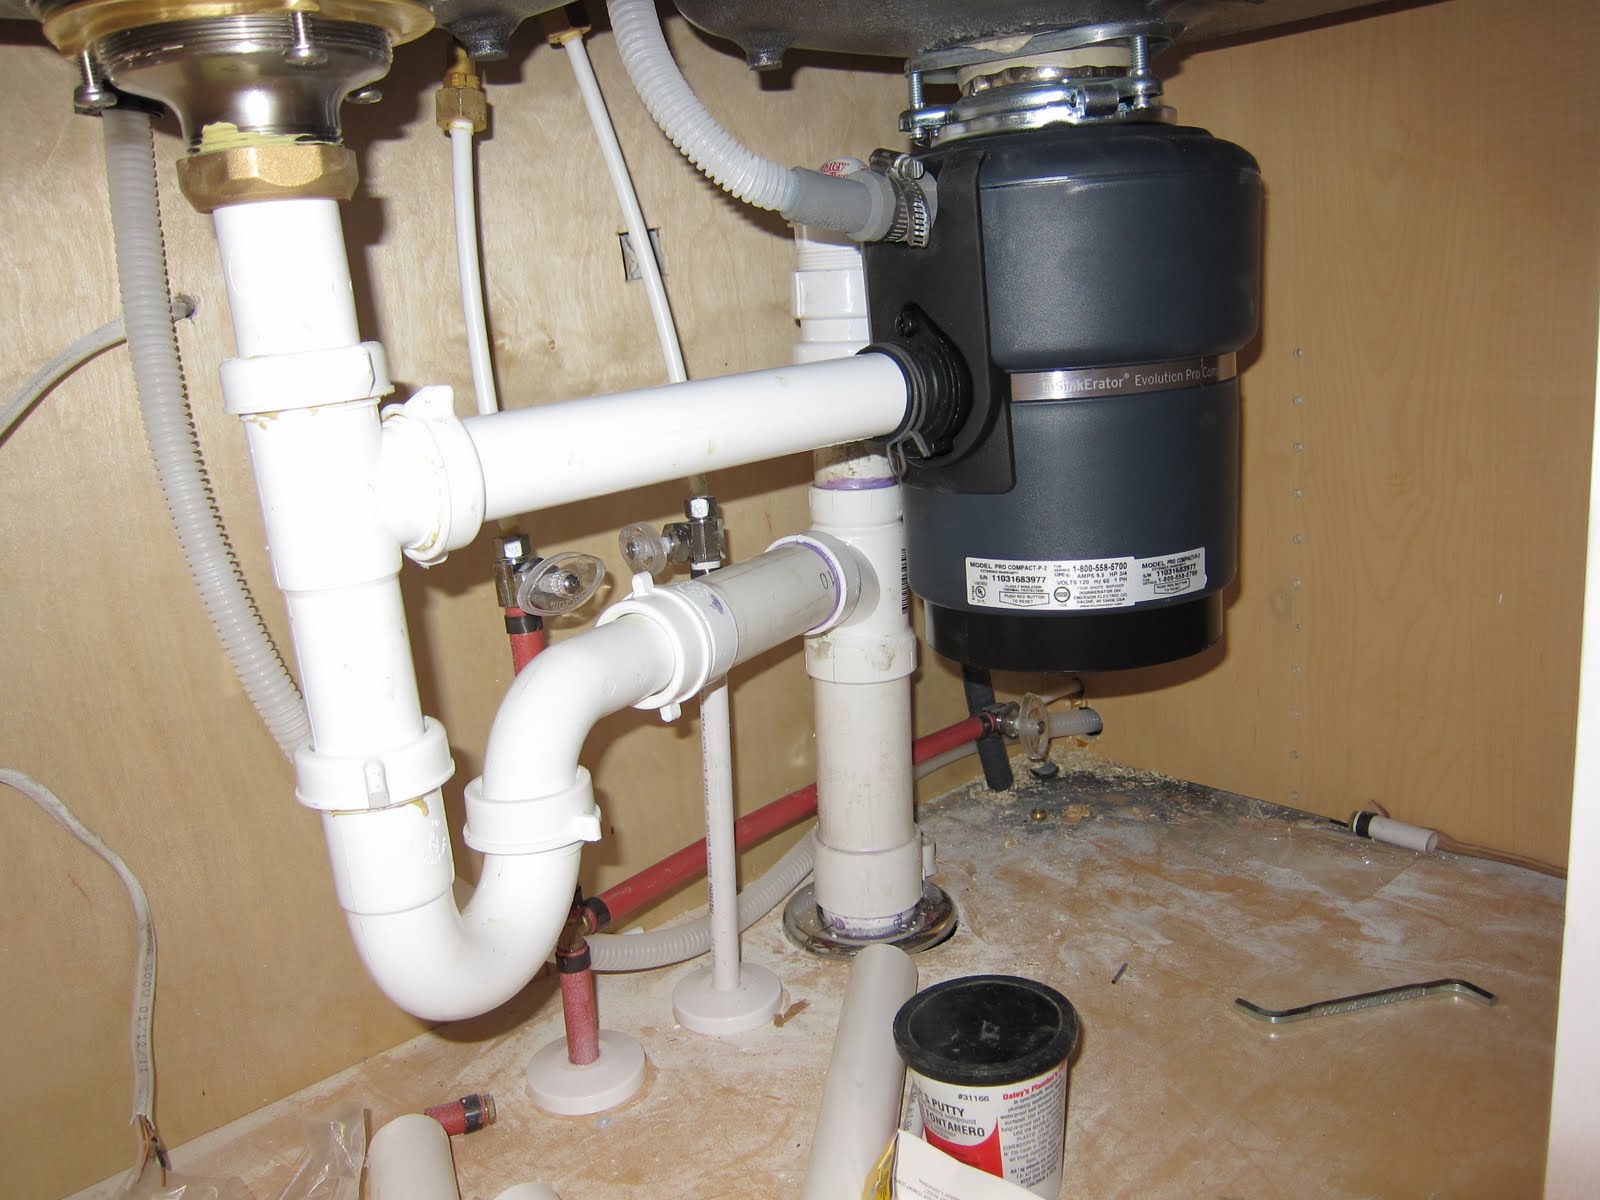
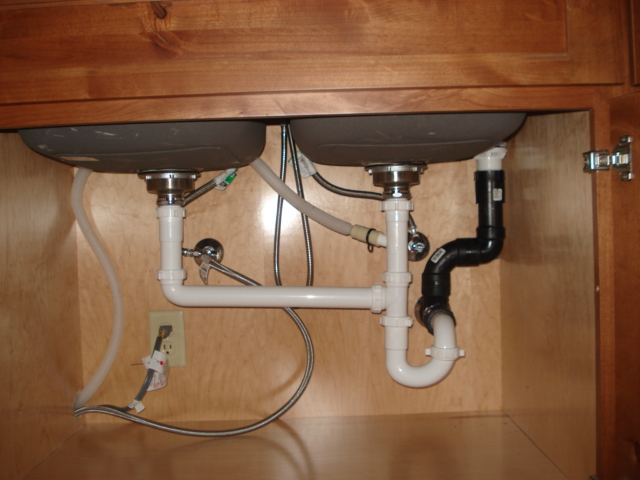
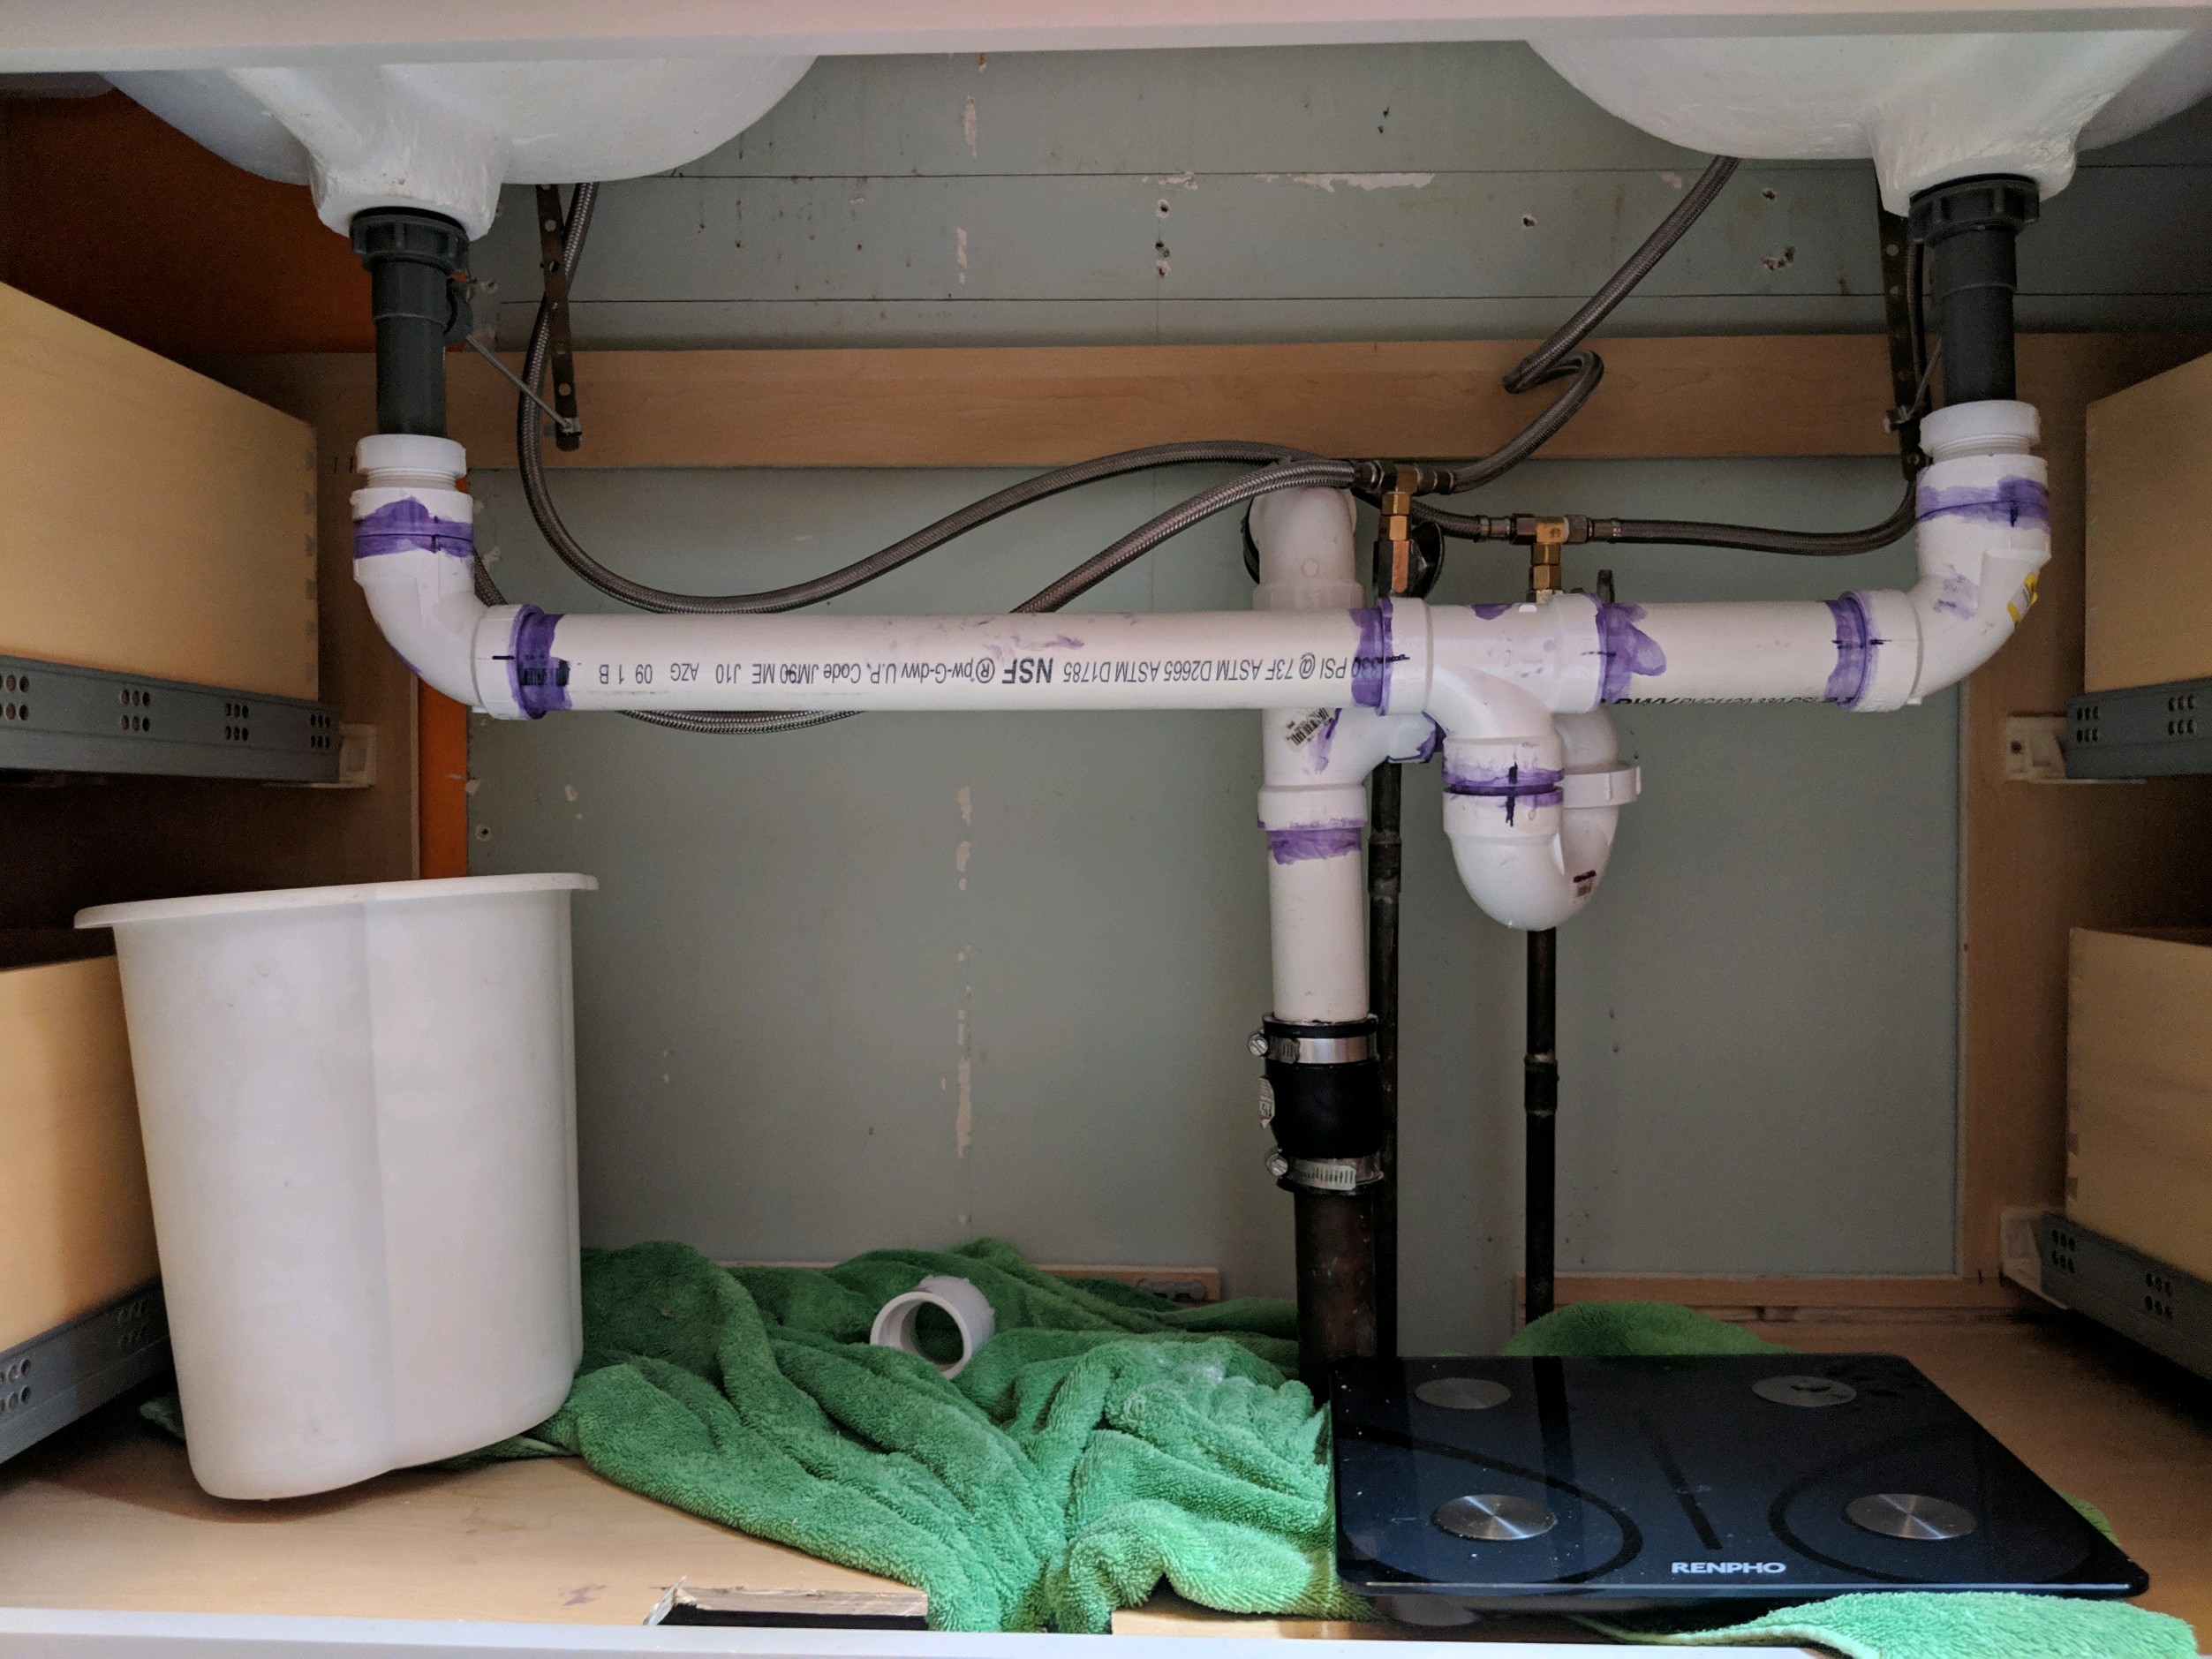
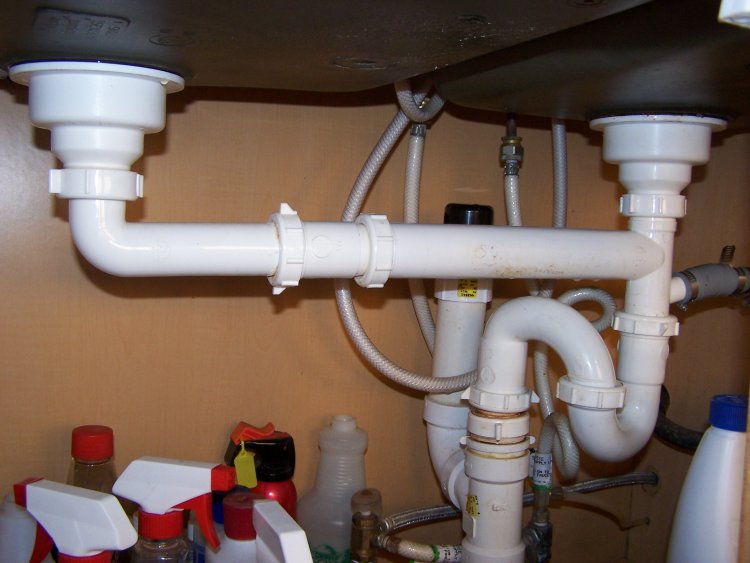
If you are a DIY enthusiast, installing a vent for your kitchen sink can be a fun and rewarding project. To start, you will need to gather the necessary tools and materials. This includes a vent pipe, a PVC cutter, Teflon tape, a vent cap, and a drill. Once you have all your tools and materials, you can begin by cutting a hole in your sink's cabinet to run the vent pipe through. Then, using the Teflon tape, secure the vent cap to the pipe and attach it to the sink's drain line. Finally, run the vent pipe through the hole and connect it to the vent cap. With a few simple steps, you can have a fully functional vent for your kitchen sink.3. DIY Kitchen Sink Vent Installation


3. DIY Kitchen Sink Vent Installation


:max_bytes(150000):strip_icc()/sink-vent-installing-an-auto-vent-2718828-03-7d2c3b9c51024155a1ea47f7ae35cadd.jpg)

As mentioned earlier, a vent is an essential component of your kitchen sink's plumbing system. Without it, your sink may experience a range of issues, including slow draining, gurgling noises, and unpleasant odors. A vent ensures that air pressure is balanced in your pipes, allowing water to flow freely and preventing any blockages. Additionally, a vent helps to prevent harmful sewer gases from entering your home, keeping your family safe and healthy. Overall, the importance of a vent for your kitchen sink cannot be overstated.4. The Importance of a Vent for Your Kitchen Sink


4. The Importance of a Vent for Your Kitchen Sink


If you are unsure of how to add a vent to your kitchen sink, don't worry. We have put together a step-by-step guide to help you through the installation process. Firstly, you will need to determine the location for your vent. This should be as close to the sink as possible and away from any windows or doors. Next, cut a hole in your sink's cabinet and run the vent pipe through it. Then, attach the vent cap to the pipe and secure it using Teflon tape. Finally, connect the vent pipe to the vent cap and test your sink to ensure it is functioning correctly. With these simple steps, you can have a vent for your kitchen sink in no time.5. Step-by-Step Guide to Adding a Vent to Your Kitchen Sink


5. Step-by-Step Guide to Adding a Vent to Your Kitchen Sink

While adding a vent to your kitchen sink may seem like a simple task, there are some common mistakes that can be easily avoided. Firstly, make sure you have the correct tools and materials for the job. Using the wrong tools can not only make the process more difficult but also lead to improper installation. Additionally, be sure to measure and cut the vent pipe accurately to avoid any leaks or blockages. Lastly, check for any local building codes or regulations before starting the installation process. By avoiding these common mistakes, you can ensure a successful and hassle-free installation.6. Common Mistakes to Avoid When Adding a Vent to Your Kitchen Sink


6. Common Mistakes to Avoid When Adding a Vent to Your Kitchen Sink


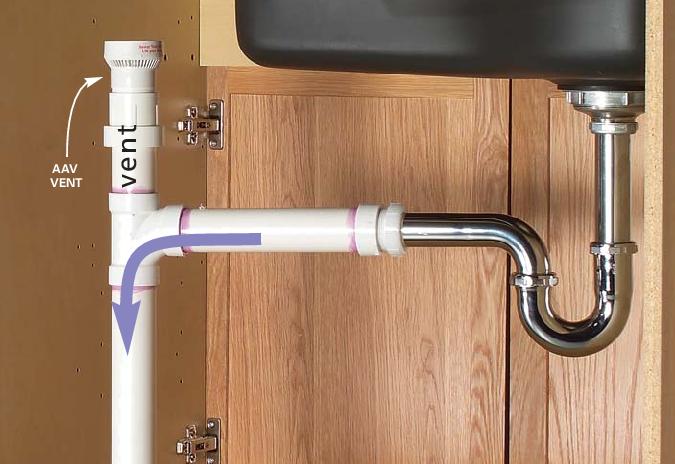
When it comes to choosing the right vent for your kitchen sink, there are a few options available. The most common type of vent for a kitchen sink is a studor vent, which is easy to install and requires minimal maintenance. Another option is an air admittance valve, which is a one-way valve that allows air to enter but not exit your plumbing system. It is essential to choose a vent that is compatible with your plumbing system and meets local building codes.7. Choosing the Right Vent for Your Kitchen Sink


7. Choosing the Right Vent for Your Kitchen Sink

Adding a vent to your kitchen sink has several benefits that go beyond just preventing slow draining and odors. By balancing air pressure in your plumbing system, a vent can also improve water flow, reducing the risk of clogs and backups. It can also extend the lifespan of your pipes by reducing the strain and pressure on them. Additionally, installing a vent can increase the value of your home, making it a worthwhile investment for any homeowner.8. Benefits of Adding a Vent to Your Kitchen Sink


8. Benefits of Adding a Vent to Your Kitchen Sink


As mentioned earlier, before starting the installation process, it is essential to gather all the necessary tools and materials. This includes a vent pipe, Teflon tape, a vent cap, a PVC cutter, a drill, and a hole saw. It is also recommended to have a helper to assist with the installation process, as well as a bucket and towels to catch any water that may spill during installation.9. Tools and Materials Needed for Adding a Vent to Your Kitchen Sink

9. Tools and Materials Needed for Adding a Vent to Your Kitchen Sink
:no_upscale()/cdn.vox-cdn.com/uploads/chorus_asset/file/19495086/drain_0.jpg)


While adding a vent to your kitchen sink can be a DIY project, it may be best to leave it to the professionals. A licensed plumber will have the necessary knowledge and experience to ensure proper installation and compliance with local building codes. They can also provide valuable advice on choosing the right vent and maintain it for you in the future. While DIY may seem like a cost-effective option, hiring a professional can save you time, money, and hassle in the long run.10. Professional vs. DIY: Adding a Vent to Your Kitchen Sink


10. Professional vs. DIY: Adding a Vent to Your Kitchen Sink

:max_bytes(150000):strip_icc()/Basic-kitchen-sink-types-1821207_color_rev-0b539306b9ef4236a136624ad2a89a4c.jpg)


The Importance of Adding a Vent to Your Kitchen Sink

The Purpose of a Vent
 When designing a house, the kitchen is often considered the heart of the home. It's where meals are prepared, family and friends gather, and memories are made. With all the activity that happens in the kitchen, it's important to have proper ventilation to keep the space clean and comfortable. One of the most crucial areas that requires ventilation is the kitchen sink.
Adding a vent to your kitchen sink
not only improves the overall functionality of your kitchen but also has several other benefits.
When designing a house, the kitchen is often considered the heart of the home. It's where meals are prepared, family and friends gather, and memories are made. With all the activity that happens in the kitchen, it's important to have proper ventilation to keep the space clean and comfortable. One of the most crucial areas that requires ventilation is the kitchen sink.
Adding a vent to your kitchen sink
not only improves the overall functionality of your kitchen but also has several other benefits.
Prevents Unpleasant Odors
 One of the main reasons to have a vent in your kitchen sink is to eliminate unpleasant odors. Without proper ventilation, the steam and odors from cooking and washing dishes can linger in the air, making your kitchen smell less than desirable. By
installing a vent
, these odors are quickly and effectively removed from the space, leaving your kitchen smelling fresh and clean.
One of the main reasons to have a vent in your kitchen sink is to eliminate unpleasant odors. Without proper ventilation, the steam and odors from cooking and washing dishes can linger in the air, making your kitchen smell less than desirable. By
installing a vent
, these odors are quickly and effectively removed from the space, leaving your kitchen smelling fresh and clean.
Reduces Moisture and Mold
 Another important reason for having a vent in your kitchen sink is to reduce moisture and prevent mold growth. When hot water and steam from cooking and washing dishes are not properly ventilated, they can create a high humidity environment. This can lead to condensation on surfaces and promote the growth of mold, which can be harmful to your health.
Adding a vent
helps to reduce moisture and keep your kitchen dry and mold-free.
Another important reason for having a vent in your kitchen sink is to reduce moisture and prevent mold growth. When hot water and steam from cooking and washing dishes are not properly ventilated, they can create a high humidity environment. This can lead to condensation on surfaces and promote the growth of mold, which can be harmful to your health.
Adding a vent
helps to reduce moisture and keep your kitchen dry and mold-free.
Improves Air Quality
 Proper ventilation is essential for maintaining good air quality in your kitchen. In addition to removing odors and reducing moisture, a vent helps to remove pollutants and contaminants from the air. This is especially important if you have a gas stove, as it can release harmful gases into the air. By
installing a vent
, you can improve the air quality in your kitchen and create a healthier environment for you and your family.
Proper ventilation is essential for maintaining good air quality in your kitchen. In addition to removing odors and reducing moisture, a vent helps to remove pollutants and contaminants from the air. This is especially important if you have a gas stove, as it can release harmful gases into the air. By
installing a vent
, you can improve the air quality in your kitchen and create a healthier environment for you and your family.
Enhances Functionality
 Aside from the practical benefits,
adding a vent to your kitchen sink
also improves the overall functionality of your kitchen. A vent helps to keep your kitchen cool and comfortable while cooking, and it also prevents steam and condensation from accumulating on surfaces. This makes it easier to clean and maintain your kitchen, making it a more enjoyable space to cook and spend time in.
Aside from the practical benefits,
adding a vent to your kitchen sink
also improves the overall functionality of your kitchen. A vent helps to keep your kitchen cool and comfortable while cooking, and it also prevents steam and condensation from accumulating on surfaces. This makes it easier to clean and maintain your kitchen, making it a more enjoyable space to cook and spend time in.
Conclusion
 In conclusion,
adding a vent to your kitchen sink
is an important aspect of house design. It not only eliminates unpleasant odors and reduces moisture, but it also improves air quality and enhances the functionality of your kitchen. If you're planning on building or remodeling your kitchen, be sure to include a vent in your design for a cleaner, healthier, and more comfortable space.
In conclusion,
adding a vent to your kitchen sink
is an important aspect of house design. It not only eliminates unpleasant odors and reduces moisture, but it also improves air quality and enhances the functionality of your kitchen. If you're planning on building or remodeling your kitchen, be sure to include a vent in your design for a cleaner, healthier, and more comfortable space.