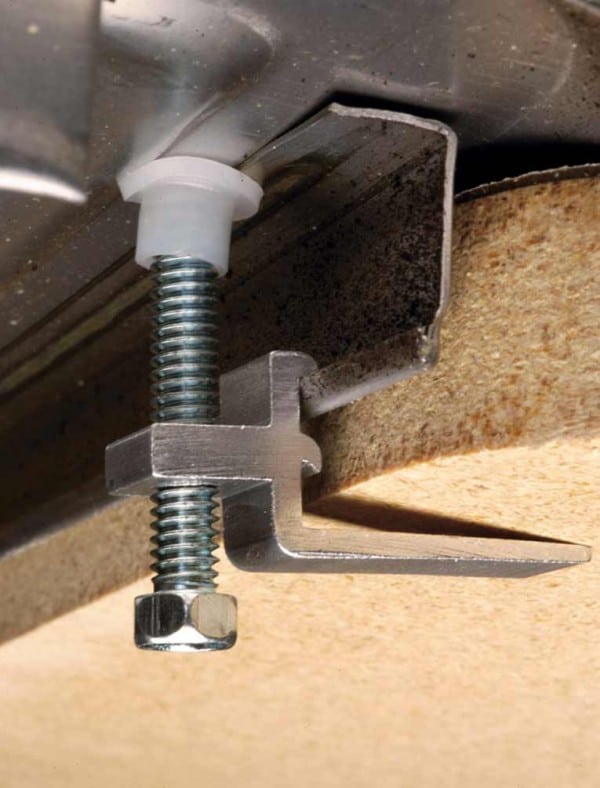
If you're looking to upgrade your kitchen, one of the most essential elements is your kitchen sink. Not only does it serve as a functional space for washing dishes and preparing food, but it also adds to the overall aesthetic of your kitchen. However, installing a kitchen sink can be a daunting task, especially when it comes to the plumbing aspect. But fear not, with the right tools and knowledge, you can easily install a new kitchen sink and have it up and running in no time. When it comes to installing a kitchen sink, there are a few key things to keep in mind. First, you need to choose the right sink for your space. There are various types of kitchen sinks available, including undermount, top mount, and farmhouse sinks. Consider the size and layout of your kitchen before deciding on the type of sink to install. Next, you need to gather the necessary tools and materials for the installation process. These may include a wrench, pliers, putty knife, plumber's putty, and a sink installation kit. It's also important to shut off the water supply before beginning any work to avoid any potential accidents. Once you have your sink and tools ready, the installation process can begin. First, you'll need to install the strainer, which is the part that prevents food scraps from going down the drain. Apply plumber's putty around the strainer and place it in the sink's drain hole. Then, attach the mounting hardware and tighten it with a wrench. Next, you'll need to install the sink's mounting clips or brackets, depending on the type of sink you have. These will hold the sink in place and prevent it from shifting. Place the clips or brackets on the sink's rim and tighten them with a screwdriver. Now, it's time to position the sink in place. Carefully lower the sink into the cutout on the countertop, making sure it's centered and level. If necessary, use shims to adjust the sink's position. Once the sink is in place, secure it with the mounting hardware provided in the installation kit. Finally, you'll need to connect the sink's plumbing. This includes attaching the water supply lines and installing the drain pipes. Use a wrench to tighten any connections, and make sure there are no leaks before turning the water supply back on. With these steps, you should now have a fully installed kitchen sink. Remember to clean up any excess putty or debris and enjoy your newly upgraded kitchen space.1. Kitchen Sink Plumbing: How to Install a Kitchen Sink


1. Kitchen Sink Plumbing: How to Install a Kitchen Sink


One of the most important components of a kitchen sink is the drain. It's responsible for removing dirty water and preventing clogs in your plumbing system. If you're installing a new kitchen sink, it's crucial to properly install the drain to ensure it functions correctly. Here's how to install a kitchen sink drain: The first step is to assemble the drain. This includes attaching the strainer to the flange, then attaching the tailpiece to the strainer. Make sure to use plumber's putty to create a watertight seal between the strainer and flange. Next, you'll need to attach the drain to the sink. Place the drain assembly in the sink's drain hole and secure it with the mounting hardware provided in the installation kit. Once the drain is in place, you can attach the tailpiece to the drain pipe using a slip nut and washer. Before connecting the drain pipes, it's important to clean them thoroughly to remove any debris or buildup. Then, connect the pipes using slip nuts and washers, making sure they are tightened securely. You may also want to use plumber's tape for an extra layer of protection against leaks. Once the drain pipes are connected, you can turn on the water supply and check for any leaks. If there are no leaks, you can then test the drain by running water and checking for proper drainage. If everything is functioning correctly, you have successfully installed a kitchen sink drain.2. How to Install a Kitchen Sink Drain


How to Install a Kitchen Sink Drain
/how-to-install-a-sink-drain-2718789-hero-b5b99f72b5a24bb2ae8364e60539cece.jpg)


:max_bytes(150000):strip_icc()/how-to-install-a-sink-drain-2718789-hero-24e898006ed94c9593a2a268b57989a3.jpg)


The kitchen sink strainer is a crucial part of your sink's plumbing system. It prevents food scraps and other debris from going down the drain and causing clogs. Here's how to install a kitchen sink strainer: The first step is to remove the old strainer, if there is one. Use a putty knife to scrape away any old plumber's putty around the old strainer, then unscrew and remove it from the sink. Next, you'll need to prepare the new strainer for installation. Apply plumber's putty around the strainer's flange, then place it in the sink's drain hole. Make sure the strainer is centered and level. Then, attach the mounting hardware provided in the installation kit and tighten it with a wrench. This will secure the strainer in place and create a watertight seal. Finally, clean up any excess putty and test the strainer by running water and checking for any leaks. If everything is in working order, you have successfully installed a kitchen sink strainer.3. How to Install a Kitchen Sink Strainer


How to Install a Kitchen Sink Strainer 2. How to Install a Kitchen Sink


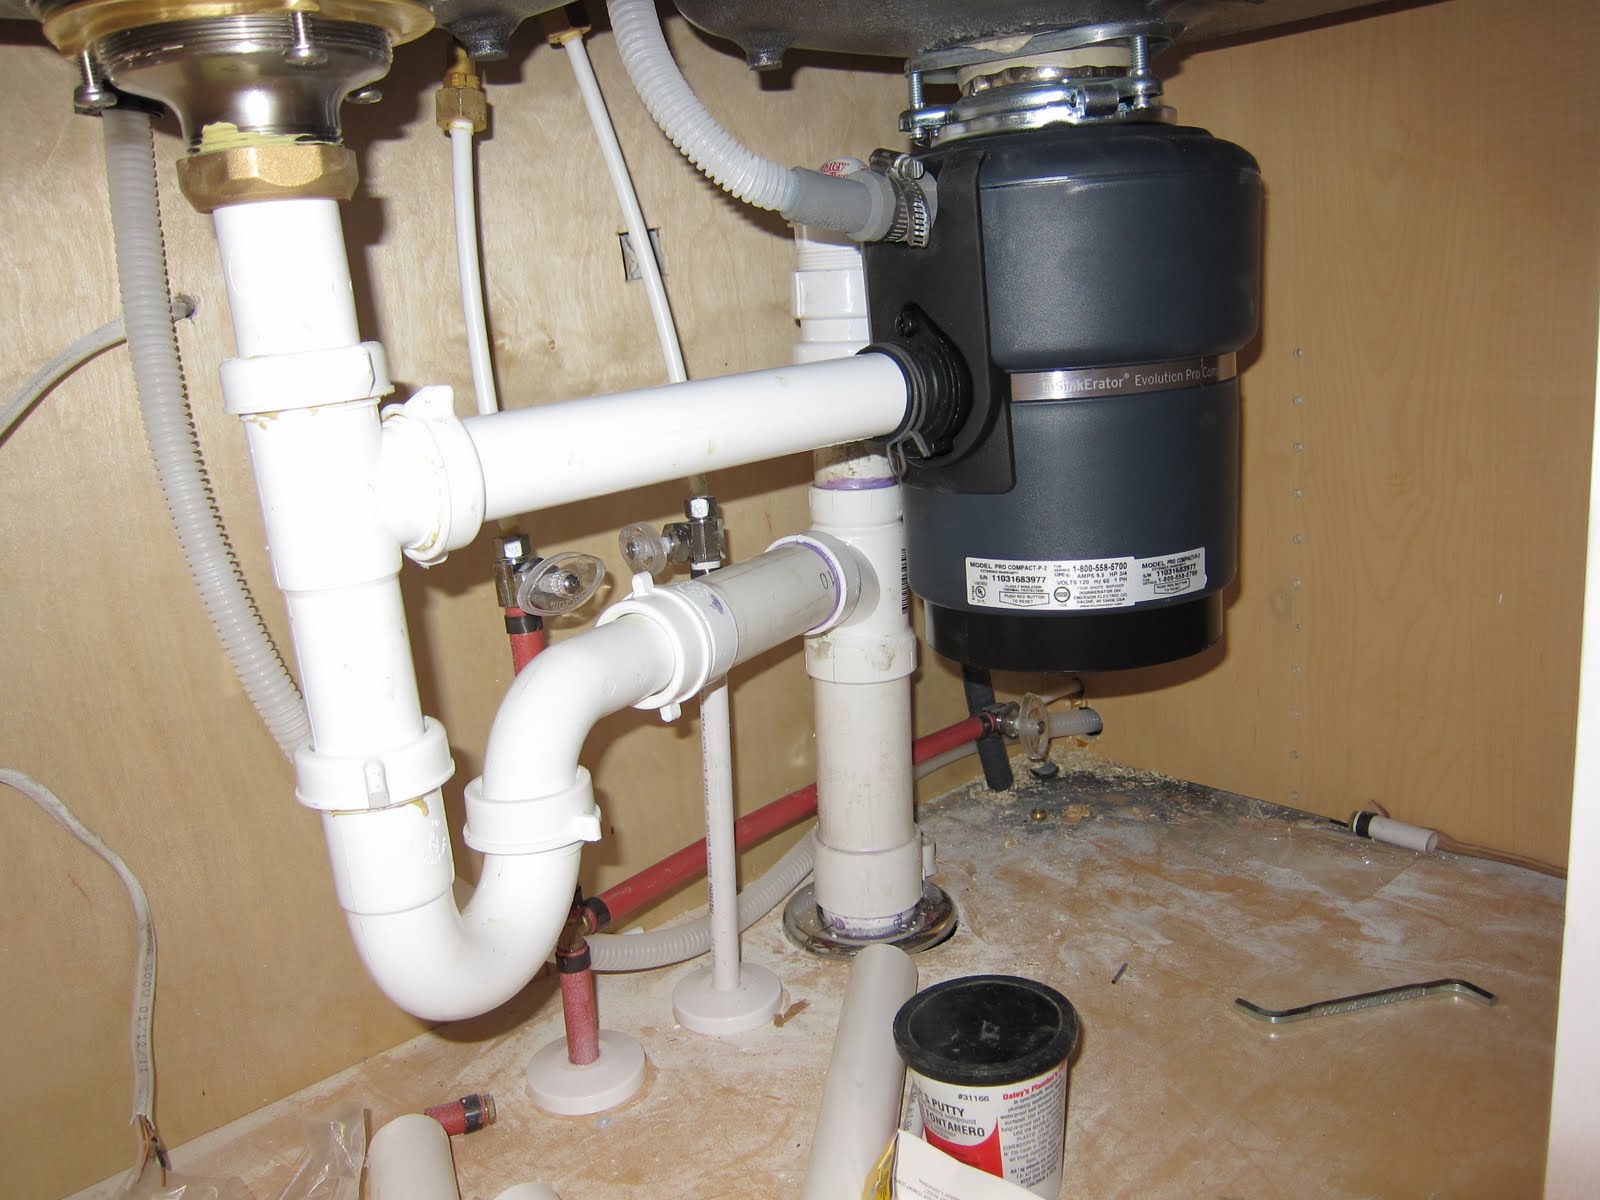
If you're looking to upgrade your kitchen sink, it's essential to have a basic understanding of kitchen sink plumbing. This will not only help you during the installation process but also allow you to troubleshoot any issues that may arise. Here's how to install a kitchen sink strainer in the context of the overall plumbing system: The first step is to prepare the strainer for installation. Apply plumber's putty around the strainer's flange and place it in the sink's drain hole. Then, attach the mounting hardware and secure it with a wrench. Next, you'll need to connect the strainer to the drain pipe using a tailpiece and slip nut. Make sure to tighten the connections securely to prevent any leaks. You'll also need to connect the water supply lines to the sink. This can be done by attaching a shut-off valve to the hot and cold water supply lines, then connecting them to the corresponding sides of the sink. Again, make sure to tighten the connections securely. Finally, you can test the plumbing system by turning on the water supply and checking for any leaks. If everything is functioning correctly, you have successfully installed a kitchen sink and its plumbing system.4. Kitchen Sink Plumbing: How to Install a Kitchen Sink Strainer

How to Install a Kitchen Sink Drain

:max_bytes(150000):strip_icc()/how-to-install-a-sink-drain-2718789-04-5715d67f5b7d41429d42bf705bb70e2c.jpg)

Installing a new kitchen sink is a great way to upgrade your kitchen's functionality and aesthetics. Whether you're replacing an old sink or installing a completely new one, the process can be quite straightforward with the right tools and knowledge. Here's how to install a kitchen sink: The first step is to choose the right sink for your space. Consider the size and layout of your kitchen before deciding on the type of sink to install. You may also want to choose a sink that complements your kitchen's design and style. Next, gather the necessary tools and materials for the installation process. These may include a wrench, pliers, putty knife, plumber's putty, and a sink installation kit. It's also important to shut off the water supply before beginning any work. Once you have your sink and tools ready, you can begin the installation process. This may involve installing the strainer, mounting clips or brackets, positioning the sink in place, and connecting the plumbing. Refer to the previous headings for detailed instructions on each of these steps. After completing the installation, make sure to clean up any debris or excess putty and test the sink for proper functionality. With these steps, you should now have a fully installed kitchen sink that adds both style and function to your kitchen space.5. How to Install a Kitchen Sink


How to Install a Kitchen Sink Strainer 3. How to Install a Kitchen Sink Drain
The kitchen sink strainer is a crucial component of your sink's plumbing system. It keeps food scraps and other debris from going down the drain and causing clogs. Here's how to install a kitchen sink strainer: First, you'll need to remove the old strainer, if there is one. Use a putty knife to scrape away any old plumber's putty around the strainer, then unscrew and remove it from the sink. Next, prepare the new strainer for installation by applying plumber's putty around the flange. Then, place it in the sink's drain hole and secure it with the mounting hardware provided in the installation kit. Finally, clean up any excess putty and test the strainer by running water and checking for any leaks. Once everything is in working order, you have successfully installed a kitchen sink strainer.6. How to Install a Kitchen Sink Strainer


How to Install a Kitchen Sink Strainer


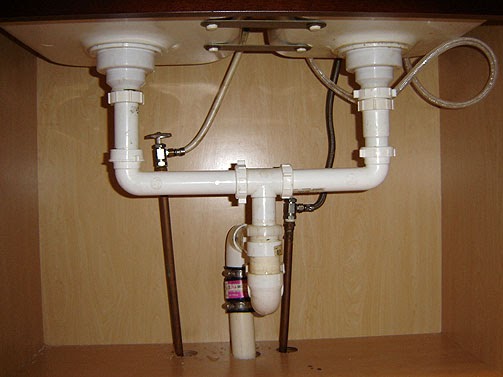
Proper kitchen sink plumbing is essential for the overall functionality of your sink. Here's how to install a kitchen sink drain: The first step is to assemble the drain. This may involve attaching the strainer to the flange and connecting the tailpiece to the strainer. Make sure to use plumber's putty to create a watertight seal between the strainer and flange. Next, attach the drain to the sink by placing the assembly in the drain hole and securing it with the mounting hardware provided in the installation kit. Then, connect the tailpiece to the drain pipe using a slip nut and washer. Before connecting the drain pipes, make sure to clean them thoroughly to remove any debris or buildup. Then, connect the pipes using slip nuts and washers, and tighten the connections securely. You may also want to use plumber's tape for an extra layer of protection against leaks. Finally, turn on the water supply and check for any leaks. If everything is functioning correctly, you have successfully installed a kitchen sink drain.7. Kitchen Sink Plumbing: How to Install a Kitchen Sink Drain


How to Install a Kitchen Sink Plumbing 4. How to Install a Kitchen Sink Strainer


Installing a kitchen sink strainer is an essential step in the overall process of installing a new kitchen sink. Here's how to install a kitchen sink strainer: The first step is to remove the old strainer, if there is one. Use a putty knife to scrape away any old plumber's putty around the strainer, then unscrew and remove it from the sink. Next, prepare the new strainer for installation by applying plumber's putty around the flange. Then, place it in the sink's drain hole and secure it with the mounting hardware provided in the installation kit. Finally, clean up any excess putty and test the strainer by running water and checking for any leaks. Once everything is in working order, you have successfully installed a kitchen sink strainer.8. How to Install a Kitchen Sink Strainer


How to Install a Kitchen Sink Plumbing

Installing a new kitchen sink is a great way to upgrade your kitchen's functionality and aesthetics. Here's how to install a kitchen sink in the context of the overall plumbing system: The first step is to choose the right sink for your space. Consider the size and layout of your kitchen before deciding on the type of sink to install. You may also want to choose a sink that complements your kitchen's design and style. Next, gather the necessary tools and materials for the installation process. These may include a wrench, pliers, putty knife, plumber's putty, and a sink installation kit. It's also important to shut off the water supply before beginning any work. Once you have your sink and tools ready, you can begin the installation process. This may involve installing the strainer, mounting clips or brackets, positioning the sink in place, and connecting the plumbing. Refer to the previous headings for detailed instructions on each of these steps. After completing the installation, make sure to clean up any debris or excess putty and test the sink for proper functionality. With these steps, you should now have a fully installed kitchen sink that adds both style and function to your kitchen space.9. Kitchen Sink Plumbing: How to Install a Kitchen Sink


How to Install a Kitchen Sink Drain 5. Kitchen Sink Plumbing: How to Install a Kitchen Sink Strainer

The kitchen sink strainer is a crucial component of your sink's plumbing system. It keeps food scraps and other debris from going down the drain and causing clogs. Here's how to install a kitchen sink strainer: First, you'll need to remove the old strainer, if there is one. Use a putty knife to scrape away any old plumber's putty around the strainer, then unscrew and remove it from the sink. Next, prepare the new strainer for installation by applying plumber's putty around the flange. Then, place it in the sink's drain hole and secure it with the mounting hardware provided in the installation kit. Finally, clean up any excess putty and test the strainer by running water and checking for any leaks. Once everything is in working order, you have successfully installed a kitchen sink strainer.10. How to Install a Kitchen Sink Strainer


How to Install a Kitchen Sink Drain
The Importance of a Well-Designed Kitchen Sink

The Heart of the Home
 When it comes to house design, the kitchen sink may not be the first thing that comes to mind. However, it is an essential element that can greatly impact the functionality and style of your kitchen. The kitchen sink is often referred to as the "heart of the home" because it is where many daily tasks are completed, from washing dishes to preparing meals. Therefore, it is crucial to have a kitchen sink that not only fits your needs but also enhances the overall design of your home.
A Multifunctional Workstation
 The kitchen sink is not just a place to wash dishes anymore. With advancements in technology and design, kitchen sinks now come with a variety of features and accessories, making them a multifunctional workstation.
Featured keywords
such as "stub out for kitchen sink" can provide a more efficient and organized space for food preparation, cleaning, and even storage. For example, a sink with built-in cutting boards and drying racks can save you valuable counter space and keep your kitchen clutter-free.
The kitchen sink is not just a place to wash dishes anymore. With advancements in technology and design, kitchen sinks now come with a variety of features and accessories, making them a multifunctional workstation.
Featured keywords
such as "stub out for kitchen sink" can provide a more efficient and organized space for food preparation, cleaning, and even storage. For example, a sink with built-in cutting boards and drying racks can save you valuable counter space and keep your kitchen clutter-free.
The Perfect Blend of Form and Function
 In addition to its practical uses, the kitchen sink also plays a significant role in the aesthetic of your home. It can be a statement piece that ties the entire kitchen design together, or it can blend seamlessly into the background.
Related main keywords
such as "kitchen sink design" and "kitchen sink style" are crucial considerations when choosing the perfect sink for your kitchen. From modern stainless steel designs to traditional farmhouse sinks, there are endless options to suit your personal taste and complement your overall house design.
In addition to its practical uses, the kitchen sink also plays a significant role in the aesthetic of your home. It can be a statement piece that ties the entire kitchen design together, or it can blend seamlessly into the background.
Related main keywords
such as "kitchen sink design" and "kitchen sink style" are crucial considerations when choosing the perfect sink for your kitchen. From modern stainless steel designs to traditional farmhouse sinks, there are endless options to suit your personal taste and complement your overall house design.
Conclusion
 In conclusion, the kitchen sink is a vital component of any well-designed home. It serves both practical and aesthetic purposes, making it an essential element to consider during the house design process. With a wide range of options available, you can find the perfect kitchen sink that not only fits your needs but also adds a touch of style to your home. So, don't underestimate the impact of a well-designed kitchen sink in creating a functional and beautiful space.