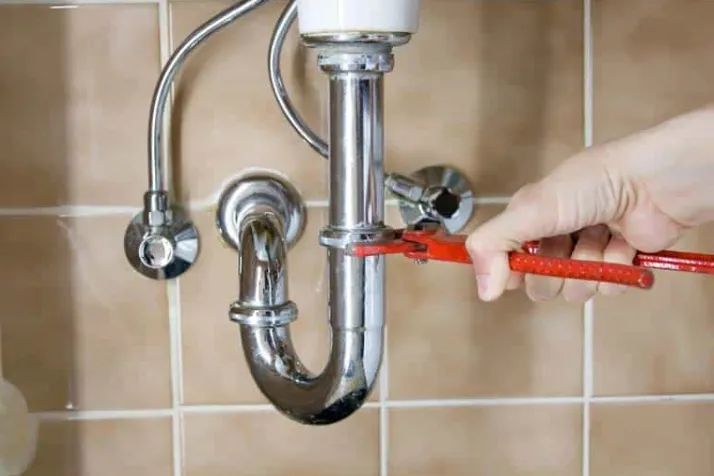
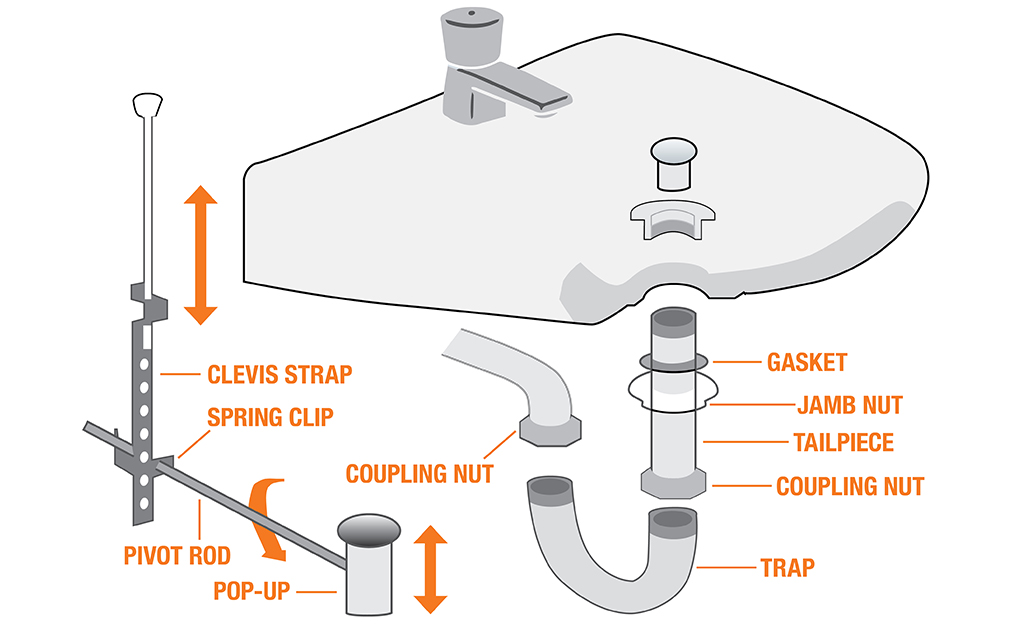
If you're looking to update your bathroom or simply need to replace a damaged sink, removing the old bathroom sink tailpiece is an essential step. The tailpiece is the pipe that connects the sink drain to the P-trap, and it can often become clogged with debris or develop leaks over time. Not to mention, removing the tailpiece can give you better access for cleaning and maintenance. Here's a step-by-step guide on how to remove a bathroom sink tailpiece.Removing Bathroom Sink Tailpiece: A Step-by-Step Guide
Before you begin, make sure you have all the necessary tools and materials. You'll need a pipe wrench, pliers, a bucket, and a new tailpiece if you're replacing it. It's also a good idea to have some towels or rags on hand to clean up any spills. Step 1: Turn off the water supply. Before you start working on the sink, turn off the water supply valves located under the sink. This will prevent any water from spilling out while you're working. Step 2: Disconnect the P-trap. Using your pliers, loosen the slip nuts that hold the P-trap in place. Place a bucket underneath to catch any water that may spill out, then remove the P-trap and set it aside. Step 3: Loosen the tailpiece. Next, use your pipe wrench to loosen the slip nut that connects the tailpiece to the sink drain. If the nut is stuck, you may need to use some WD-40 to help loosen it. Step 4: Remove the old tailpiece. Once the slip nut is loosened, you should be able to slide the old tailpiece out of the drain. If it's stuck, you can use your pliers to gently twist and pull it out. Step 5: Clean the area. Now that the old tailpiece is removed, take the opportunity to clean the area around the sink drain. You can use a rag or brush to remove any buildup or gunk that may have accumulated over time. Step 6: Install the new tailpiece. If you're replacing the old tailpiece, now is the time to install the new one. Simply slide it into the drain and use your pipe wrench to tighten the slip nut. Step 7: Reattach the P-trap. Once the new tailpiece is in place, reattach the P-trap by tightening the slip nuts with your pliers. Make sure everything is securely in place before moving on to the next step. Step 8: Turn the water back on. With everything connected, turn the water supply valves back on and check for any leaks. If everything looks good, you're all done!How to Remove a Bathroom Sink Tailpiece
Removing a bathroom sink tailpiece may seem like a daunting task, but it can easily be done as a DIY project. Not only will you save money by not hiring a professional, but you'll also gain valuable knowledge and skills for future plumbing projects. One of the most important things to remember when attempting a DIY project like this is to have the right tools on hand. Make sure to have a pipe wrench, pliers, and WD-40 if needed. It's also a good idea to have a helper to assist with holding pipes in place while you work. Follow the step-by-step guide above and take your time to ensure everything is done correctly. If you run into any issues, don't hesitate to consult online tutorials or ask for advice from a professional.DIY: Removing a Bathroom Sink Tailpiece
While removing a bathroom sink tailpiece may seem straightforward, there are a few tips and tricks that can make the process smoother and more effective. First, make sure to turn off the water supply before starting any work. This will prevent any accidents or water damage. It's also a good idea to have a bucket or towel on hand to catch any spills. Additionally, if the slip nuts are hard to loosen, try using some WD-40 to help loosen them. And if the tailpiece is stuck, use pliers to gently twist and pull it out. Just be careful not to apply too much force and damage the pipes. Lastly, if you're replacing the old tailpiece, make sure to clean the area around the sink drain before installing the new one. This will ensure a tight and secure fit.Removing a Bathroom Sink Tailpiece: Tips and Tricks
Removing a bathroom sink tailpiece may seem like an unnecessary step, but it's actually crucial for maintaining the overall health and functionality of your sink and plumbing system. Here's why: Firstly, the tailpiece connects the sink drain to the P-trap, which is responsible for trapping debris and preventing clogs. By removing the tailpiece, you can easily access the P-trap for cleaning and maintenance, ensuring it can do its job effectively. Secondly, the tailpiece can also develop leaks over time due to wear and tear or incorrect installation. By removing it, you can inspect and fix any leaks before they become a bigger problem. Lastly, removing the tailpiece can give you better access to the pipes and make it easier to detect and fix any issues that may be causing problems with your sink or plumbing system.The Importance of Removing a Bathroom Sink Tailpiece
While removing a bathroom sink tailpiece may seem simple enough, there are a few common mistakes to avoid to ensure the process goes smoothly and without any issues. One of the most common mistakes is not turning off the water supply before starting work. This can lead to accidental spills and even water damage. Always make sure to turn off the water supply valves before beginning any work on your sink. Another mistake is using too much force when loosening tight slip nuts or removing the tailpiece. This can damage the pipes and make the job more difficult. Instead, use the right tools and be gentle when working with the pipes. Lastly, not properly cleaning the area around the sink drain before installing the new tailpiece can lead to a poor fit and potential leaks. Take the time to clean the area before installing the new tailpiece for the best results.Removing a Bathroom Sink Tailpiece: Common Mistakes to Avoid
As mentioned earlier, having the right tools on hand is essential for successfully removing a bathroom sink tailpiece. Here's a quick list of the tools you'll need: - Pipe wrench - Pliers - Bucket or towels - WD-40 (if needed) Having these tools readily available will make the process much smoother and easier to manage.Tools You'll Need for Removing a Bathroom Sink Tailpiece
If you're new to DIY plumbing projects, removing a bathroom sink tailpiece can be a great place to start. It's a relatively simple task that can give you valuable experience and knowledge for future projects. Follow the step-by-step guide above and take your time to ensure everything is done correctly. Don't hesitate to consult online resources or ask for advice if needed. With a little patience and the right tools, you'll have the old tailpiece removed in no time!Removing a Bathroom Sink Tailpiece: A Beginner's Guide
For those who prefer visual aids, here's a step-by-step tutorial for removing a bathroom sink tailpiece: Step 1: Turn off the water supply Step 2: Disconnect the P-trap Step 3: Loosen the tailpiece Step 4: Remove the old tailpiece Step 5: Clean the area Step 6: Install the new tailpiece Step 7: Reattach the P-trap Step 8: Turn the water back on Follow these steps and refer to the previous sections for more detailed instructions. And remember, take your time and don't be afraid to ask for help if needed.Step-by-Step Tutorial for Removing a Bathroom Sink Tailpiece
Now that you know the steps and tips for removing a bathroom sink tailpiece, here are a few additional things you should know: - Always turn off the water supply before starting work. - Use the right tools and be gentle when working with the pipes. - Clean the area around the sink drain before installing the new tailpiece. - If you run into any issues, don't hesitate to ask for help or consult online resources. By following these guidelines and being patient, you'll have the old bathroom sink tailpiece removed and your sink ready for an update or repair in no time.Removing a Bathroom Sink Tailpiece: What You Need to Know
Why You Should Consider Removing Your Bathroom Sink Tailpiece
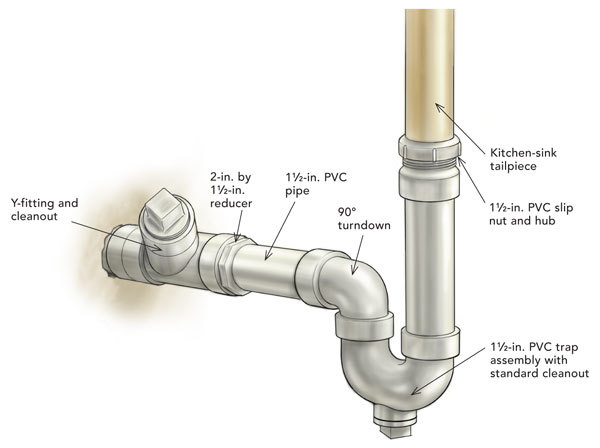
The Importance of Proper Drainage in Your Bathroom
u0026$50_article$u0026fmtu003dwebp) When it comes to designing your dream bathroom, there are many factors to consider. From the color scheme to the fixtures and hardware, every detail plays a role in creating a functional and aesthetically pleasing space. However, one aspect that is often overlooked is the proper drainage of your sink. This is where removing your bathroom sink tailpiece comes into play.
Proper drainage is crucial in any bathroom to prevent clogs and potential water damage.
The tailpiece, also known as the sink drain pipe, is a small but essential component that connects the sink to the P-trap and ultimately the main drain line. While it may seem insignificant, a damaged or clogged tailpiece can cause major issues in your bathroom.
When it comes to designing your dream bathroom, there are many factors to consider. From the color scheme to the fixtures and hardware, every detail plays a role in creating a functional and aesthetically pleasing space. However, one aspect that is often overlooked is the proper drainage of your sink. This is where removing your bathroom sink tailpiece comes into play.
Proper drainage is crucial in any bathroom to prevent clogs and potential water damage.
The tailpiece, also known as the sink drain pipe, is a small but essential component that connects the sink to the P-trap and ultimately the main drain line. While it may seem insignificant, a damaged or clogged tailpiece can cause major issues in your bathroom.
The Benefits of Removing Your Bathroom Sink Tailpiece
 In some cases, removing the tailpiece altogether can improve the functionality and appearance of your bathroom sink.
Here are some of the main benefits of removing your bathroom sink tailpiece:
- Better Drainage:
By removing the tailpiece, you are creating a straight path for water to flow directly into the P-trap and down the drain. This allows for better drainage and reduces the risk of clogs.
- Increased Storage Space:
A tailpiece can take up valuable space under the sink, making it difficult to store items such as cleaning supplies or extra towels. Removing it can free up this space and make your bathroom more organized.
- Enhanced Aesthetics:
Depending on the style of your sink, a tailpiece can be visible and disrupt the clean lines of your bathroom design. Removing it can create a sleeker, more minimalist look.
How to Remove Your Bathroom Sink Tailpiece
 If you're convinced that removing your bathroom sink tailpiece is the right choice for you, here's how to do it:
Step 1: Turn off the Water Supply:
Before starting any plumbing project, it's essential to turn off the water supply to avoid any accidents.
Step 2: Disconnect the Tailpiece:
Using pliers, loosen the slip nut connecting the tailpiece to the P-trap. Then, unscrew the tailpiece from the sink drain.
Step 3: Remove the Tailpiece:
Carefully lift the tailpiece out of the sink and set it aside.
Step 4: Install a New Drain Stopper:
If you want to replace the tailpiece with a new drain stopper, now is the time to do so. Simply follow the manufacturer's instructions to install the new stopper.
Step 5: Reconnect the P-Trap:
Once the tailpiece is removed, reconnect the P-trap to the sink drain and tighten the slip nut.
Conclusion
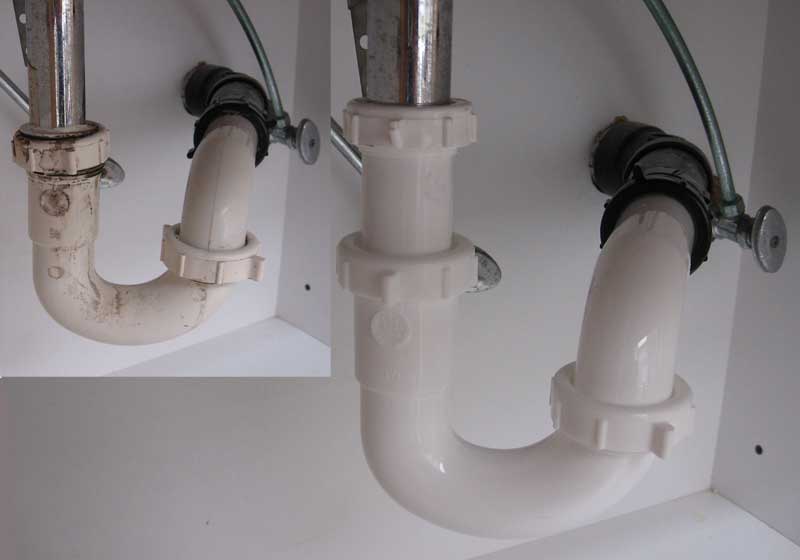
 Removing your bathroom sink tailpiece may seem like a small change, but it can have a significant impact on the functionality and aesthetics of your bathroom. By improving drainage, creating more storage space, and enhancing the overall look of your sink, this simple DIY project can elevate your bathroom design. So if you're looking to upgrade your bathroom, don't overlook the importance of proper drainage and consider removing your sink tailpiece.











/Bathroomsink-GettyImages-73452873-595fb1ce5f9b583f1809c7ad.jpg)


