How to Install a Kitchen Sink Air Gap
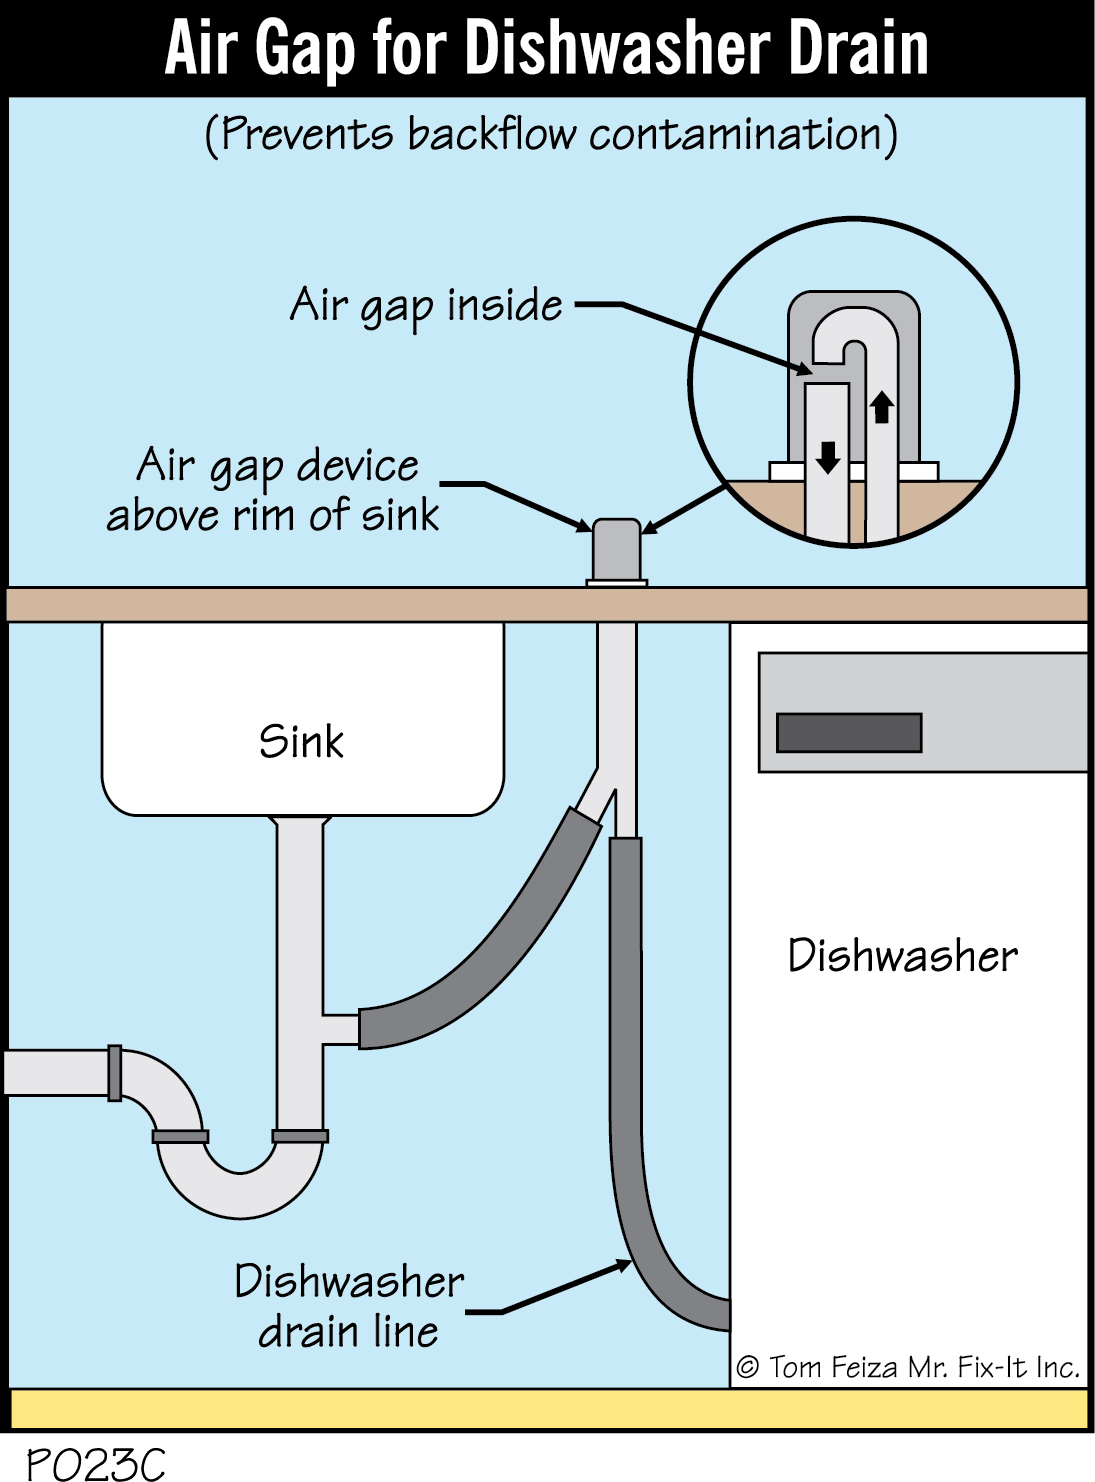
Are you in the process of installing a new kitchen sink or replacing an old one? One important feature that should not be overlooked is the kitchen sink air gap. An air gap is a small device that helps prevent dirty water from backing up into your sink and contaminating your clean water supply. It is a crucial component of your kitchen plumbing system and is required by most building codes. In this guide, we will walk you through the steps of installing a kitchen sink air gap to ensure that your plumbing system is up to code and functioning properly.
How to Install an Air Gap in a Kitchen Sink
The first step in installing a kitchen sink air gap is to gather all the necessary tools and materials. You will need an air gap kit, a drill, a screwdriver, plumber's tape, and a wrench. Once you have everything you need, follow these steps:
Step-by-Step Guide for Installing a Kitchen Sink Air Gap
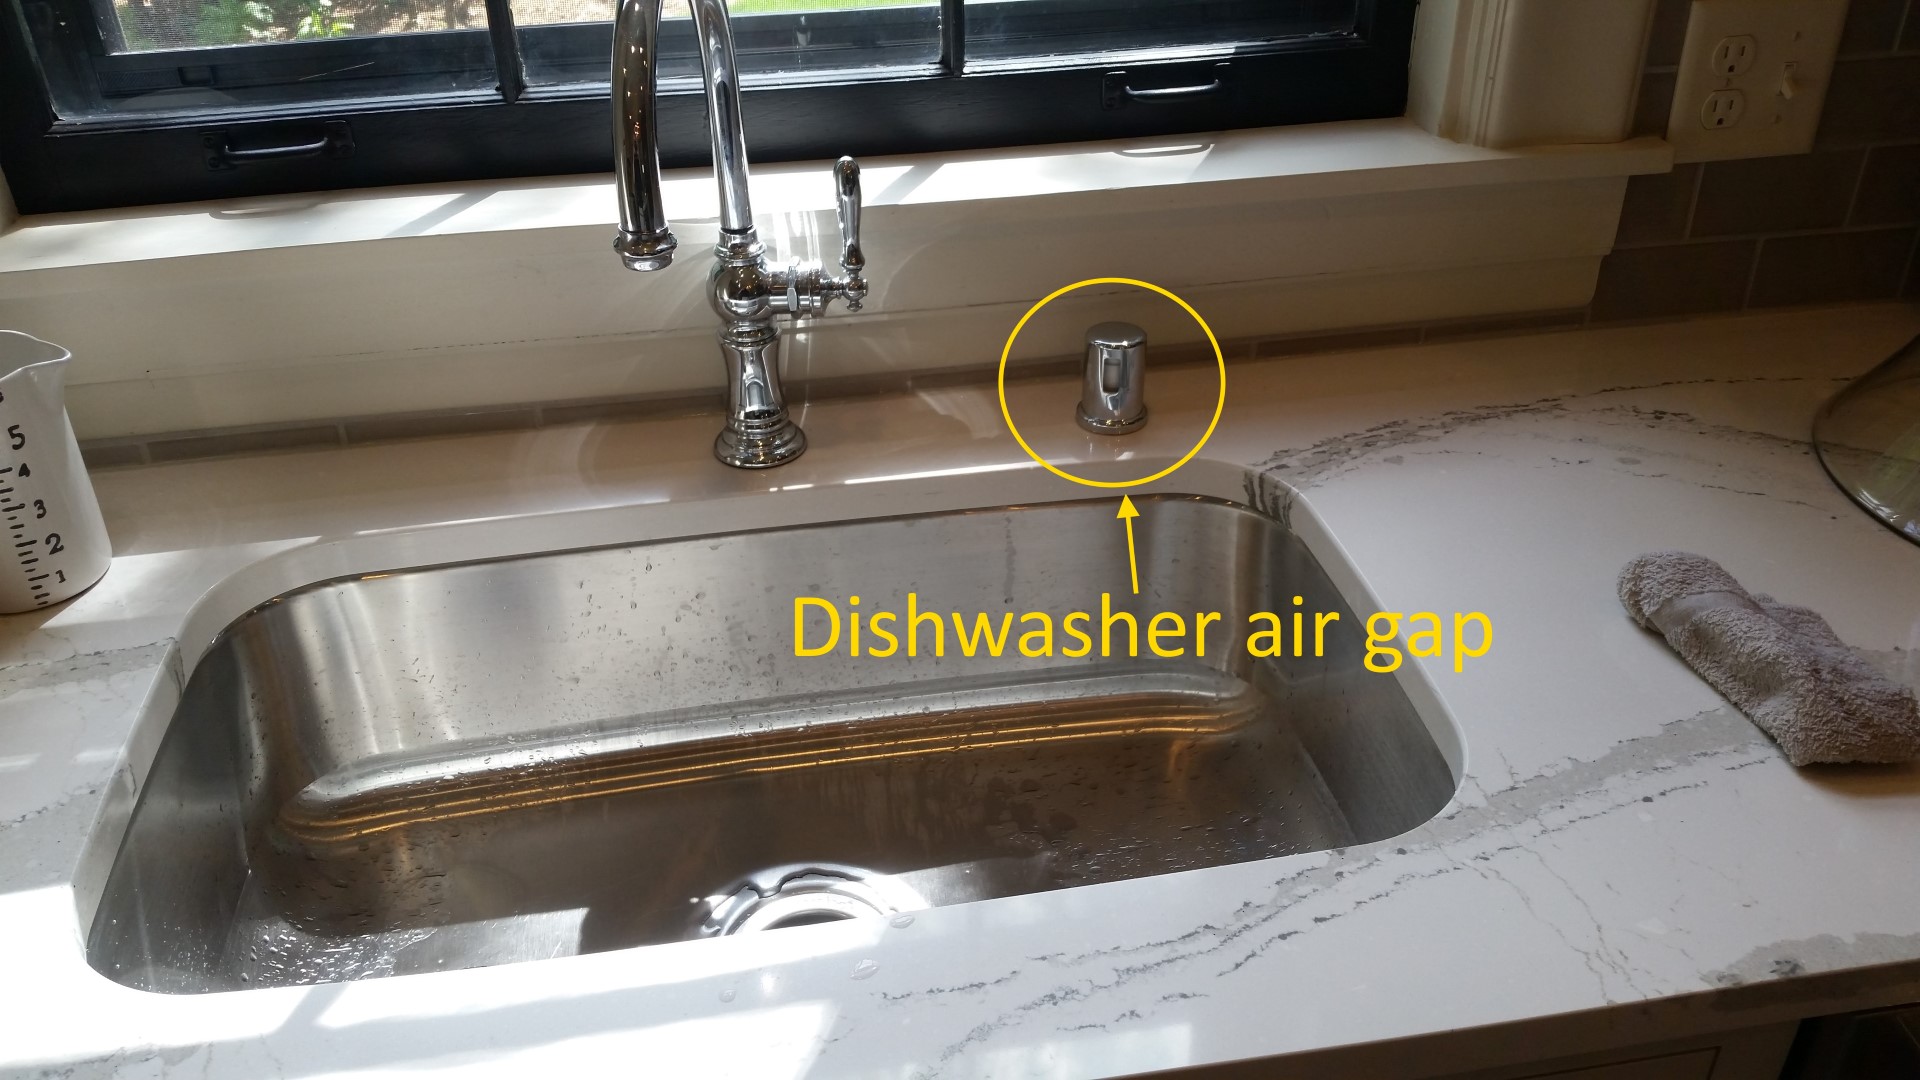
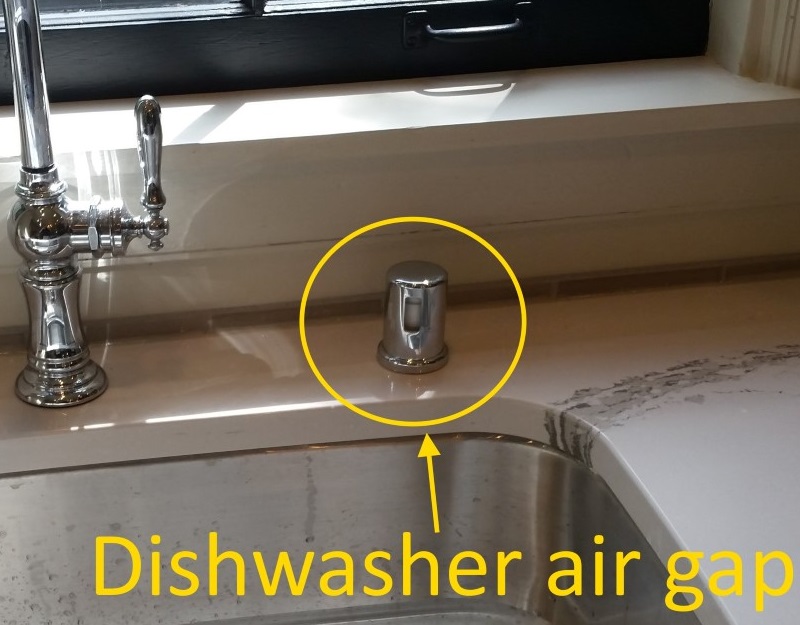
Step 1: Start by locating the hole on your sink where the air gap will be installed. This hole is usually located next to the faucet or on the sink rim. If your sink does not have a pre-drilled hole, you will need to drill one using a drill and the appropriate size drill bit.
Step 2: Next, insert the body of the air gap into the hole on the sink and secure it with the mounting nut provided in the kit. Use a wrench to tighten the nut and ensure that the air gap is securely attached to the sink.
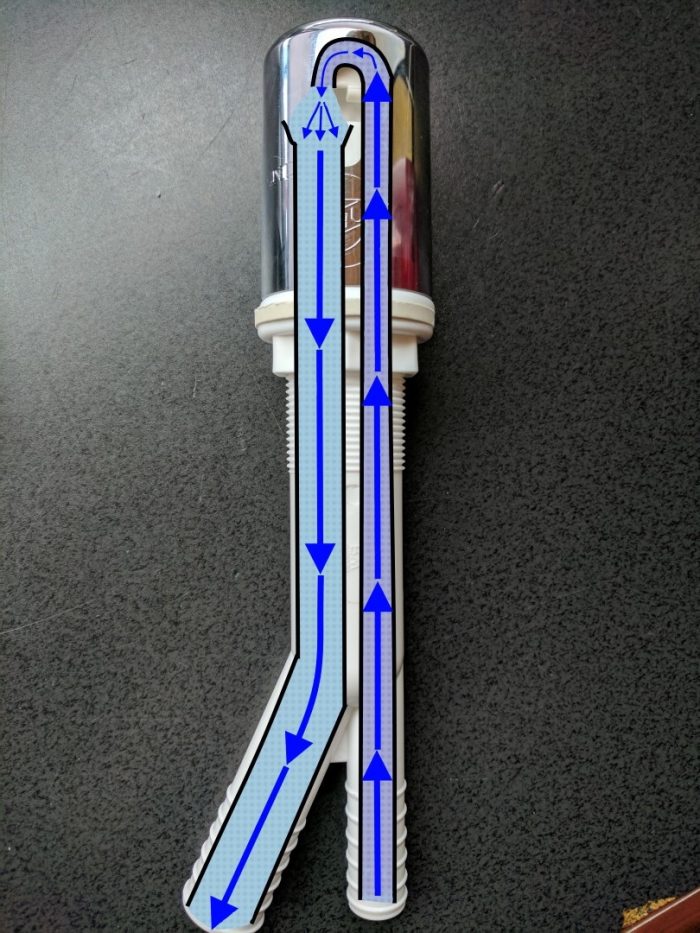
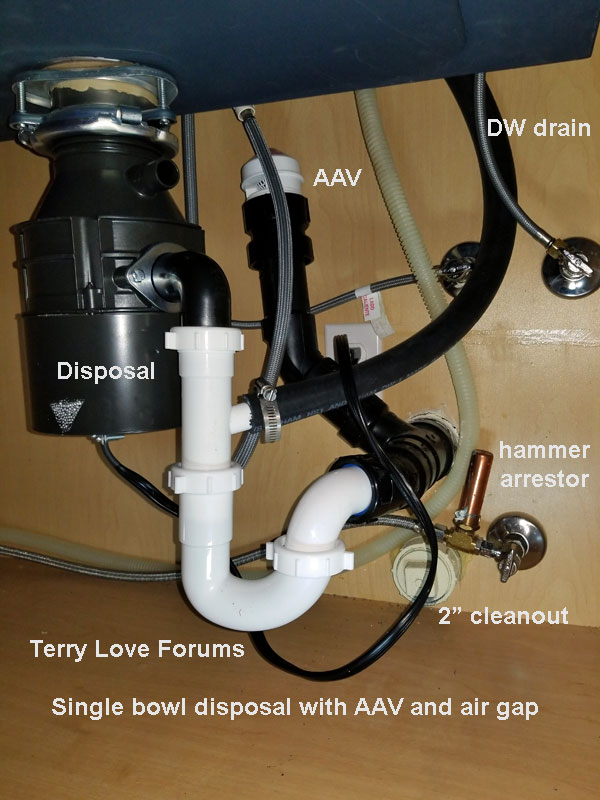
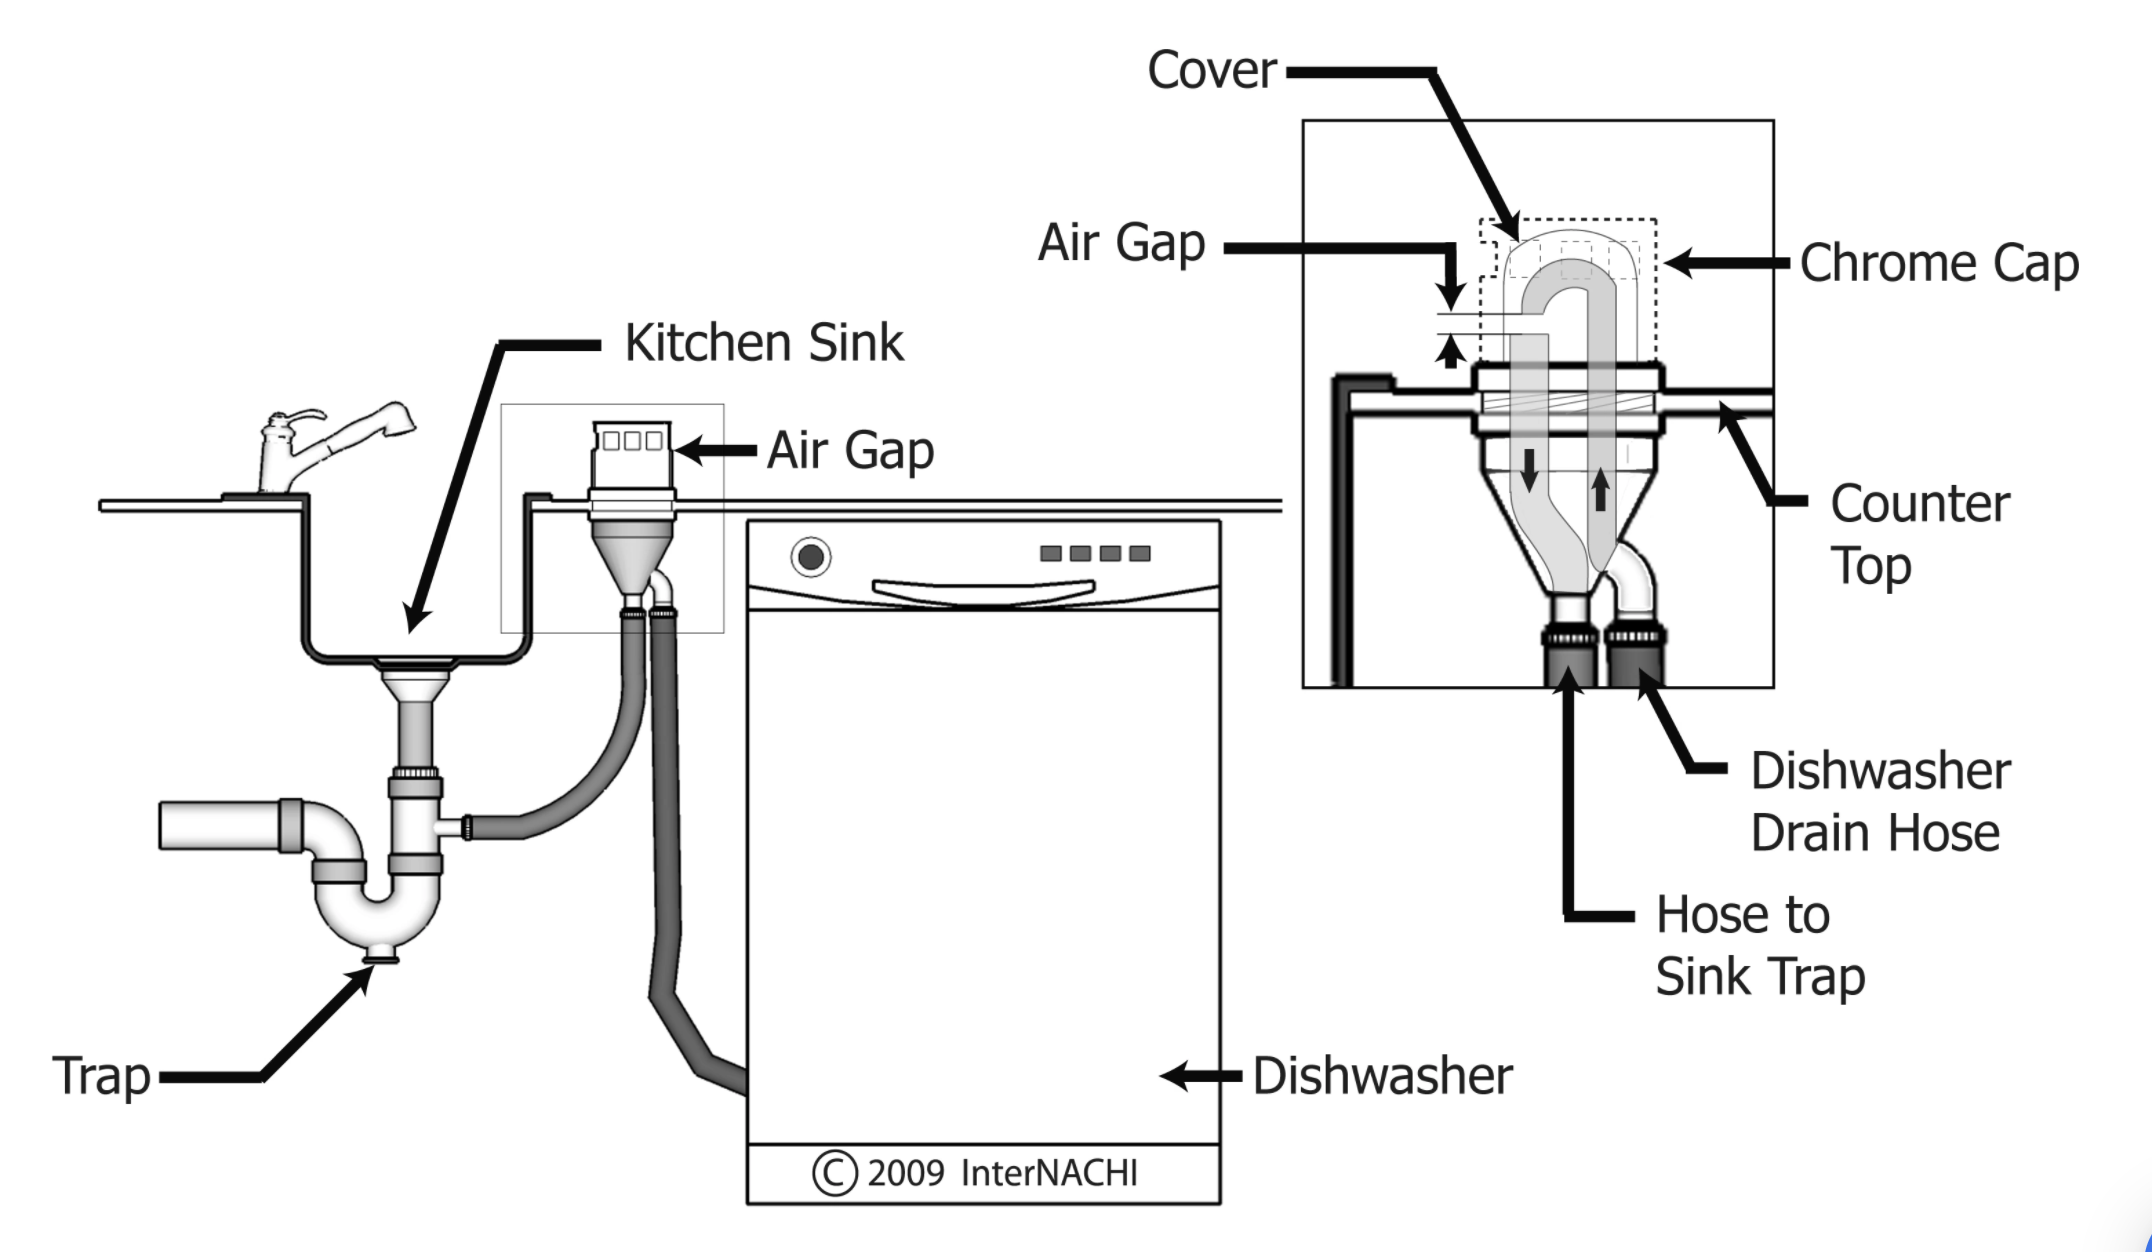
Step 3: Now, attach the plastic hoses to the body of the air gap. One hose should be connected to the dishwasher and the other to the garbage disposal or drain pipe. Use plumber's tape to secure the connections and prevent any leaks.
Step 4: Once the hoses are securely attached, you can now connect the air gap to the sink drain. Use a screwdriver to loosen the clamp on the drain pipe and insert the hose from the air gap. Then, tighten the clamp to secure the connection.
Step 5: Finally, check all connections and tighten any loose fittings. Turn on the water and run the dishwasher to ensure that the air gap is functioning properly and there are no leaks.
Kitchen Sink Air Gap Installation: A DIY Guide
If you are a handy homeowner looking to save some money on plumbing costs, installing a kitchen sink air gap is a relatively easy DIY project. However, if you are not confident in your plumbing skills, it is always best to hire a professional to ensure that the installation is done correctly and to avoid any potential issues in the future.
Installing an Air Gap for Your Kitchen Sink: Tips and Tricks
Here are some tips and tricks to keep in mind when installing a kitchen sink air gap:
Tip 1: Make sure to follow the instructions provided in the air gap kit for the specific model you are installing. Some may have slight variations in the installation process.
Tip 2: If your sink does not have a pre-drilled hole for the air gap, be sure to measure and mark the exact location before drilling to ensure a proper fit.
Tip 3: Use plumber's tape on all connections to prevent leaks and ensure a tight fit.
Tip 4: If you run into any issues during the installation process, do not hesitate to seek assistance from a professional plumber.
What You Need to Know About Kitchen Sink Air Gap Installation
When it comes to installing a kitchen sink air gap, there are a few important things to keep in mind:
Important Note 1: The air gap is not a substitute for a proper dishwasher drain line. It is designed to prevent backflow, not to drain the dishwasher.
Important Note 2: To maintain the proper function of the air gap, it is important to clean it regularly. Remove any debris or buildup from the air gap to prevent clogs and potential issues.
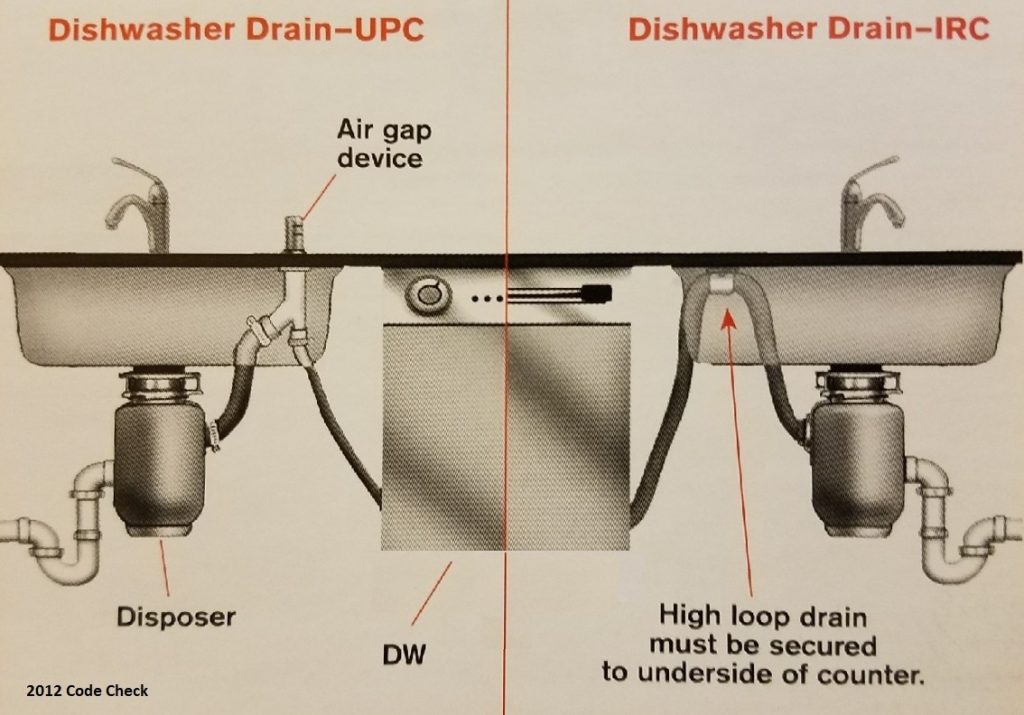
Important Note 3: In some areas, it is required by law to have an air gap installed for your kitchen sink. Be sure to check your local building codes to ensure that your plumbing is up to par.
Easy Steps for Installing a Kitchen Sink Air Gap
To summarize, here are the steps for installing a kitchen sink air gap in an easy-to-follow format:
Step 1: Gather all necessary tools and materials.
Step 2: Insert the body of the air gap into the pre-drilled hole on the sink.
Step 3: Attach the plastic hoses from the dishwasher and garbage disposal to the air gap.
Step 4: Connect the air gap to the sink drain.
Step 5: Check all connections and test for leaks.
DIY Kitchen Sink Air Gap Installation: A Comprehensive Guide
If you are planning on installing a kitchen sink air gap yourself, be sure to follow all the steps outlined in this guide and take note of the tips and important notes mentioned. With the proper tools and materials, this is a relatively simple and straightforward project, but it is always best to err on the side of caution and seek professional help if needed.
How to Properly Install an Air Gap for Your Kitchen Sink
Proper installation of a kitchen sink air gap is crucial for the health and safety of your household. By following the steps and tips provided in this guide, you can ensure that your air gap is installed correctly and functioning properly to prevent any potential issues with your plumbing system.
Kitchen Sink Air Gap Installation: Common Mistakes to Avoid
Here are some common mistakes to avoid when installing a kitchen sink air gap:
Mistake 1: Not following the manufacturer's instructions or skipping steps in the installation process.
Mistake 2: Using the wrong size or type of drill bit when drilling the hole for the air gap.
Mistake 3: Not properly securing the connections with plumber's tape, leading to leaks and potential damage to your plumbing system.
Mistake 4: Attempting to install the air gap without the proper tools or plumbing knowledge.
By avoiding these common mistakes, you can ensure a smooth and successful installation of your kitchen sink air gap.
The Importance of Proper Kitchen Sink Air Gap Installation

Ensuring the Safety and Cleanliness of Your Home
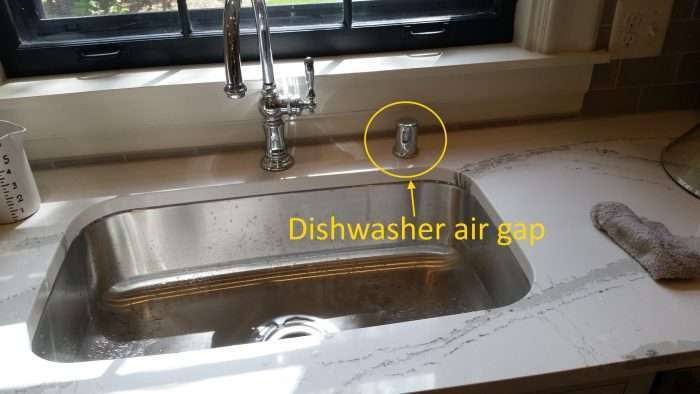 When designing a new kitchen or renovating an existing one, there are many important elements to consider, including the
kitchen sink air gap installation
. This often overlooked aspect plays a crucial role in the safety and cleanliness of your home, making it an essential part of any house design.
What is a Kitchen Sink Air Gap?
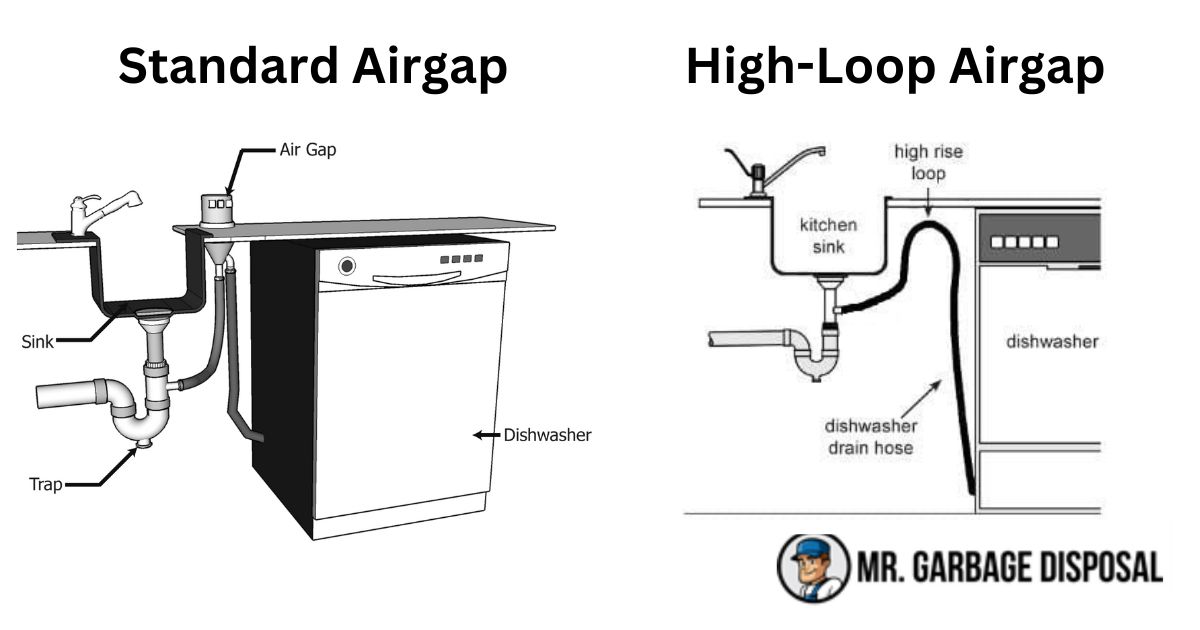
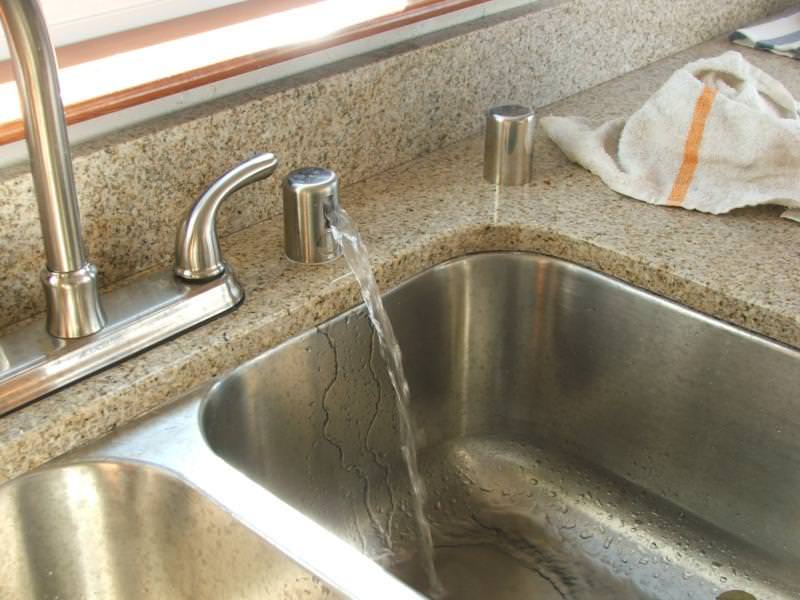
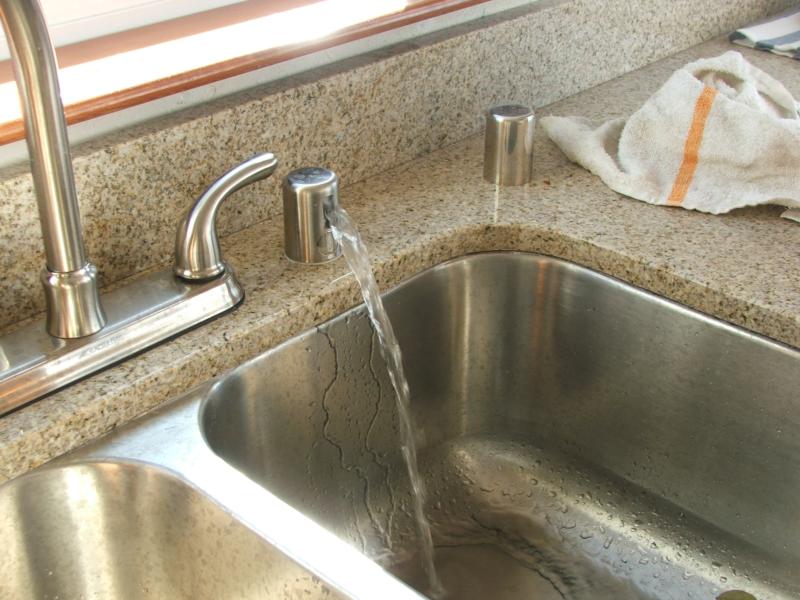
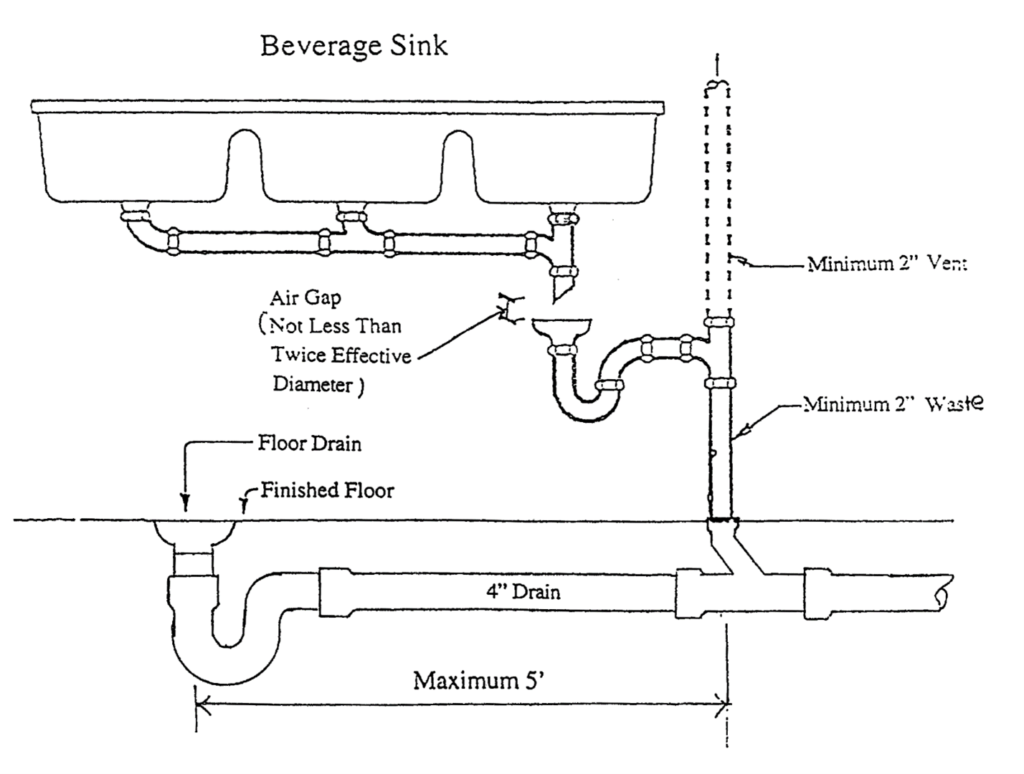
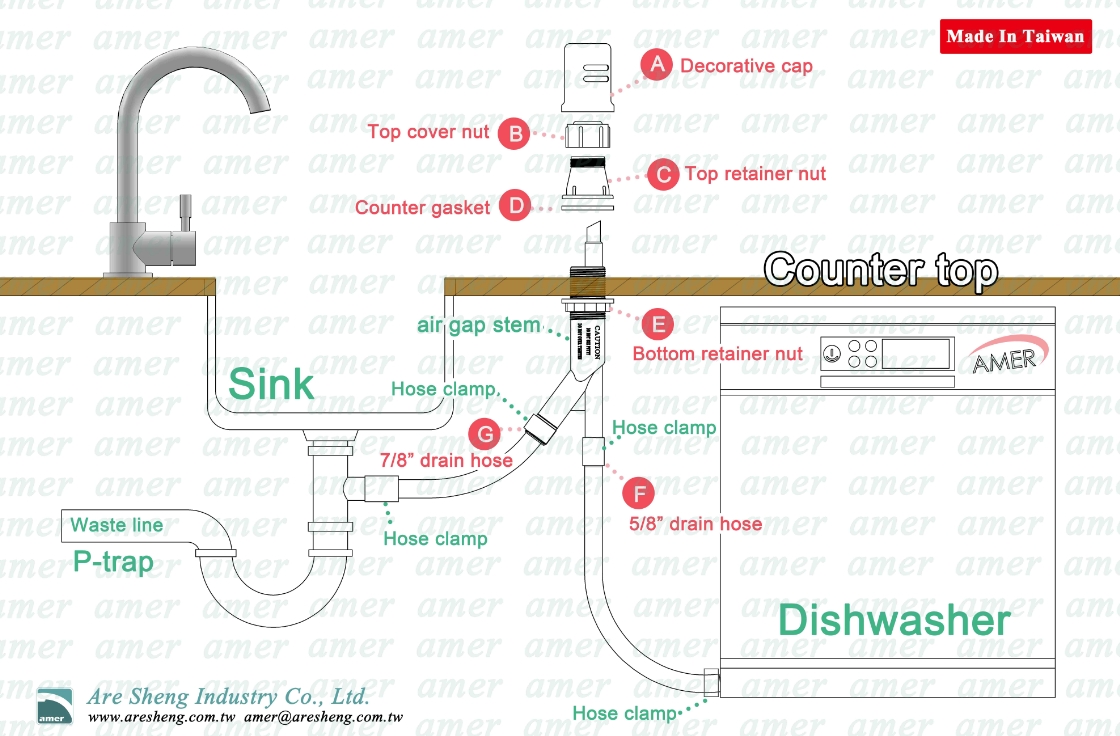 A kitchen sink air gap is a device that is installed above the sink and connects to the dishwasher drain line. Its purpose is to prevent contaminated water from flowing back into the dishwasher and ultimately into your drinking water. This is particularly important for homes that are connected to a municipal water supply, as it helps to prevent the spread of harmful bacteria and contaminants.
The Benefits of Proper Installation
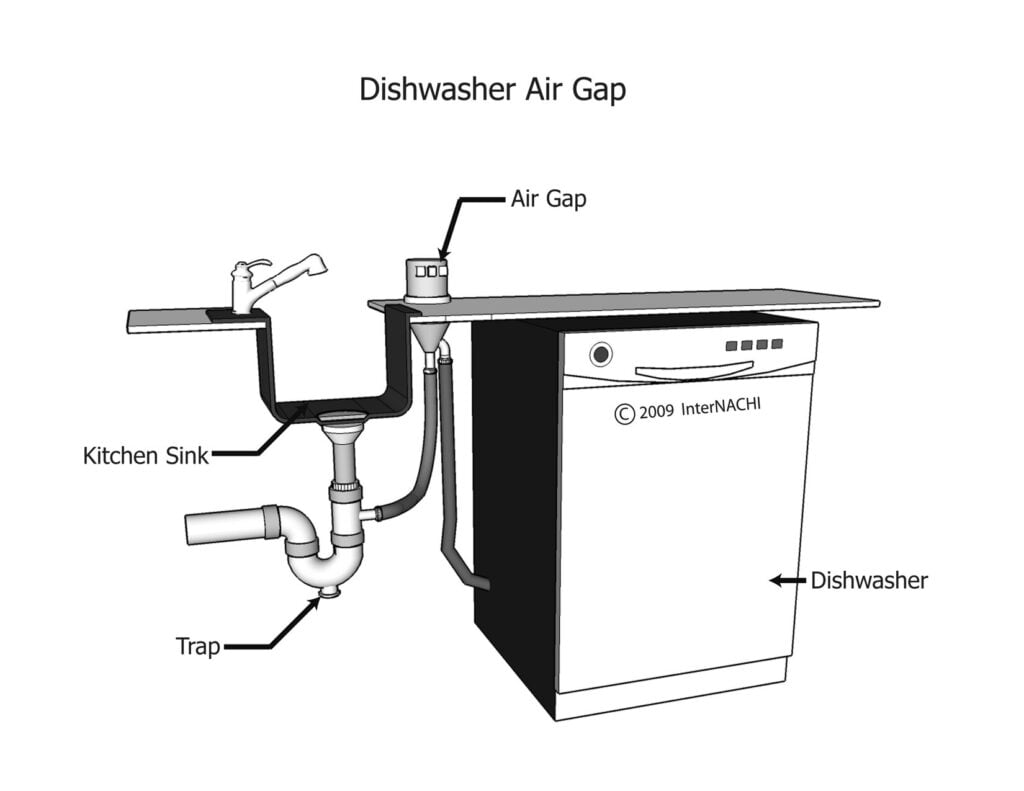 Proper installation of a kitchen sink air gap has several benefits. First and foremost, it ensures the safety of your household by preventing contamination of your drinking water. Additionally, it helps to keep your kitchen clean by preventing any potential backups or clogs in the dishwasher drain line. This can save you time and money on costly repairs and replacements.
How to Properly Install a Kitchen Sink Air Gap
 Installing a kitchen sink air gap is a relatively simple process that can be done by a professional plumber or as a DIY project. The air gap should be installed at least 1 inch above the sink and should be connected to the dishwasher drain line. It is important to regularly clean and maintain the air gap to ensure it is functioning properly.
Final Thoughts
 In conclusion, proper kitchen sink air gap installation is an important aspect of any house design. Not only does it ensure the safety and cleanliness of your home, but it also helps to prevent any potential plumbing issues. Whether you are designing a new kitchen or renovating an existing one, make sure to prioritize the installation of a kitchen sink air gap for the well-being of your household.













:no_upscale()/cdn.vox-cdn.com/uploads/chorus_asset/file/19495086/drain_0.jpg)

