Are you tired of dealing with a slow or clogged bathroom sink drain? Perhaps it's time for a DIY installation of a new drain. Not only will this save you money on professional installation costs, but it will also give you a sense of accomplishment and satisfaction. Follow these simple steps to successfully install a new bathroom sink drain.DIY Bathroom Sink Drain Installation: A Step-by-Step Guide


DIY Bathroom Sink Drain Installation: A Step-by-Step Guide


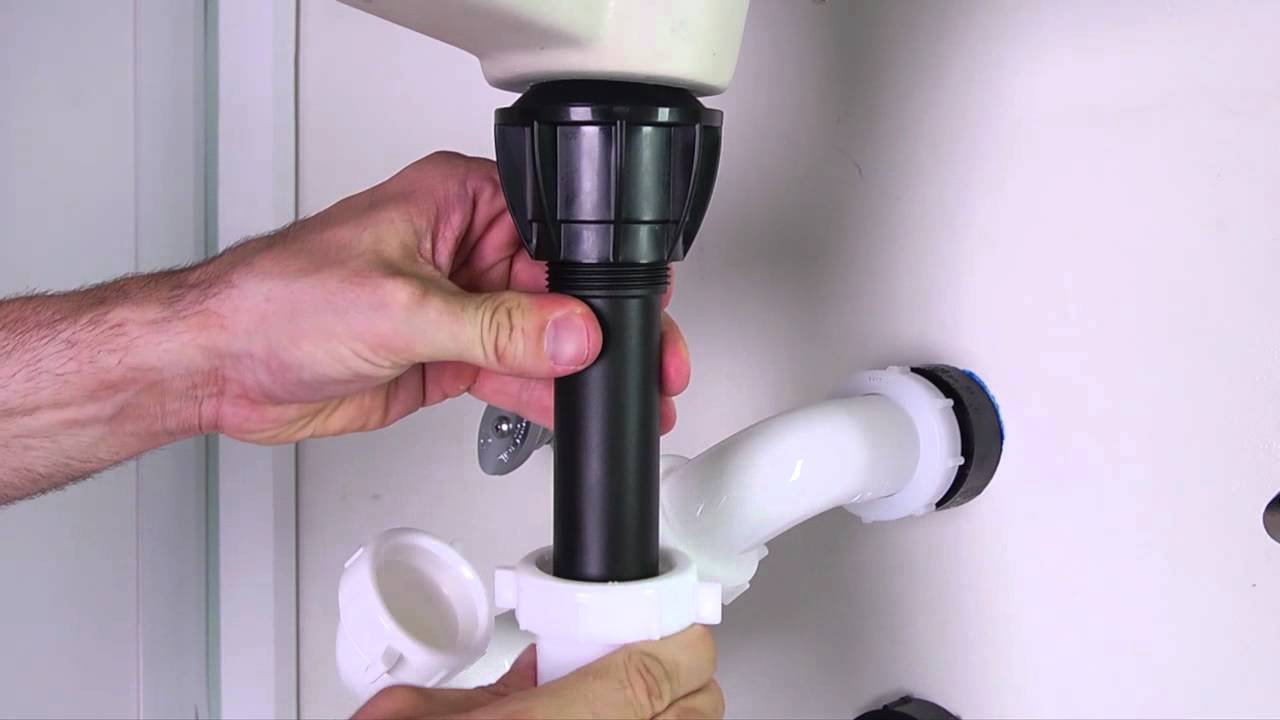
Before starting the installation process, gather all necessary tools and materials. This includes a new drain assembly, plumber's putty, a basin wrench, and a screwdriver. Make sure to turn off the water supply to the sink and clear out any items from under the sink. Next, remove the old drain assembly by loosening the slip nuts connecting it to the sink and the trap. Once removed, use a putty knife to scrape off any remaining plumber's putty or old caulk from the sink and drain hole. This will ensure a smooth surface for the new drain to be installed.How to Install a Bathroom Sink Drain


How to Install a Bathroom Sink Drain


/bathroom-sink-drain-installation-2718843-03-6fee5b9d9f7d475abfe06a95ddb1f695.jpg)

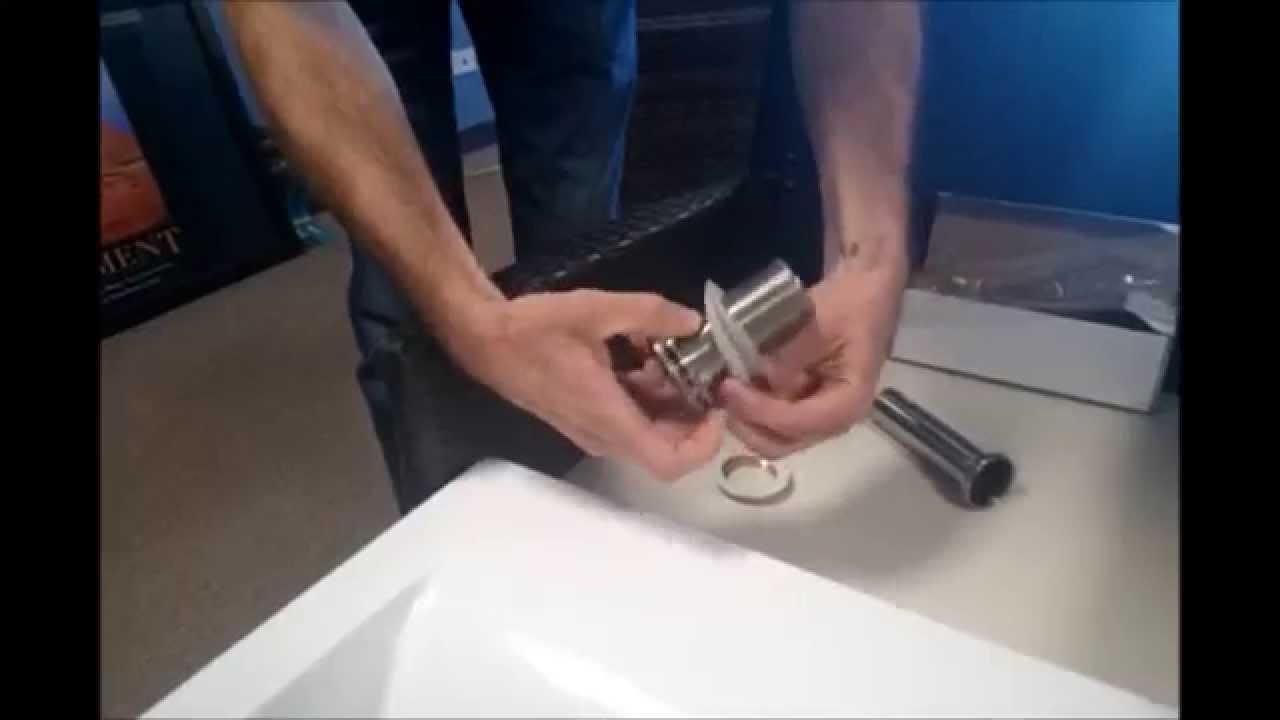
If you are replacing an old drain with a new one, make sure to match the new drain with the old one in terms of size and type. It's also a good idea to take a photo of the old drain assembly before removing it to have a reference for the new installation. Once you have the new drain assembly, apply plumber's putty to the underside of the flange and insert it into the drain hole. Press down firmly to create a seal. Then, insert the rubber gasket and slip nut onto the drain tailpiece and tighten it with a basin wrench.DIY Bathroom Sink Drain Replacement


DIY Bathroom Sink Drain Replacement


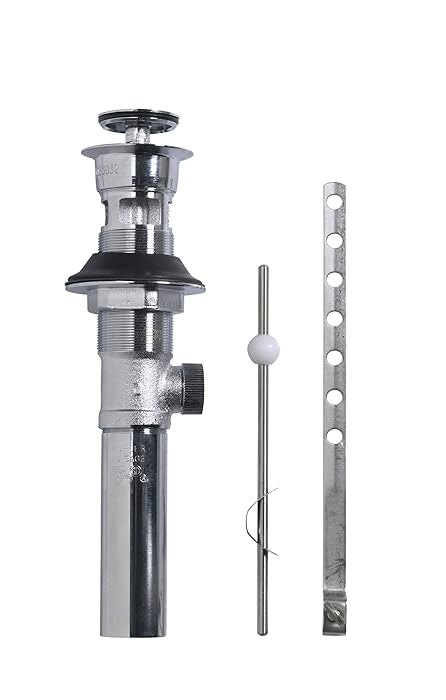
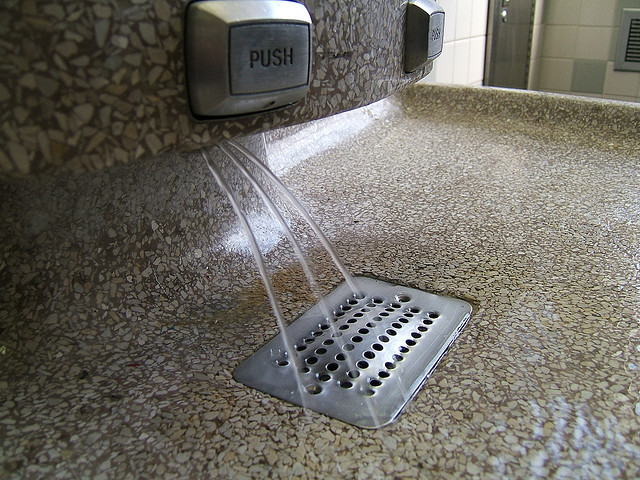
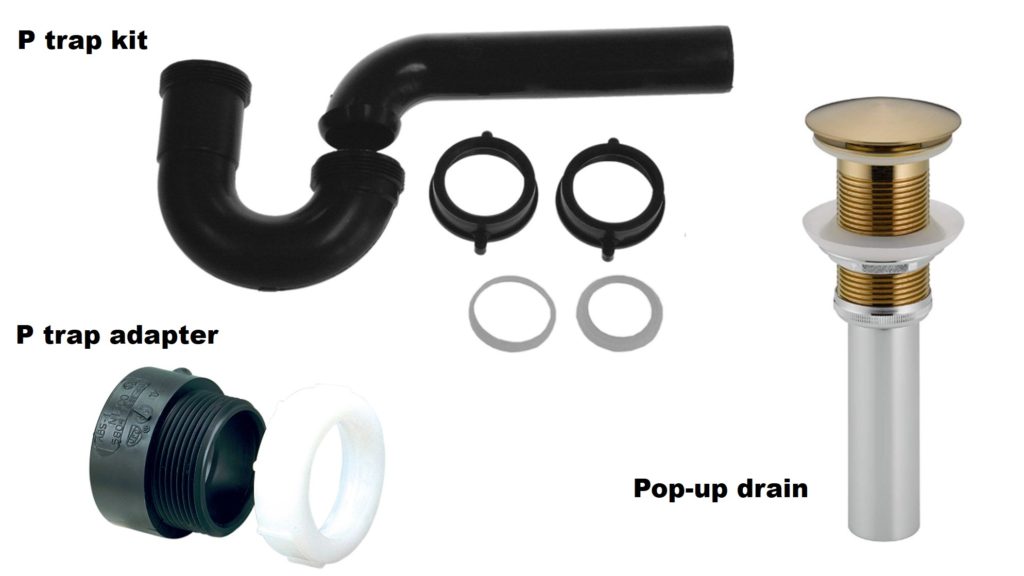
If your sink has a pop-up drain, you will need to install the lift rod and clevis. First, attach the lift rod to the back of the faucet and insert it into the hole in the clevis. Then, connect the clevis to the pop-up drain by inserting it into the hole and securing it with the provided clip or screw. Finally, connect the pivot rod to the clevis and adjust the length as needed to ensure proper operation of the pop-up drain. Test it by pulling up on the lift rod to open the drain and pushing it down to close it.Installing a Pop-Up Drain in a Bathroom Sink


Installing a Pop-Up Drain in a Bathroom Sink


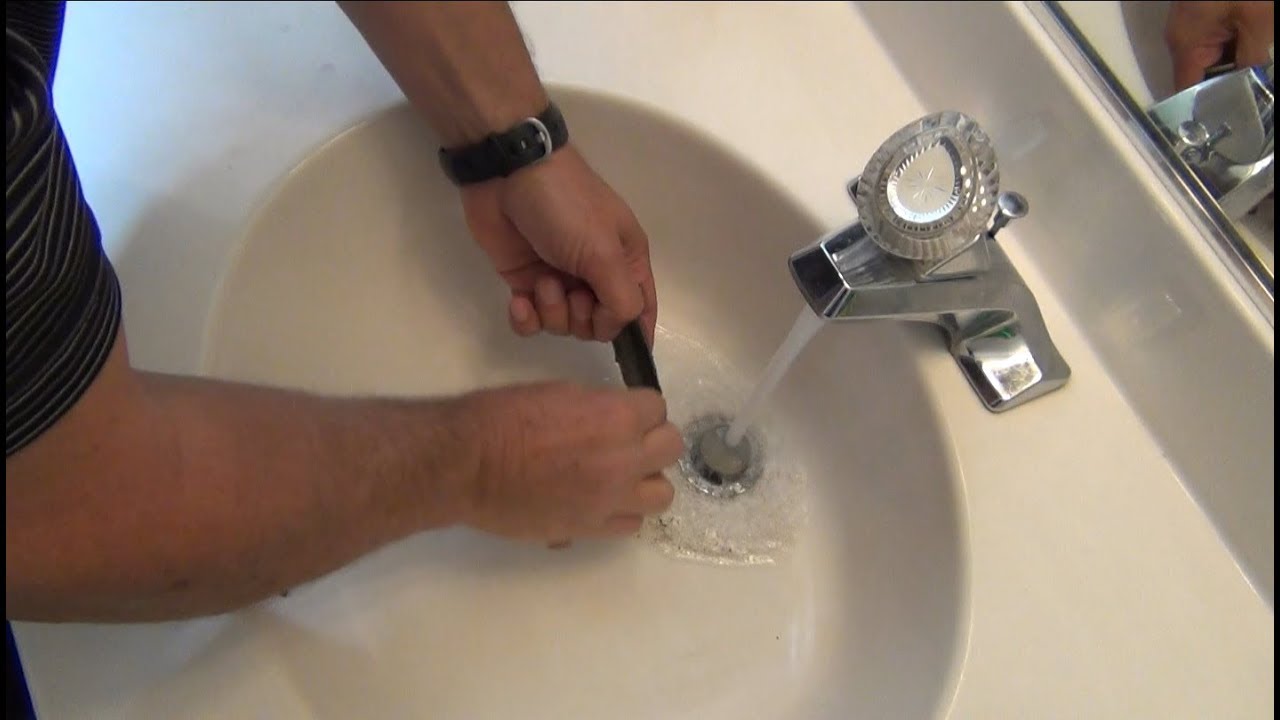
If you are not replacing the entire drain assembly but need to repair a leak or clog, follow similar steps as mentioned above. However, instead of replacing the entire assembly, you can simply replace the damaged parts, such as the rubber gasket or the slip nuts. If there is a clog in the drain, try using a drain snake or a plunger to clear it out. You can also use a mixture of baking soda and vinegar to dissolve any buildup in the pipes.DIY Bathroom Sink Drain Repair
DIY Bathroom Sink Drain Repair


With the right tools and materials, installing a new bathroom sink drain can be a straightforward and easy process. Just make sure to take your time and follow the steps carefully to ensure a proper and secure installation. If you are unsure about any of the steps or run into any issues, don't hesitate to seek professional help. It's better to have the drain installed correctly the first time than to have to deal with costly repairs later.Easy DIY Bathroom Sink Drain Installation


Easy DIY Bathroom Sink Drain Installation


/bathroom-sink-drain-installation-2718843-01-4955fe1f576b447a91abe51c126d220b.jpg)

When installing a new bathroom sink drain, there are a few tips and tricks that can make the process even easier. For example, applying a small amount of petroleum jelly to the rubber gasket can help create a better seal. Also, using Teflon tape on the threads of the slip nuts can prevent leaks. If you are having trouble reaching certain areas under the sink, consider using a flashlight or a mirror to help guide you. And remember to always turn off the water supply before starting any plumbing work.DIY Bathroom Sink Drain Installation: Tips and Tricks


DIY Bathroom Sink Drain Installation: Tips and Tricks


The drain pipe connects the sink drain to the main plumbing line. To install it, first measure and cut the pipe to the correct length, leaving room for the necessary fittings. Next, insert the pipe into the drain tailpiece and secure it with slip nuts. Then, attach the other end of the pipe to the main plumbing line with a slip nut and a coupling. Make sure all connections are tight and secure to prevent leaks. Finally, turn on the water supply and test the drain for any leaks.How to Install a Bathroom Sink Drain Pipe


How to Install a Bathroom Sink Drain Pipe

While installing a bathroom sink drain may seem like a simple task, there are a few common mistakes that can lead to issues down the line. One of the most common mistakes is not creating a proper seal with plumber's putty or forgetting to use Teflon tape on the threads of the slip nuts. Another mistake is not properly aligning the drain assembly, which can result in leaks. It's important to take your time and ensure all parts are aligned correctly before tightening any fittings.DIY Bathroom Sink Drain Installation: Common Mistakes to Avoid


DIY Bathroom Sink Drain Installation: Common Mistakes to Avoid


To summarize, here is a step-by-step guide to installing a bathroom sink drain:Step-by-Step Guide to Installing a Bathroom Sink Drain


Step-by-Step Guide to Installing a Bathroom Sink Drain


:max_bytes(150000):strip_icc()/bathroom-sink-drain-installation-2718843-02-61e5ecbee1e949be8d8f45ac4f5a6797.jpg)
The Importance of Proper DIY Bathroom Sink Drain Installation

Why It Matters
 When it comes to designing and renovating your home, the bathroom is often one of the most overlooked areas. However, a well-designed and functional bathroom can greatly enhance the overall value and appeal of your house. One important aspect of a bathroom that is often neglected is the sink drain installation. Properly installing the sink drain not only ensures efficient and proper functioning of the sink, but it also helps prevent potential issues such as clogs and leaks. In this article, we will guide you through the process of
DIY bathroom sink drain installation
and explain why it is crucial for any bathroom design.
When it comes to designing and renovating your home, the bathroom is often one of the most overlooked areas. However, a well-designed and functional bathroom can greatly enhance the overall value and appeal of your house. One important aspect of a bathroom that is often neglected is the sink drain installation. Properly installing the sink drain not only ensures efficient and proper functioning of the sink, but it also helps prevent potential issues such as clogs and leaks. In this article, we will guide you through the process of
DIY bathroom sink drain installation
and explain why it is crucial for any bathroom design.
The Benefits of DIY Bathroom Sink Drain Installation
 Many homeowners may be tempted to hire a professional plumber for their sink drain installation, but opting for a
DIY
approach can have numerous benefits. First and foremost, it can save you a significant amount of money. Hiring a professional for a simple task like sink drain installation can be expensive and can add up to the overall cost of your bathroom renovation. By doing it yourself, you can save money and allocate it towards other aspects of your bathroom design.
Moreover,
DIY
bathroom sink drain installation gives you the freedom to customize the design according to your preferences. With a wide range of sink and faucet options available in the market, you can choose a style and finish that complements your bathroom design. Additionally,
DIY
installation allows you to carefully select the materials and tools needed, ensuring the quality and longevity of your sink drain.
Many homeowners may be tempted to hire a professional plumber for their sink drain installation, but opting for a
DIY
approach can have numerous benefits. First and foremost, it can save you a significant amount of money. Hiring a professional for a simple task like sink drain installation can be expensive and can add up to the overall cost of your bathroom renovation. By doing it yourself, you can save money and allocate it towards other aspects of your bathroom design.
Moreover,
DIY
bathroom sink drain installation gives you the freedom to customize the design according to your preferences. With a wide range of sink and faucet options available in the market, you can choose a style and finish that complements your bathroom design. Additionally,
DIY
installation allows you to carefully select the materials and tools needed, ensuring the quality and longevity of your sink drain.
The Step-by-Step Guide to DIY Bathroom Sink Drain Installation
 Before starting the installation process, it is important to gather all the necessary tools and materials. These may include a sink drain assembly, plumber's putty, a pipe wrench, and plumber's tape. Once you have everything you need, you can begin the installation process by following these simple steps:
1. Begin by placing the sink drain assembly into the sink drain hole and secure it with plumber's putty.
2. Connect the sink drain to the P-trap using a pipe wrench, making sure to tighten all connections to prevent any leaks.
3. Apply plumber's tape to the threads of the sink drain and attach the sink stopper.
4. Finally, turn on the water and check for any leaks, making adjustments if necessary.
Before starting the installation process, it is important to gather all the necessary tools and materials. These may include a sink drain assembly, plumber's putty, a pipe wrench, and plumber's tape. Once you have everything you need, you can begin the installation process by following these simple steps:
1. Begin by placing the sink drain assembly into the sink drain hole and secure it with plumber's putty.
2. Connect the sink drain to the P-trap using a pipe wrench, making sure to tighten all connections to prevent any leaks.
3. Apply plumber's tape to the threads of the sink drain and attach the sink stopper.
4. Finally, turn on the water and check for any leaks, making adjustments if necessary.
Final Thoughts
 Proper installation of your bathroom sink drain is crucial for the overall functionality and design of your bathroom. By opting for a
DIY
approach, you not only save money but also have the freedom to customize the design according to your preferences. With the step-by-step guide provided in this article, you can easily and efficiently install your bathroom sink drain and have a beautifully designed and functional bathroom.
Proper installation of your bathroom sink drain is crucial for the overall functionality and design of your bathroom. By opting for a
DIY
approach, you not only save money but also have the freedom to customize the design according to your preferences. With the step-by-step guide provided in this article, you can easily and efficiently install your bathroom sink drain and have a beautifully designed and functional bathroom.